


上一篇文章《Spring Security技术栈开发企业级认证与授权(十三)Spring Social集成第三方登录验证开发流程介绍》主要是介绍了
OAuth2协议的基本内容以及Spring Social集成第三方登录验证的基本流程。那么在前篇文章的基础上,我们在本篇文章中将介绍Spring Social集成
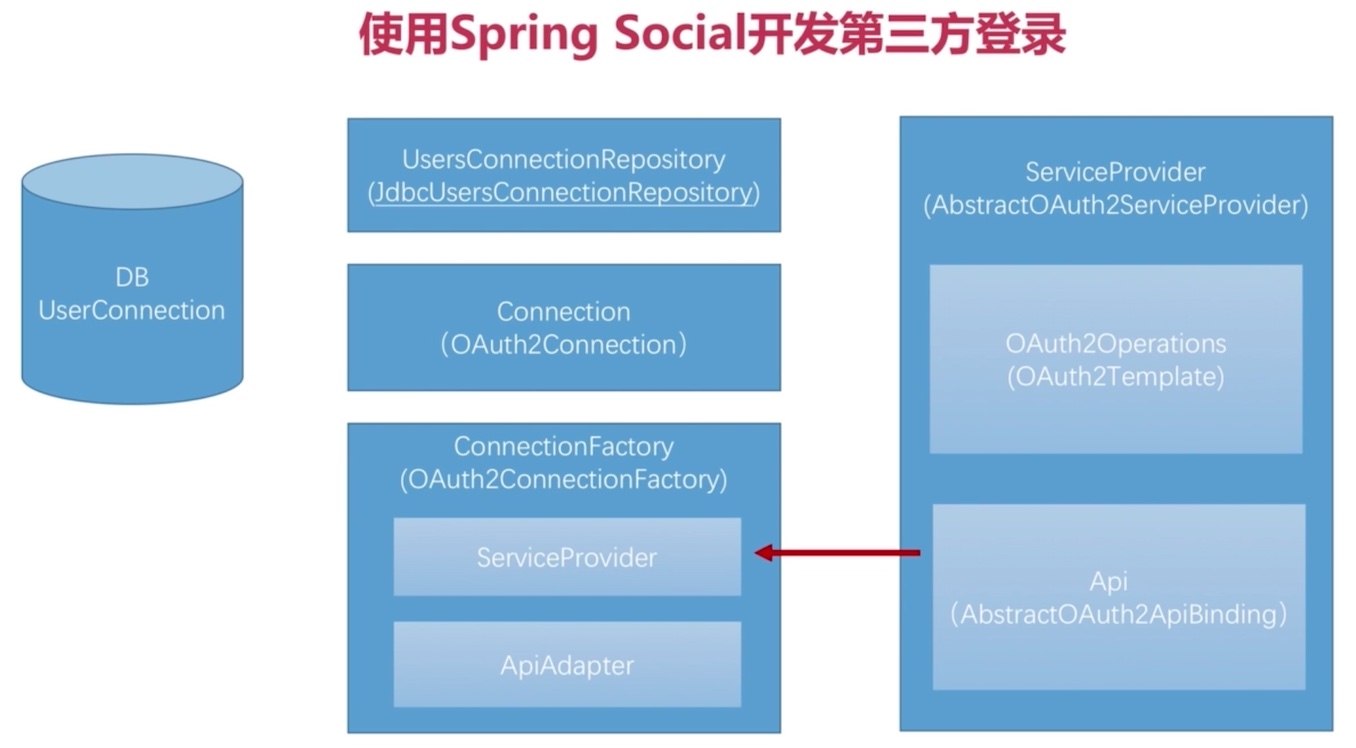
我们继续将上一篇文章的图贴到这里,对着图片开发相应的模块。
一、开发获取用户QQ信息的接口
在前一篇文章中介绍到,Spring Social封装了OAuth协议的标准步骤,我们只需要配置第三方应用的认证服务器地址即可,就可以获取到访问令牌Access Token,拿着这个令牌就可以获取到用户信息了,QQ互联的文档中介绍到,要正确获取到用户的基础信息之前,还需要通过Access Token来获取到用户的OpenID,这个OpenID是每一个用户使用QQ登录到你的系统都会产生一个唯一的ID。如下图所示:

要获取到OpenID, 需要访问下面的API地址,带上正确的access_token参数即可。
| 内容 | 说明 |
|---|---|
| 请求URL | https://graph.qq.com/oauth2.0/me |
| 请求方法 | GET |
| 请求参数 | access_token |
| 返回内容 | callback( {“client_id”:“YOUR_APPID”,“openid”:“YOUR_OPENID”} ); |
正确访问API,拿到返回内容之后,可以对内容进行解析,获取到OpenID,然后再访问获取用户信息的接口,携带必需的参数,从而拿到用户的信息。获取用户信息,相关说明如下表所以:
| 内容 | 说明 |
|---|---|
| 请求URL | https://graph.qq.com/user/get_user_info |
| 请求方法 | GET |
| 请求参数 | access_token=ACCESS_TOKEN&oauth_consumer_key=APP_ID&openid=OPENID |
| 返回内容 | 返回内容是JSON格式的字符串,具体字段和说明如下表所示 |
获取用户信息JSON返回体说明:
| 参数说明 | 描述 |
|---|---|
| ret | 返回码 |
| msg | 如果ret<0,会有相应的错误信息提示,返回数据全部用UTF-8编码 |
| is_lost | 是否丢失,0否,1是 |
| nickname | 用户在QQ空间的昵称 |
| figureurl | 大小为30×30像素的QQ空间头像URL |
| figureurl_1 | 大小为50×50像素的QQ空间头像URL |
| figureurl_2 | 大小为100×100像素的QQ空间头像URL |
| figureurl_qq_1 | 大小为40×40像素的QQ头像URL |
| figureurl_qq_2 | 大小为100×100像素的QQ头像URL |
| gender | 性别。 如果获取不到则默认返回"男" |
| province | 省份 |
| city | 城市 |
| year | 出生年月 |
| constellation | 星座 |
| is_yellow_vip | 是否是黄钻,0否,1是 |
| vip | 是否是QQ会员,0否,1是 |
| yellow_vip_level | 黄钻等级 |
| level | QQ等级 |
| is_yellow_year_vip | 是否是黄钻年费会员,0否,1是 |
那么错误的返回体就很简单: { "ret":1002, "msg":"请先登录" }。
那么这一些操作我们该如何在代码中体现呢?先来写一个获取用户信息的接口QQ,代码如下:
package com.lemon.security.core.social.qq.api;

/**
 * 获取QQ用户信息的接口
 *
 * @author jiangpingping
 * @date 2019-02-05 11:30
 */
public interface QQ {

    /**
     * 获取QQ用户的信息
     *
     * @return QQ用户信息
     */
    QQUserInfo getUserInfo();

}
其中实体类QQUserInfo则是封装了从腾讯服务器获取到的用户基础信息,具体的代码如下所示:
package com.lemon.security.core.social.qq.api;

import com.fasterxml.jackson.annotation.JsonProperty;
import lombok.*;

/**
 * QQ用户信息
 *
 * @author jiangpingping
 * @date 2019-02-05 11:32
 */
@Getter
@Setter
@NoArgsConstructor
@AllArgsConstructor
@Builder
@ToString
public class QQUserInfo {

    /**
     * 用户的OpenId
     */
    private String openId;

    /**
     * 返回码
     */
    private Integer ret;

    /**
     * 返回消息,如果ret<0,会有相应的错误信息提示,返回数据全部用UTF-8编码
     */
    private String msg;

    /**
     * 是否丢失0否,1是
     */
    @JsonProperty("is_lost")
    private Integer isLost;

    /**
     * 用户在QQ空间的昵称
     */
    private String nickname;

    /**
     * 大小为30×30像素的QQ空间头像URL
     */
    @JsonProperty("figureurl")
    private String figureUrl30;

    /**
     * 大小为50×50像素的QQ空间头像URL
     */
    @JsonProperty("figureurl_1")
    private String figureUrl50;

    /**
     * 大小为100×100像素的QQ空间头像URL
     */
    @JsonProperty("figureurl_2")
    private String figureUrl100;

    /**
     * 大小为40×40像素的QQ头像URL
     */
    @JsonProperty("figureurl_qq_1")
    private String figureUrlQq40;

    /**
     * 大小为100×100像素的QQ头像URL。需要注意,不是所有的用户都拥有QQ的100x100的头像,但40x40像素则是一定会有
     */
    @JsonProperty("figureurl_qq_2")
    private String figureUrlQq100;

    /**
     * 性别。 如果获取不到则默认返回"男"
     */
    private String gender;

    /**
     * 省份
     */
    private String province;

    /**
     * 城市
     */
    private String city;

    /**
     * 出生年份
     */
    private String year;

    /**
     * 星座
     */
    private String constellation;

    /**
     * 是否是黄钻,0否,1是
     */
    @JsonProperty("is_yellow_vip")
    private String isYellowVip;

    /**
     * 是否是会员,0否,1是
     */
    private String vip;

    /**
     * 黄钻等级
     */
    @JsonProperty("yellow_vip_level")
    private String yellowVipLevel;

    /**
     * 等级
     */
    private String level;

    /**
     * 是否是黄钻年费VIP,0否,1是
     */
    @JsonProperty("is_yellow_year_vip")
    private String isYellowYearVip;

}
上面的代码中,使用Jackson将JSON字符串序列化为QQUserInfo实例对象的时候,将带有下划线的字段值映射到了对应的驼峰字段上,使用的Jackson的@JsonProperty注解来完成的。有了接口和实体类,我们自然需要写一个实现类,具体的信息获取代码都在实现类中。
package com.lemon.security.core.social.qq.api;

import com.fasterxml.jackson.databind.ObjectMapper;
import lombok.extern.slf4j.Slf4j;
import org.apache.commons.lang3.StringUtils;
import org.springframework.social.oauth2.AbstractOAuth2ApiBinding;
import org.springframework.social.oauth2.TokenStrategy;

import java.io.IOException;

/**
 * 获取QQ用户信息的实现类
 *
 * @author jiangpingping
 * @date 2019-02-05 11:34
 */
@Slf4j
public class QQImpl extends AbstractOAuth2ApiBinding implements QQ {

    /**
     * Open ID的获取链接,它需要传递令牌,也就是OAuth协议的前五步获取到的数据访问令牌
     */
    private static final String URL_GET_OPEN_ID = "https://graph.qq.com/oauth2.0/me?access_token=%s";

    /**
     * 获取用户信息的链接:https://graph.qq.com/user/get_user_info?access_token=YOUR_ACCESS_TOKEN&oauth_consumer_key=YOUR_APP_ID&openid=YOUR_OPENID
     * 其中,access_token会被父类AbstractOAuth2ApiBinding处理,在请求之前,会被拼接到请求链接中,故这里删除即可
     */
    private static final String URL_GET_USER_INFO = "https://graph.qq.com/user/get_user_info?oauth_consumer_key=%s&openid=%s";

    /**
     * appId是腾讯要求的应用ID,需要开发者去QQ互联上申请,对应的参数字段是oauth_consumer_key
     */
    private String appId;

    /**
     * openId是腾讯对应用和用户之间的关系管理的一个参数,用户在一个应用的openID唯一
     */
    private String openId;

    private ObjectMapper objectMapper = new ObjectMapper();

    public QQImpl(String accessToken, String appId) {
        // 这里的父类构造方法传入两个参数,第二个参数的意思是在构造方法中构建restTemplate的时候,将accessToken作为请求参数集成到请求链接中
        // 父类的默认构造也就是一个参数的构造,默认行为是将参数放到了请求头中,这个就和QQ的API接口要求的传参方式不一样了
        super(accessToken, TokenStrategy.ACCESS_TOKEN_PARAMETER);
        this.appId = appId;
        // 获取openId
        String url = String.format(URL_GET_OPEN_ID, accessToken);
        String result = getRestTemplate().getForObject(url, String.class);
        // 返回的数据结构体为:callback( {"client_id":"YOUR_APPID","openid":"YOUR_OPENID"} );
        this.openId = StringUtils.substringBetween(result, "\"openid\":\"", "\"}");
    }

    @Override
    public QQUserInfo getUserInfo() {
        String url = String.format(URL_GET_USER_INFO, appId, openId);
        String result = getRestTemplate().getForObject(url, String.class);
        log.info("获取到用户的信息为:{}", result);
        try {
            QQUserInfo userInfo = objectMapper.readValue(result, QQUserInfo.class);
            // 这里需要将openId存储到userInfo中
            userInfo.setOpenId(openId);
            log.info("封装后的UserInfo为:{}", userInfo);
            return userInfo;
        } catch (IOException e) {
            e.printStackTrace();
            log.error("转换QQ用户信息失败:{}", e.getMessage());
            throw new RuntimeException(e);
        }
    }

}
QQImpl类中的注释写的很详细,读者一看就明白。这里还重点说明三点:
QQImpl继承了AbstractOAuth2ApiBinding,这在上一篇文章中也介绍了AbstractOAuth2ApiBinding帮助我们完成了一些基础操作,方便我们快速开发。QQImpl的构造方法中调用了父类AbstractOAuth2ApiBinding的两个参数的构造方法,在父类的构造方法中,我们将第二个参数设置为TokenStrategy.ACCESS_TOKEN_PARAMETER,这样在父类的构造方法中构建RestTemplate对象的时候,就会将accessToken放到请求参数中,如果调用一个参数的父类构造方法,那么它默认的行为是将accessToken放到请求头中,这就和QQ互联要求的请求方式不一样了。- 没有将
QQImpl标注为Spring Bean,这是因为Spring Bean是单例的,这里的每一个用户应该对应一个QQImpl对象。当用户选择QQ登录的时候,就会去创建一个QQImpl对象,在调用构造方法的时候,就会去事先设定好的链接获取该用户在应用中唯一的OpenID,拿到OpenID后就会调用getUserInfo方法来获取用户信息。
二、开发QQServiceProvider
开发完获取用户的QQ信息的接口后,那么接着开发QQServiceProvider,OAuth2Operations是不需要我们开发的,Spring Social提供了OAuth2Template,已经帮我们封装好了OAuth协议规定的基础步骤,我们直接调用即可,在调用之前,需要配置好授权的URL和获取Access Token的URL。
package com.lemon.security.core.social.qq.connect;

import com.lemon.security.core.social.qq.api.QQ;
import com.lemon.security.core.social.qq.api.QQImpl;
import org.springframework.social.oauth2.AbstractOAuth2ServiceProvider;
import org.springframework.social.oauth2.OAuth2Template;

/**
 * QQ的Service Provider
 *
 * @author jiangpingping
 * @date 2019-02-05 13:13
 */
public class QQServiceProvider extends AbstractOAuth2ServiceProvider<QQ> {

    /**
     * 引导用户授权的URL,获取授权码
     */
    private static final String URL_AUTHORIZE = "https://graph.qq.com/oauth2.0/authorize";

    /**
     * 获取令牌的URL
     */
    private static final String URL_ACCESS_TOKEN = "https://graph.qq.com/oauth2.0/token";

    private String appId;

    public QQServiceProvider(String appId, String appSecret) {
        // 使用Spring Social的默认的OAuth2Template
        super(new OAuth2Template(appId, appSecret, URL_AUTHORIZE, URL_ACCESS_TOKEN));
        this.appId = appId;
    }

    @Override
    public QQ getApi(String accessToken) {
        return new QQImpl(accessToken, appId);
    }

}
QQServiceProvider的代码编写还是很简单的,AbstractOAuth2ServiceProvider用到的泛型是API的接口类型,在这里配置了授权的URL和获取Access Token的URL,然后调用AbstractOAuth2ServiceProvider的构造方法就可以获得了Access Token的值,OAuth协议中规定的参数传递等步骤都由Spring Social提供的OAuth2Template来完成了。也许你有一个疑问,在OAuth协议中,在获取授权和获取Access Token的时候都会设置一个参数redirect_uri,但是我们并没有设置这个参数啊?Spring Social是如何帮助我们设置的呢?这里暂时不回答这个问题,请接着往下阅读,后面将会为您解释这个参数设置问题。至此,我们已经开发完了与第三方服务提供商相关的代码,也就是第一幅图的最右边需要的代码。
三、开发ConnectionFactory
从上一篇文章可知,Connection是一个接口,它有一个实现类OAuth2Connection,该实现类中封装了与用户相关的信息,这些信息,比如DisplayName(显示名称),ProfileUrl(主页地址),ImageUrl(头像地址)等基本信息,这些信息是Spring Social所规定的用户信息(固定字段),我们现在要做的就是将拿到的用户信息转换成OAuth2Connection所封装的用户信息。生成Connection实现类对象需要用到ConnectionFactory工厂,而创建ConnectionFactory对象就需要用到我们开发的QQServiceProvider,还有一个ApiAdapter实现类对象,前者我们已经开发好了,那么现在就需要开发ApiAdapter的实现类,从ApiAdapter这个名称可以看出,它就是一个适配器,负责将从第三方应用拿到的用户基础数据转换成OAuth2Connection的封装的数据,但是进入ApiAdapter的源码看到,我们并不是直接将数据转换成OAuth2Connection封装的属性值,而是设置到ConnectionValues中,后期的转换工作交给Spring Social来完成。分析到这里,我们可以开始编写ApiAdapter实现类的代码了,具体代码如下所示:
package com.lemon.security.core.social.qq.connect;

import com.lemon.security.core.social.qq.api.QQ;
import com.lemon.security.core.social.qq.api.QQUserInfo;
import org.springframework.social.connect.ApiAdapter;
import org.springframework.social.connect.ConnectionValues;
import org.springframework.social.connect.UserProfile;

/**
 * @author jiangpingping
 * @date 2019-02-05 15:05
 */
public class QQAdapter implements ApiAdapter<QQ> {

    /**
     * 这个方法用来判断QQ服务是否可用
     *
     * @param api API接口
     * @return 是否可用
     */
    @Override
    public boolean test(QQ api) {
        return true;
    }

    /**
     * 将API中获取到的用户信息转换成创建Connection所需的值
     *
     * @param api    用户信息获取API
     * @param values 创建Connection所需的值
     */
    @Override
    public void setConnectionValues(QQ api, ConnectionValues values) {
        QQUserInfo userInfo = api.getUserInfo();
        values.setDisplayName(userInfo.getNickname());
        values.setImageUrl(userInfo.getFigureUrlQq40());
        // QQ用户信息接口没有主页这个值
        values.setProfileUrl(null);
        values.setProviderUserId(userInfo.getOpenId());
    }

    @Override
    public UserProfile fetchUserProfile(QQ api) {
        return null;
    }

    @Override
    public void updateStatus(QQ api, String message) {

    }
}
这里主要是编写了setConnectionValues方法的代码,将从QQ获取到的数据封装到了ConnectionValues中。现在有了QQServiceProvider和QQAdapter,那么就可以来开发ConnectionFactory的实现类了,这里贴出代码:
package com.lemon.security.core.social.qq.connect;

import com.lemon.security.core.social.qq.api.QQ;
import org.springframework.social.connect.support.OAuth2ConnectionFactory;

/**
 * @author jiangpingping
 * @date 2019-02-05 17:15
 */
public class QQConnectionFactory extends OAuth2ConnectionFactory<QQ> {

    /**
     * QQ Connection Factory的构造方法
     *
     * @param providerId 第三方服务提供商的ID,如facebook,qq,wechat
     * @param appId      第三方服务提供商给予的应用ID
     * @param appSecret  第三方服务提供商给予的应用Secret
     */
    public QQConnectionFactory(String providerId, String appId, String appSecret) {
        super(providerId, new QQServiceProvider(appId, appSecret), new QQAdapter());
    }
}
写到这里,主要的内容算是写完了,其中UsersConnectionRepository这一块内容封装了对UserConnection表的基础操作,是不需要我们开发的,我们要做的就是将JdbcUsersConnectionRepository配置进来即可,主要代码如下:
package com.lemon.security.core.social;

import org.springframework.beans.factory.annotation.Autowired;
import org.springframework.context.annotation.Bean;
import org.springframework.context.annotation.Configuration;
import org.springframework.security.crypto.encrypt.Encryptors;
import org.springframework.social.config.annotation.EnableSocial;
import org.springframework.social.config.annotation.SocialConfigurerAdapter;
import org.springframework.social.connect.ConnectionFactoryLocator;
import org.springframework.social.connect.UsersConnectionRepository;
import org.springframework.social.connect.jdbc.JdbcUsersConnectionRepository;
import org.springframework.social.security.SpringSocialConfigurer;

import javax.sql.DataSource;

/**
 * 社交配置类
 *
 * @author jiangpingping
 * @date 2019-02-05 17:23
 */
@Configuration
@EnableSocial
public class SocialConfig extends SocialConfigurerAdapter {

    private final DataSource dataSource;

    @Autowired
    public SocialConfig(DataSource dataSource) {
        this.dataSource = dataSource;
    }

    @Override
    public UsersConnectionRepository getUsersConnectionRepository(ConnectionFactoryLocator connectionFactoryLocator) {
        // 创建一个JDBC连接仓库,需要dataSource、connectionFactory加载器,对存到数据库中的加密策略,这里选择不做加密,信息原样存入数据库
        // 这里创建的JdbcUsersConnectionRepository可以设置UserConnection表的前缀
        return new JdbcUsersConnectionRepository(dataSource, connectionFactoryLocator, Encryptors.noOpText());
    }

    @Bean
    public SpringSocialConfigurer lemonSocialSecurityConfig() {
        return new SpringSocialConfigurer();
    }
}
这里使用注解@EnableSocial启用社交登录,并配置了JdbcUsersConnectionRepository,代码中Encryptors.noOpText()表示将用户信息以明文的方式存储到数据库中,也可以以加密的方式进行存储。并将SpringSocialConfigurer的实例对象交给了Spring来管理。最后将SpringSocialConfigurer的对象注入到了BrowserSecurityConfig中,并apply到配置代码中(详情请关注码云上的代码chapter014),如下所示:
@Autowired
private SpringSocialConfigurer lemonSocialSecurityConfig;

http.apply(lemonSocialSecurityConfig);
现在需要写一些基础配置类,比如appId、appSecret以及providerId等,这些内容必须支持开发者自定义,因为每个开发者的appId、appSecret肯定是不一样的,providerId可以提供一个默认值,但是也得提供一个可配置的值。接下来写配置方面的内容。
四、开发基础配置类
我们开发一个配置类来接收来自配置文件中的值,定义配置类名称为QQProperties,该类继承SocialProperties,在SocialProperties中,已经存在了appId和appSecret,QQProperties继承了SocialProperties,就相当于已经有了appId和appSecret两个属性,再添加一个providerId属性即可,且设置默认值为qq,代码如下:
package com.lemon.security.core.properties;

import lombok.Getter;
import lombok.Setter;
import org.springframework.boot.autoconfigure.social.SocialProperties;

/**
 * @author jiangpingping
 * @date 2019-02-05 17:56
 */
@Getter
@Setter
public class QQProperties extends SocialProperties {

    private String providerId = "qq";

}
由于我们当前开发的仅仅是QQ登录,后面还会开发微信登录,这两者都是属于第三方登录,所以我们再封装一层属性,写一个SocialProperties类,代码如下:
package com.lemon.security.core.properties;

import lombok.Getter;
import lombok.Setter;

/**
 * @author jiangpingping
 * @date 2019-02-05 17:59
 */
@Getter
@Setter
public class SocialProperties {

    private QQProperties qq = new QQProperties();

}
然后再将代码private SocialProperties social = new SocialProperties();加入到SecurityProperties中,完整代码如下:
package com.lemon.security.core.properties;

import lombok.Data;
import org.springframework.boot.context.properties.ConfigurationProperties;

/**
 * @author lemon
 * @date 2018/4/5 下午3:08
 */
@Data
@ConfigurationProperties(prefix = "com.lemon.security")
public class SecurityProperties {

    private BrowserProperties browser = new BrowserProperties();

    private ValidateCodeProperties code = new ValidateCodeProperties();

    private SocialProperties social = new SocialProperties();

}
这样设置以后,我们就可以在application.properties中设置appId、appSecret以及providerId了,例如:
com.lemon.security.social.qq.appId=xxxxxx
com.lemon.security.social.qq.appSecret=xxxxxx
com.lemon.security.social.qq.providerId=xxxxxx
以上最后一个字段名称appId可以替换为app-id,appSecret和providerId同理,Spring读取配置文件是支持横杠转换为驼峰形式的参数。
我们还需要写一个自动配置类,当检测到用户在application.properties中配置了属性com.lemon.security.social.qq.appId后,就应该将QQConnectionFactory实例化,并交给Spring来管理。也就是说,只要开发者开发的系统中配置了属性com.lemon.security.social.qq.appId后,说明该系统就支持QQ登录,那么就应该实例化QQConnectionFactory,且该工厂类是单例的,负责创建与用户信息相关的Connection。自动配置类的代码如下所示:
package com.lemon.security.core.social.qq.config;

import com.lemon.security.core.properties.QQProperties;
import com.lemon.security.core.properties.SecurityProperties;
import com.lemon.security.core.social.qq.connect.QQConnectionFactory;
import org.springframework.beans.factory.annotation.Autowired;
import org.springframework.boot.autoconfigure.condition.ConditionalOnProperty;
import org.springframework.boot.autoconfigure.social.SocialAutoConfigurerAdapter;
import org.springframework.context.annotation.Configuration;
import org.springframework.social.connect.ConnectionFactory;

/**
 * @author jiangpingping
 * @date 2019-02-05 18:03
 */
@Configuration
@ConditionalOnProperty(prefix = "com.lemon.security.social.qq", name = "app-id")
public class QQAutoConfiguration extends SocialAutoConfigurerAdapter {

    private final SecurityProperties securityProperties;

    @Autowired
    public QQAutoConfiguration(SecurityProperties securityProperties) {
        this.securityProperties = securityProperties;
    }

    @Override
    protected ConnectionFactory<?> createConnectionFactory() {
        QQProperties qqProperties = securityProperties.getSocial().getQq();
        return new QQConnectionFactory(qqProperties.getProviderId(), qqProperties.getAppId(), qqProperties.getAppSecret());
    }

}
自动配置类写完了,整体的代码算是基本完成了。我们现在在lemon-security-browser项目中的默认登录页面后面加上QQ登录,页面代码如下:
<h2>社交登录</h2>
<!-- /auth是类SocialAuthenticationFilter规定的,/qq是providerId -->
<a href="/auth/qq"><img src="http://qzonestyle.gtimg.cn/qzone/vas/opensns/res/img/Connect_logo_3.png"></a>
页面显示的效果图如下:
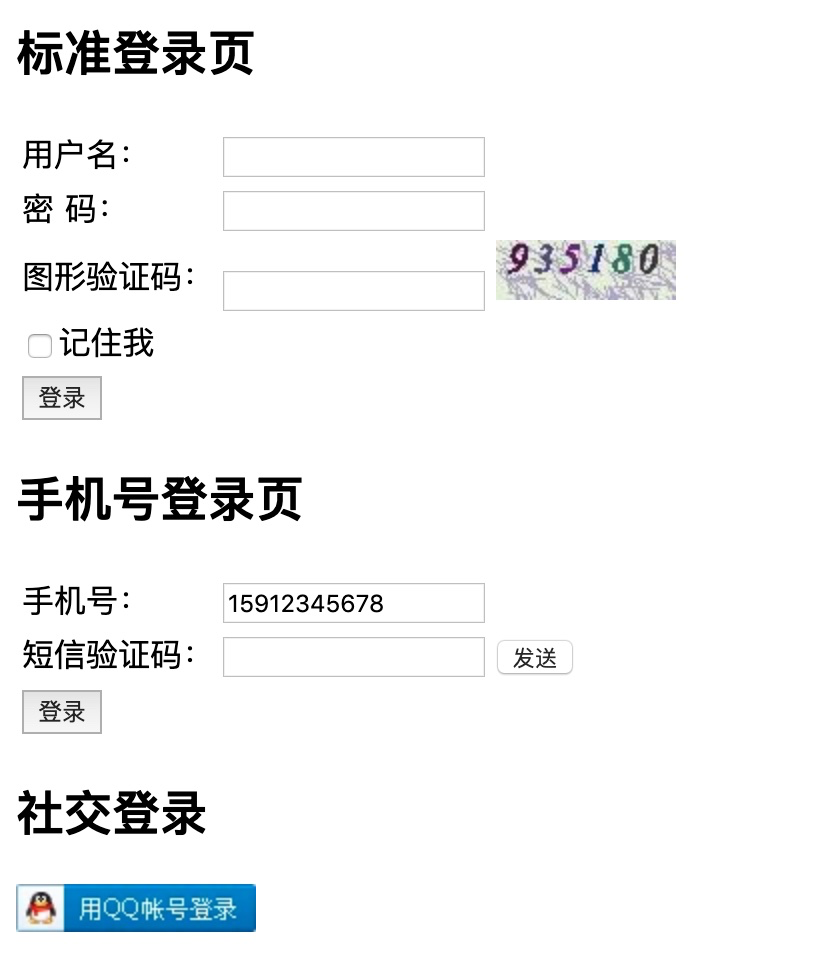
这里的QQ登录按钮地址为什么是/auth/qq?这是因为Spring Social对社交登录的拦截地址做了默认值,它拦截的请求地址就是/auth,而后面的/qq则是providerId,这是默认规则。具体的默认定义可以去看Spring Social的类SocialAuthenticationFilter,它源代码最底部有一个常量DEFAULT_FILTER_PROCESSES_URL,它的值就是/auth,也就是说该拦截器会拦截/auth的请求,并对其进行验证。现在我们启动项目,来验证一下QQ登录的功能是否完善。我们在8080端口启动demo项目,然后直接访问默认的登录页面,并点击QQ登录,我们跳转到了QQ登录授权页面,如下所示:
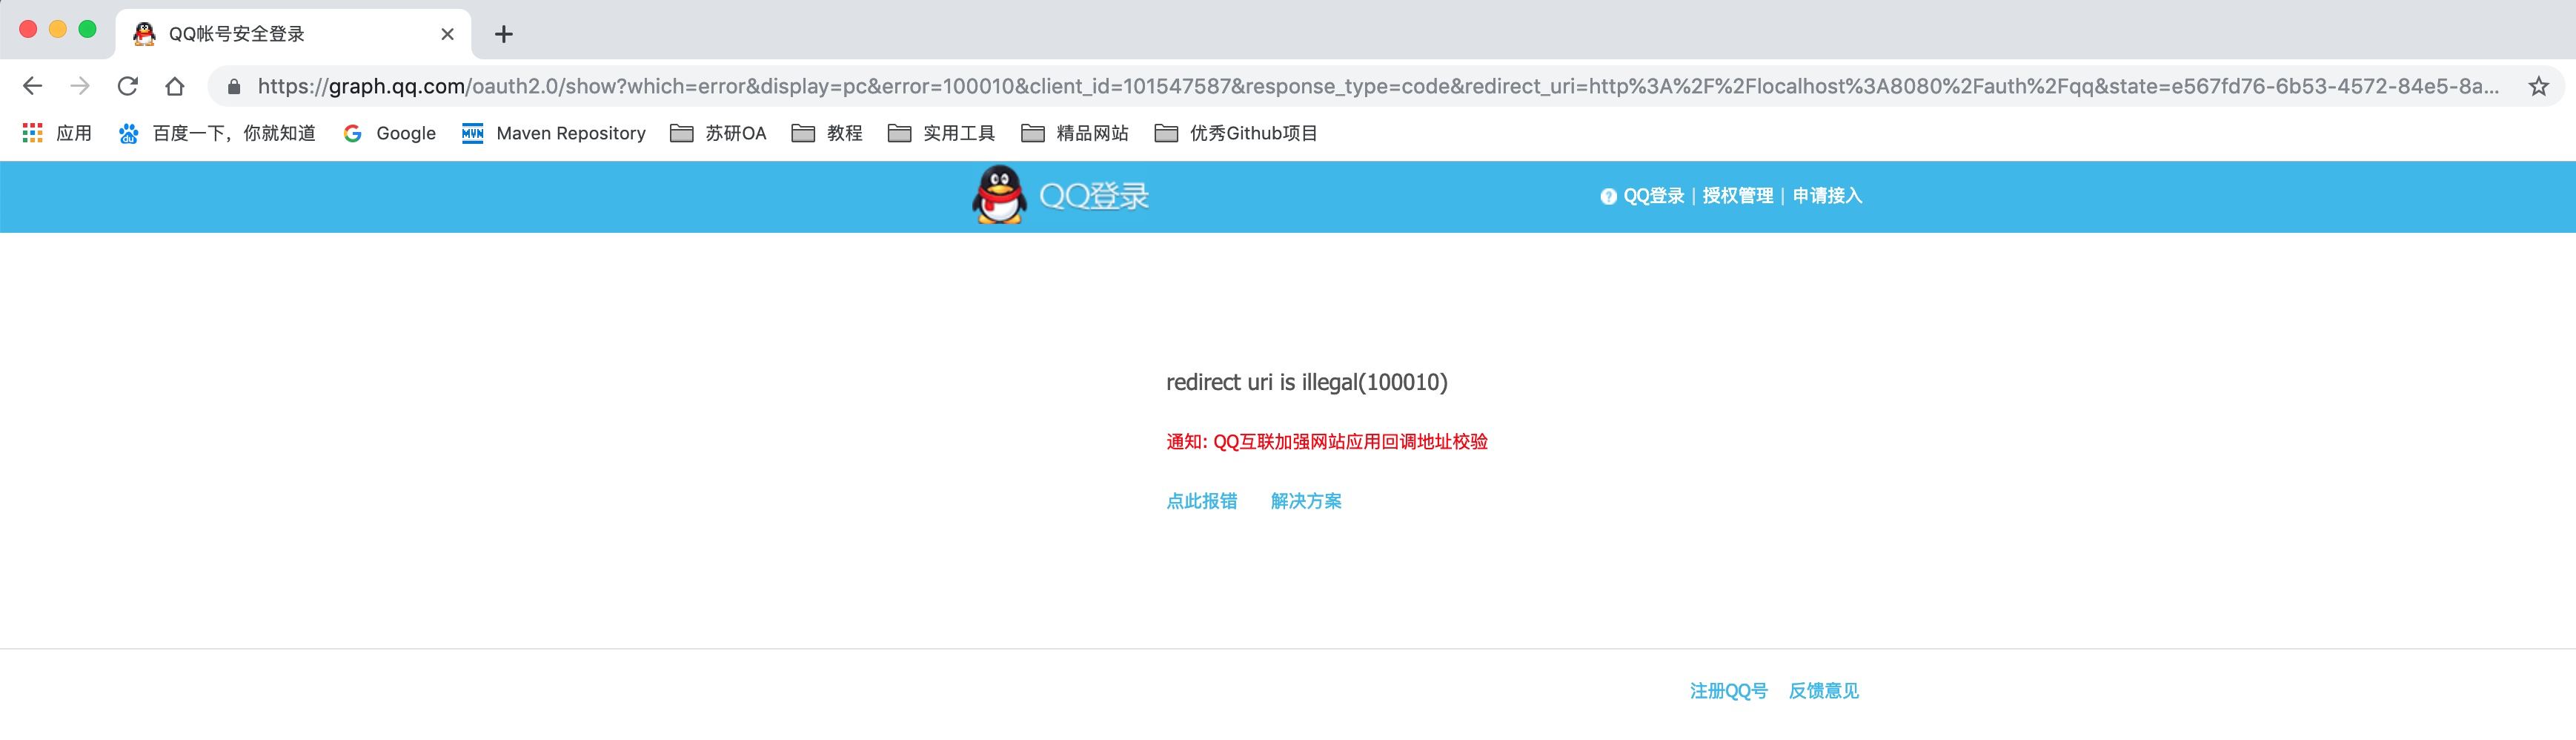
我们发现回调地址是非法的,我们仔细观察地址栏的链接,我把它拷贝到这里:
https://graph.qq.com/oauth2.0/show?which=error&display=pc&error=100010&client_id=101547587&response_type=code&redirect_uri=http%3A%2F%2Flocalhost%3A8080%2Fauth%2Fqq&state=e567fd76-6b53-4572-84e5-8a0e93defb47
从上面的地址可以看出来,redirect_uri参数我们在之前并没有设置,这里很明显是Spring Social帮助我们完成了这部分操作,这也就回答了之前遗留下来为什么不用我们自己设置redirect_uri参数的问题。现在一起来分析一下这个redirect_uri参数,它的值如下所示:
http%3A%2F%2Flocalhost%3A8080%2Fauth%2Fqq
这里的回调地址是经过编码后的地址,还原后就是:
http://localhost:8080/auth/qq
这地址不就是我们设置的QQ登录的地址吗?对的,回调地址就是这个QQ登录地址。但是为什么会出现这种“回调地址非法”的问题呢?原因是因为回调地址和我们在QQ互联平台上创建的应用的时候设置的回调地址不一致导致的,我在开发这一块的时候,设置的回调地址是http://www.itlemon.cn/auth/qq,两者是不一致的,所以就会提示回调地址非法,由于我设置的http协议的回调地址,所以默认访问的是应用所在服务器的80端口,所以我们需要将demo项目的启动端口改成80端口,然后再借助软件switchhosts将本地www.itlemon.cn指向127.0.0.1,这样的话,访问http://www.itlemon.cn就会映射到本地的应用上来,准备工作做好以后,我们再次启动项目,访问登录页面http://www.itlemon.cn/login.html,点击QQ登录,跳转页面如下图所示:

这就说明正确地到达了QQ登录授权页面了,扫码就可以进行登录操作了。我现在扫码来授权一下,看看接下来会发生什么,扫码后如下图所示:

我明明授权了,为什么不是直接展示用户认证信息,而是出现这种未授权的信息呢?还有一个问题,那就是社交登录默认拦截的是/auth,providerId也默认是qq,我该如何来实现自定义社交登录拦截地址呢?那么接下来我们一起来解决这两个问题。
五、解决遗留的两个问题
1)解决第一个问题
首先解决自定义配置社交登录拦截路径的问题,我们在配置类SocialConfig中实例化了一个SpringSocialConfigurer的Spring Bean,在这个Bean中直接返回的是SpringSocialConfigurer的实例对象,在这个类的configure方法中,如下所示:
@Override
public void configure(HttpSecurity http) throws Exception {
	ApplicationContext applicationContext = http.getSharedObject(ApplicationContext.class);
	UsersConnectionRepository usersConnectionRepository = getDependency(applicationContext, UsersConnectionRepository.class);
	SocialAuthenticationServiceLocator authServiceLocator = getDependency(applicationContext, SocialAuthenticationServiceLocator.class);
	SocialUserDetailsService socialUsersDetailsService = getDependency(applicationContext, SocialUserDetailsService.class);

	SocialAuthenticationFilter filter = new SocialAuthenticationFilter(
			http.getSharedObject(AuthenticationManager.class),
			userIdSource != null ? userIdSource : new AuthenticationNameUserIdSource(),
			usersConnectionRepository,
			authServiceLocator);

	RememberMeServices rememberMe = http.getSharedObject(RememberMeServices.class);
	if (rememberMe != null) {
		filter.setRememberMeServices(rememberMe);
	}

	if (postLoginUrl != null) {
		filter.setPostLoginUrl(postLoginUrl);
		filter.setAlwaysUsePostLoginUrl(alwaysUsePostLoginUrl);
	}

	if (postFailureUrl != null) {
		filter.setPostFailureUrl(postFailureUrl);
	}

	if (signupUrl != null) {
		filter.setSignupUrl(signupUrl);
	}

	if (connectionAddedRedirectUrl != null) {
		filter.setConnectionAddedRedirectUrl(connectionAddedRedirectUrl);
	}

	if (defaultFailureUrl != null) {
		filter.setDefaultFailureUrl(defaultFailureUrl);
	}

	http.authenticationProvider(
			new SocialAuthenticationProvider(usersConnectionRepository, socialUsersDetailsService))
		.addFilterBefore(postProcess(filter), AbstractPreAuthenticatedProcessingFilter.class);
}
在这个方法中,首先创建了一个SocialAuthenticationFilter对象,最后将其加到了AbstractPreAuthenticatedProcessingFilter这个过滤器之前,在加入之前,调用了postProcess方法,而这个postProcess方法是可以被覆盖掉的,在这里我们可以对SocialAuthenticationFilter进行个性化处理,在个性化处理的过程中将社交登录的拦截路径设置到其中,我们在项目lemon-security-core的social包下开发一个配置类,来覆盖一下postProcess方法,代码如下:
package com.lemon.security.core.social;

import lombok.AllArgsConstructor;
import org.springframework.social.security.SocialAuthenticationFilter;
import org.springframework.social.security.SpringSocialConfigurer;

/**
 * 配置社交登录的拦截路径
 *
 * @author jiangpingping
 * @date 2019-02-12 19:33
 */
@AllArgsConstructor
public class LemonSpringSocialConfigurer extends SpringSocialConfigurer {

    private String filterProcessesUrl;

    @Override
    @SuppressWarnings("unchecked")
    protected <T> T postProcess(T object) {
        // 获取父类的处理结果
        SocialAuthenticationFilter filter = (SocialAuthenticationFilter) super.postProcess(object);
        filter.setFilterProcessesUrl(filterProcessesUrl);
        return (T) filter;
    }

}
写完这个代码以后,我们在SocialConfig类中就不能在实例化SpringSocialConfigurer了,而是要实例化我们自己写的那个LemonSpringSocialConfigurer类了,在实例化之前,需要修改一些配置,SocialProperties类修改后代码如下:
package com.lemon.security.core.properties;

import lombok.Getter;
import lombok.Setter;

/**
 * @author jiangpingping
 * @date 2019-02-05 17:59
 */
@Getter
@Setter
public class SocialProperties {

    /**
     * 这个属性是为了设置自定义社交登录拦截路径的
     */
    private String filterProcessesUrl = "/auth";

    private QQProperties qq = new QQProperties();

}
那么修改后的SocialConfig类如下所示:
package com.lemon.security.core.social;

import com.lemon.security.core.properties.SecurityProperties;
import org.springframework.beans.factory.annotation.Autowired;
import org.springframework.context.annotation.Bean;
import org.springframework.context.annotation.Configuration;
import org.springframework.security.crypto.encrypt.Encryptors;
import org.springframework.social.config.annotation.EnableSocial;
import org.springframework.social.config.annotation.SocialConfigurerAdapter;
import org.springframework.social.connect.ConnectionFactoryLocator;
import org.springframework.social.connect.UsersConnectionRepository;
import org.springframework.social.connect.jdbc.JdbcUsersConnectionRepository;
import org.springframework.social.security.SpringSocialConfigurer;

import javax.sql.DataSource;

/**
 * 社交配置类
 *
 * @author jiangpingping
 * @date 2019-02-05 17:23
 */
@Configuration
@EnableSocial
public class SocialConfig extends SocialConfigurerAdapter {

    private final DataSource dataSource;

    private final SecurityProperties securityProperties;

    @Autowired
    public SocialConfig(DataSource dataSource, SecurityProperties securityProperties) {
        this.dataSource = dataSource;
        this.securityProperties = securityProperties;
    }

    @Override
    public UsersConnectionRepository getUsersConnectionRepository(ConnectionFactoryLocator connectionFactoryLocator) {
        // 创建一个JDBC连接仓库,需要dataSource、connectionFactory加载器,对存到数据库中的加密策略,这里选择不做加密,信息原样存入数据库
        // 这里创建的JdbcUsersConnectionRepository可以设置UserConnection表的前缀
        return new JdbcUsersConnectionRepository(dataSource, connectionFactoryLocator, Encryptors.noOpText());
    }

    @Bean
    public SpringSocialConfigurer lemonSocialSecurityConfig() {
        String filterProcessesUrl = securityProperties.getSocial().getFilterProcessesUrl();
        return new LemonSpringSocialConfigurer(filterProcessesUrl);
    }
}
到这里,我们就解决了不能自定义拦截社交登录的路径问题了,但是要注意的是,当我们没有使用默认的/auth拦截路径的时候,在配置文件中配置的路径一定要和在QQ互联网站上创建的应用配置的回调地址一致,否则还会被提示“回调地址非法”的错误。在这里,我把QQ互联上登记的应用的回调地址改成了http://www.itlemon.cn/authentication/qq,所以我需要在demo项目中添加一个配置com.lemon.security.social.filterProcessesUrl=/authentication,并且将默认的登录页面QQ登录按钮地址改成了/authentication/qq。
2)解决第二个问题
使用手机授权登录以后,为什么会出现这个提示:
我们查看日志可以知道,我们在手机上点击登录以后,页面自动跳转到http://www.itlemon.cn/signin这个链接上,因为我们没有对这个链接进行任何配置,所以默认需要认证后才可以访问,但是我们刚刚QQ登录就是一个授权登录行为,但是授权后却没有进入到系统中,还被系统拦截要求登录认证,这就说明在走OAuth认证过程中出现了问题,然后默认跳转到这个链接上进行重新认证,所以就出现了需要身份认证的提示。但是为什么会自动跳转到/signin这个链接上呢?这就需要我们到Spring Social的相关源码中找原因,在找原因之前,我们一起来分析一下Spring Social集成QQ登录的主要流程,熟悉流程之后,找原因也就方便很多了,这里贴出流程图如下所示:
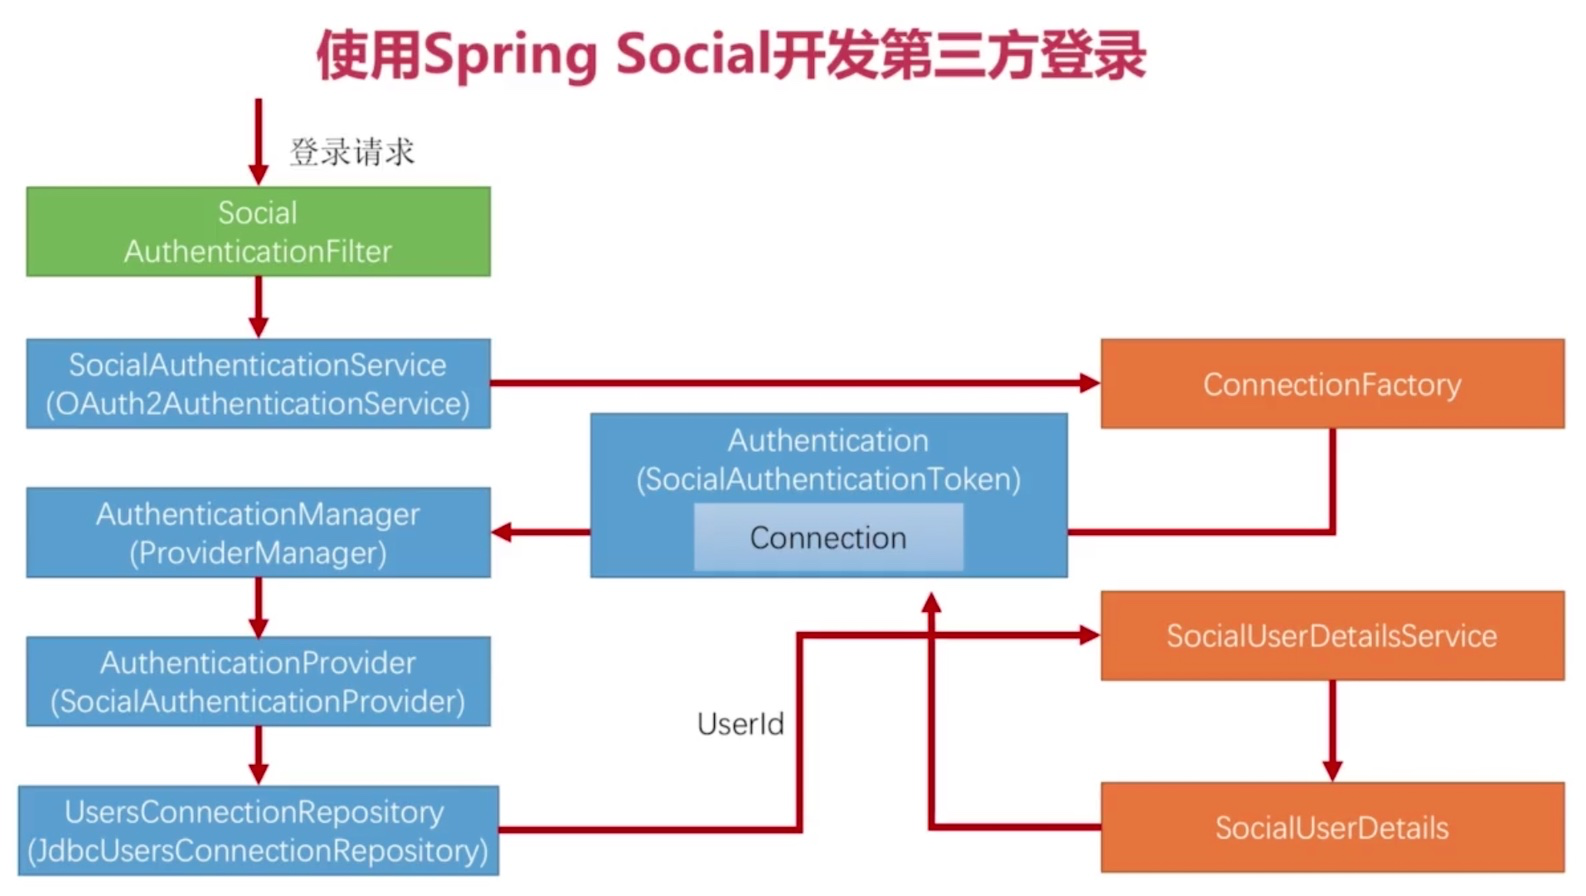
类似于用户名密码、手机登录,这里的QQ登录的核心原理是一模一样的,只是多了一点OAuth的流程,分步骤讲解如下。
- 当用户点击
QQ登录按钮的时候,链接/authentication/qq会被SocialAuthenticationFilter所拦截,该过滤器的内部获取了一个SocialAuthenticationService实现类对象,默认是OAuth2AuthenticationService,它会调用我们自己写的QQConnectionFactory,而QQConnectionFactory里有QQServiceProvider,QQServiceProvider里有OAuth2Template来帮助我们完成OAuth的基础步骤并拿到QQ用户数据。 - 拿到数据以后,也就是生成了
Connection以后,就会拿着这个Connection数据来封装一个SocialAuthenticationToken对象,并将这个对象标记为“未认证”。 - 进一步将
SocialAuthenticationToken传递到了AuthenticationManager中,AuthenticationManager会根据传入的Token类型找到合适的AuthenticationProvider来处理它,这里就会找到SocialAuthenticationProvider来处理它,而SocialAuthenticationProvider就会调用UserConnectionRepository来从业务系统的数据库中来查找业务系统的用户。 - 查找业务系统的用户过程实际是
UserConnectionRepository调用我们自己写的UserDetailService的实现类(这里的实现类由于加入了第三方登录,已经进行了简单修改,这里不做介绍,读者可以看案例中的代码)来完成的,找到用户以后(找不到的情况待会详细说明,这里仅仅假设可以找到业务系统中的用户),将封装成SocialUserDetails,并设置为“已认证”,将认证结果存储到SecurityContext中。
这就是Spring Social使用第三方服务提供商存储的用户信息进行认证的一个核心原理,和使用用户名和密码的方式唯一的区别是,用户名密码认证的数据来源是用户填写的登录表单,而QQ登录的数据则来源于QQ服务器,其他的核心步骤都是一模一样的。后面讲解的微信登录原理也是一样的。
分析完了Spring Social开发第三方登录的原理以后,我们在源码中打断点,来找一下究竟是在认证过程中走OAuth步骤中的哪一步出现了问题,导致链接跳转到了http://www.itlemon.cn/signin上。我们依次在上图中的各个类或者接口的实现类的关键步骤上打断点,我们依次打断点,而不是一次性打完,我们跟着代码走,然后一步一步打断点。
1)在SocialAuthenticationFilter类上打断点
我们进入到类SocialAuthenticationFilter中,然后在其attemptAuthentication方法合适位置打断点,如下图所示:
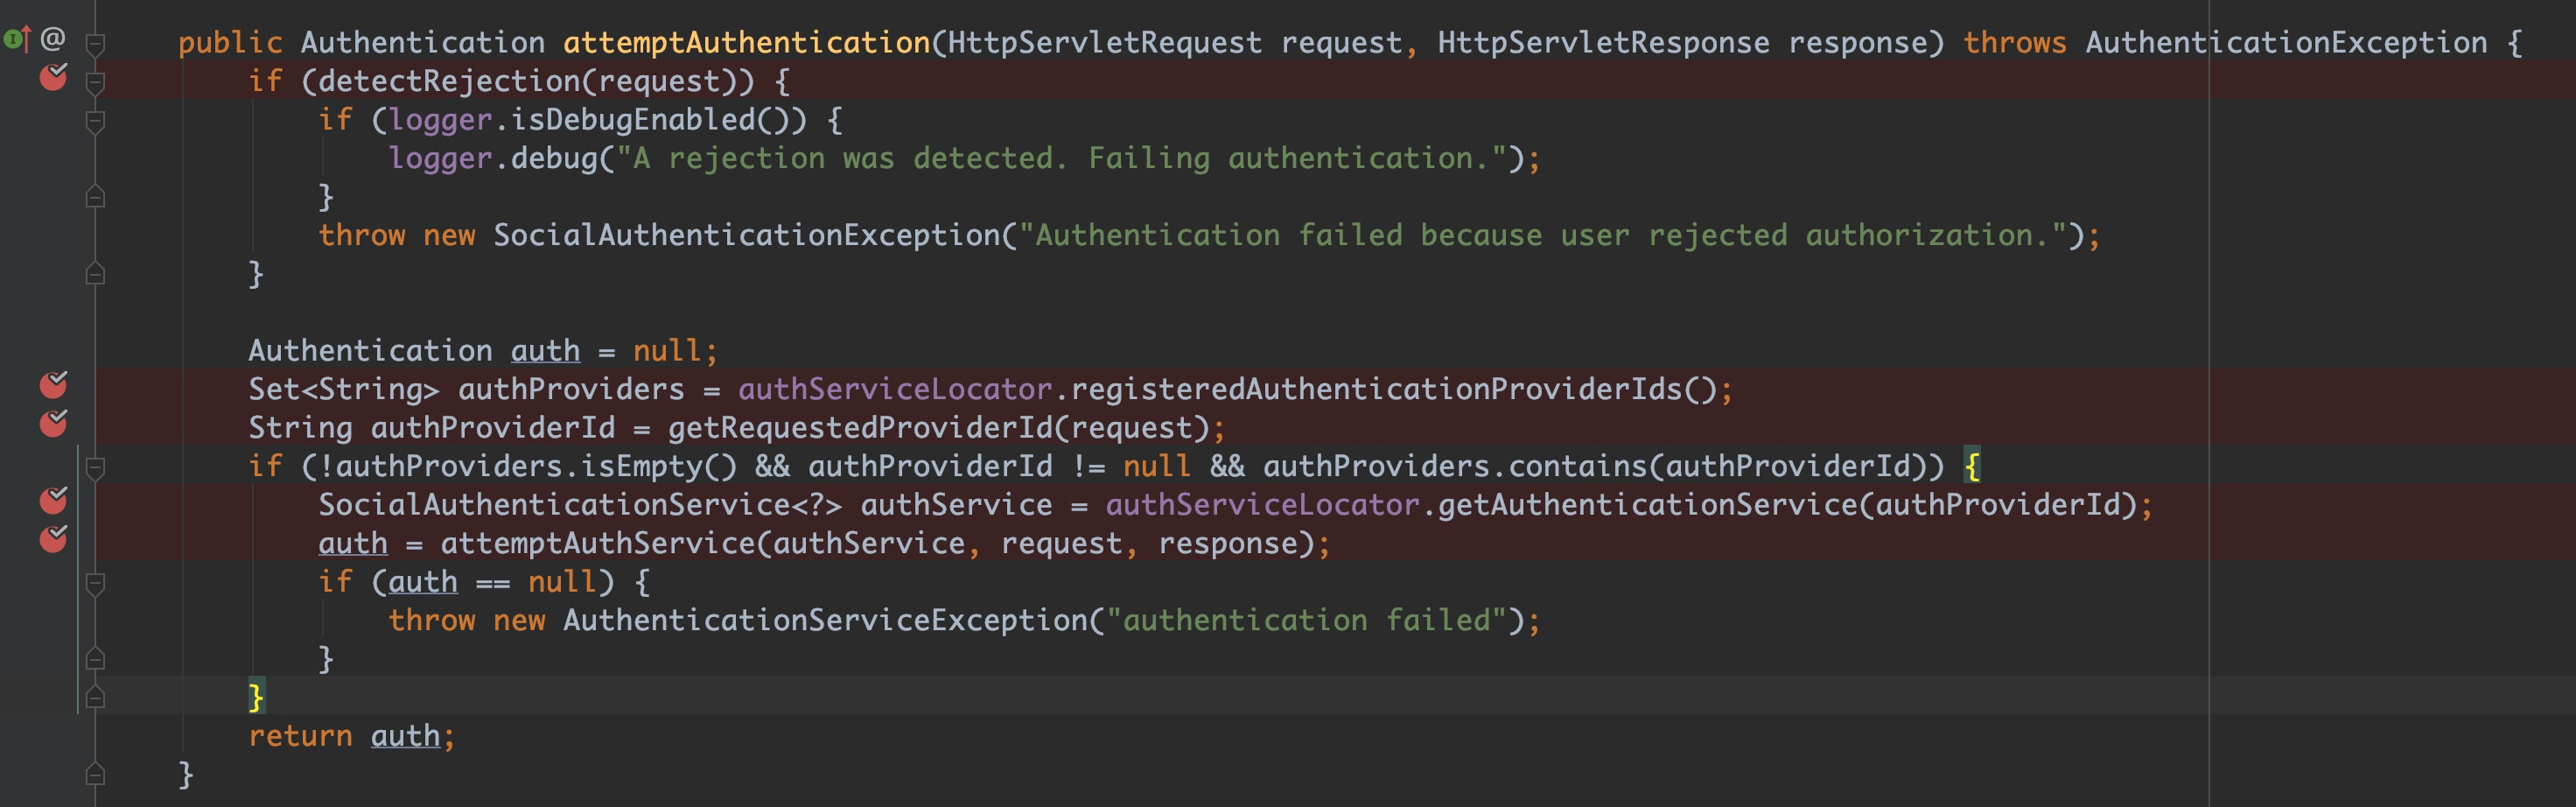
我们来分析一下上面的代码,第一个断点出,首先根据请求判断用户是否拒绝授权,如果用户拒绝授权,那么将抛出一个异常,紧接着封装一个Authentication实现类对象,暂时为null,第二个断点,其内部是从一个Map中拿到ProviderId,所以拿到的结果是一个包含qq的Set集合,第三个断点是从请求中获取到ProviderId,我们的请求链接是/authentication/qq,所以拿到的结果也是qq,具体里面的实现逻辑也很简答,读者跟进去一看便知。紧接着就是一个判断,判断ProviderId是否为空,判断从请求中获取到的ProviderId是否为空,并且两者是否包含关系,如果都满足的话,那么该请求就是一个第三方登录认证的请求。第四个断点是获取一个SocialAuthenticationService对象,第六个断点是开始尝试走认证流程,这个断点我们需要进入到方法中看一看。
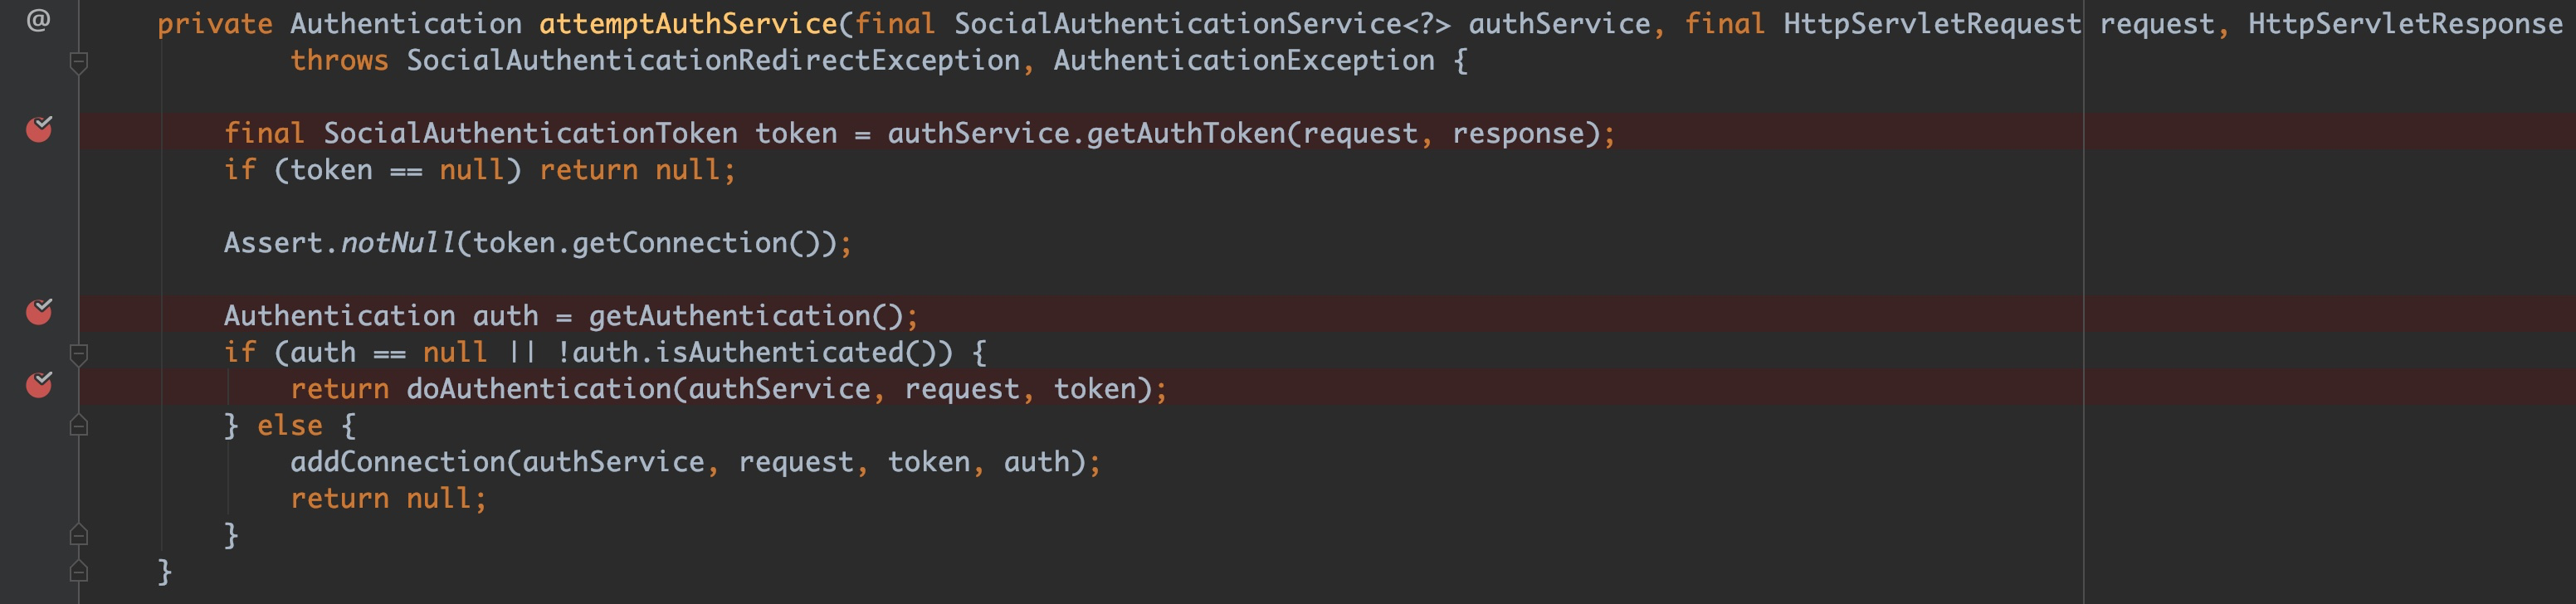
上图中第一个断点是获取Token,这个Token是SocialAuthenticationToken的对象,是认证过程中的数据载体,而不是我们之前所说的访问令牌Access Token,这一点要注意。第一个断点我们需要进入到其中进行分析。第二个断点是从SecurityContext中获取认证信息,以用来判断是否已经认证过了,如果没有认证,将进入到第三个断点方法中进行认证,第三个断点我们也需要进入到其中进行分析。首先来分析第一个断点:
2)在OAuth2AuthenticationService类上打断点
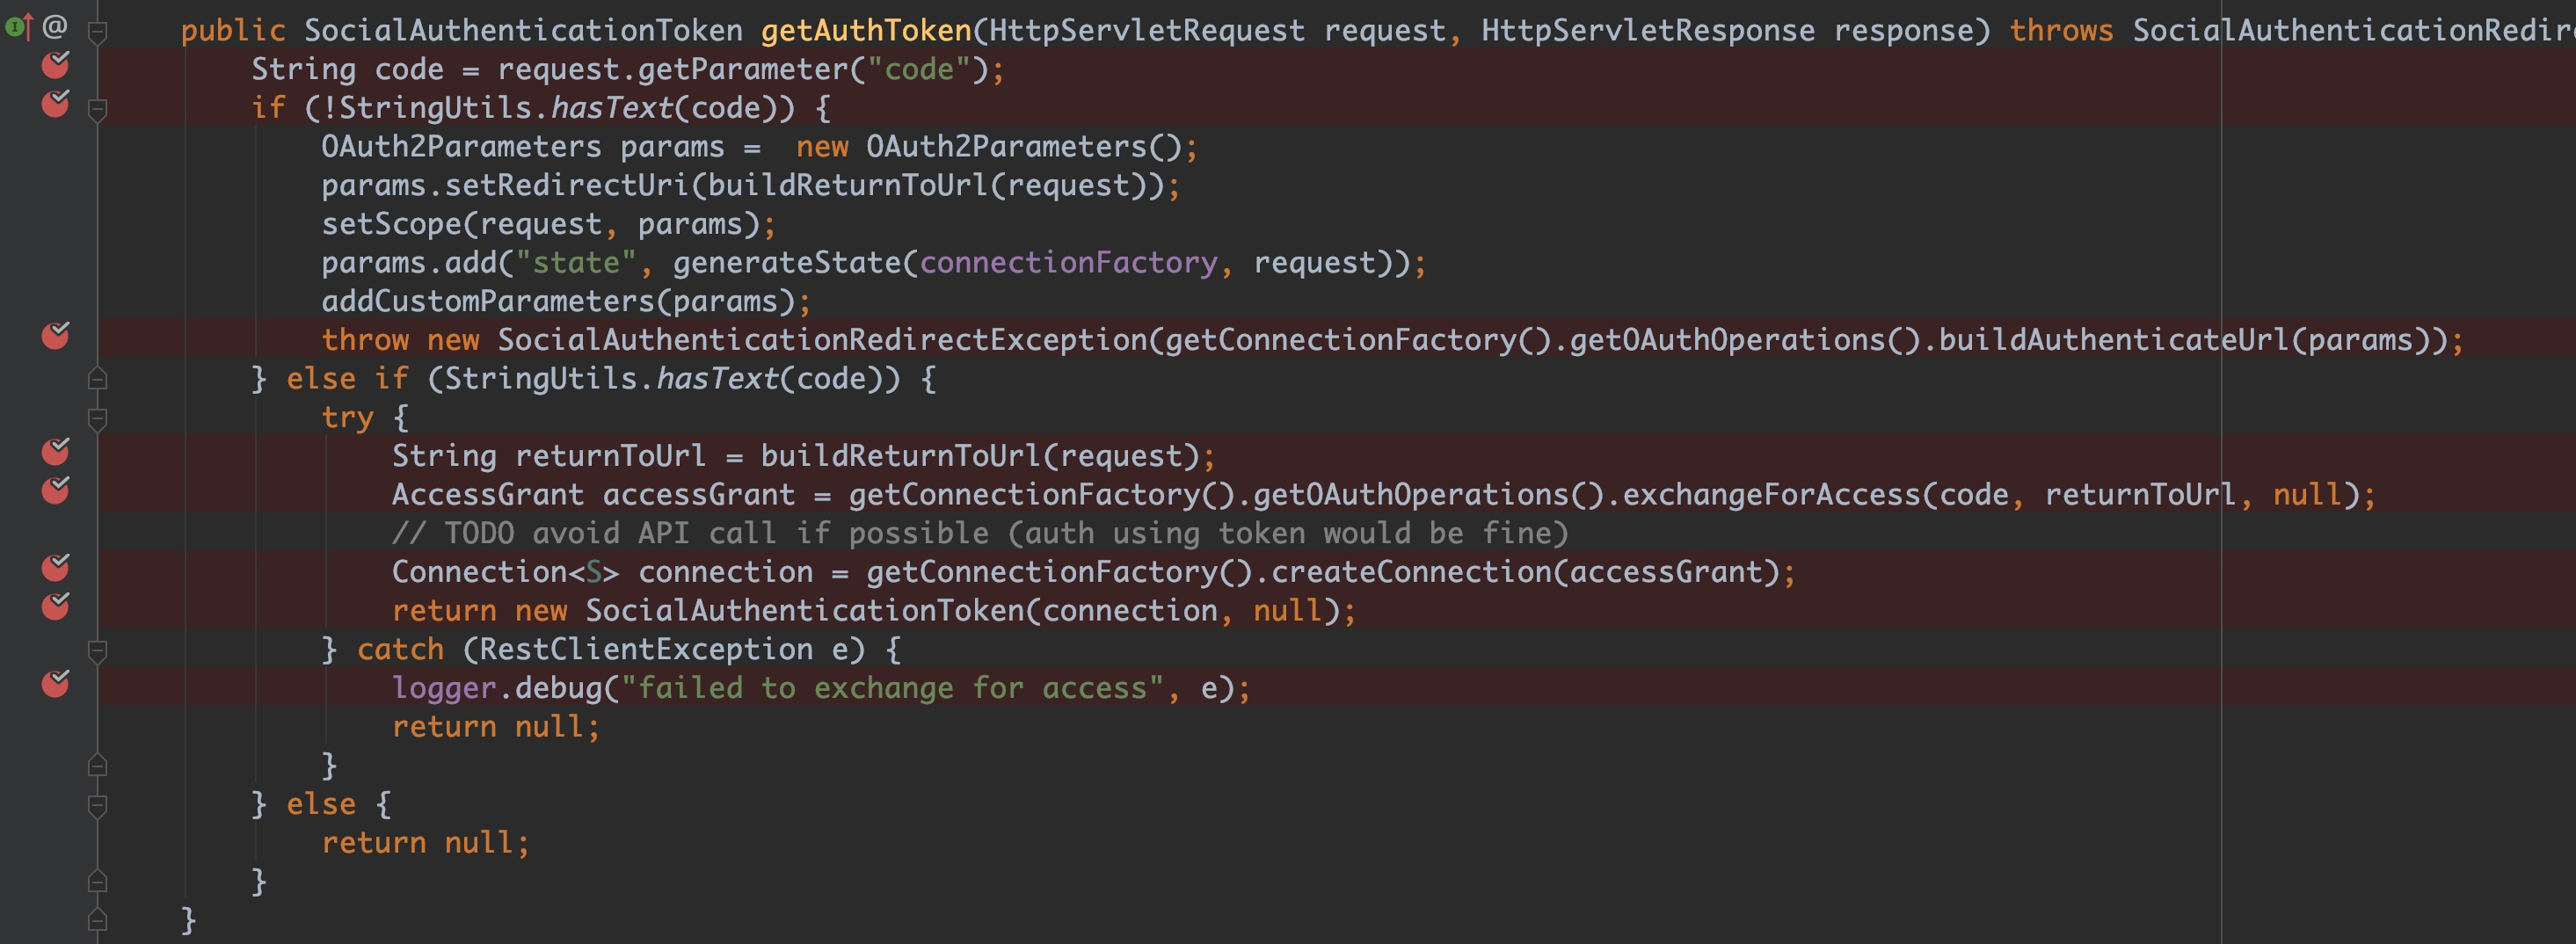
我们进入到的是类OAuth2AuthenticationService的getAuthToken方法,该方法首先判断请求中是否带参数code,我们都很清楚,在OAuth2协议中,code参数是用户授权后才能拿到,也就说在引导用户授权之前,是没有code参数的,用户同意授权之后,会返回code给我们的应用,然后我们的应用拿着code去请求第三方授权服务器换取访问令牌Access Token(如果对协议这一块不了解的,可以查看我前一篇文章),如果我们第一次访问,那么就就有code这个值,那么它就会抛出一个异常,捕获到异常之后将我们的请求重定向到QQ授权页面,等用户授权后,将会重定向到我们一开始的那个/authentication/qq上,再次被拦截后,走到这里,此时链接上是带有code值,这个时候就会走到else if块中,这时候,就会拿到我们的code去申请令牌,exchangeForAccess就是OAuth2Template的方法,里面封装申请令牌的必要参数并发送post请求获取令牌,拿到令牌封装的AccessGrant对象之后,就通过ConnectionFactory去调用QQProviderService来创建Connection实现类对象,最后将这个Connection数据封装成SocialAuthenticationToken去接着走下面的认证流程。我们从代码中分析到,当我们点击QQ登录的时候,走到这个类的第一个if代码块就结束了,就进入了QQ授权页面,然后我们扫码授权之后,就走到else if代码块继续走下面的认证流程,这个时候,就与OAuth协议没有关系了。
我们之前分析到的问题是点击授权后跳到了http://www.itlemon.cn/signin上,然后被Spring Security拦截,显示没有授权,说明并没有走接下来的认证流程了,而是在走OAuth的流程就出现了问题。好了,我们不接着往下打断点了,就暂时打到这里,我们来启动项目,扫码授权,看看到底会出现上面问题。
我们点击QQ登录后,请求到达了这里,目前页面还没有跳到QQ授权页面,如下图所示:
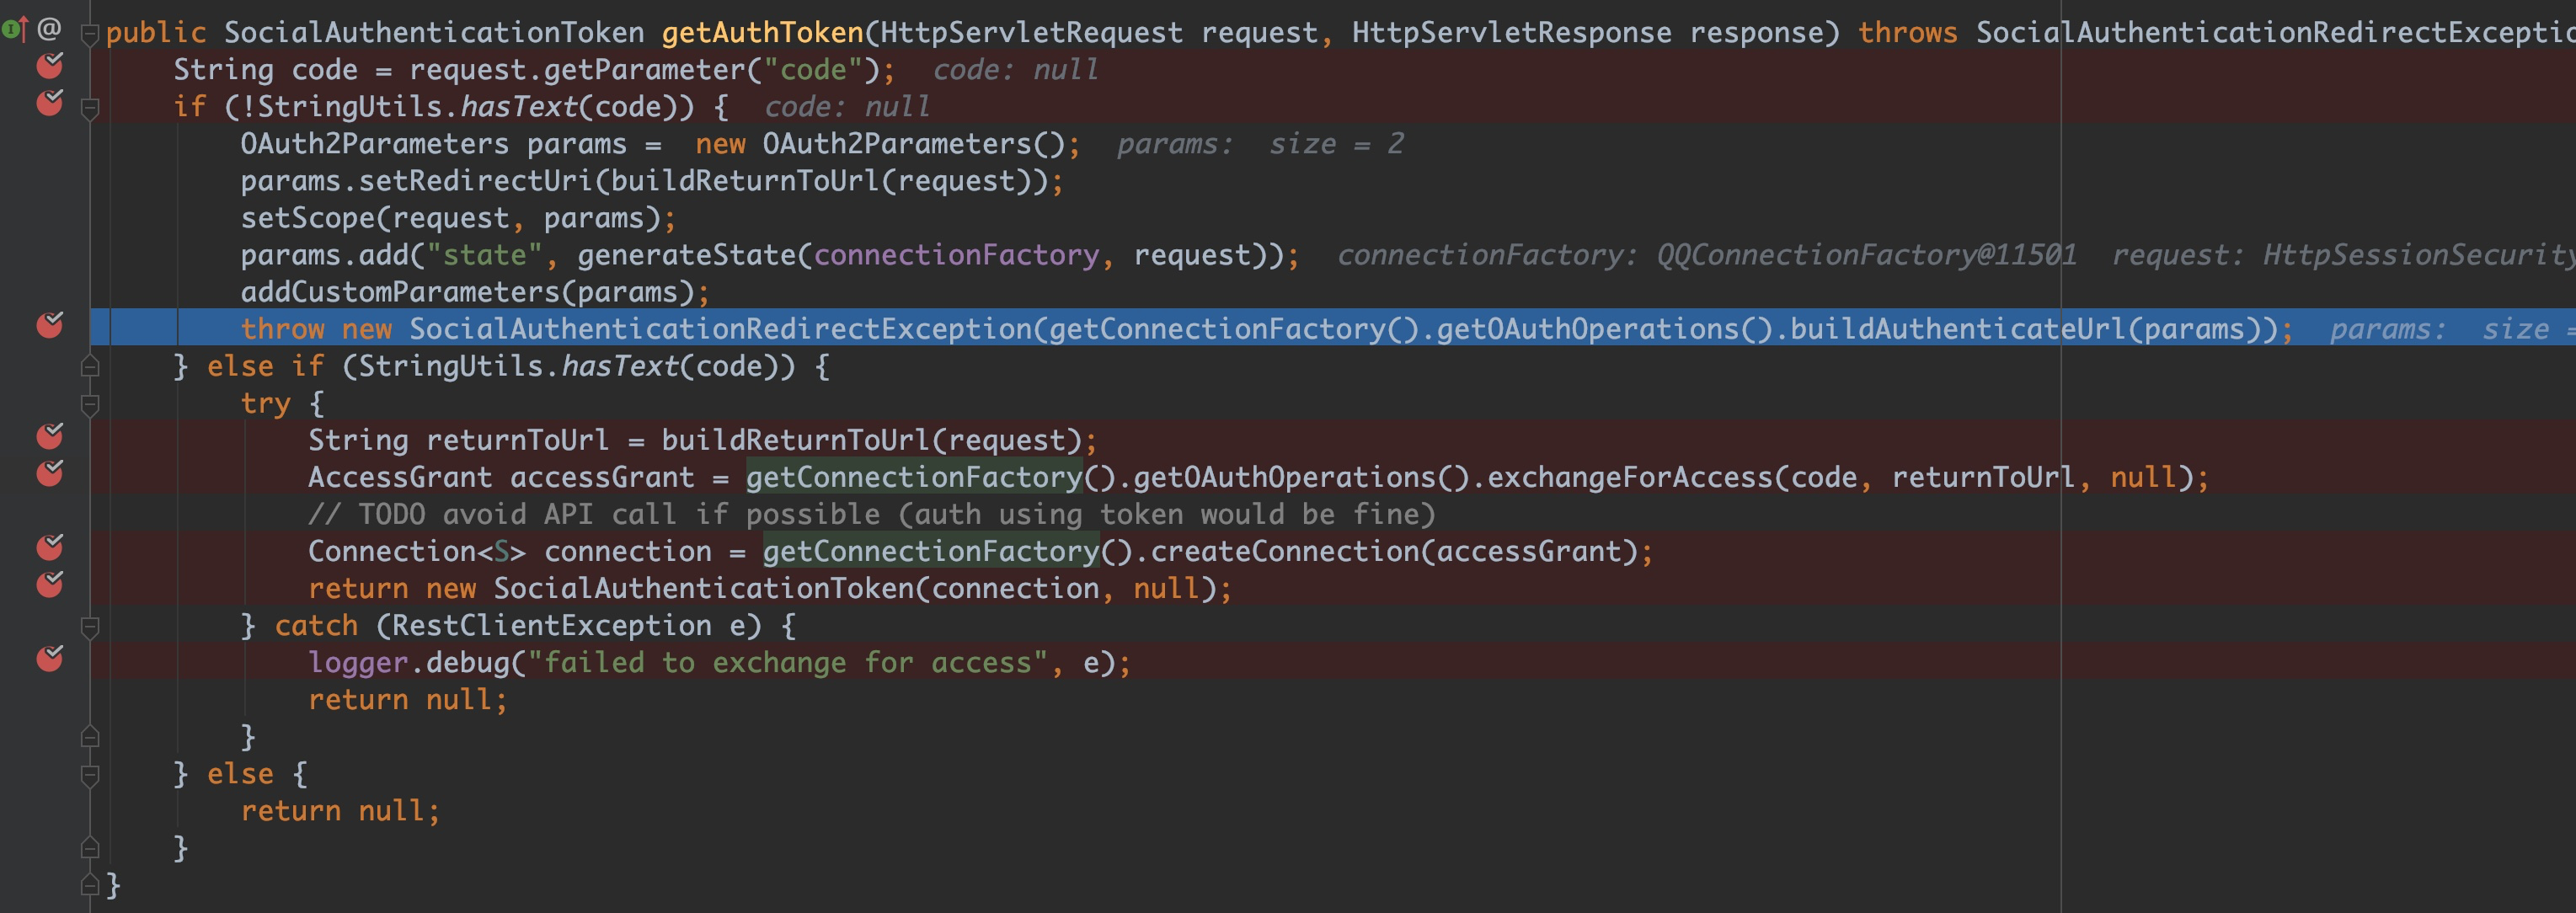
我们让代码继续走,这时候,网页已经跳转到了授权页面。我们扫码授权,然后再次被SocialAuthenticationFilter拦截并走到getAuthToken方法中,这次一步一步走,看看会发生什么,授权后,此时code就带有值了,如下图所示:

我们接着往下走,直到走到拿着code去换取Access Token并封装AccessGrant的时候,发现这一步发生了异常,也就是直接跳到了catch块中,我们一起看看到底发生了什么异常:
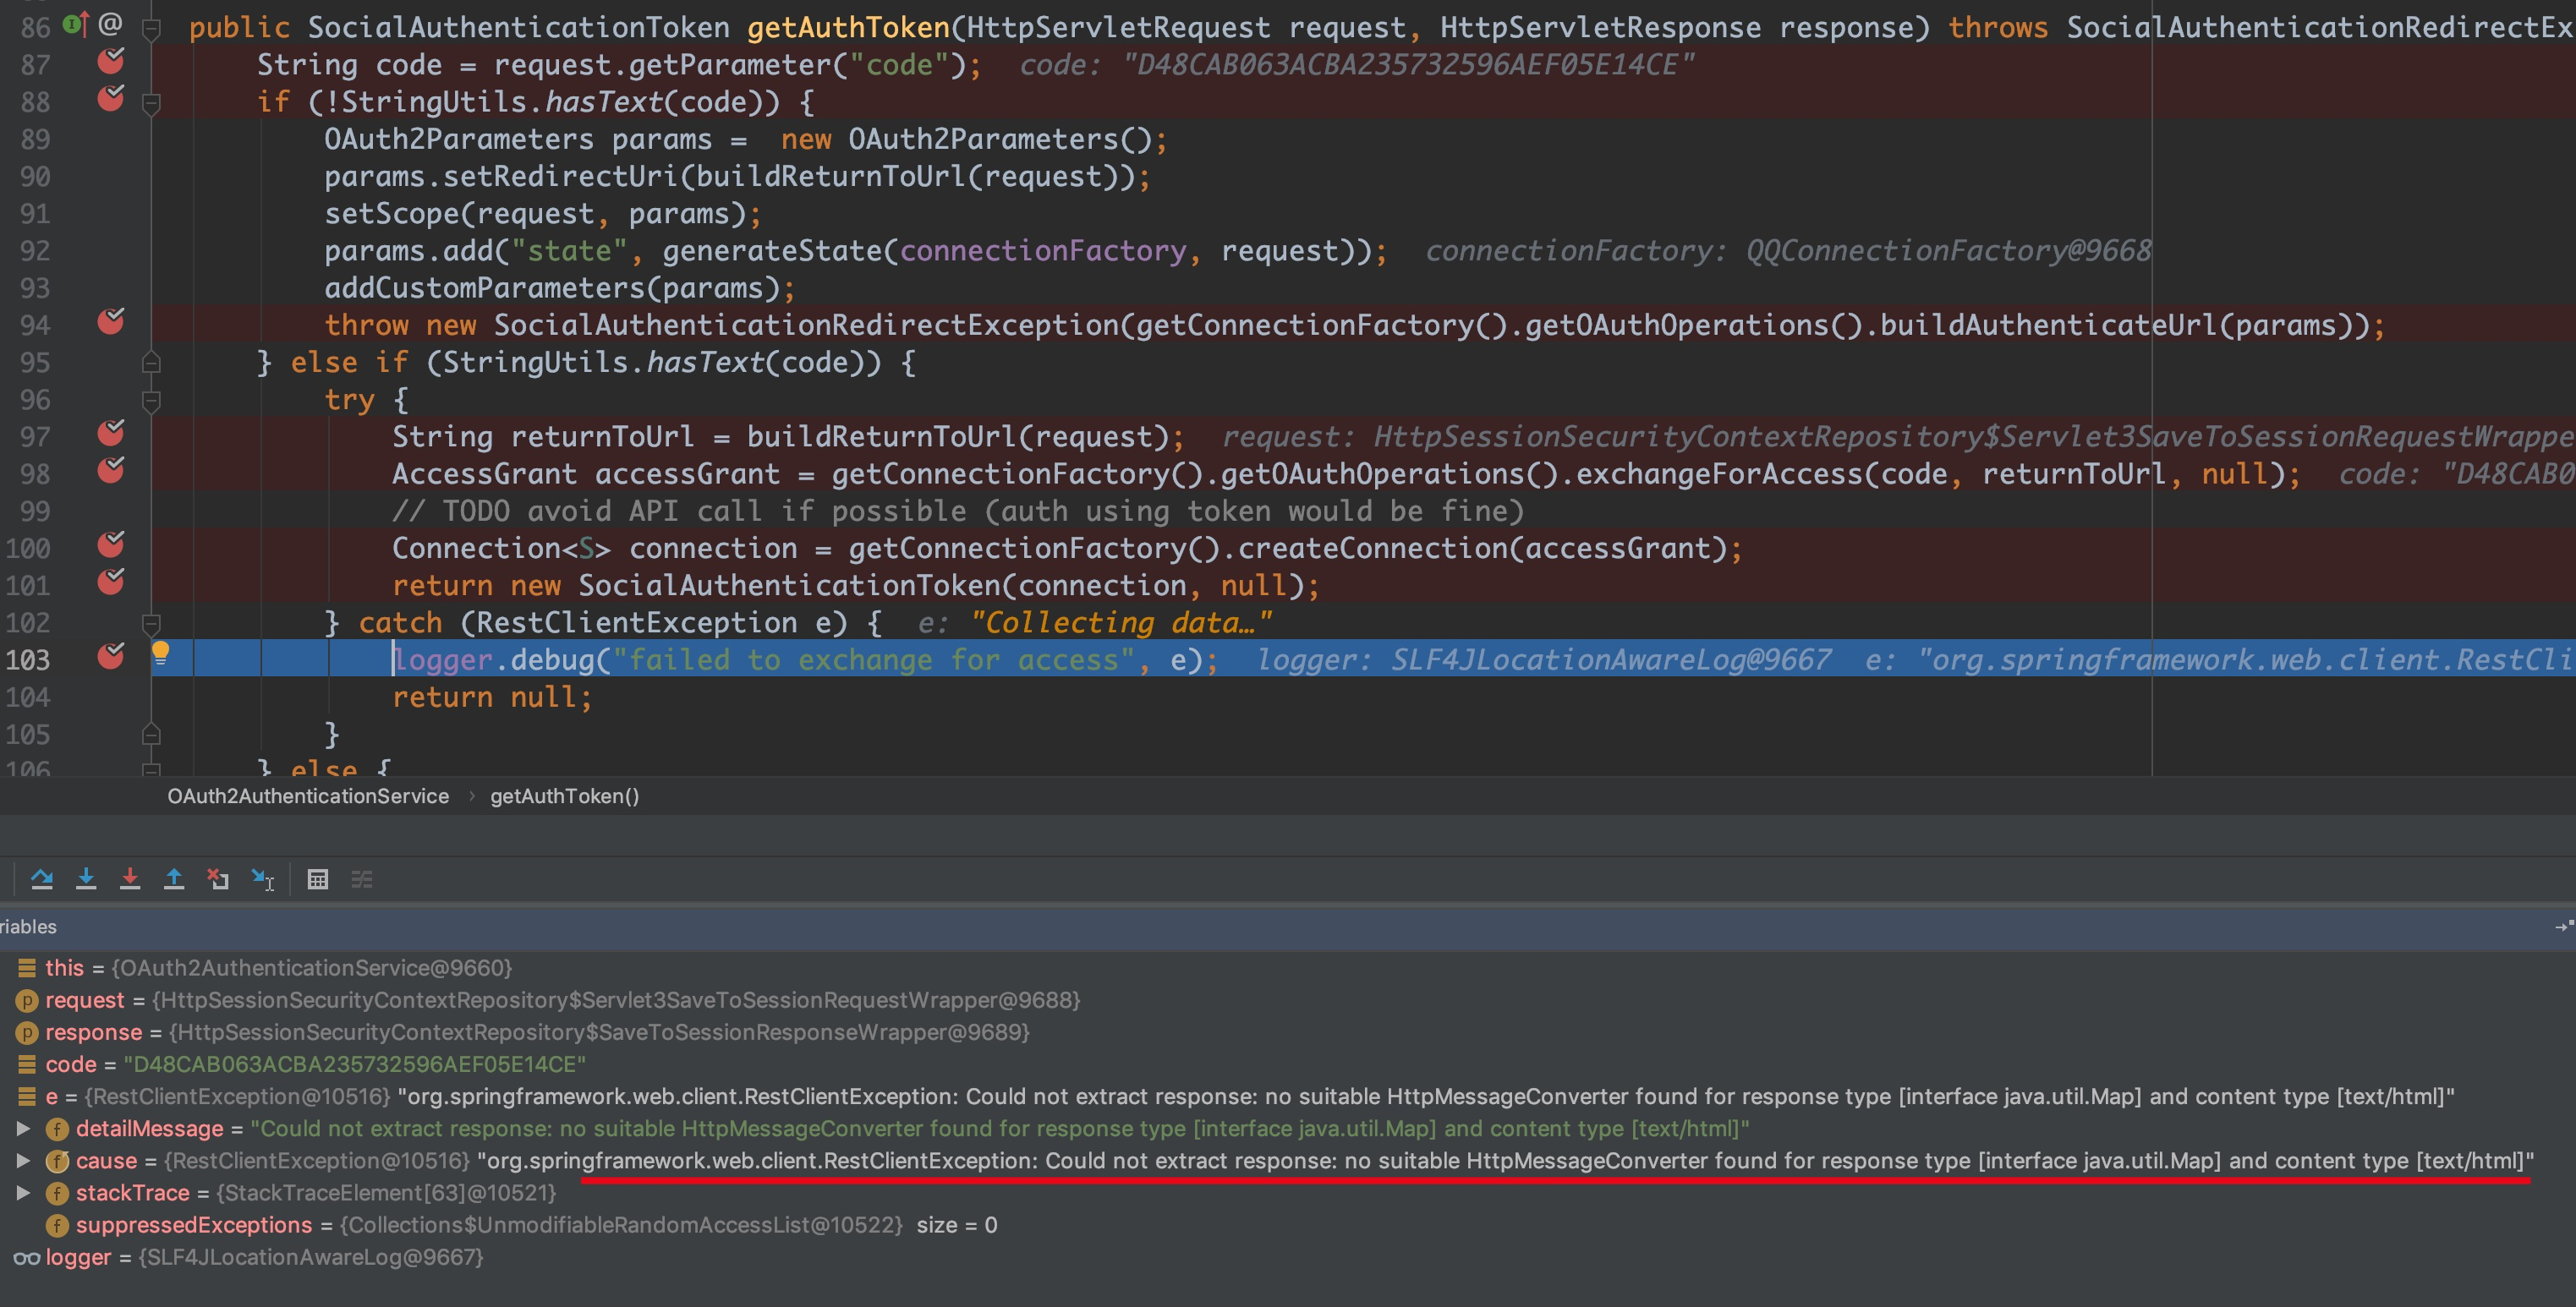
从图中可以看出,报的错是:Could not extract response: no suitable HttpMessageConverter found for response type [interface java.util.Map] and content type [text/html],错误中也就是说没有找到合适的Converter来转换从QQ服务器返回的内容,也就是说QQ服务器返回来的内容无法被Spring Social来转换,那么我们来看看Spring Social默认的转换器和QQ返回来的内容都是什么。
我们进入到exchangeForAccess方法中,如下图所示:
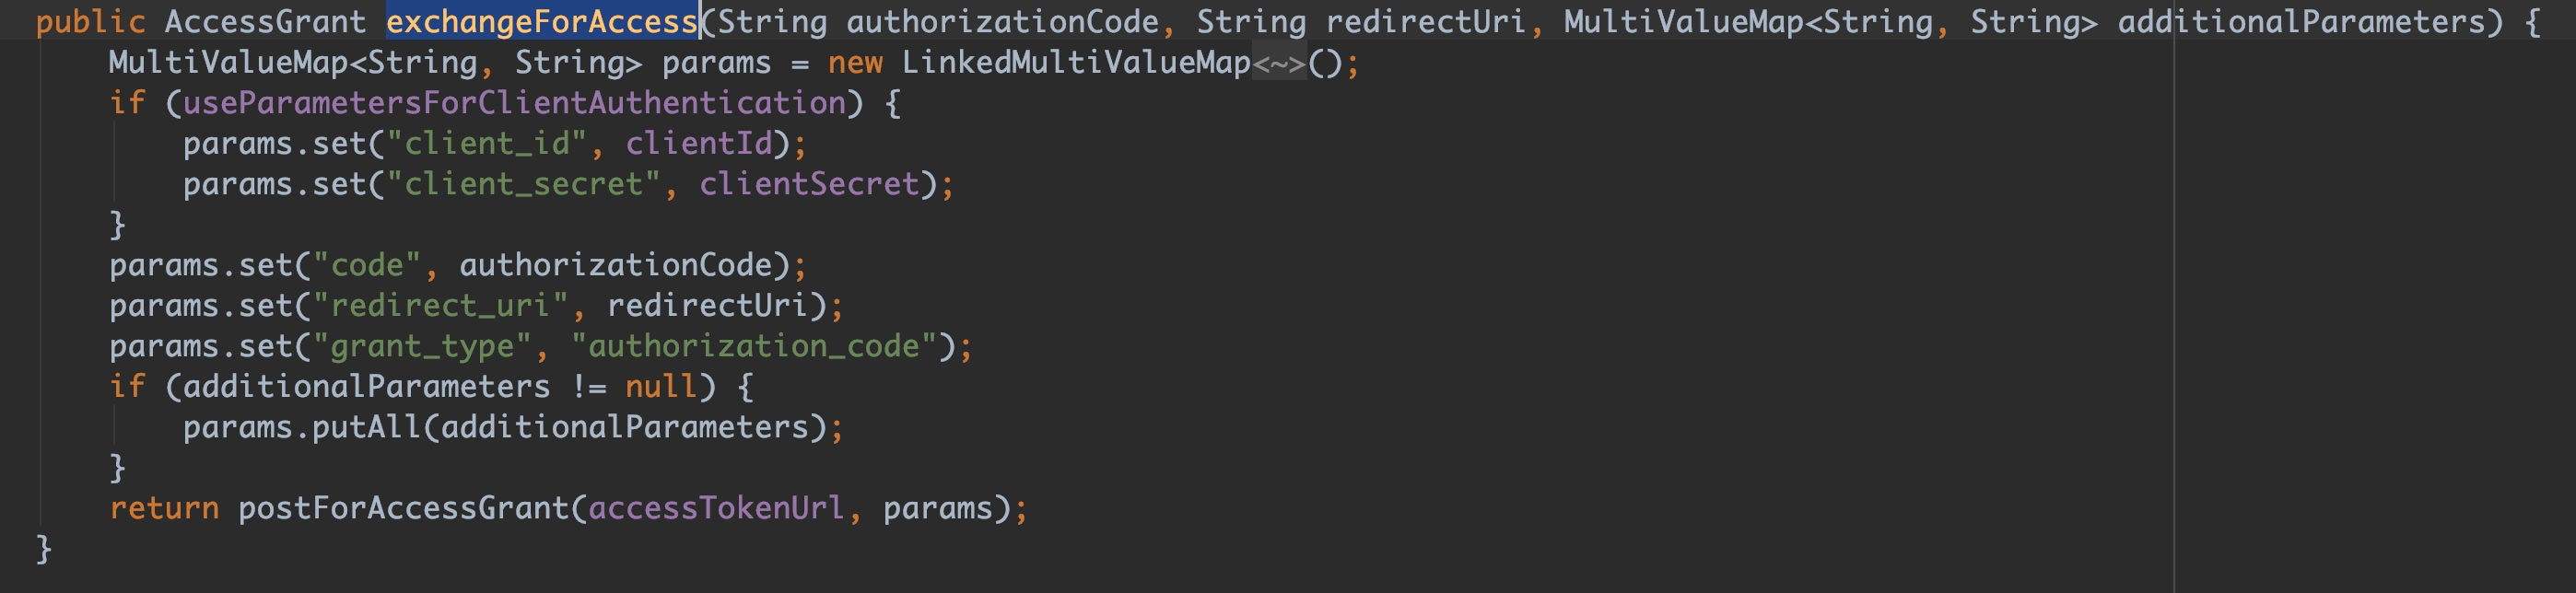
首先是封装OAuth协议规定的参数,然后就是发送了一个POST请求,我们继续进入到postForAccessGrant方法中一探究竟,它的代码只有一行,如下所示:
return extractAccessGrant(getRestTemplate().postForObject(accessTokenUrl, parameters, Map.class));
它首先是获取了RestTemplate对象,RestTemplate都是以JSON交互数据的,也就是说它接受的类型是application/json类型的数据,并将接收到的数据封装到一个Map集合中。最后从Map中提取access_token,scope和refresh_token来封装AccessGrant对象,也就是说,Spring Social希望返回的是一个JSON,但QQ服务器真正返回的确实text/html,所以在这里转换失败了,我紧接着QQ互联文档看看QQ服务器返回的数据格式,如下所示:access_token=FE04******CCE2&expires_in=7776000&refresh_token=88E4******BE14,很明显,这不是一个JSON数据。
我们还是回到OAuth2AuthenticationService类的getAuthToken方法里,那么在获取Access Token的时候发生了数据转换异常,那么就会进入到getAuthToken的catch代码块中,那么getToken方法就会返回null,那么SocialAuthenticationFilter的attemptAuthService方法的第一行代码就返回了null,那么整个attemptAuthService方法就会返回null,那么该类的attemptAuthentication方法就会抛出SocialAuthenticationException的异常,那么接着就会进入到AbstractAuthenticationProcessingFilter类的doFilter方法中,并被其catch代码块捕获,代码块中的代码如下如所示:
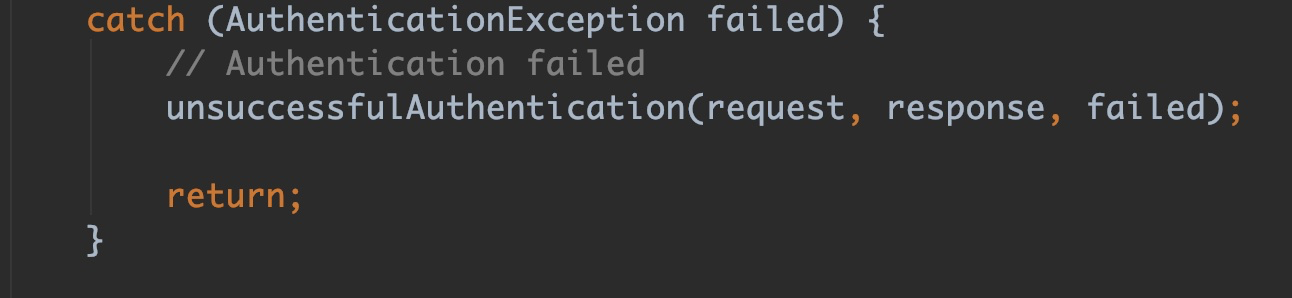
我们进入到unsuccessfulAuthentication方法中,代码如下:
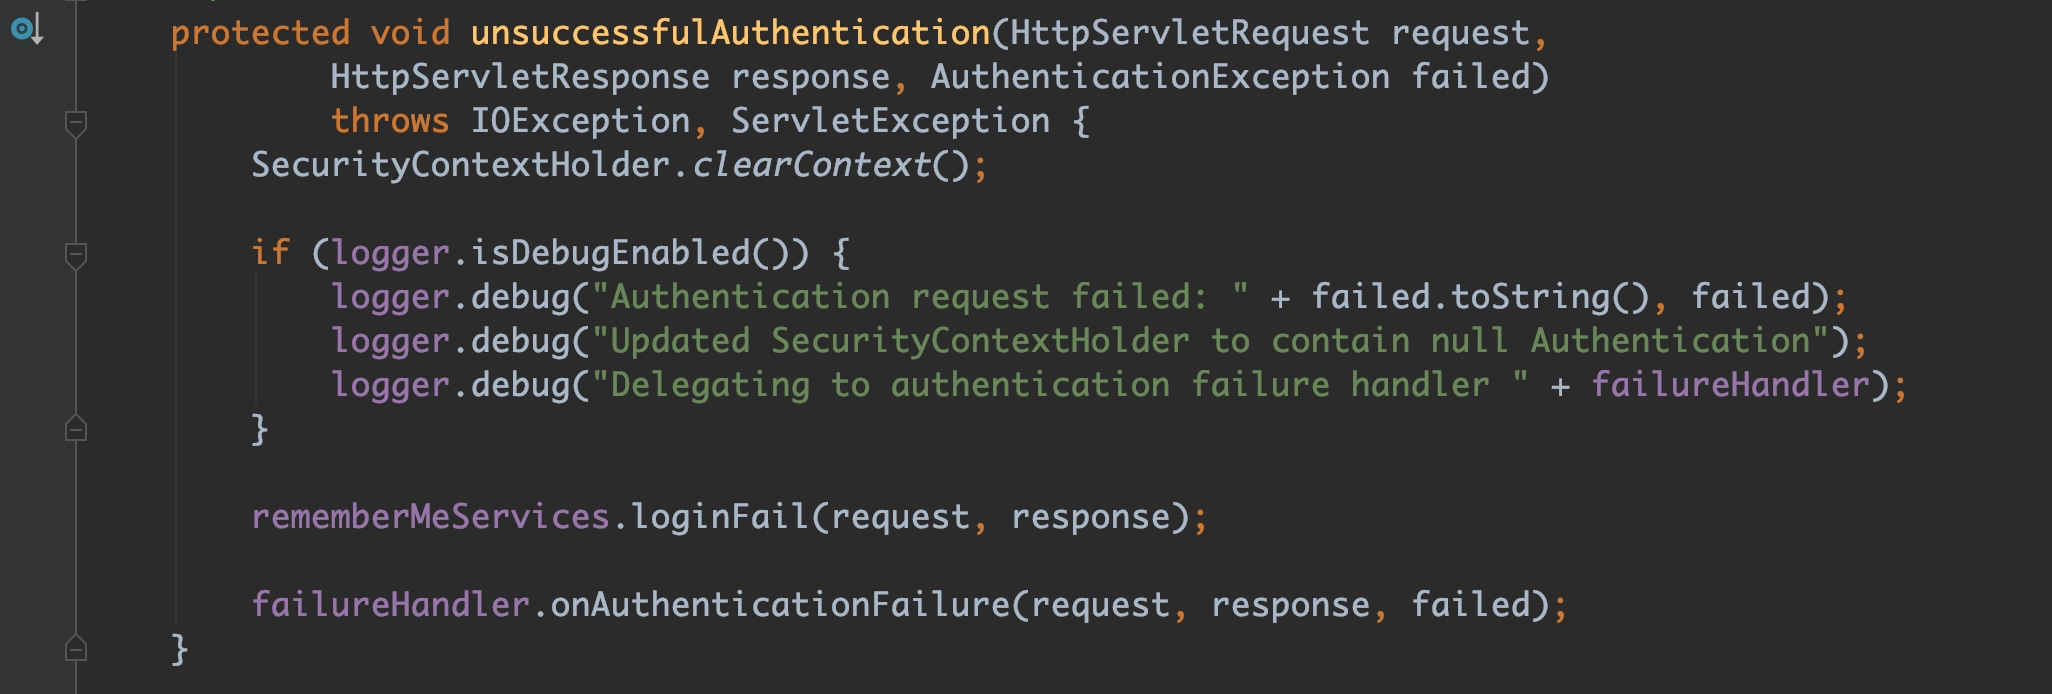
上图的最后一行代码是失败处理器在处理当前请求,我们回到SocialAuthenticationFilter类中,SocialAuthenticationFilter类的构造方法设置了失败处理器,我们一起来看看构造方法:

从断点出可以看出,DEFAULT_FAILURE_URL的值正是“/signin”,这也就解释了为什么我们在QQ授权页面扫码授权之后,跳转到了“/signin”,这是因为我们在获取Access Token的过程中转换数据发生了异常,然后被SocialAuthenticationFilter类的失败处理器处理了,重定向到了“/signin”上,这也就导致了后面我们项目拦截了该请求,出现了如下画面:
我们通过分析源码,通过打断点的方式,找到了问题的原因所在,那么我们现在开始着手解决这个问题吧。在处理之前,我们一起来看看类OAuth2Template的postForAccessGrant方法,它代码里通过调用getRestTemplate方法来获取了RestTemplate对象,那么我们进入到该方法中,如下所示:
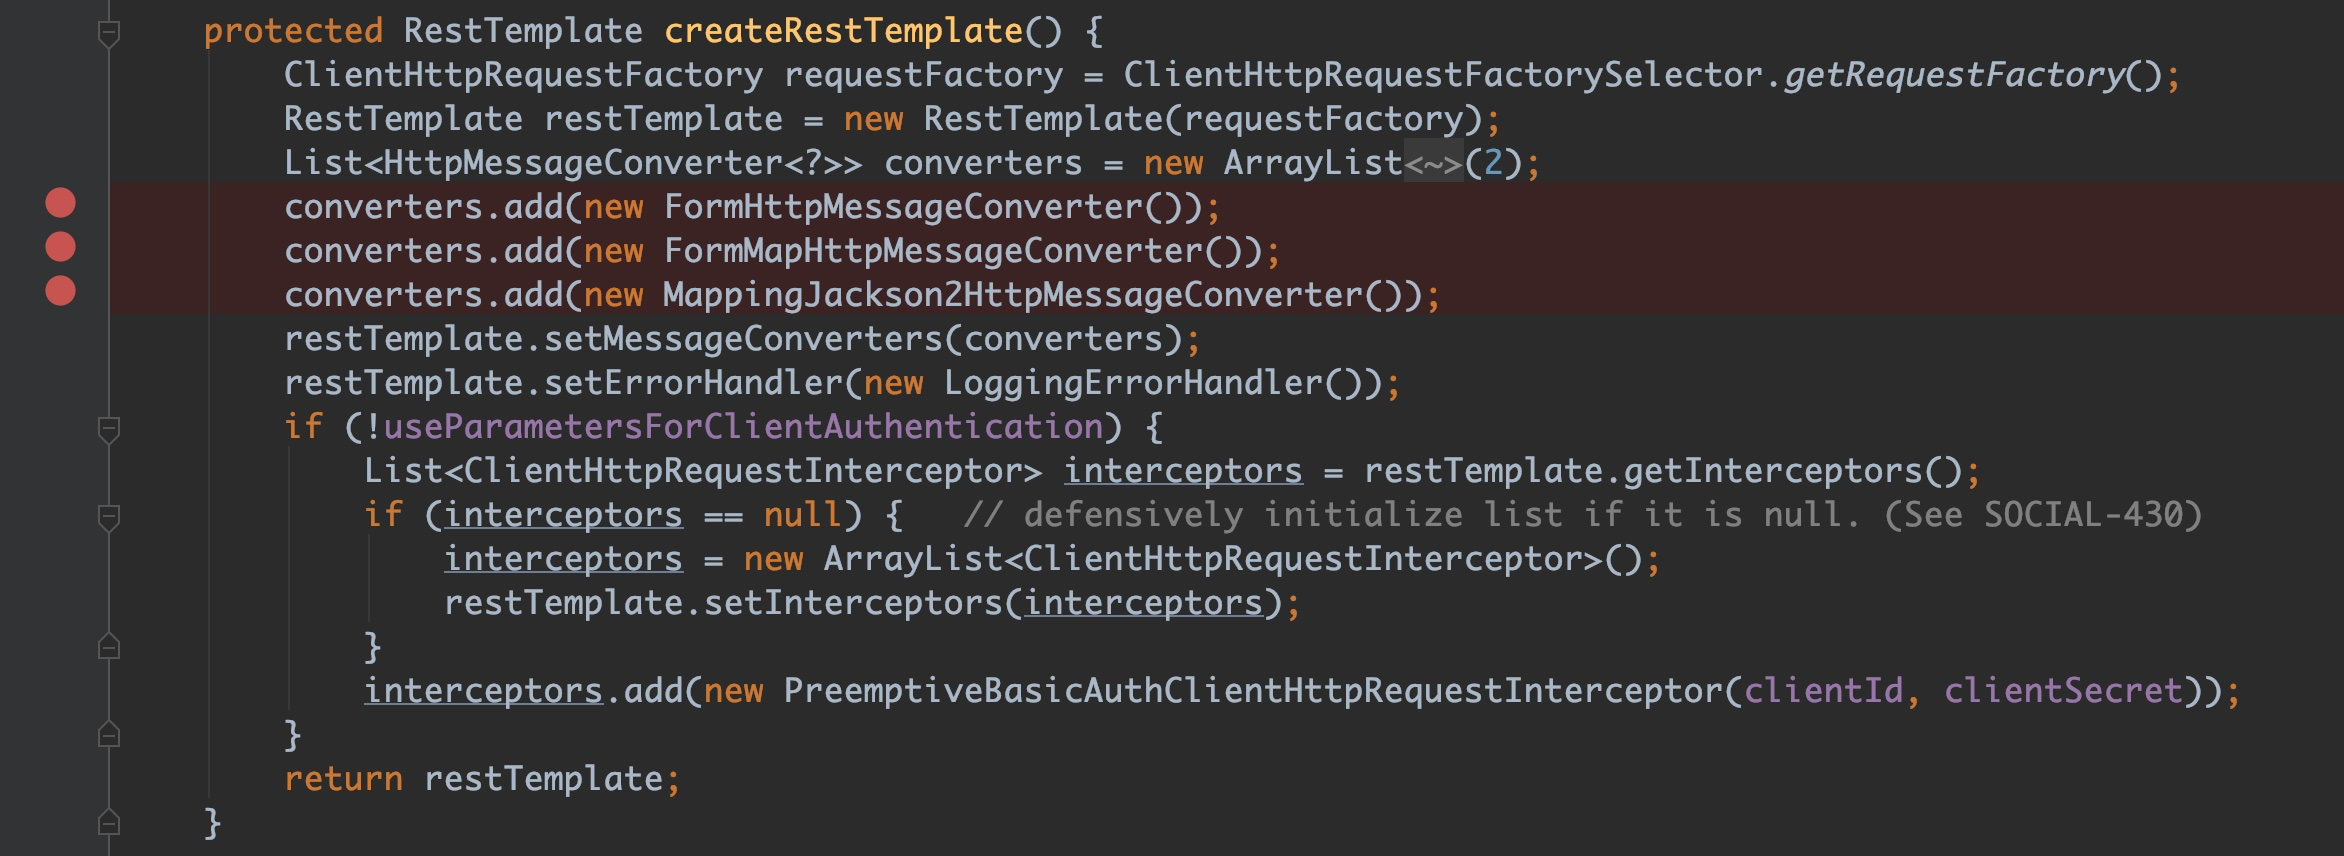
在创建RestTemplate对象的时候,我们从代码中可以看出,该方法仅仅只添加了三个数据转换器,分别是:FormHttpMessageConverter、FormMapHttpMessageConverter、MappingJackson2HttpMessageConverter。前两个只能处理application/x-www-form-urlencoded类型的数据和multipart/form-data类型的数据的,而第三个是处理application/json类型的数据的,这是不符合我们要求的,那么我们需要在写一个方法来覆盖它,我们拿到从父类创建好的RestTemplate中添加一个StringHttpMessageConverter,该Converter就可以处理ContentType为text/html的数据,因为QQ服务器返回来的数据形式是access_token=FE04******CCE2&expires_in=7776000&refresh_token=88E4******BE14,它并不是JSON数据,那么我们还需要重写postForAccessGrant方法,这样我们就可以自定义处理access_token=FE04******CCE2&expires_in=7776000&refresh_token=88E4******BE14类型的数据了,而不是直接将QQ服务器返回来的数据当做JSON来处理。我们在包connect下再写一个类QQOAuth2Template,代码如下所示:
package com.lemon.security.core.social.qq.connect;

import lombok.extern.slf4j.Slf4j;
import org.apache.commons.lang3.StringUtils;
import org.springframework.http.converter.StringHttpMessageConverter;
import org.springframework.social.oauth2.AccessGrant;
import org.springframework.social.oauth2.OAuth2Template;
import org.springframework.util.MultiValueMap;
import org.springframework.web.client.RestTemplate;

import java.nio.charset.Charset;

/**
 * @author jiangpingping
 * @date 2019-02-17 00:03
 */
@Slf4j
public class QQOAuth2Template extends OAuth2Template {

    public QQOAuth2Template(String clientId, String clientSecret, String authorizeUrl, String accessTokenUrl) {
        super(clientId, clientSecret, authorizeUrl, accessTokenUrl);
        // 因为OAuth2Template的exchangeCredentialsForAccess方法,在封装OAuth协议的时候,默认不会带上client_id和client_secret
        // 也就是说默认的useParametersForClientAuthentication值为false,所以这里需要改成true
        setUseParametersForClientAuthentication(true);
    }

    @Override
    protected RestTemplate createRestTemplate() {
        RestTemplate restTemplate = super.createRestTemplate();
        // 添加一个StringHttpMessageConverter,他能处理text/html类型的数据
        restTemplate.getMessageConverters().add(new StringHttpMessageConverter(Charset.forName("UTF-8")));
        return restTemplate;
    }

    @Override
    protected AccessGrant postForAccessGrant(String accessTokenUrl, MultiValueMap<String, String> parameters) {
        String responseString = getRestTemplate().postForObject(accessTokenUrl, parameters, String.class);
        log.info("获取access token的响应为:{}", responseString);
        // QQ服务器返回的数据类型为access_token=FE04******CCE2&expires_in=7776000&refresh_token=88E4******BE14
        String[] items = StringUtils.splitByWholeSeparatorPreserveAllTokens(responseString, "&");
        // 分割数据
        String accessToken = StringUtils.substringAfterLast(items[0], "=");
        Long expiresIn = new Long(StringUtils.substringAfterLast(items[1], "="));
        String refreshToken = StringUtils.substringAfterLast(items[2], "=");
        // 封装AccessGrant对象
        return new AccessGrant(accessToken, null, refreshToken, expiresIn);
    }
}
上述代码写完以后,我们还需要修改一下QQServiceProvider的部分代码,在QQServiceProvider的构造方法中,如下所示:
public QQServiceProvider(String appId, String appSecret) {
    // 使用Spring Social的默认的OAuth2Template
    super(new OAuth2Template(appId, appSecret, URL_AUTHORIZE, URL_ACCESS_TOKEN));
    this.appId = appId;
}
现在需要修改为:
public QQServiceProvider(String appId, String appSecret) {
    // 不能再使用Spring Social的默认的OAuth2Template,而需要我们自定义的QQOAuth2Template
    super(new QQOAuth2Template(appId, appSecret, URL_AUTHORIZE, URL_ACCESS_TOKEN));
    this.appId = appId;
}
当然,加入了社交登录以后,我们还需要重构一下UserDetailsServiceImpl类,这个类主要是负责从数据库读取用户信息来封装UserDetails对象,这里修改如下所示:
package com.lemon.security.web.authentication;

import lombok.extern.slf4j.Slf4j;
import org.springframework.security.core.authority.AuthorityUtils;
import org.springframework.security.core.userdetails.UserDetails;
import org.springframework.security.core.userdetails.UserDetailsService;
import org.springframework.security.core.userdetails.UsernameNotFoundException;
import org.springframework.security.crypto.bcrypt.BCryptPasswordEncoder;
import org.springframework.security.crypto.password.PasswordEncoder;
import org.springframework.social.security.SocialUser;
import org.springframework.social.security.SocialUserDetails;
import org.springframework.social.security.SocialUserDetailsService;
import org.springframework.stereotype.Component;

/**
 * @author jiangpingping
 * @date 2019-02-05 17:53
 */
@Component
@Slf4j
public class UserDetailsServiceImpl implements UserDetailsService, SocialUserDetailsService {

    private PasswordEncoder passwordEncoder;

    public UserDetailsServiceImpl() {
        this.passwordEncoder = new BCryptPasswordEncoder();
    }

    @Override
    public UserDetails loadUserByUsername(String username) throws UsernameNotFoundException {
        log.info("表单登录用户名: {}", username);
        return buildUser(username);
    }

    @Override
    public SocialUserDetails loadUserByUserId(String userId) throws UsernameNotFoundException {
        log.info("社交登录用户ID:{}", userId);
        return buildUser(userId);
    }

    private SocialUserDetails buildUser(String userId) {
        // 这里可以根据用户名到数据库中查询用户,获得数据库中得到的密码(这里不进行查询操作,使用固定代码)
        // 在实际的开发中,存到数据库的密码不是明文的,而是经过加密的
        String password = "123456";
        String encodedPassword = passwordEncoder.encode(password);
        log.info("加密后的密码为: {}", encodedPassword);
        // 这里查询该账户是否过期,这里使用固定代码,假设没有过期
        boolean accountNonExpired = true;
        // 这里查询该账户被删除,假设没有被删除
        boolean enabled = true;
        // 这里查询该账户认证是否过期,假设没有过期
        boolean credentialsNonExpired = true;
        // 查询该账户是否被锁定,假设没有被锁定
        boolean accountNonLocked = true;
        // 关于密码的加密,应该是在创建用户的时候进行的,这里仅仅是举例模拟
        return new SocialUser(userId, encodedPassword,
                enabled, accountNonExpired,
                credentialsNonExpired, accountNonLocked,
                AuthorityUtils.commaSeparatedStringToAuthorityList("admin"));
    }
}
我们再次重启demo项目,点击QQ登录,然后扫码授权,这时候,我们发现,又发生了刚才的那种情况:
这是为什么呢?我们观察项目的控制台,发现控制台打印出来的日志提示,我们的请求再次被重定向到了http://www.itlemon.cn/signup上,这很明显是跳转到了一个注册的链接上,这也就让我们回想起以前使用QQ登录一个新的网站的时候,网站的大部分操作都是在我们授权之后,跳转到了一个需要我们绑定该网站账号密码或者注册的页面,那么这个问题该如何解决呢?请关注我的下一篇文章《Spring Security技术栈开发企业级认证与授权(十五)解决Spring Social集成QQ登录后的注册问题》。
Spring Security技术栈开发企业级认证与授权系列文章列表:
Spring Security技术栈学习笔记(一)环境搭建
Spring Security技术栈学习笔记(二)RESTful API详解
Spring Security技术栈学习笔记(三)表单校验以及自定义校验注解开发
Spring Security技术栈学习笔记(四)RESTful API服务异常处理
Spring Security技术栈学习笔记(五)使用Filter、Interceptor和AOP拦截REST服务
Spring Security技术栈学习笔记(六)使用REST方式处理文件服务
Spring Security技术栈学习笔记(七)使用Swagger自动生成API文档
Spring Security技术栈学习笔记(八)Spring Security的基本运行原理与个性化登录实现
Spring Security技术栈学习笔记(九)开发图形验证码接口
Spring Security技术栈学习笔记(十)开发记住我功能
Spring Security技术栈学习笔记(十一)开发短信验证码登录
Spring Security技术栈学习笔记(十二)将短信验证码验证方式集成到Spring Security
Spring Security技术栈学习笔记(十三)Spring Social集成第三方登录验证开发流程介绍
Spring Security技术栈学习笔记(十四)使用Spring Social集成QQ登录验证方式
Spring Security技术栈学习笔记(十五)解决Spring Social集成QQ登录后的注册问题
Spring Security技术栈学习笔记(十六)使用Spring Social集成微信登录验证方式
示例代码下载地址:
项目已经上传到码云,欢迎下载,内容所在文件夹为
chapter014。
更多干货分享,欢迎关注我的微信公众号:爪哇论剑(微信号:itlemon)


 5万+
5万+

 被折叠的 条评论
为什么被折叠?
被折叠的 条评论
为什么被折叠?
 到【灌水乐园】发言


