


直接贴demo示例
拿过来直接跑
版本选择
我一般喜欢选带management的
如果需要安装其他版本在rabbitmq后面跟上版本号即可
docker pull rabbitmq:3.7.7-management

说明

docker pull rabbitmq:版本号 -management
docker 安装 rabbitMQ
docker run -d --hostname my-rabbit --name rabbit -p 15672:15672 -p 5673:5672 rabbitmq进入容器
docker exec -it 容器id /bin/bssh开启控制台
rabbitmq-plugins enable rabbitmq_management访问
http://自己的ip:15672/注意:端口你写多少就是多少,我这里是写的15672
普通依赖就是
<!-- https://mvnrepository.com/artifact/com.rabbitmq/amqp-client -->
<dependency>
    <groupId>com.rabbitmq</groupId>
    <artifactId>amqp-client</artifactId>
    <version>5.19.0</version>
</dependency>
一般现在都是boot项目了,直接使用下面的
        <dependency>
            <groupId>org.springframework.boot</groupId>
            <artifactId>spring-boot-starter-amqp</artifactId>
        </dependency>
六种模式了解了解
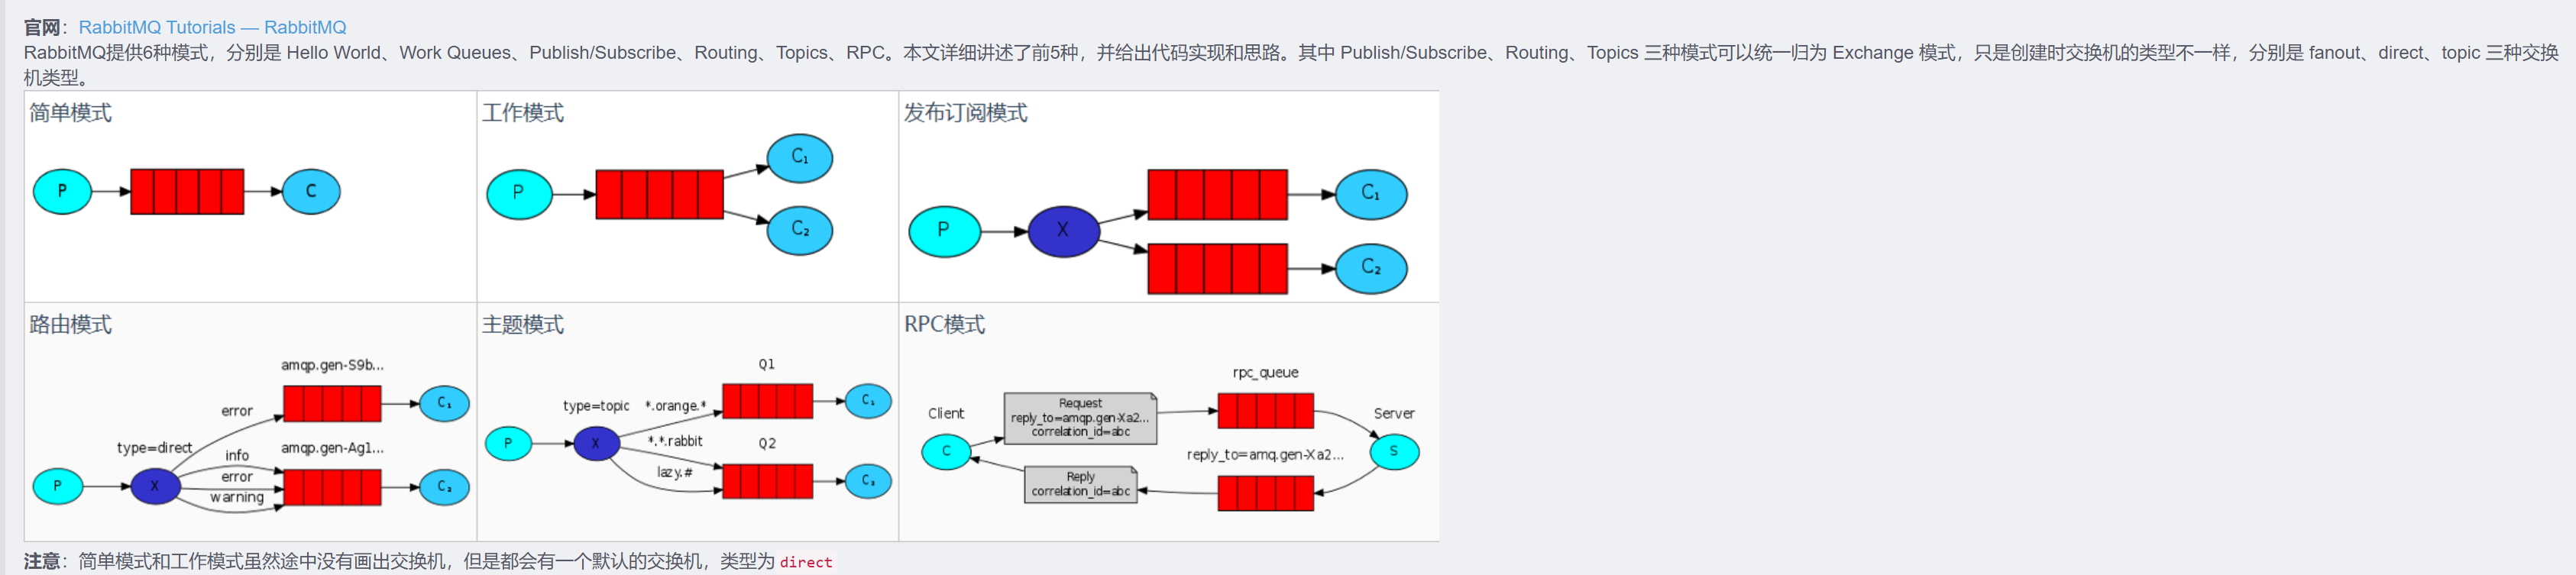
简单模式
1、一个生产者,一个消费者,一个队列,采用默认交换机。生产者发送到默认交换机,再到队列,再到消费者
发布者(Producer) → 默认交换机(Default Exchange) → 队列(Queue) → 消费者(Consumer)
工作模式
一个生产者,多个消费者,一个队列,采用默认交换机。可以理解为生产者P发送消息到队列Q,可以由多个消费者C1、C2进行接收。
生产者(Producer) → 默认交换机(Default Exchange) → 队列(Queue) → 多个消费者(Consumers)竞争消费
发布订阅(fanout)
功能:一个生产者、一个 fanout 类型的交换机、多个队列、多个消费者。一个生产者发送的消息会被多个消费者获取。其中 fanout 类型就是发布订阅模式,只有订阅该生产者的消费者会收到消息
生产者(Producer) → Fanout Exchange → 绑定到交换机的所有队列(Queue1, Queue2...) → 多个消费者(Consumer1, Consumer2...)
路由模式(direct)
功能:一个生产者,一个 direct 类型的交换机,多个队列,交换机与队列之间通过 routing-key 进行关联绑定,多个消费者。生产者发送消息到交换机并且要指定routing-key,然后消息根据这交换机与队列之间的 routing-key 绑定规则进行路由被指定消费者消费。
生产者(Producer) → Direct Exchange → 根据Routing Key匹配队列 → 消费者(Consumer)
主题模式(topic)
说明:一个生产者,一个 topic 类型的交换机,多个队列,交换机与队列之间通过 routing-key 进行关联绑定,多个消费者。生产者发送消息到交换机并且要指定 routing-key,然后消息根据这交换机与队列之间的 routing-key 绑定规则进行路由被指定消费者消费。与路由模式不同是 routing-key 有指定的队则,可以更加的通用,满足更过的场景。routing-key 的规则如下:
#:匹配一个或者多个词,例如lazy.# 可以匹配 lazy.xxx 或者 lazy.xxx.xxx
:只能匹配一个词,例如lazy. 只能匹配 lazy.xxx
生产者(Producer)
→ Topic Exchange(根据Routing Key通配符匹配Binding Key)
→ 符合规则的队列(Queue1, Queue2...)
→ 消费者(Consumer1, Consumer2...)
主题模式和路由模式的区别
1. 主题模式 = 路由模式的超集
| 特性 | 路由模式(Direct) | 主题模式(Topic) |
| 匹配方式 | 精确匹配(order.paid=order.paid) | 支持精确匹配 + 通配 (order.*、user.#) |
| 灵活性 | 低 | 高 |
| 使用场景 | 固定分类(如支付状态) | 动态分层(如日志分级、多维度事件) |
- 当主题模式不使用通配符时,它的行为与路由模式 完全一致。
例如:
- 生产者发送
Routing Key = "order.paid"
- 队列绑定
Binding Key = "order.paid"
→ 此时主题模式退化为路由模式。
性能考量
- 路由模式
:直接哈希查找,性能略高。
- 主题模式
:通配符匹配需遍历 Trie 树,但现代 RabbitMQ 优化后差异极小(除非极端高频场景)。
总结
- ✅
主题模式的精确匹配 ≈ 路由模式(功能等价)。
- ✅
主题模式额外提供通配符能力,适合更复杂的业务场景。
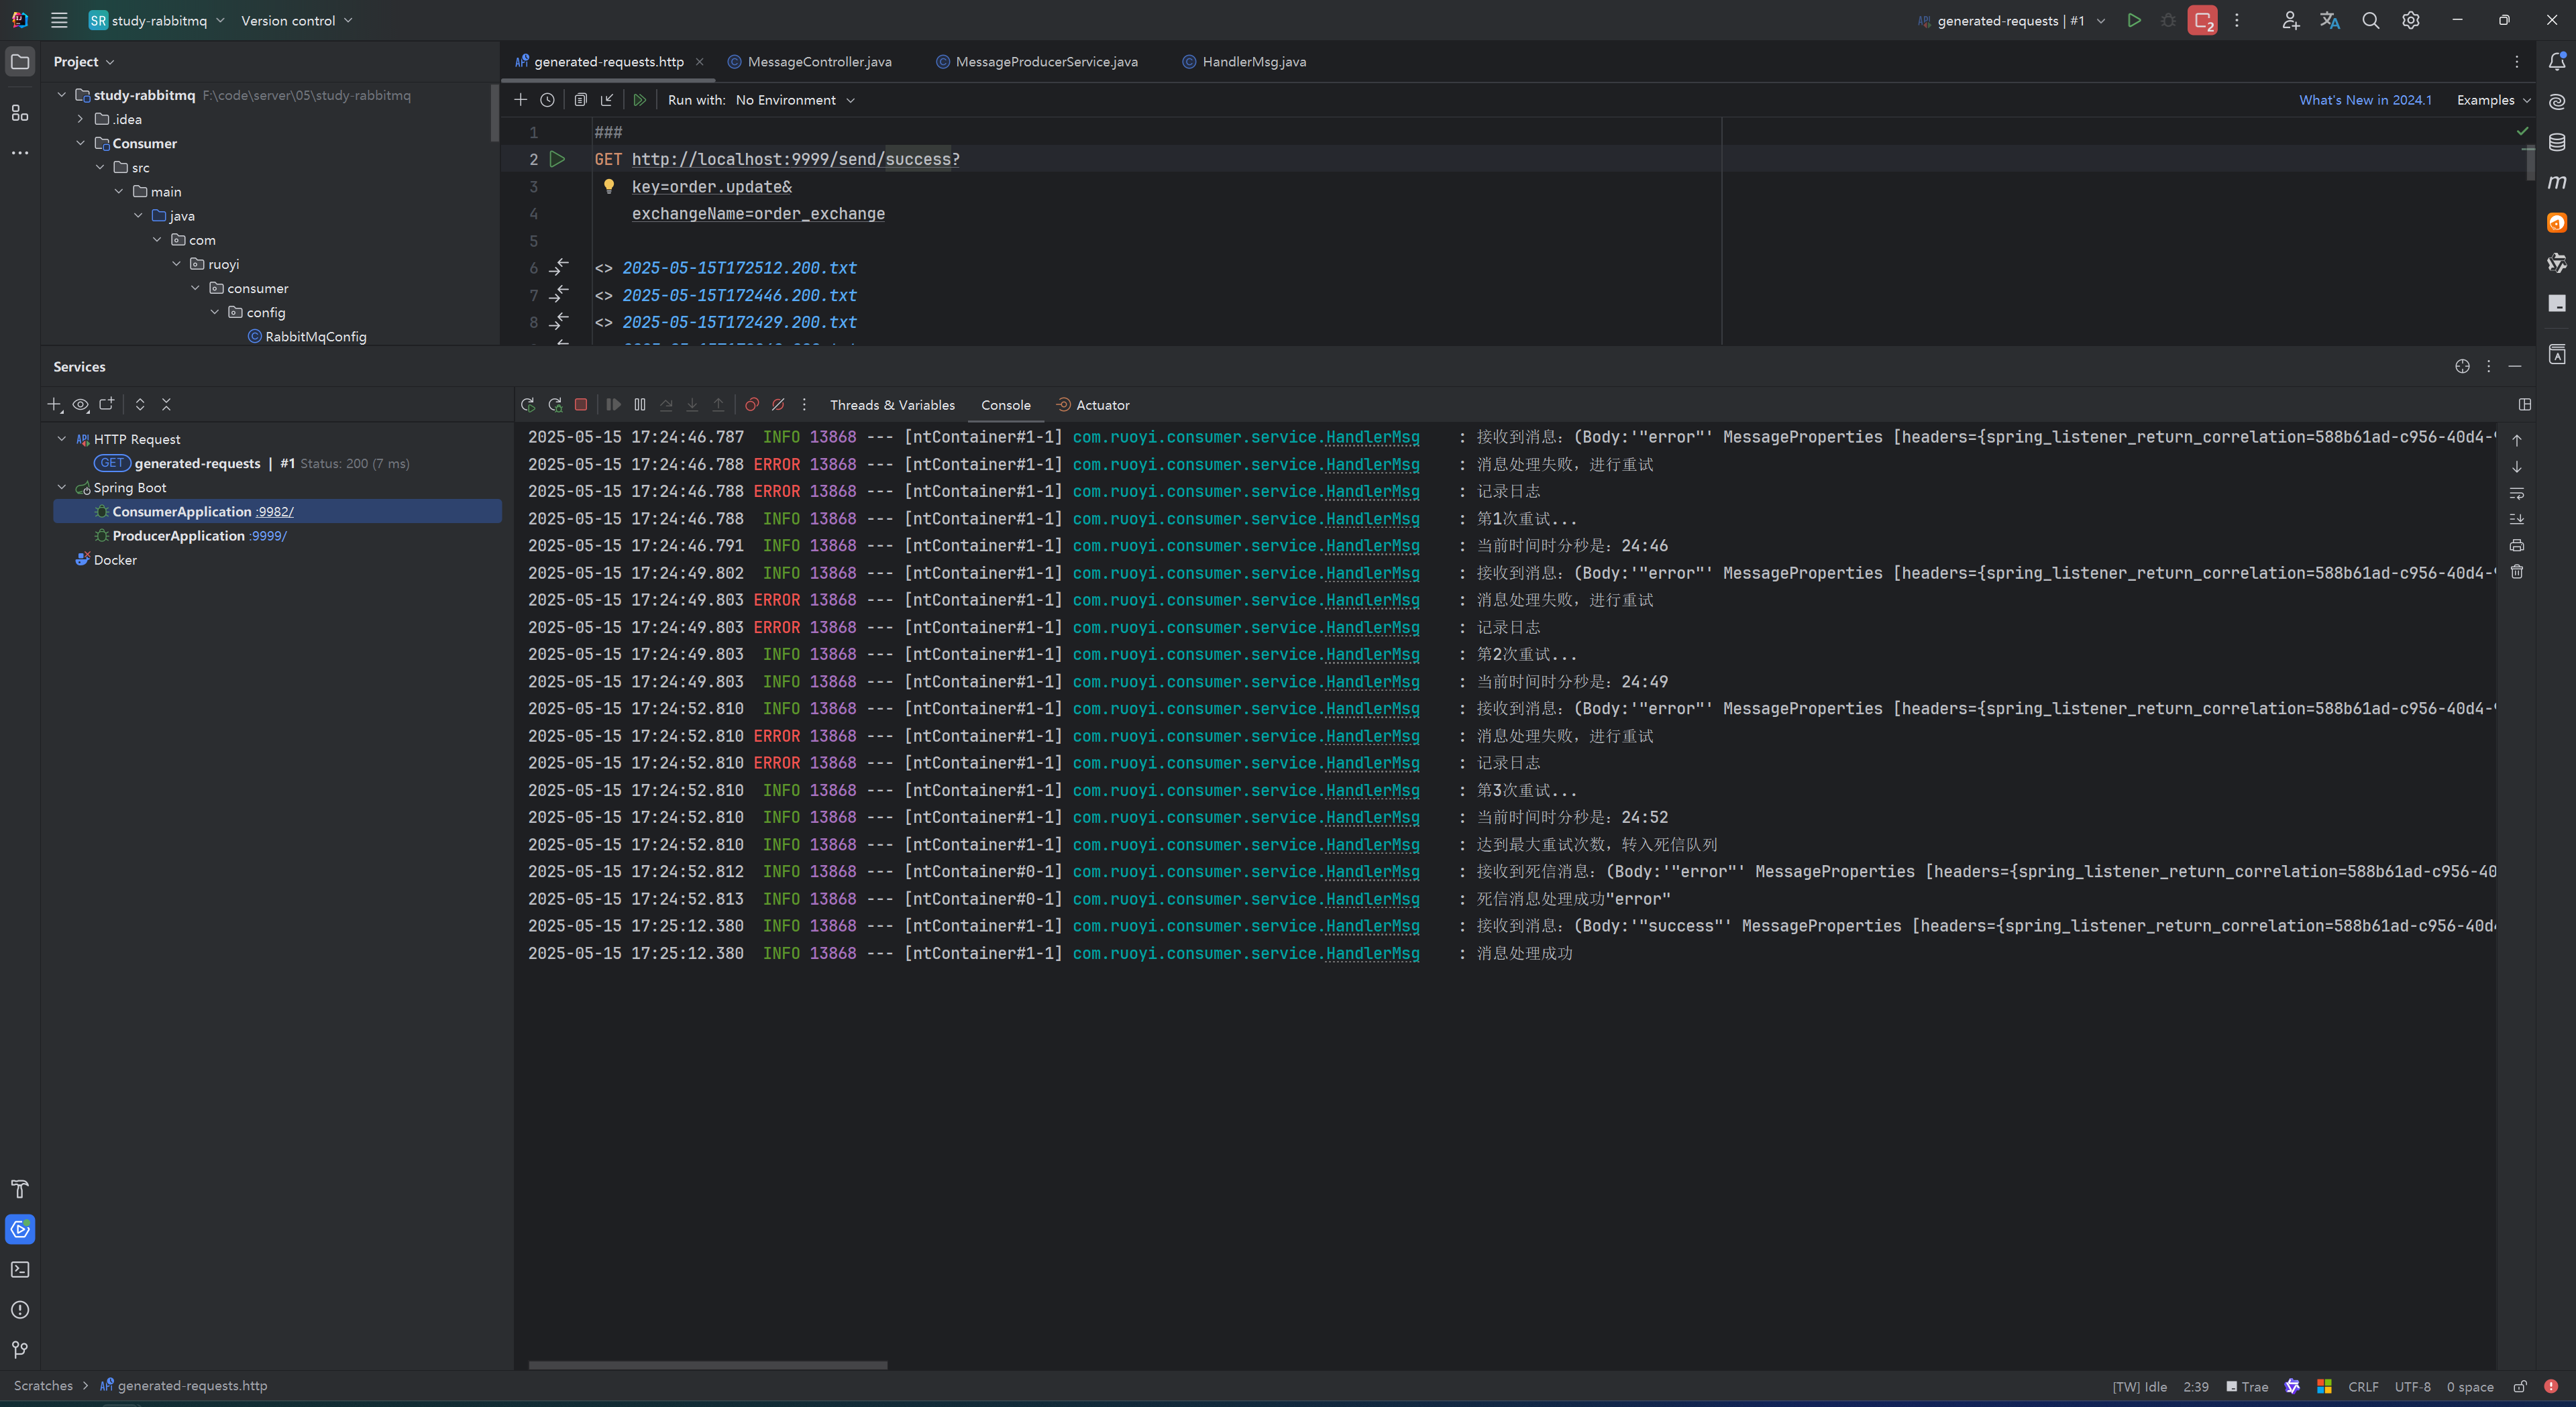
直接搭建一个带重试和带间隔时间还有死信的队列:建议手动写,不copy,copy多了sout怎么写都忘了 : )
消费端
1、队列配置
import com.rabbitmq.client.AMQP;
import org.springframework.amqp.core.*;
import org.springframework.beans.factory.annotation.Qualifier;
import org.springframework.context.annotation.Bean;
import org.springframework.context.annotation.Configuration;

import java.util.HashMap;
import java.util.Map;

@Configuration
public class RabbitMqConfig {

    public static final String ORDER_EXCHANGE_NAME = "order_exchange";

    public static final String ORDER_QUEUE_NAME = "order_queue";

    public static final String ORDER_ROUTING_KEY = "order.#";

    public static final String ORDER_DEAD_QUEUE = "order_dead_queue";

    public static final String ORDER_DEAD_ROUTING_KEY = "order.dead.#";

    public static final String ORDER_DEAD_EXCHANGE = "order_dead_exchange";

    /**
     * 订单重试队列
     */
    public static final String ORDER_RETRY_QUEUE = "order_retry_queue";
    /**
     * 订单重试队列的路由键
     */
    public static final String ORDER_RETRY_ROUTING_KEY = "order.retry.#";
    /**
     * 订单重试交换机
     */
    public static final String ORDER_RETRY_EXCHANGE = "order_retry_exchange";


    /**
     * 创建一个订单队列
     * @return Queue
     * 设置死信队列,死信队列的参数设置
     */
    @Bean(name = "orderQueue")
    public Queue orderQueue(){
        Map<String, Object> args = new HashMap<>();
        // 设置重试队列的参数
        args.put("x-dead-letter-exchange", ORDER_DEAD_EXCHANGE);
        // 重试队列的路由键
        args.put("x-dead-letter-routing-key", ORDER_DEAD_ROUTING_KEY);
        // args.put("x-max-length", 10);
        // args.put("x-message-ttl", 3000);
        return new Queue(ORDER_QUEUE_NAME, false, false, true, args);
    }


    /**
     * 创建一个订单交换机(topic类型的交换机)
     * @return DirectExchange
     */
    @Bean(name = "orderExchange")
    public Exchange orderExchange(){
        return new TopicExchange(ORDER_EXCHANGE_NAME,false,true);
    }

    /**
     * 绑定订单队列和订单交换机
     * @param queue 队列
     * @param exchange 交换机
     * @return Binding
     */
    @Bean
    public Binding bindOrderQueueWithExchange(@Qualifier("orderQueue") Queue queue, @Qualifier("orderExchange") Exchange exchange){
        return BindingBuilder.bind(queue).to(exchange).with(ORDER_ROUTING_KEY).noargs();
    }

    /**
     * 创建一个死信队列
     * @return Queue
     */
    @Bean(name = "deadQueue")
    public Queue deadQueue(){
        return new Queue(ORDER_DEAD_QUEUE, false, false, true);
    }

    /**
     * 创建一个死信交换机
     * @return DirectExchange
     */
    @Bean(name = "deadExchange")
    public Exchange deadExchange(){
        return new TopicExchange(ORDER_DEAD_EXCHANGE,false,true);
    }

    /**
     * 绑定死信队列和死信交换机
     * @param queue 死信队列
     * @param exchange 死信交换机
     * @return Binding
     */
    @Bean
    public Binding bindDeadQueueWithExchange(@Qualifier("deadQueue") Queue queue, @Qualifier("deadExchange") Exchange exchange){
        return BindingBuilder.bind(queue).to(exchange).with(ORDER_DEAD_ROUTING_KEY).noargs();
    }

    /**
     * 创建一个订单重试队列
     * @return Queue
     */
    @Bean(name = "orderRetryQueue")
    public Queue orderRetryQueue() {
        Map<String, Object> args = new HashMap<>();
        // 设置死信队列的参数为订单队列
        args.put("x-dead-letter-exchange", ORDER_EXCHANGE_NAME);
        // 死信队列的路由键 为订单队列的路由键
        args.put("x-dead-letter-routing-key", ORDER_ROUTING_KEY);
        // 设置消息的过期时间
        args.put("x-message-ttl", 3000);
        return new Queue(ORDER_RETRY_QUEUE, false, false, true, args);
    }

    /**
     * 创建一个订单重试交换机
     * @return DirectExchange
     */
    @Bean("orderRetryExchange")
    public Exchange orderRetryExchange() {
        return new TopicExchange(ORDER_RETRY_EXCHANGE, false, true);
    }

    /**
     * 绑定订单重试队列和订单重试交换机
     * @param queue 订单重试队列
     * @param exchange 订单重试交换机
     * @return Binding
     */
    @Bean
    public Binding bindOrderRetryQueueWithExchange(@Qualifier("orderRetryQueue") Queue queue, @Qualifier("orderRetryExchange") Exchange exchange) {
        return BindingBuilder.bind(queue).to(exchange).with(ORDER_RETRY_ROUTING_KEY).noargs();
    }
}
2、处理消息类:
import com.rabbitmq.client.Channel;
import com.ruoyi.consumer.config.RabbitMqConfig;
import lombok.extern.slf4j.Slf4j;
import org.springframework.amqp.core.Message;
import org.springframework.amqp.rabbit.annotation.RabbitListener;
import org.springframework.amqp.rabbit.core.RabbitTemplate;
import org.springframework.amqp.support.AmqpHeaders;
import org.springframework.beans.factory.annotation.Autowired;
import org.springframework.messaging.handler.annotation.Header;
import org.springframework.stereotype.Service;

import java.io.IOException;
import java.time.LocalDateTime;
import java.util.Map;

import static com.ruoyi.consumer.config.RabbitMqConfig.ORDER_RETRY_EXCHANGE;
import static com.ruoyi.consumer.config.RabbitMqConfig.ORDER_RETRY_QUEUE;

/**
 *
 * @Package: com.ruoyi.consumer.service
 * @CreateTime: 2025-05-15
 * @Description:
 * @Version: 1.0
 */
@Slf4j
@Service
public class HandlerMsg {

    @Autowired
    private RabbitTemplate rabbitTemplate;

    @RabbitListener(queues = RabbitMqConfig.ORDER_QUEUE_NAME)
    public void handleMessage(Message message, Channel channel,@Header(AmqpHeaders.DELIVERY_TAG) long deliveryTag,
                              @Header(name = "x-retry-count", required = false) Integer retryCount) throws IOException {
        log.info("接收到消息:{}", message);
        String msg = new String(message.getBody());
        if(msg.contains("error")){
            log.error("消息处理失败,进行重试");
            log.error("记录日志");
            int currentRetryCount = (retryCount == null) ? 0 : retryCount;
            log.info("第{}次重试...", currentRetryCount + 1);
            log.info("当前时间时分秒是:{}:{}", LocalDateTime.now().getMinute(), LocalDateTime.now().getSecond());
            if (currentRetryCount < 2) { // 最多重试3次(0,1,2)
                // 将消息投递到延迟队列(3秒后重新处理)
                sendMessageToRetryQueue(message, currentRetryCount + 1);
                log.info("当前消息的id是:{}", message.getMessageProperties().getMessageId() + "当前消息的路由键是:" + message.getMessageProperties().getReceivedRoutingKey() + "当前消息的交换机是:" + message.getMessageProperties().getReceivedExchange());
            } else {
                log.info("达到最大重试次数,转入死信队列");
                // 手动拒绝消息(不重新入队,进入死信队列)
                channel.basicNack(deliveryTag, false, false);
            }
        }else {
            log.info("消息处理成功");
            channel.basicAck(message.getMessageProperties().getDeliveryTag(), false);
        }

    }

    @RabbitListener(queues = RabbitMqConfig.ORDER_DEAD_QUEUE)
    public void handleDeadMessage(Message message, Channel channel) throws IOException {
        log.info("接收到死信消息:{}", message +"消息id是:" + message.getMessageProperties().getMessageId());
        String msg = new String(message.getBody());
        log.info("死信消息处理成功{}", msg);
        channel.basicAck(message.getMessageProperties().getDeliveryTag(), false);
    }

    public void sendMessageToRetryQueue(Message message,  int retryCount) {
        // 实现发送消息到重试队列的逻辑
        // 可以使用RabbitTemplate发送消息到重试队列
        // 修改消息头,增加重试次数
        message.getMessageProperties().setHeader("x-retry-count", retryCount);
        // 发送到延迟交换器
        rabbitTemplate.convertAndSend(
                ORDER_RETRY_EXCHANGE,
                "order.retry.error",
                message
        );
    }
}
3、YML文件
spring:
  rabbitmq:
    host: 192.168.237.129
    port: 5673
    username: guest
    password: guest
    # 消费者配置
    listener:
      simple:
        #        开启手动应答
        acknowledge-mode: manual
server:
  port: 9982
生产者端
1、配置
import lombok.extern.slf4j.Slf4j;
import org.springframework.amqp.core.*;
import org.springframework.amqp.rabbit.connection.ConnectionFactory;
import org.springframework.amqp.rabbit.core.RabbitTemplate;
import org.springframework.amqp.support.converter.Jackson2JsonMessageConverter;
import org.springframework.amqp.support.converter.MessageConverter;
import org.springframework.context.annotation.Bean;
import org.springframework.context.annotation.Configuration;
@Slf4j
@Configuration
public class RabbitMQConfig {
// 配置消息转换器
@Bean
public MessageConverter jsonMessageConverter() {
return new Jackson2JsonMessageConverter();
}
// 配置RabbitTemplate,用于发送消息
/**
* 配置消息是否到交换机,消息是否到队列的回调函数
* @param connectionFactory 连接工厂
* @return RabbitTemplate
*/
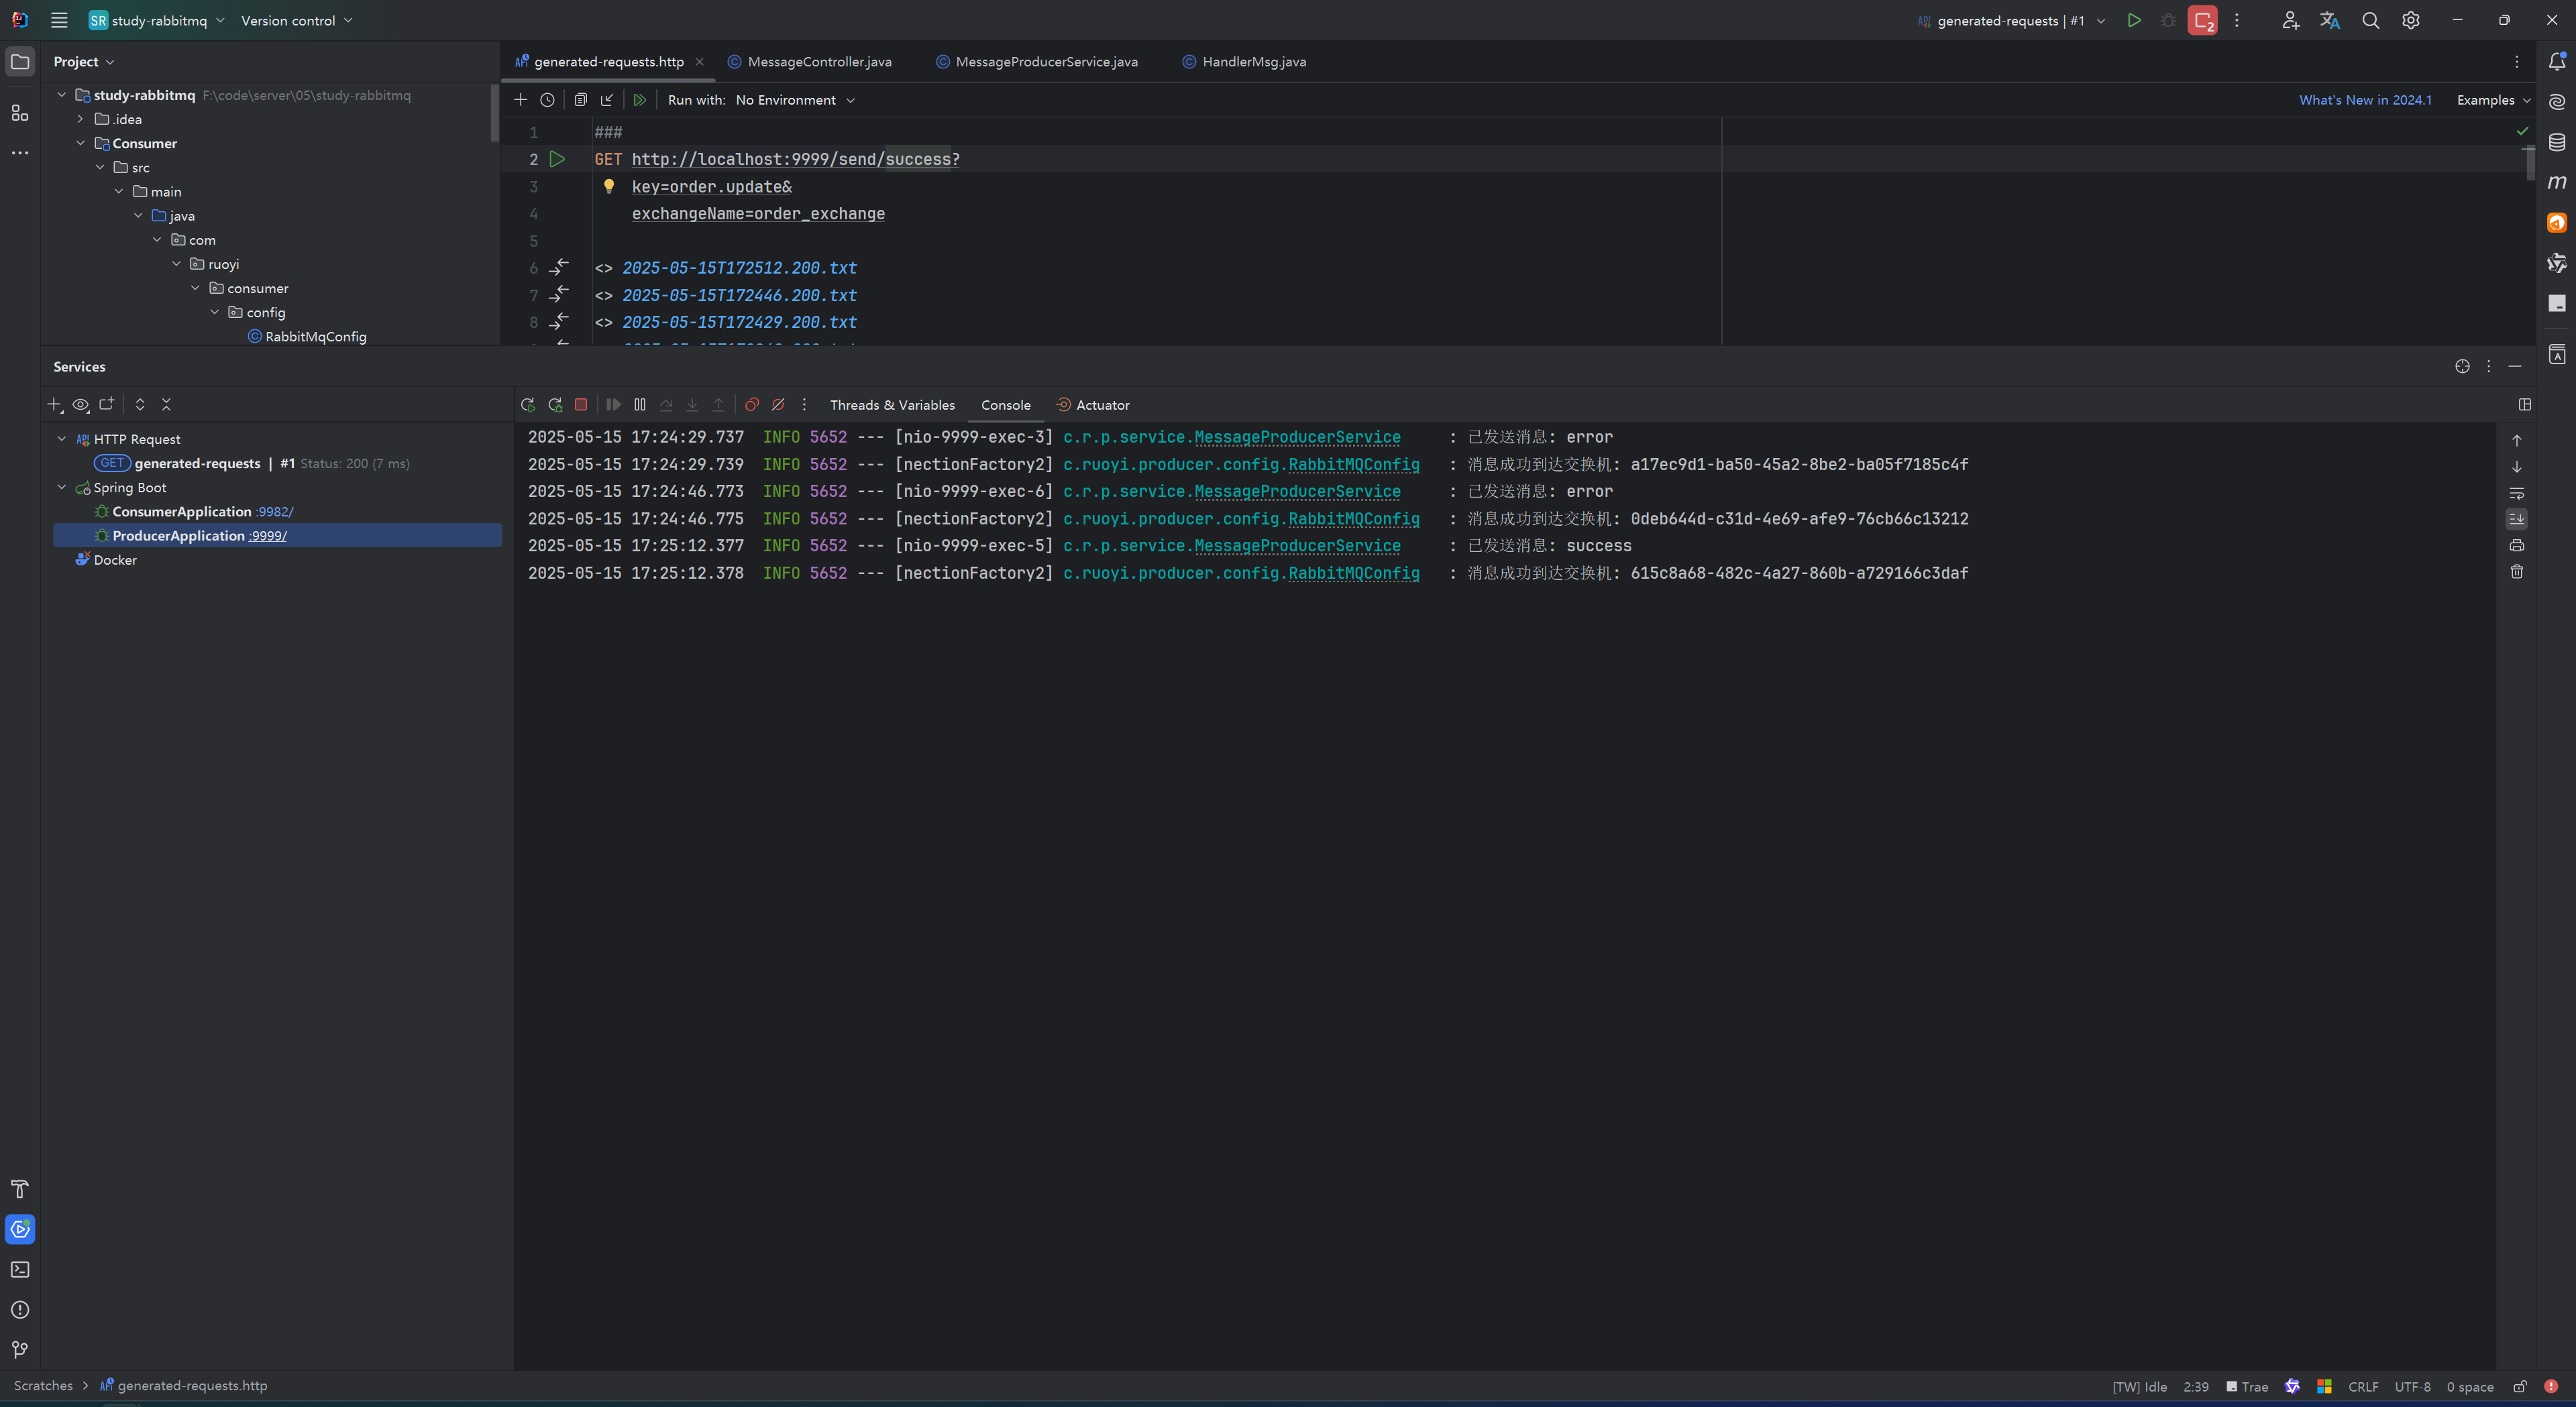
@Bean
public RabbitTemplate rabbitTemplate(ConnectionFactory connectionFactory) {
RabbitTemplate rabbitTemplate = new RabbitTemplate(connectionFactory);
rabbitTemplate.setMessageConverter(jsonMessageConverter());
// 设置确认回调
rabbitTemplate.setConfirmCallback((correlationData, ack, cause) -> {
if (ack) {
log.info("消息成功到达交换机: {}", correlationData != null ? correlationData.getId() : "null");
} else {
log.info("消息未能到达交换机,原因: {}记录数据库消息ID:{}", cause, correlationData.getId());
}
});
// 设置返回回调(当消息无法路由到队列时触发)
rabbitTemplate.setReturnsCallback(returned -> {
log.info("消息从交换机路由到队列失败: {}, 应答码: {}, 原因: {}, 交换机: {}, 路由键: {}", returned.getMessage(), returned.getReplyCode(), returned.getReplyText(), returned.getExchange(), returned.getRoutingKey());
});
// 必须设置为true,否则不会触发返回回调
rabbitTemplate.setMandatory(true);
return rabbitTemplate;
}
}2、业务类
import com.ruoyi.producer.config.RabbitMQConfig;
import lombok.extern.slf4j.Slf4j;
import org.springframework.amqp.core.Message;
import org.springframework.amqp.core.MessageProperties;
import org.springframework.amqp.rabbit.connection.CorrelationData;
import org.springframework.amqp.rabbit.core.RabbitTemplate;
import org.springframework.beans.BeanUtils;
import org.springframework.beans.factory.annotation.Autowired;
import org.springframework.stereotype.Service;
import org.springframework.transaction.annotation.Transactional;

import java.util.UUID;

@Slf4j
@Service
public class MessageProducerService {

    public static final String ORDER_EXCHANGE_NAME = "order_exchange";


    private final RabbitTemplate rabbitTemplate;

    @Autowired
    public MessageProducerService(RabbitTemplate rabbitTemplate) {
        this.rabbitTemplate = rabbitTemplate;
    }

    public void sendMessage(Object message, String routingKey, String exchangeName) {
        String  messageId = java.util.UUID.randomUUID().toString();

        // 生成唯一消息ID(可以是业务ID或UUID)

        // 设置消息属性(可选,但推荐)
        MessageProperties props = new MessageProperties();
        props.setCorrelationId(messageId); // 设置消息ID
        Message msg = new Message(message.toString().getBytes(), props);

        // 发送消息,并关联 CorrelationData
        CorrelationData correlationData = new CorrelationData(messageId);
        rabbitTemplate.convertAndSend(exchangeName, routingKey, message, correlationData);


        log.info("已发送消息: {}", message);
    }
}
3、测试controller
import com.ruoyi.producer.service.MessageProducerService;
import org.springframework.beans.factory.annotation.Autowired;
import org.springframework.web.bind.annotation.GetMapping;
import org.springframework.web.bind.annotation.PathVariable;
import org.springframework.web.bind.annotation.PostMapping;
import org.springframework.web.bind.annotation.RequestBody;
import org.springframework.web.bind.annotation.RequestParam;
import org.springframework.web.bind.annotation.RequestPart;
import org.springframework.web.bind.annotation.RestController;

import static com.ruoyi.producer.service.MessageProducerService.ORDER_EXCHANGE_NAME;

@RestController
public class MessageController {

    private final MessageProducerService messageProducerService;

    @Autowired
    public MessageController(MessageProducerService messageProducerService) {
        this.messageProducerService = messageProducerService;
    }

    @GetMapping("/send/{message}")
    public String sendMessage(@PathVariable String message, @RequestParam String key , @RequestParam String exchangeName) {
        String queue = key == null ? "order.create" : key;
        String exchange = exchangeName == null ? ORDER_EXCHANGE_NAME : exchangeName;
        messageProducerService.sendMessage(message,  queue, exchange);
        return "消息已发送: " + message;
    }
}
4、YML文件
功到达交换机
    publisher-returns: true # 启用发布返回,确认消息是否成功路由到队列(若无法路由,会触发 ReturnCallback)
    host: 192.168.237.129
    port: 5673
    username: guest
    password: guest
    virtual-host: /

server:
  port: 9999
依赖
<?xml version="1.0" encoding="UTF-8"?>
<project xmlns="http://maven.apache.org/POM/4.0.0" xmlns:xsi="http://www.w3.org/2001/XMLSchema-instance"
         xsi:schemaLocation="http://maven.apache.org/POM/4.0.0 https://maven.apache.org/xsd/maven-4.0.0.xsd">
    <modelVersion>4.0.0</modelVersion>
    <groupId>com.liudi</groupId>
    <artifactId>study-rabbitmq</artifactId>
    <version>0.0.1-SNAPSHOT</version>
    <name>study-rabbitmq</name>
    <description>study-rabbitmq</description>
    <properties>
        <java.version>1.8</java.version>
        <project.build.sourceEncoding>UTF-8</project.build.sourceEncoding>
        <project.reporting.outputEncoding>UTF-8</project.reporting.outputEncoding>
        <spring-boot.version>2.6.13</spring-boot.version>
    </properties>
    <packaging>pom</packaging>
    <dependencies>
        <dependency>
            <groupId>org.springframework.boot</groupId>
            <artifactId>spring-boot-starter-amqp</artifactId>
        </dependency>
        <dependency>
            <groupId>org.springframework.boot</groupId>
            <artifactId>spring-boot-starter-web</artifactId>
        </dependency>

        <dependency>
            <groupId>org.projectlombok</groupId>
            <artifactId>lombok</artifactId>
            <optional>true</optional>
        </dependency>
        <dependency>
            <groupId>org.springframework.boot</groupId>
            <artifactId>spring-boot-starter-test</artifactId>
            <scope>test</scope>
        </dependency>
        <dependency>
            <groupId>org.springframework.amqp</groupId>
            <artifactId>spring-rabbit-test</artifactId>
            <scope>test</scope>
        </dependency>
    </dependencies>
    <dependencyManagement>
        <dependencies>
            <dependency>
                <groupId>org.springframework.boot</groupId>
                <artifactId>spring-boot-dependencies</artifactId>
                <version>${spring-boot.version}</version>
                <type>pom</type>
                <scope>import</scope>
            </dependency>
        </dependencies>
    </dependencyManagement>

    <build>
        <plugins>
            <plugin>
                <groupId>org.apache.maven.plugins</groupId>
                <artifactId>maven-compiler-plugin</artifactId>
                <version>3.8.1</version>
                <configuration>
                    <source>1.8</source>
                    <target>1.8</target>
                    <encoding>UTF-8</encoding>
                </configuration>
            </plugin>
            <plugin>
                <groupId>org.springframework.boot</groupId>
                <artifactId>spring-boot-maven-plugin</artifactId>
                <version>${spring-boot.version}</version>
                <configuration>
                    <mainClass>com.ruoyi.studyrabbitmq.StudyRabbitmqApplication</mainClass>
                    <skip>true</skip>
                </configuration>
                <executions>
                    <execution>
                        <id>repackage</id>
                        <goals>
                            <goal>repackage</goal>
                        </goals>
                    </execution>
                </executions>
            </plugin>
        </plugins>
    </build>

</project>
代码规范不管了
大概就这样


 695
695

 被折叠的 条评论
为什么被折叠?
被折叠的 条评论
为什么被折叠?
 到【灌水乐园】发言


