


目录
TestNG&NGReport
本文介绍三种测试报告
第一种 生成TestNG自带的默认报告Use Default Reportters
TestNG.xml里的内容正常配置,没有专门为这个报告形式配置的内容,如下所示:
配置Run/Debug
点击右上角Edit Configurations打开配置编辑:
打开后选中要执行的文件,在监听器Listeners中勾选上Use default reporters:
然后执行testng.xml文件,会自动在项目结构中生成一个名为test-output的文件夹,其中保存着运行对应测试用例生成的测试报告及各数据文件:
查看报告
直接在浏览器中打开:


第二种 ReportNG
在testng.xml中配置监听:
接着我们要在POM.xml文件中添加ReportNG的依赖:
<!-- https://mvnrepository.com/artifact/org.uncommons/reportng -->
<dependency>
<groupId>org.uncommons</groupId>
<artifactId>reportn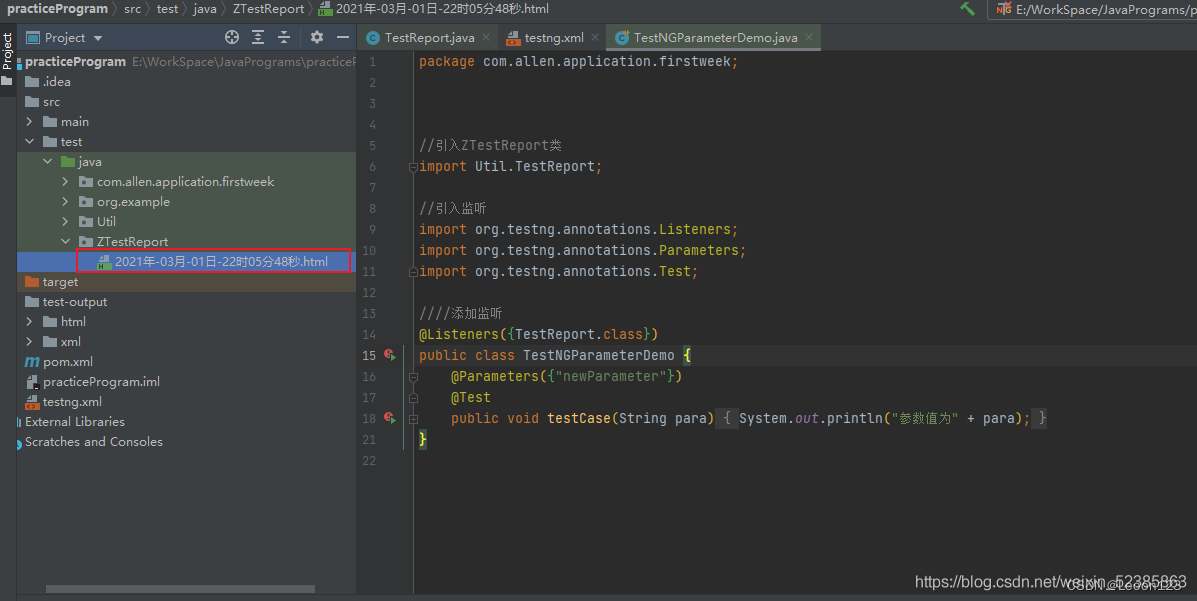
g</artifactId>
<version>1.1.4</version>
<scope>test</scope>
<exclusions>
<exclusion>
<groupId>org.testng</groupId>
<artifactId>testng</artifactId>
</exclusion>
</exclusions>
</dependency>
<!-- https://mvnrepository.com/artifact/com.google.inject/guice -->
<dependency>
<groupId>com.google.inject</groupId>
<artifactId>guice</artifactId>
<version>4.2.0</version>
<scope>test</scope>
</dependency>
<!-- https://mvnrepository.com/artifact/velocity/velocity-dep -->
<dependency>
<groupId>velocity</groupId>
<artifactId>velocity-dep</artifactId>
<version>1.4</version>
</dependency>
    <!-- https://mvnrepository.com/artifact/com.google.code.gson/gson -->
    <dependency>
      <groupId>com.google.code.gson</groupId>
      <artifactId>gson</artifactId>
      <version>2.8.0</version>
    </dependency>
<!-- https://mvnrepository.com/artifact/org.uncommons/reportng -->
<dependency>
<groupId>org.uncommons</groupId>
<artifactId>reportng</artifactId>
<version>1.1.4</version>
<scope>test</scope>
<exclusions>
<exclusion>
<groupId>org.testng</groupId>
<artifactId>testng</artifactId>
</exclusion>
</exclusions>
</dependency>
<!-- https://mvnrepository.com/artifact/com.google.inject/guice -->
<dependency>
<groupId>com.google.inject</groupId>
<artifactId>guice</artifactId>
<version>4.2.0</version>
<scope>test</scope>
</dependency>
<!-- https://mvnrepository.com/artifact/velocity/velocity-dep -->
<dependency>
<groupId>velocity</groupId>
<artifactId>velocity-dep</artifactId>
<version>1.4</version>
</dependency>
并且在 Edit Configurations中,将监听器Listeners 下 Use Default Reporters的勾选配置取消:
执行testng.xml文件
生成的测试报告及数据同样存放在test-output文件夹下,打开index.html测试报告文件:


第三种 ZTestReport
使用ZTestReport方式一:
ZTestReport同Python中BeautifulReport类似
配置POM.xml文件,添加依赖:
<!-- https://mvnrepository.com/artifact/com.google.code.gson/gson -->
<dependency>
<groupId>com.google.code.gson</groupId>
<artifactId>gson</artifactId>
<version>2.8.0</version>
</dependency>
把ZTestReport的Java文件和报告模板文件放到项目中,手动复制,我是在项目结构中创建了一个Util工具包存放,就需要修改下ZTestReport文件中引入报告模板及生成报告的路径:
然后在测试类上添加监听:
//引入 ZTestReport 类
import Util.TestReport;
//引入监听
import org.testng.annotations.Listeners;
import org.testng.annotations.Parameters;
import org.testng.annotations.Test;
//添加监听
@Listeners({TestReport.class})
public class TestNGParameterDemo {
	@Parameters({"newParameter"})
	@Test
	public void testCase(String para){
		System.out.println("参数值为" + para);
并且去掉testng.xml文件中对原有报告的监听,然后执行testng.xml文件:
生成对应的测试报告文件:

使用ZTestReport方式二:
还可以直接在testng.xml文件中加入监听:
将要生成测试报告数据的类名、
方法名称添加到testng.xml文件中,在加入监听后,运行testng.xml,即会生成对应报告。

推荐使用ZTestReport报告,既美观,且展示数据简洁。
ZTestReport最重要的两个文件TestReport,template


相应文件的资料可以参考:https://github.com/zhangfei19841004/ztest/blob/master/README.md
TestReport
粘贴不下,自己百度,到处有
template
自己百度,或者到我的主页去下载


 2667
2667

 被折叠的 条评论
为什么被折叠?
被折叠的 条评论
为什么被折叠?
 到【灌水乐园】发言


