


Qwen2(https://modelscope.cn/models/qwen/Qwen2-1.5B-Instruct/summary)是通义千问团队最近开源的大语言模型,由阿里云通义实验室研发。
以Qwen2作为基座大模型,通过指令微调的方式做高精度文本分类,是学习LLM微调的入门任务。

在本文中,我们会使用 Qwen2-1.5b-Instruct(https://modelscope.cn/models/qwen/Qwen2-1.5B-Instruct/summary) 模型在 复旦中文新闻 (https://modelscope.cn/datasets/huangjintao/zh_cls_fudan-news/summary)数据集上做指令微调训练,同时使用SwanLab监控训练过程、评估模型效果。
显存要求不高,10GB左右就可以跑。
-
代码: 完整代码直接看本文第5节 或 Github(https://github.com/Zeyi-Lin/LLM-Finetune),Jupyter Notebook(https://github.com/Zeyi-Lin/LLM-Finetune/blob/main/train_qwen2.ipynb)
-
实验日志过程: Qwen2-1.5B-Fintune - SwanLab(https://swanlab.cn/@ZeyiLin/Qwen2-fintune/runs/cfg5f8dzkp6vouxzaxlx6/chart)
-
模型: Modelscope(https://modelscope.cn/models/qwen/Qwen2-1.5B-Instruct/summary)
-
数据集: zh_cls_fudan_news(https://modelscope.cn/datasets/huangjintao/zh_cls_fudan-news/summary)
-
SwanLab: https://swanlab.cn(https://swanlab.cn/)
本教程参考了焦躁的冷味姜汁ttb的这篇文章(https://zhuanlan.zhihu.com/p/701370317)。
知识点:什么是指令微调?
大模型指令微调(Instruction Tuning)是一种针对大型预训练语言模型的微调技术,其核心目的是增强模型理解和执行特定指令的能力,使模型能够根据用户提供的自然语言指令准确、恰当地生成相应的输出或执行相关任务。
指令微调特别关注于提升模型在遵循指令方面的一致性和准确性,从而拓宽模型在各种应用场景中的泛化能力和实用性。
https://zhuanlan.zhihu.com/p/695378820
在实际应用中,我的理解是,指令微调更多把LLM看作一个更智能、更强大的传统NLP模型(比如Bert),来实现更高精度的文本预测任务。所以这类任务的应用场景覆盖了以往NLP模型的场景,甚至很多团队拿它来标注互联网数据。
下面是实战正片:
1.环境安装
本案例基于Python>=3.8,请在您的计算机上安装好Python;
另外,您的计算机上至少要有一张英伟达显卡(显存要求并不高,大概10GB左右就可以跑)。
我们需要安装以下这几个Python库,在这之前,请确保你的环境内已安装了pytorch以及CUDA:
swanlab
modelscope
transformers
datasets
peft
accelerate
pandas
一键安装命令:
pip install swanlab modelscope transformers datasets peft pandas accelerate
本案例测试于modelscope1.14.0、transformers4.41.2、datasets2.18.0、peft0.11.1、accelerate0.30.1、swanlab0.3.9
2.准备数据集
本案例使用的是zh_cls_fudan-news(https://modelscope.cn/datasets/huangjintao/zh_cls_fudan-news/summary)数据集,该数据集主要被用于训练文本分类模型。
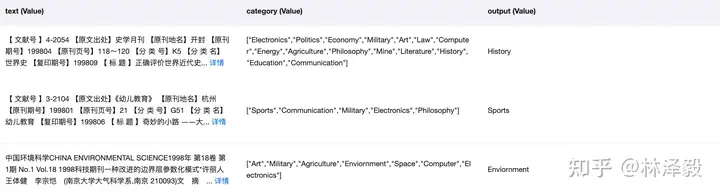
该数据集由几千条数据组成,每条数据包含text、category、output三列:
-
text 是训练语料,内容是书籍或新闻的文本内容;
-
category 是text的多个备选类型组成的列表;
-
output 则是text唯一真实的类型。
将三者组合成数据集的例子如下:
"""``[PROMPT]``Text: 第四届全国大企业足球赛复赛结束新华社郑州5月3日电(实习生田兆运)上海大隆机器厂队昨天在洛阳进行的第四届牡丹杯全国大企业足球赛复赛中,以5:4力克成都冶金实验厂队,进入前四名。沪蓉之战,双方势均力敌,90分钟不分胜负。最后,双方互射点球,沪队才以一球优势取胜。复赛的其它3场比赛,青海山川机床铸造厂队3:0击败东道主洛阳矿山机器厂队,青岛铸造机械厂队3:1战胜石家庄第一印染厂队,武汉肉联厂队1:0险胜天津市第二冶金机械厂队。在今天进行的决定九至十二名的两场比赛中,包钢无缝钢管厂队和河南平顶山矿务局一矿队分别击败河南平顶山锦纶帘子布厂队和江苏盐城无线电总厂队。4日将进行两场半决赛,由青海山川机床铸造厂队和青岛铸造机械厂队分别与武汉肉联厂队和上海大隆机器厂队交锋。本届比赛将于6日结束。(完)``Category: Sports, Politics``Output:`` ``[OUTPUT]``Sports``"""
我们的训练任务,便是希望微调后的大模型能够根据Text和Category组成的提示词(Prompt),预测出正确的Output。
我们将数据集下载到本地目录下。下载方式是前往zh_cls_fudan-news - 魔搭社区(https://modelscope.cn/datasets/huangjintao/zh_cls_fudan-news/files),将train.jsonl和test.jsonl下载到本地根目录下即可:
3. 加载模型
这里我们使用modelscope下载Qwen2-1.5B-Instruct模型(modelscope在国内,所以下载不用担心速度和稳定性问题),然后把它加载到Transformers中进行训练:
from modelscope import snapshot_download, AutoTokenizer``from transformers import AutoModelForCausalLM, TrainingArguments, Trainer, DataCollatorForSeq2Seq`` ``# 在modelscope上下载Qwen模型到本地目录下``model_dir = snapshot_download("qwen/Qwen2-1.5B-Instruct", cache_dir="./", revision="master")`` ``# Transformers加载模型权重``tokenizer = AutoTokenizer.from_pretrained("./qwen/Qwen2-1___5B-Instruct/", use_fast=False, trust_remote_code=True)``model = AutoModelForCausalLM.from_pretrained("./qwen/Qwen2-1___5B-Instruct/", device_map="auto", torch_dtype=torch.bfloat16)``
4. 配置训练可视化工具
我们使用SwanLab来监控整个训练过程,并评估最终的模型效果。
这里直接使用SwanLab和Transformers的集成来实现,更多用法可以参考官方文档(https://docs.swanlab.cn/zh/guide_cloud/integration/integration-huggingface-transformers.html):
from swanlab.integration.huggingface import SwanLabCallback``from transformers import Trainer`` ``swanlab_callback = SwanLabCallback(...)`` ``trainer = Trainer(` `...` `callbacks=[swanlab_callback],``)
如果你是第一次使用SwanLab,那么还需要去https://swanlab.cn上注册一个账号,在用户设置页面复制你的API Key,然后在训练开始时粘贴进去即可:

- 完整代码 开始训练时的目录结构:
|--- train.py``|--- train.jsonl``|--- test.jsonl
train.py:
import json``import pandas as pd``import torch``from datasets import Dataset``from modelscope import snapshot_download, AutoTokenizer``from swanlab.integration.huggingface import SwanLabCallback``from peft import LoraConfig, TaskType, get_peft_model``from transformers import AutoModelForCausalLM, TrainingArguments, Trainer, DataCollatorForSeq2Seq``import os``import swanlab`` `` ``def dataset_jsonl_transfer(origin_path, new_path):` `"""` `将原始数据集转换为大模型微调所需数据格式的新数据集` `"""` `messages = []`` ` `# 读取旧的JSONL文件` `with open(origin_path, "r") as file:` `for line in file:` `# 解析每一行的json数据` `data = json.loads(line)` `context = data["text"]` `catagory = data["category"]` `label = data["output"]` `message = {` `"instruction": "你是一个文本分类领域的专家,你会接收到一段文本和几个潜在的分类选项,请输出文本内容的正确类型",` `"input": f"文本:{context},类型选型:{catagory}",` `"output": label,` `}` `messages.append(message)`` ` `# 保存重构后的JSONL文件` `with open(new_path, "w", encoding="utf-8") as file:` `for message in messages:` `file.write(json.dumps(message, ensure_ascii=False) + "\n")`` `` ``def process_func(example):` `"""` `将数据集进行预处理` `"""` `MAX_LENGTH = 384`` input_ids, attention_mask, labels = [], [], []` `instruction = tokenizer(` `f"<|im_start|>system\n你是一个文本分类领域的专家,你会接收到一段文本和几个潜在的分类选项,请输出文本内容的正确类型<|im_end|>\n<|im_start|>user\n{example['input']}<|im_end|>\n<|im_start|>assistant\n",` `add_special_tokens=False,` `)` `response = tokenizer(f"{example['output']}", add_special_tokens=False)` `input_ids = instruction["input_ids"] + response["input_ids"] + [tokenizer.pad_token_id]` `attention_mask = (` `instruction["attention_mask"] + response["attention_mask"] + [1]` `)` `labels = [-100] * len(instruction["input_ids"]) + response["input_ids"] + [tokenizer.pad_token_id]` `if len(input_ids) > MAX_LENGTH: # 做一个截断` `input_ids = input_ids[:MAX_LENGTH]` `attention_mask = attention_mask[:MAX_LENGTH]` `labels = labels[:MAX_LENGTH]` `return {"input_ids": input_ids, "attention_mask": attention_mask, "labels": labels}` ` `` ``def predict(messages, model, tokenizer):` `device = "cuda"` `text = tokenizer.apply_chat_template(` `messages,` `tokenize=False,` `add_generation_prompt=True` `)` `model_inputs = tokenizer([text], return_tensors="pt").to(device)`` ` `generated_ids = model.generate(` `model_inputs.input_ids,` `max_new_tokens=512` `)` `generated_ids = [` `output_ids[len(input_ids):] for input_ids, output_ids in zip(model_inputs.input_ids, generated_ids)` `]`` ` `response = tokenizer.batch_decode(generated_ids, skip_special_tokens=True)[0]`` ` `print(response)`` ` `return response`` ``# 在modelscope上下载Qwen模型到本地目录下``model_dir = snapshot_download("qwen/Qwen2-1.5B-Instruct", cache_dir="./", revision="master")`` ``# Transformers加载模型权重``tokenizer = AutoTokenizer.from_pretrained("./qwen/Qwen2-1___5B-Instruct/", use_fast=False, trust_remote_code=True)``model = AutoModelForCausalLM.from_pretrained("./qwen/Qwen2-1___5B-Instruct/", device_map="auto", torch_dtype=torch.bfloat16)``model.enable_input_require_grads() # 开启梯度检查点时,要执行该方法`` ``# 加载、处理数据集和测试集``train_dataset_path = "train.jsonl"``test_dataset_path = "test.jsonl"`` ``train_jsonl_new_path = "new_train.jsonl"``test_jsonl_new_path = "new_test.jsonl"`` ``if not os.path.exists(train_jsonl_new_path):` `dataset_jsonl_transfer(train_dataset_path, train_jsonl_new_path)``if not os.path.exists(test_jsonl_new_path):` `dataset_jsonl_transfer(test_dataset_path, test_jsonl_new_path)`` ``# 得到训练集``train_df = pd.read_json(train_jsonl_new_path, lines=True)``train_ds = Dataset.from_pandas(train_df)``train_dataset = train_ds.map(process_func, remove_columns=train_ds.column_names)`` ``config = LoraConfig(` `task_type=TaskType.CAUSAL_LM,` `target_modules=["q_proj", "k_proj", "v_proj", "o_proj", "gate_proj", "up_proj", "down_proj"],` `inference_mode=False, # 训练模式` `r=8, # Lora 秩` `lora_alpha=32, # Lora alaph,具体作用参见 Lora 原理` `lora_dropout=0.1, # Dropout 比例``)`` ``model = get_peft_model(model, config)`` ``args = TrainingArguments(` `output_dir="./output/Qwen2",` `per_device_train_batch_size=4,` `gradient_accumulation_steps=4,` `logging_steps=10,` `num_train_epochs=2,` `save_steps=100,` `learning_rate=1e-4,` `save_on_each_node=True,` `gradient_checkpointing=True,` `report_to="none",``)`` ``swanlab_callback = SwanLabCallback(` `project="Qwen2-fintune",` `experiment_name="Qwen2-1.5B-Instruct",` `description="使用通义千问Qwen2-1.5B-Instruct模型在zh_cls_fudan-news数据集上微调。",` `config={` `"model": "qwen/Qwen2-1.5B-Instruct",` `"dataset": "huangjintao/zh_cls_fudan-news",` `}``)`` ``trainer = Trainer(` `model=model,` `args=args,` `train_dataset=train_dataset,` `data_collator=DataCollatorForSeq2Seq(tokenizer=tokenizer, padding=True),` `callbacks=[swanlab_callback],``)`` ``trainer.train()`` ``# 用测试集的前10条,测试模型``test_df = pd.read_json(test_jsonl_new_path, lines=True)[:10]`` ``test_text_list = []``for index, row in test_df.iterrows():` `instruction = row['instruction']` `input_value = row['input']`` ` `messages = [` `{"role": "system", "content": f"{instruction}"},` `{"role": "user", "content": f"{input_value}"}` `]`` ` `response = predict(messages, model, tokenizer)` `messages.append({"role": "assistant", "content": f"{response}"})` `result_text = f"{messages[0]}\n\n{messages[1]}\n\n{messages[2]}"` `test_text_list.append(swanlab.Text(result_text, caption=response))`` ``swanlab.log({"Prediction": test_text_list})``swanlab.finish()
看到下面的进度条即代表训练开始:

6.训练结果演示
在SwanLab上查看最终的训练结果:
可以看到在2个epoch之后,微调后的qwen2的loss降低到了不错的水平——当然对于大模型来说,真正的效果评估还得看主观效果。
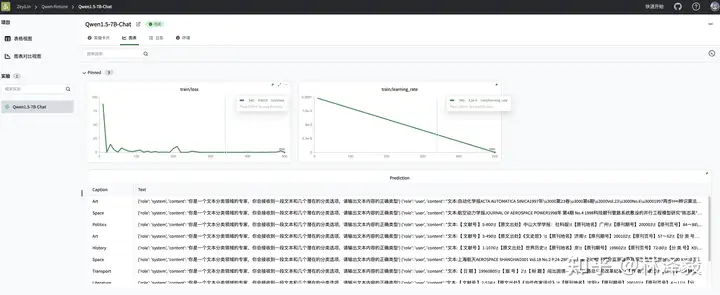
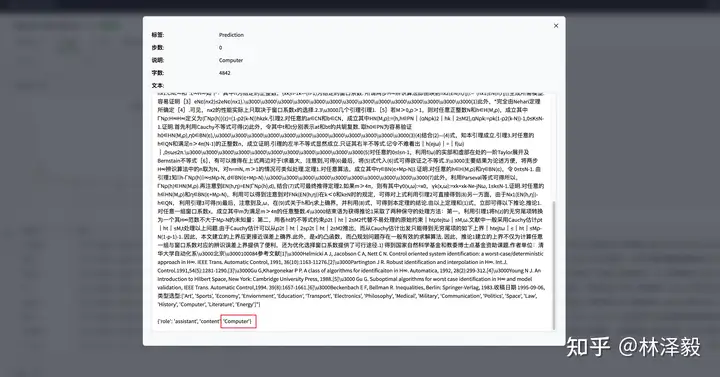
可以看到在一些测试样例上,微调后的qwen2能够给出准确的文本类型:
至此,你已经完成了qwen2指令微调的训练!
7. 推理训练好的模型
训好的模型默认被保存在./output/Qwen2文件夹下。
推理模型的代码如下:
import torch``from transformers import AutoModelForCausalLM, AutoTokenizer`` ``def predict(messages, model, tokenizer):` `device = "cuda"`` ` `text = tokenizer.apply_chat_template(messages, tokenize=False, add_generation_prompt=True)` `model_inputs = tokenizer([text], return_tensors="pt").to(device)`` ` `generated_ids = model.generate(model_inputs.input_ids, max_new_tokens=512)` `generated_ids = [output_ids[len(input_ids):] for input_ids, output_ids in zip(model_inputs.input_ids, generated_ids)]` `response = tokenizer.batch_decode(generated_ids, skip_special_tokens=True)[0]`` ` `return response`` `` ``# 加载原下载路径的tokenizer``tokenizer = AutoTokenizer.from_pretrained("./qwen/Qwen2-1___5B-Instruct/", use_fast=False, trust_remote_code=True)`` ``# 加载训练好的模型路径的model,将下面的checkpointXXX替换为实际的checkpoint文件名名称``model = AutoModelForCausalLM.from_pretrained("./output/Qwen2/checkpointXXX", device_map="auto", torch_dtype=torch.bfloat16)`` ``test_texts = {` `'instruction': "你是一个文本分类领域的专家,你会接收到一段文本和几个潜在的分类选项,请输出文本内容的正确类型",` `'input': "文本:航空动力学报JOURNAL OF AEROSPACE POWER1998年 第4期 No.4 1998科技期刊管路系统敷设的并行工程模型研究*陈志英* * 马 枚北京航空航天大学【摘要】 提出了一种应用于并行工程模型转换研究的标号法,该法是将现行串行设计过程(As-is)转换为并行设计过程(To-be)。本文应用该法将发动机外部管路系统敷设过程模型进行了串并行转换,应用并行工程过程重构的手段,得到了管路敷设并行过程模型。"``instruction = test_texts['instruction']``input_value = test_texts['input']`` ``messages = [` `{"role": "system", "content": f"{instruction}"},` `{"role": "user", "content": f"{input_value}"}``]`` ``response = predict(messages, model, tokenizer)``print(response)
相关链接
-
代码: 完整代码直接看本文第5节 或 Github(https://github.com/Zeyi-Lin/LLM-Finetune),Jupyter Notebook(https://github.com/Zeyi-Lin/LLM-Finetune/blob/main/train_qwen2.ipynb)
-
实验日志过程: Qwen2-1.5B-Fintune - SwanLab(https://swanlab.cn/@ZeyiLin/Qwen2-fintune/runs/cfg5f8dzkp6vouxzaxlx6/chart)
-
模型: Modelscope(https://modelscope.cn/models/qwen/Qwen2-1.5B-Instruct/summary)
-
数据集: zh_cls_fudan_news(https://modelscope.cn/datasets/huangjintao/zh_cls_fudan-news/summary)
-
SwanLab: https://swanlab.cn(https://swanlab.cn/)
下面给大家分享一份2025最新版的大模型学习路线,帮助新人小白更系统、更快速的学习大模型!
因篇幅有限,仅展示部分资料,需要点击下方链接即可前往获取
2024最新版CSDN大礼包:《AGI大模型学习资源包》免费分享**
一、2025最新大模型学习路线
一个明确的学习路线可以帮助新人了解从哪里开始,按照什么顺序学习,以及需要掌握哪些知识点。大模型领域涉及的知识点非常广泛,没有明确的学习路线可能会导致新人感到迷茫,不知道应该专注于哪些内容。
我们把学习路线分成L1到L4四个阶段,一步步带你从入门到进阶,从理论到实战。

L1级别:AI大模型时代的华丽登场
L1阶段:我们会去了解大模型的基础知识,以及大模型在各个行业的应用和分析;学习理解大模型的核心原理,关键技术,以及大模型应用场景;通过理论原理结合多个项目实战,从提示工程基础到提示工程进阶,掌握Prompt提示工程。

L2级别:AI大模型RAG应用开发工程
L2阶段是我们的AI大模型RAG应用开发工程,我们会去学习RAG检索增强生成:包括Naive RAG、Advanced-RAG以及RAG性能评估,还有GraphRAG在内的多个RAG热门项目的分析。

L3级别:大模型Agent应用架构进阶实践
L3阶段:大模型Agent应用架构进阶实现,我们会去学习LangChain、 LIamaIndex框架,也会学习到AutoGPT、 MetaGPT等多Agent系统,打造我们自己的Agent智能体;同时还可以学习到包括Coze、Dify在内的可视化工具的使用。

L4级别:大模型微调与私有化部署
L4阶段:大模型的微调和私有化部署,我们会更加深入的探讨Transformer架构,学习大模型的微调技术,利用DeepSpeed、Lamam Factory等工具快速进行模型微调;并通过Ollama、vLLM等推理部署框架,实现模型的快速部署。

整个大模型学习路线L1主要是对大模型的理论基础、生态以及提示词他的一个学习掌握;而L3 L4更多的是通过项目实战来掌握大模型的应用开发,针对以上大模型的学习路线我们也整理了对应的学习视频教程,和配套的学习资料。
二、大模型经典PDF书籍
书籍和学习文档资料是学习大模型过程中必不可少的,我们精选了一系列深入探讨大模型技术的书籍和学习文档,它们由领域内的顶尖专家撰写,内容全面、深入、详尽,为你学习大模型提供坚实的理论基础。(书籍含电子版PDF)

三、大模型视频教程
对于很多自学或者没有基础的同学来说,书籍这些纯文字类的学习教材会觉得比较晦涩难以理解,因此,我们提供了丰富的大模型视频教程,以动态、形象的方式展示技术概念,帮助你更快、更轻松地掌握核心知识。

四、大模型项目实战
学以致用 ,当你的理论知识积累到一定程度,就需要通过项目实战,在实际操作中检验和巩固你所学到的知识,同时为你找工作和职业发展打下坚实的基础。

五、大模型面试题
面试不仅是技术的较量,更需要充分的准备。
在你已经掌握了大模型技术之后,就需要开始准备面试,我们将提供精心整理的大模型面试题库,涵盖当前面试中可能遇到的各种技术问题,让你在面试中游刃有余。

因篇幅有限,仅展示部分资料,需要点击下方链接即可前往获取


 被折叠的 条评论
为什么被折叠?
被折叠的 条评论
为什么被折叠?
 到【灌水乐园】发言


