


目录
1.Entry
1.1基本概念
所谓的文本框Entry,通常是指单行的文本框,在GUI程序设计中这是用于输入的最基本的Widget控件,我们可以使用它输入单行字符串,如果输入的字符串长度大于文本框的宽度,所输入的文字会自动隐藏造成部分内容无法显示。碰到这种状况时,可以使用箭头键移动鼠标光标到看不到的区域。需要留意的是文本框Entry限定是单行文字,如果想要处理多行文字需要使用Widget控件中的Text。Entry的使用格式如下:
Entry(父对象, options, ……)
Entry()方法的第一个参数是父对象,表示这个文本框将建立在哪一个窗口内。下面是Entry()方法其他常用的options常数:
| bg或background | 背景色彩 |
| borderwidth或bd | 边界宽度默认是2像素 |
| command | 当用户更改内容时,会自动执行此函数 |
| cursor | 当鼠标光标在复选框上时的光标形状 |
| exportselection | 如果执行选取时,所选取的字符串会自动输出至剪贴板,如果想要避免,可以设置exportselection=0 |
| fg或foreground | 前景色彩 |
| font | 字形 |
| height | 高,单位是字符高 |
| highlightbackground | 当文本框取得焦点时的背景颜色 |
| highlightcolor | 当文本框取得焦点时的颜色 |
| justify | 当含多行文字时,最后一行的对齐方式 |
| relief | 默认是relief=FLAT,可由此控制文字外框 |
| selectbackground | 被选取字符串的背景色彩 |
| selectborderwidth | 选取字符串时的边界宽度,预设是1 |
| selectforeground | 被选取字符串的前景色彩 |
| show | 显示输入字符,例如,show=’*’表示星号显示,常用于输入密码字段 |
| state | 输入状态,默认是NORMAL表示可以输入,DISABLE则表示无法输入 |
| textvariable | 文字变量 |
| width | 宽,单位是字符宽 |
| xscrollcommand | 在x轴使用滚动条 |
程序设计:
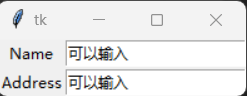

from tkinter import *

root = Tk()
nameL = Label(root, text = "Name")
nameL.grid(row = 0)

addressL = Label(root, text = "Address")
addressL.grid(row = 1)

nameR = Entry(root)
nameR.grid(row = 0, column = 1)

addressR = Entry(root)
addressR.grid(row = 1, column = 1)

root.mainloop()
1.2使用show参数隐藏输入的字符
其实Entry控件具有可以使用show参数设置隐藏输入字符的特性,所以也常被应用于密码的输入控制

accountR = Entry(root)
accountR.grid(row = 0, column = 1)
pwdR = Entry(root,show = "*")
pwdR.grid(row = 1,column =1 )
程序设计:公司登录界面

from tkinter import *

root = Tk()
msg = "欢迎光临"
image0 = PhotoImage(file = "2.png")
logo = Label(root, image = image0, text = msg, compound = BOTTOM)
logo.grid(row = 0, column = 0, columnspan = 2, pady = 10, padx = 10)

accountL = Label(root, text = "账户")
accountL.grid(row = 1)
pwdL = Label(root, text = "密码")
pwdL.grid(row = 2)

accountR = Entry(root)
accountR.grid(row = 1, column = 1)
pwdR = Entry(root, show = "*")
pwdR.grid(row = 2, column = 1)

root.mainloop()
1.3Entry的get()方法
Entry有一个get()方法,可以利用这个方法获得目前Entry的字符串内容。Widget控件有一个常用方法Quit,执行此方法时Python Shell窗口的程序将结束,但是此窗口的应用程序继续运行
程序设计:增加Login和Quit功能按钮

def printfInfo():
	print("账户:%s\n密码:%s" % (accountR.get(), pwdR.get()))

# 以下建立Login按钮和Quit按钮
loginbtn = Button(root, text = "进入", command = printfInfo)
loginbtn.grid(row = 3)
quitbtn = Button(root, text = "退出", command = root.quit)
quitbtn.grid(row = 3, column = 1)
当点击登录时,会在Python Shell窗口执行结果:

1.4Entry的insert()方法
在设计GUI时,常常需要在建立Entry的文本框内默认建立输入文字,在Widget的Entry控件中可以使用insert(index, s)方法插入字符串,其中,s是所插入的字符串,位置在index

accountL = Label(root, text = "账户")
accountR.insert(0, "请输入账户名称")
pwdR = Entry(root, show = "*")
pwdR.insert(0, "请输入密码")
1.5Entry的delete()方法
在tkinter模块的应用中可以使用delete(first,last)方法删除Entry内的从第first字符到第last-1字符间的字符串,如果要删除整个字符串可以使用delete(0,end)
程序设计:当单机删除后,清空文本框内容


def deleteInfo():
	accountR.delete(0, END)
	pwdR.delete(0, END)

delbtn = Button(root, text = "清除", command = deleteInfo)
delbtn.grid(row = 3, column =2)
1.6计算数学表达式使用eval()
Python内有一个非常好用的计算数学表达式的函数eval,该函数可以直接传回此数学表达式的计算结果。格式如下:
result = eval(expression)程序设计:输入表达式,传回结果

from tkinter import *

expression = input("请输入计算公式: ")
print("结果是: ", eval(expression))
对于以上程序,可以用GUI界面来展示:
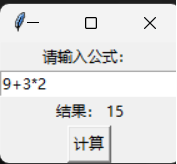
from tkinter import *

def cal():
	out.configure(text = "结果: " + str(eval(equ.get())))

root = Tk()
label = Label(root, text = "请输入公式: ")
label.pack()

equ = Entry(root)
equ.pack()
out = Label(root)
out.pack()
btn = Button(root, text = "计算", command = cal)
btn.pack()

root.mainloop()
2.文字区域Text
Entry控件主要是处理单行文字输入,Text控件主要处理多行的输入,另外,也可以在文字中嵌入图像或是提供格式化功能。因此,实际上我们可以将Text当作简单的文字处理软件,甚至也可以当作网页浏览器使用。
2.1基本概念
Text(父对象, options, ……)Text方法的第一个参数是父对象,表示这个文字区域将建立在哪一个父对象内。下列是Text方法内其他常用的options参数
| bg或background | 背景色彩 |
| borderwidth或bd | 边界宽度,默认是2像素 |
| cursor | 当鼠标光标在复选框上时的光标形状 |
| exportselection | 如果执行选择操作时,所选择的字符串会自动输出至剪贴板,如果想要避免如此可以设置exportselection=0 |
| fg或foreground | 字形色彩 |
| font | 字形 |
| height | 高,单位是字符 |
| highlightbackground | 当文本框取得焦点时的背景颜色 |
| highlightcolor | 当文本框取得焦点的颜色 |
| highlightthickness | 取得焦点时的厚度,默认值是1 |
| insertbackground | 插入光标的颜色,默认是黑色 |
| insertborderwidth | 围绕插入游标的3D厚度,默认是0 |
| padx | Text左/右框与文字最左/右的间距 |
| pady | Text上/下框与文字最上/下的间距 |
| relief | 默认relief=SUNKEN,可由此控制文字外框 |
| selectbackground | 被选取字符串的背景色彩 |
| selectborderwidth | 被选取字符串时的边界厚度,默认值是1 |
| selectforeground | 被选取字符串的前景色彩 |
| state | 输入状态,默认是NORMAL,表示可以输入,DISABLED则是无法编辑 |
| tab | 可设置按Tab键,如何定位插入点 |
| width | Text的宽 |
| wrap | 可控制某行文字太长时的处理,默认是wrap=CHAR,当某行文字太长时,可从字符做断行;当wrap=WORD时,只能从字做断行 |
| xscrollcommand | 在x轴使用滚动条 |
| yscrollcommand | 在y轴使用滚动条 |
程序设计:
from tkinter import *

root = Tk()
text = Text(root, height = 2, width = 30)
text.pack()

root.mainloop()
运行后发现,若是文字输入超过两行,将导致第一行数据被隐藏,若是输入更多行将造成第二行被隐藏,此时可以用移动光标的方法重新看到第一行
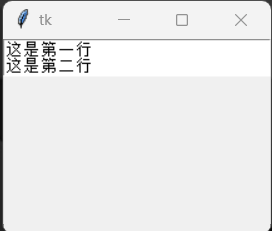
2.2插入文字insert()
insert()可以将字符串插入指定的索引位置
程序设计:

text.insert(END, "第一次插入文字\n")
text.insert(INSERT, "第二次插入文字")
2.3Text加上滚动条Scrollbar设计
将原来3行文字改为5行,添加Y轴滚动条

from tkinter import *

root = Tk()
yscrollbar = Scrollbar(root)
text = Text(root, height = 2, width = 30)
yscrollbar.pack(side = RIGHT, fill = Y)
text.pack()
yscrollbar.config(command = text.yview)
text.config(yscrollcommand = yscrollbar.set)
str = "第一行文字\n第二行文字\n第三行文字\n第四行文字\n第五行文字"

text.insert(END, str)
root.mainloop()
程序改进:增加x轴滚动条,且显示区域随窗口更改大小
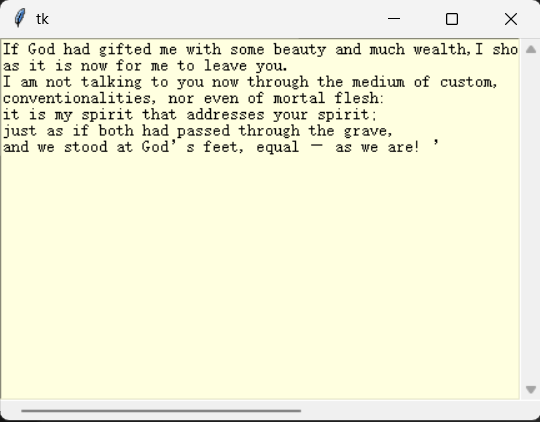
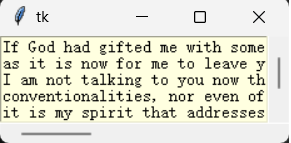
from tkinter import *

root = Tk()
xscrollbar = Scrollbar(root, orient = HORIZONTAL)
yscrollbar = Scrollbar(root)
text = Text(root, height = 5, width = 30, wrap = "none", bg = "lightyellow")
xscrollbar.pack(side = BOTTOM, fill = X)
yscrollbar.pack(side = RIGHT, fill = Y)
text.pack(fill = BOTH, expand = True)
xscrollbar.config(command = text.xview)
yscrollbar.config(command = text.yview)
text.config(xscrollcommand = xscrollbar.set)
text.config(yscrollcommand = yscrollbar.set)
str = """If God had gifted me with some beauty and much wealth,\
I should have made it as hard for you to leave me,
as it is now for me to leave you.
I am not talking to you now through the medium of custom,
conventionalities, nor even of mortal flesh:
it is my spirit that addresses your spirit;
just as if both had passed through the grave,
and we stood at God’s feet, equal — as we are! ’"""

text.insert(END, str)
root.mainloop()
2.4字形
在tkinter.font模块内有Font方法,可以由此设定Font相关参数,例如:family,size,weight,slant,underline,overstrike
2.4.1family
用于设置Text文字区域的字形
程序设计:建立三种字形
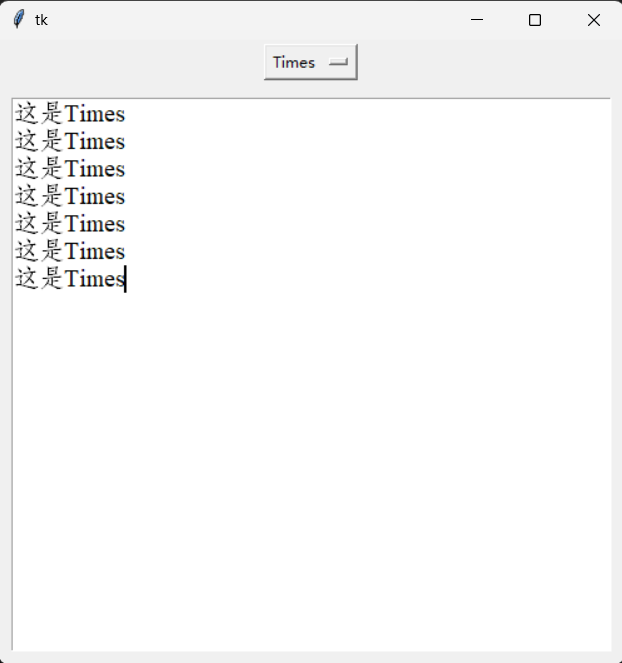


from tkinter import *
from tkinter.font import Font

def familyChanged(event):
	f = Font(family = familyVar.get())    # 取得新font family
	text.config(font = f)                 # 更新text的font family

root = Tk()
root.geometry("500x500")

# 建立font family OptioMenu
familyVar = StringVar()
familyFamily = ("宋体", "黑体", "Times")
familyVar.set(familyFamily[0])
family = OptionMenu(root, familyVar, *familyFamily, command = familyChanged)
family.pack(pady = 2)

# 建立text
text = Text(root)
text.pack(fill = BOTH, expand = True, padx = 10, pady = 10)
text.focus_set()

root.mainloop()
2.4.2weight
weight用于设置Text文字区域的字是否粗体
程序设计:


def weightChanged(event):
	f = Font(weight = weightVar.get())
	text.configure(font = f)

# 建立工具栏
toolbar = Frame(root, relief = RAISED, borderwidth = 1)
toolbar.pack(side = TOP, fill = X, padx = 2, pady = 1)

# 建立font weight OptionMenu
weightVar = StringVar()
weightFamily = ("normal", "bold")
weightVar.set(weightFamily[0])
weight = OptionMenu(toolbar, weightVar, *weightFamily, command = weightChanged)
weight.pack(pady = 3, side = LEFT)
2.4.3size
size设置Text文字区域的字号
程序设计:


from tkinter import *
from tkinter.font import Font
from tkinter.ttk import *

def familyChanged(event):
	f = Font(family = familyVar.get())    # 取得新font family
	text.config(font = f)                 # 更新text的font family

def weightChanged(event):
	f = Font(weight = weightVar.get())
	text.configure(font = f)

def sizeSelected(event):
	f = Font(size = sizeVar.get())
	text.configure(font = f)

root = Tk()
root.geometry("500x500")

# 建立工具栏
toolbar = Frame(root, relief = RAISED, borderwidth = 1)
toolbar.pack(side = TOP, fill = X, padx = 2, pady = 1)

# 建立font family OptioMenu
familyVar = StringVar()
familyFamily = ("宋体", "黑体", "Times")
familyVar.set(familyFamily[0])
family = OptionMenu(toolbar, familyVar, *familyFamily, command = familyChanged)
family.pack(side = LEFT, pady = 2)

# 建立font weight OptionMenu
weightVar = StringVar()
weightFamily = ("normal", "bold")
weightVar.set(weightFamily[0])
weight = OptionMenu(toolbar, weightVar, *weightFamily, command = weightChanged)
weight.pack(pady = 3, side = LEFT)

# 建立font size Combobox
sizeVar = IntVar()
size = Combobox(toolbar, textvariable = sizeVar)
sizeFamily = [x for x in range(8, 30)]
size["value"] = sizeFamily
size.current(4)
size.bind("<<ComboboxSelected>>", sizeSelected)
size.pack(side = LEFT)

# 建立text
text = Text(root)
text.pack(fill = BOTH, expand = True, padx = 3, pady = 2)
text.focus_set()

root.mainloop()
2.5选取文字
Text对象的get()方法可以取得目前所选的文字,在使用Text文字区域时,如果有选取文字操作发生时,Text对象会将所选文字的起始索引放在SEL_FIRST,结束索引放在SEL_LAST,将SEL_FIRST和SEL_LAST当作get()的参数,就可以获得目前所选文字
程序设计:当点击按钮时,在Python Shell窗口列出所选文字
from tkinter import *

def selectedText():
	try:
		selText = text.get(SEL_FIRST, SEL_LAST)
		print("所选文字是: ", selText)
	except TclError:
		print("没有选取文字")

root = Tk()
root.geometry("500x500")

# 建立Button
btn = Button(root, text = "打印选中文字", command = selectedText)
btn.pack()

# 建立text
text = Text(root)
text.pack(fill = BOTH, expand = True)
text.insert(END, "A B C D E F G H I J K")

root.mainloop()
2.6Text的索引
Text对象的索引并不是单一数字,而是一个字符串。索引的目的是让Text控件处理更进一步的文件操作。下列是常见的索引形式:
| line/column(“line.column”) | 计数方式line是从1开始,coluimn从0开始计数,中间用句点分割 | |
| INSERT | 目前插入点的位置 | |
| CURRENT | 光标目前位置相对于字符的位置 | |
| END | 缓冲区最后一个字符后的位置 | |
| Expression 索引使用表达式 | “+count chars” | count是数字,例如,”+2c”索引往后移动两个字符 |
| “-count chars” | count是数字,例如,”-2c”索引往前移动两个字符 | |
程序设计:对前文所选文字以”line.column”字符串方式显示
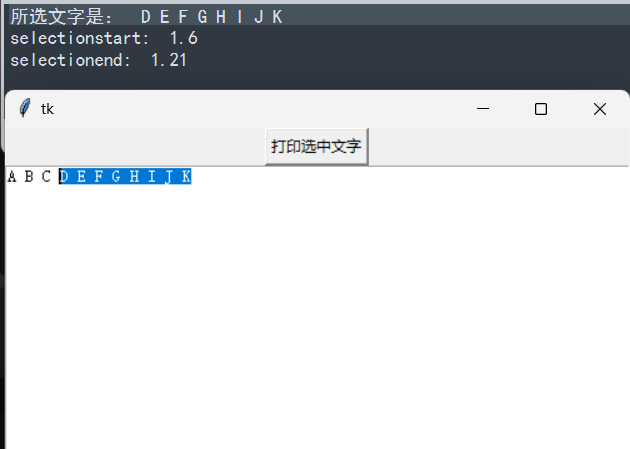
def selectedText():
	try:
		selText = text.get(SEL_FIRST, SEL_LAST)
		print("所选文字是: ", selText)
		print("selectionstart: ", text.index(SEL_FIRST))
		print("selectionend: ", text.index(SEL_LAST))
	except TclError:
		print("没有选取文字")
程序设计:查看索引位置:

def printIndex():
	print("INSERT: ", text.index(INSERT))
	print("CURRENT: ", text.index(CURRENT))
	print("END: ",text.index(END))

btn = Button(root, text = "打印索引", command = printIndex)
因为点击”打印索引”时候,鼠标位置一直在”打印索引”按钮上,所以CURRENT的值一直是1.0
2.7建立书签
在编辑文件时,可以在文件特殊位置建立书签(Marks),方便查询。书签是无法显示的,但会在编辑系统内被记录。如果书签内容被删除,则书签也将自动被删除。在tkinter内默认有两个书签:INSERT和CURRENT,它们的相对位置可以参考前节”索引”。下列是常用的书签相关方法:
| index(mark) | 传回指定书签的line和column |
| mark_names() | 传回这个Text对象所有的书签 |
| mark_set(maark,index) | 在指定的index位置设置书签 |
| mark_unset(mark) | 取消指定书签设置 |
程序设计:设置两个书签,然后列出书签间的内容
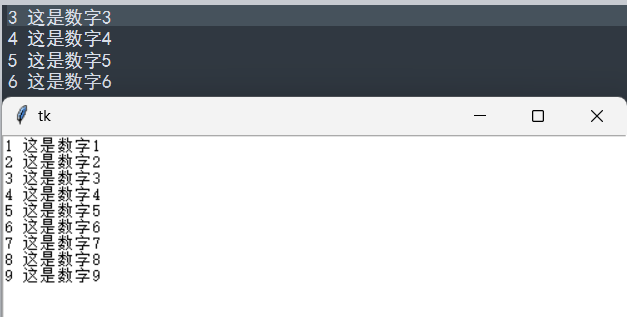
from tkinter import *

root = Tk()
root.geometry("500x500")

text = Text(root)

for i in range(1, 10):
	text.insert(END, str(i) + f' 这是数字{i}\n')

# 设置书签
text.mark_set("mark1", "3.0")
text.mark_set("mark2", "7.0")

print(text.get("mark1", "mark2"))
text.pack(fill = BOTH, expand = True)

root.mainloop()
2.8标签
标签是指一个区域文字,然后我们可以为这个区域取一个名字,这个名字称作标签,可以使用此标签名字代表这个区域文字。有了标签后,我们可以针对此标签做更进一步的工作,例如,将字形、色彩等应用在此标签上。下列是常用的标签方法:
| tag_add(tagname,startindex[,enindex]……) | 将startindex和endindex间的文字命名为tagname标签 | |
| tag_config(tagname,options,……) 可以为标签执行特定的编辑,或动作绑定 | background | 背景颜色 |
| borderwidth | 文字外围厚度,默认是0 | |
| font | 字形 | |
| foreground | 前景颜色 | |
| justify | 对齐方式,默认是LEFT,也可以是RIGHT或CENTER | |
| overstrike | 如果是True,加上删除线 | |
| underline | 如果是True,加上下划线 | |
| wrap | 当使用wrap模式时,可以使用NONE、CHAR或WORD | |
| tag_delete(tagname) | 删除此标签,同时移除此标签特殊的编辑或绑定 | |
| tag_remove(tagname[,startindex[,endindex]]……) | 删除标签,但是不移除此标签特殊的编辑或绑定 | |
除了可以使用tag_add()自行定义标签外,系统还有一个内建标签SEL,代表选取的区间
程序设计:先设定两个书签,将两个书签之间的文字设为tag,然后对tag内的文字进行设置;插入文字的同时设置标签

text.insert(END, "10 这是数字10", "a")

# 设置书签
text.mark_set("mark1", "3.0")
text.mark_set("mark2", "7.0")

# 设置标签
text.tag_add("tag1", "mark1", "mark2")
text.tag_config("tag1", foreground = "red", backgroun = "lightyellow")
text.tag_config("a", foreground = "blue", backgroun = "pink")
text.pack(fill = BOTH, expand = True)
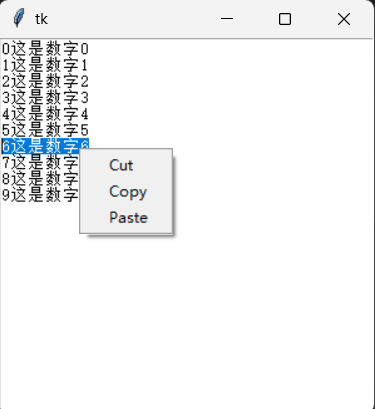
2.9Cut/Copy/Paste功能
编辑文件时剪切/复制/粘贴是很常用的功能,这些功能已经被内建在tkinter中了
程序设计:设计具有Cut/Copy/Paste功能的弹出菜单
from tkinter import *
from tkinter import messagebox

# 剪切
def cutJob():
	copyJob()
	text.delete(SEL_FIRST, SEL_LAST)

# 复制
def copyJob():
	try:
		text.clipboard_clear()
		copyText = text.get(SEL_FIRST, SEL_LAST)
		text.clipboard_append(copyText)
	except TclError:
		print("没有选取")

# 粘贴
def pasteJob():
	try:
		copyText = text.selection_get(selection = "CLIPBOARD")
		text.insert(INSERT, copyText)
	except TclError:
		print("剪贴板没有数据")

# 显示弹出菜单
def showPopupMenu(event):
	popupmenu.post(event.x_root, event.y_root)

root = Tk()
root.geometry("300x300")

popupmenu = Menu(root, tearoff = False)
popupmenu.add_command(label = "Cut", command = cutJob)
popupmenu.add_command(label = "Copy", command = copyJob)
popupmenu.add_command(label = "Paste", command = pasteJob)
# 单机鼠标右键绑定显示弹出菜单
root.bind("<Button-3>", showPopupMenu)

text = Text(root)
text.pack(fill = BOTH, expand = True)
for i in range(10):
	text.insert(END, str(i) + f"这是数字{i}\n")

root.mainloop()
对于以上程序,还可以使用内建的虚拟方法
def cutJob():
	text.event_generate("<<Cut>>")
def copyJob():
	text.event_generate("<<Copy>>")
def pasteJob():
	text.event_generate("<<Paste>>")
2.10复原与重复
Text空间有一个简单复原和重做的机制(类似于撤销),这个机制可以应用于文字删除和文字插入。Text控件在默认环境下没有开启这个机制,如果要使用这个机制,可以在Text()方法内增加undo=True参数


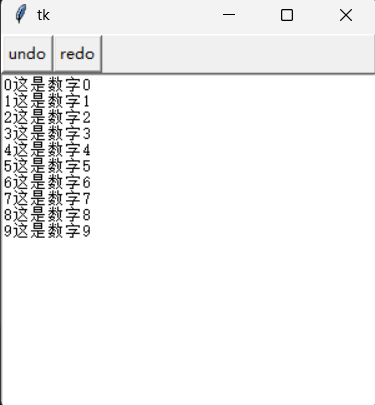
def undoJob():
	try:
		text.edit_undo()
	except:
		print("先前没有动作")
def redoJob():
	try:
		text.edit_redo()
	except:
		print("先前没有动作")

text = Text(root, undo =True)
2.11查找文字
在Text控件内可以使用search()方法查找指定的字符串,这个方法会找到第一个指定字符串的索引位置
| pos | 传回所找到的字符串的索引位置,如果查找失败则传回空字符串 |
| key | 所查找的字符串 |
| startindex | 查找起始位置 |
| endindex | 查找结束位置 |
程序设计:

from tkinter import *

def mysearch():
	text.tag_remove("found", "1.0",END)               # 删除卷标但不删除卷标定义
	start = "1.0" 									  # 设定搜寻起始位置
	key = entry.get()								  # 读取搜寻关键词
	if (len(key.strip()) == 0):	                      # 没有输入
		return
	while True:                                       # 有输入,就用while循环搜
		pos = text.search(key, start, END)			  # 执行搜寻
		if (pos == ""):
			break                                     # 没找到,退出
		text.tag_add("found", pos, "%s+%dc" % (pos, len(key)))   # 加入标签
		start = "%s+%dc" % (pos, len(key))            # 更新搜寻起始位置

root = Tk()
root.geometry("300x300")

root.rowconfigure(1, weight = 1)
root.columnconfigure(0, weight = 1)

entry = Entry()
entry.grid(row = 0, column = 0, sticky = W+E)
btn = Button(root, text = "查找", command = mysearch)
btn.grid(row = 0, column = 1)
text = Text(root, undo = True)
text.grid(row = 1, column = 0, columnspan = 2,
	sticky = N+S+W+E)
str = """If God had gifted me with some beauty and much wealth,\
I should have made it as hard for you to leave me,
as it is now for me to leave you.
I am not talking to you now through the medium of custom,
conventionalities, nor even of mortal flesh:
it is my spirit that addresses your spirit;
just as if both had passed through the grave,
and we stood at God’s feet, equal — as we are! ’"""
text.insert(END, str)

# 定义找到的标签
text.tag_configure("found", background = "yellow")

root.mainloop()
2.12拼写检查
设计字典Dict.text,然后将Text控件的每个单词与字典的单词做比较,如果有不符的单词则用红色显示此单词,点击”清除”按钮可以将红色的字改为正常显示
2.13新建文档、打开文档、存储Text控件内容

2.14插入图像
Text控件是允许插入图像文件的,所插入的图像文件会被视为一个字符方式进行处理,所呈现的大小是实际图像的大小
程序设计:

from tkinter import *
from PIL import Image, ImageTk

root = Tk()
img = Image.open("2.png")
myPhoto = ImageTk.PhotoImage(img)

text = Text()
text.image_create(END, image = myPhoto)
text.insert(END, "\n这是一张红色背景图")
text.pack(fill = BOTH, expand = True)

root.mainloop()
参考文献:《Python GUI设计 tkinter菜鸟编程》洪锦魁著


 512
512


 被折叠的 条评论
为什么被折叠?
被折叠的 条评论
为什么被折叠?
 到【灌水乐园】发言


