


引言
上一篇文章中介绍了Result算子,Result算子是最基本的算子之一。而今天要介绍的BitmapAnd算子和BitmapOr算子也很重要。
代码位置
BitmapAnd
src\gausskernel\runtime\executor\nodeBitmapAnd.cpp
BitmapOr
src\gausskernel\runtime\executor\nodeBitmapOr.cpp
功能作用
有关Bitmap(位图)的内容我在之前的文章:扫描算子—-nodeBitmapScan.cpp解析中介绍过了,可以点击此处跳转阅读。
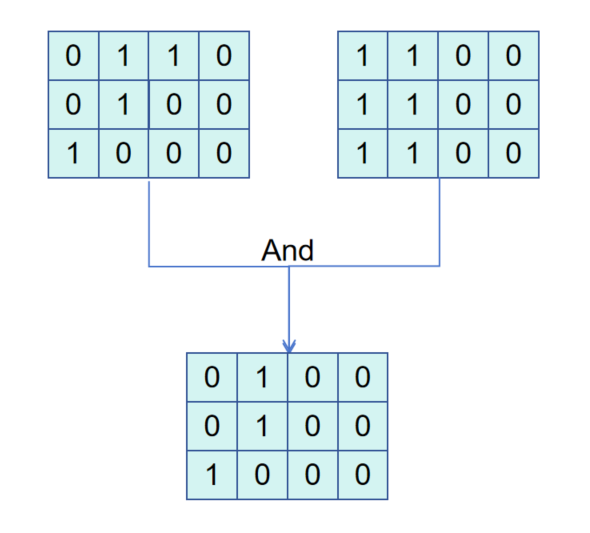
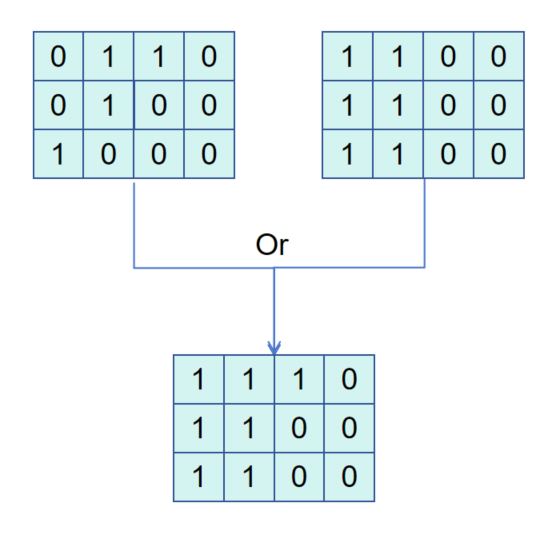
BitmapAnd和BitmapOr顾名思义,就是对位图做与运算和或运算。如下图图解所示:
- BitmapAnd
- BitmapOr
两者功能相似,这里只对BitmapAnd算子的代码做简要分析。
MultiExecBitmapAnd
MultiExecBitmapAnd函数是BitmapAnd算子中的关键函数,其代码如下:
//代码清单1Node* MultiExecBitmapAnd(BitmapAndState* node){PlanState** bitmapplans;int nplans;int i;TIDBitmap* result = NULL;/* 表示结点开始执行 */if (node->ps.instrument) {InstrStartNode(node->ps.instrument);}bitmapplans = node->bitmapplans;nplans = node->nplans;/* 遍历所有位图进行与操作 */for (i = 0; i < nplans; i++) {PlanState* subnode = bitmapplans[i];subnode->hbktScanSlot.currSlot = node->ps.hbktScanSlot.currSlot;TIDBitmap* subresult = NULL;/* 获取位图 */subresult = (TIDBitmap*)MultiExecProcNode(subnode);if (subresult == NULL || !IsA(subresult, TIDBitmap))ereport(ERROR,(errcode(ERRCODE_UNRECOGNIZED_NODE_TYPE),errmodule(MOD_EXECUTOR),errmsg("unrecognized result from subplan for BitmapAnd.")));if (result == NULL) {result = subresult; /* 初始化result为第一个子计划中的位图 */} else {/* result和subresult其中有一个是分区表索引(非全局索引),则把result设为分区表索引 */if (tbm_is_global(result) != tbm_is_global(subresult)) {tbm_set_global(result, false);}/* result和subresult取交集 */tbm_intersect(result, subresult);tbm_free(subresult);}/* 如果result为空,则可以提前退出循环,因为result将不会再发生改变 */if (tbm_is_empty(result)) {break;}}if (result == NULL) {ereport(ERROR,(errcode(ERRCODE_NULL_VALUE_NOT_ALLOWED),errmodule(MOD_EXECUTOR),errmsg("BitmapAnd doesn't support zero inputs")));}/* 表示结束此结点的执行 */if (node->ps.instrument) {InstrStopNode(node->ps.instrument, 0 /* XXX */);}return (Node*)result;}
输入参数
MultiExecBitmapAnd函数的输入参数为BitmapAndState类型的结构体指针,结构体定义如下:
typedef struct BitmapAndState {PlanState ps; /* 父结点 */PlanState** bitmapplans; /* 需要与操作的位图 */int nplans; /* 需要与操作的位图数量 */} BitmapAndState;
执行过程
执行过程较为简单,具体直接见代码清单1中的注释。
小结
这篇文章里我介绍了BitmapAnd和BitmapAnd算子,这两个算子十分重要,主要是对BitmapIndexScan算子中返回的数据页位图进行与操作和或操作,得到最终的位图。


 3303
3303


 被折叠的 条评论
为什么被折叠?
被折叠的 条评论
为什么被折叠?
 到【灌水乐园】发言


