


一.定义一个服务
新建一个类MyService extendsService,然后写重写方法onBind(),如下:
public class MyService extends Service {
    private final String TAG = "MyService";

    @Nullable
    @Override
    public IBinder onBind(Intent intent) {
        return null;
    }
}
onBond()方法是必须要实现的,因为onBond()方法是抽象方法,service是一个抽象类,而我们定义的类肯定只是普通类,所以必须重写,关于这个方法作用,我们后面再讲。
然后我们重写,onCreate,onStartCommand,onDestroy这三个方法,如下:
@Override
public void onCreate() {
    super.onCreate();
    Log.d(TAG,"onCreate executed");
    setForgroundService();

}
@Override
public int onStartCommand(Intent intent, int flags, int startId) {
    Log.d(TAG,"onStartCommand executed");
    return super.onStartCommand(intent, flags, startId);
}
@Override
public void onDestroy() {
    Log.d(TAG,"onDestroy executed");
    super.onDestroy();
} ,Android中的四大组件,我们必须要在androidManifest.xml中注册,
<?xml version="1.0" encoding="utf-8"?>
<manifest xmlns:android="http://schemas.android.com/apk/res/android"
    package="dyk.servicetest">

    <application
        android:allowBackup="true"
        android:icon="@mipmap/ic_launcher"
        android:label="@string/app_name"
        android:supportsRtl="true"
        android:theme="@style/AppTheme">
    ...
        <service android:name=".servicepackage.MyService"></service>
    </application>

</manifest> 二.启动停止服务
启动服务:startService(new Intent(this,MyService));

启动服务:stopService(new Intent(this,MyService));

三.活动和服务间通信
我们创建一个内部类DownloadBinder继承自Binder,在onBind中返回这个内部类的对象,如下:
public class MyService extends Service{
    private final String TAG="MyService";
    private DownloadBinder mBinder =new DownloadBinder();
    @Nullable
    @Override
    public IBinder onBind(Intent intent) {
        return mBinder;
    }
   public class DownloadBinder extends Binder {
       public void startDowvload(){
           Log.d(TAG,"startDowvload executed");
       }
       public void finishDowvload(){
           Log.d(TAG,"finishDowvload executed");
       }
   }
}<?xml version="1.0" encoding="utf-8"?>
<RelativeLayout xmlns:android="http://schemas.android.com/apk/res/android"
xmlns:tools="http://schemas.android.com/tools"
android:id="@+id/activity_main"
android:layout_width="match_parent"
android:layout_height="match_parent"
tools:context="dyk.servicetest.view.MainActivity">
<Button
android:id="@+id/start_Service"
android:layout_width="wrap_content"
android:layout_height="wrap_content"
android:text="Start Service" />
<Button
android:id="@+id/stop_Service"
android:layout_width="wrap_content"
android:layout_height="wrap_content"
android:layout_below="@id/start_Service"
android:text="Stop Service" />
<Button
android:id="@+id/bind_Service"
android:layout_width="wrap_content"
android:layout_height="wrap_content"
android:layout_below="@id/stop_Service"
android:text="bind Service" />
<Button
android:id="@+id/unbind_Service"
android:layout_width="wrap_content"
android:layout_height="wrap_content"
android:layout_below="@id/bind_Service"
android:text="unbind Service" />
</RelativeLayout></span> ServiceConnection mServiceConnet =new ServiceConnection() {
@Override
public void onServiceConnected(ComponentName componentName, IBinder iBinder) {
mbinder= (MyService.DownloadBinder) iBinder;
mbinder.startDowvload();
mbinder.finishDowvload();
}
@Override
public void onServiceDisconnected(ComponentName componentName) {
}
};case R.id.bind_Service:
Intent intent = new Intent(this,MyService.class);
bindService(intent,mServiceConnet,BIND_AUTO_CREATE);
break;
case R.id.unbind_Service://解除绑定
unbindService(mServiceConnet);
四.服务的生命周期

onCreate,onStartCommand,onDestroy,在调用stopService或者stopSelf方法,服务就会停止下来,需要特别注意的是:当调用startService后,调用stopService时,服务会销毁.当调用bindService后,调用unbindService时,服务也会销毁.但是,当你既
startService,又bindService,这个时候你只stopService或者只unbindService时,服务是不会销毁的.只有同时调用stopService和unbindService时,服务才会销毁.
还有一个概念就是,在我们实际开发中,整个app同一个服务的对象只能够获取到一个.
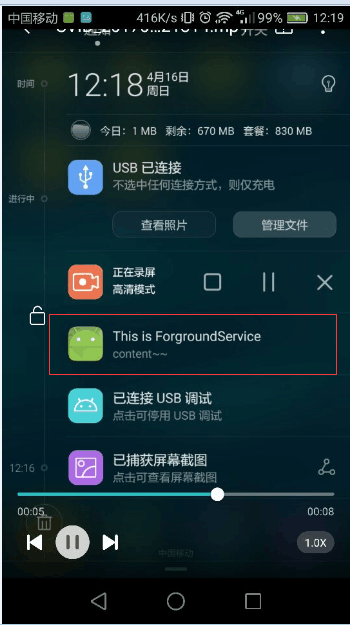
1.使用前台服务,代码如下:
private void setForgroundService(){
 Notification mBuilder =new Notification.Builder(this)
       .setContentTitle("This is ForgroundService")
                .setContentText("content~~")
                .setWhen(System.currentTimeMillis())
                .setSmallIcon(R.mipmap.ic_launcher)
                .build();
        Intent serviceIntent =new Intent(this,MainActivity.class);
        PendingIntent mPendingIntent = PendingIntent.getActivity(this,0,serviceIntent,0);
        startForeground(1,mBuilder);
    }
2.使用intentService。
服务使用的最多的情况就是在后台处理耗时的逻辑,但是又不能再主线程中使用,因此会经常在子线程中使用:常用的写法如下:
  @Override
   public int onStartCommand(Intent intent, int flags, int startId) {
        Log.d(TAG,"onStartCommand executed");
        new Thread(new Runnable() {
            @Override
            public void run() {
                //在这里面去处理耗时逻辑
            }
        }).start();
        return super.onStartCommand(intent, flags, startId);
    }
但是会经常忘记关闭服务了,而intentservice可以很好的解决这个问题,他会自动启动区处理后台任务,任务处理完成后会自动停止.
新建MyIntentService类继承自IntentService,注意:提供的无参构造方法中必须要调用父类的有残构造方法.
public class IntentServiewTest extends IntentService{
private final  String TAG="IntentServiewTest";
 public IntentServiewTest() {
        super("name");
    }

    @Override
    protected void onHandleIntent(Intent intent) {
        //打印当前线程ID
        Log.d(TAG,"Thread id id "+Thread.currentThread().getId());
    }

    @Override
    public void onDestroy() {
        super.onDestroy();
        Log.d(TAG,"onDestroy executed");
    }
}
case R.id.start_intent_Service://启动intentservice
Log.d(TAG,"Thread id id "+Thread.currentThread().getId());
                Intent intentservice =new Intent(this,IntentServiewTest.class);
                startService(intentservice);
                break;
关于服务,就说这么多了~~~~~
源码 (ServiceTest)


 491
491

 被折叠的 条评论
为什么被折叠?
被折叠的 条评论
为什么被折叠?
 到【灌水乐园】发言


