


前言
从同事的工程(STM32F4 StdPeriph_Lib)上改出一个新工程. 将其他bug改完, 发现网线必须一直插着, 否则就会卡在网卡初始化那里. 因为我做成了, 如果网卡初始化不成功, 就死等.
看他改的其他工程, 看到他也实现了网线热插拔的一个版本. 但是他的版本很不稳定, 不能正常跑. 自然也就不会在他工程中, 将网线热插拔扒出来用.
官方资料
重新下载了ST官方F4标准外设库和F4 LWIP的2个工程, 看到了官方已经给了网线热插拔的demo工程.
那从官方版本上, 将网线热插拔功能扒出来用.
STSW-STM32065 STM32F4 DSP and standard peripherals library
STSW-STM32070 LwIP TCP/IP stack demonstration for STM32F4x7 microcontrollers (AN3966)
STSW-STM32069 STM32F4x7 in-application programming (IAP) over Ethernet based on LwIP TCP/IP stack (AN3968)
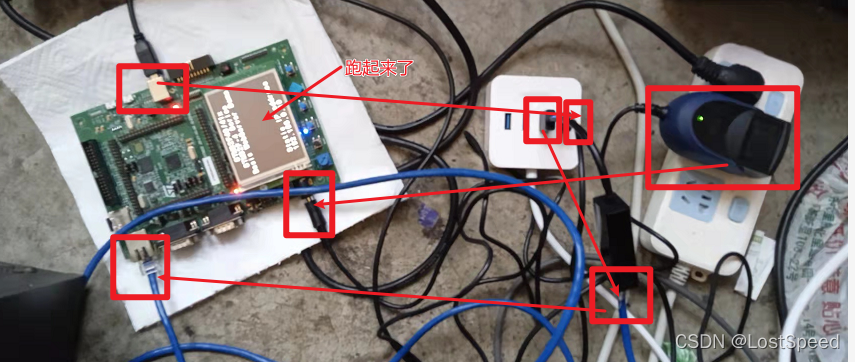
硬件实验平台
只看官方工程, 不能跑起工程, 细节看不清.
看了这些工程说明, 都说到可以直接在ST官方开发板上跑.
正好手头有以前囤下来的 STM3240G-EVAL 官方开发板, 机智啊.
编译模板工程
实验时, 路径不要太长了, 否则有可能出现工程中文件找不到(实际文件在工程中包含)编译报错的情况.
如果物理路径太长, 可以用subst模拟一个Z盘之类的, 在Z盘的短路径中打开MDK工程.
官方库和demo工程, 支持很多官方开发板.
先将模板工程调整为对应的 STM3240G-EVAL 配置, 先能编译过再下一步.
将 en.stm32f4_dsp_stdperiph_lib_v1.8.0.zip 解压到 Z:\STM32F4xx_DSP_StdPeriph_Lib_V1.8.0
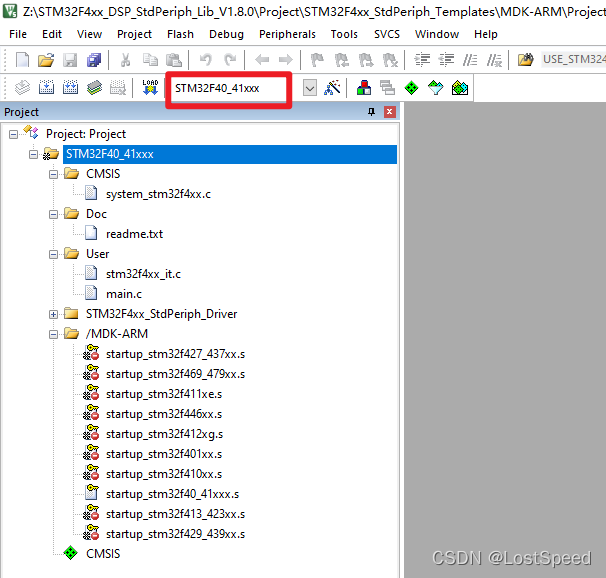
打开模板工程(同事的工程都是用MDK弄的, 这里也打开官方的MDK工程) : Z:\STM32F4xx_DSP_StdPeriph_Lib_V1.8.0\Project\STM32F4xx_StdPeriph_Templates\MDK-ARM\Project.uvprojx
STM3240G-EVAL官方开发板用的MCU是 F407IGH6, 将工程配置改为 STM32F40_41xxx
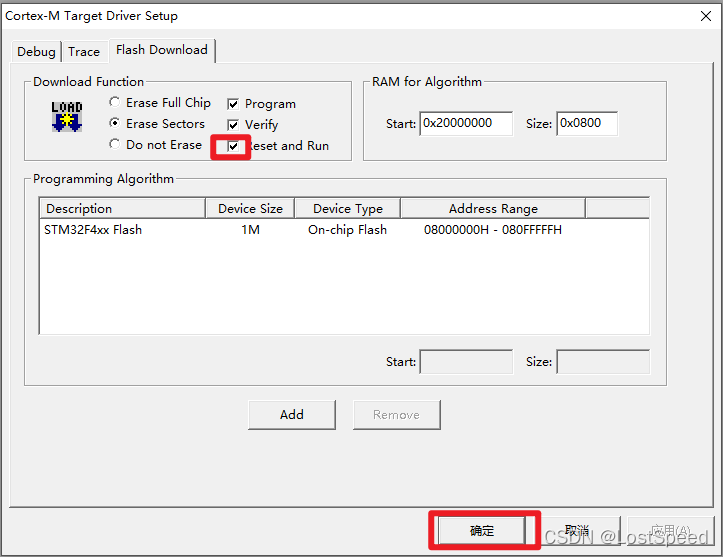
用的调试器是板载的STLINK, 将调试器改为STLINK, 勾上"reset and run"
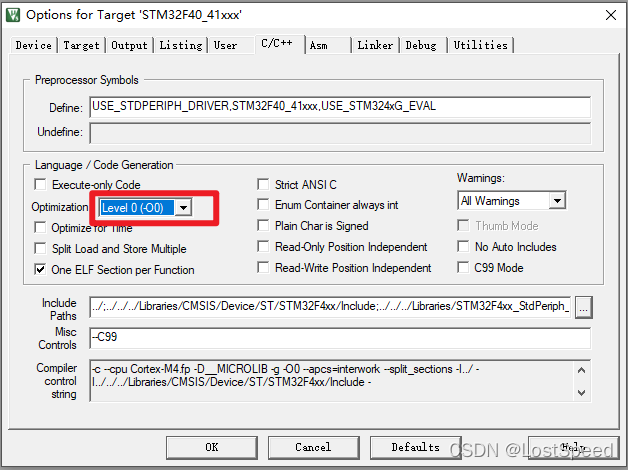
将代码优化改为不优化, 用于单步调试.
编译一下, 通过, 0警告,0错误.
单步一下试试, 好使.
将 D:\my_dev\rzhc_git_checkout\rzhc_rep_chenxuan\product\rz_jiGuiWeiHuanjing\src\case\test_lwip_offline\doc\STM32F4xx_DSP_StdPeriph_Lib_V1.8.0\Project\STM32F4xx_StdPeriph_Examples\GPIO\GPIO_IOToggle 目录下的内容全部拷贝过来, 覆盖到 Z:\STM32F4xx_DSP_StdPeriph_Lib_V1.8.0\Project\STM32F4xx_StdPeriph_Templates
再次打开工程编译单步, 可以看到可以操作一个LED的亮灭. 说明板子, 调试器, IDE都正常.
将 en.stsw-stm32070_v1.1.1.zip 解压, 将 Z:\en.stsw-stm32070_v1.1.1\STM32F4x7_ETH_LwIP_V1.1.1 下所有内容 到覆盖到 Z:\STM32F4xx_DSP_StdPeriph_Lib_V1.8.0
我的工程用的ucos, 我也要看官方带RTOS的工程是怎么实现网线热插拔的.
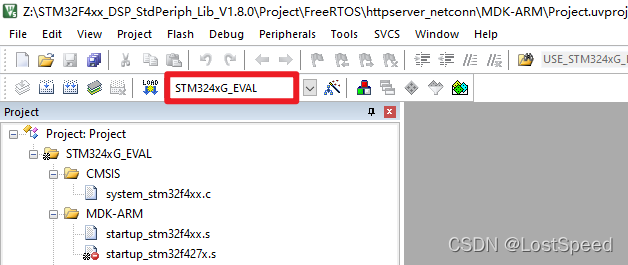
打开工程 Z:\STM32F4xx_DSP_StdPeriph_Lib_V1.8.0\Project\FreeRTOS\httpserver_netconn\MDK-ARM\Project.uvproj
将工程选项选为 “STM324xG_EVAL”, 和硬件实验平台对应
将优化级别改为0, STLINK的port 改为SWD, 勾上 “reset and run”.
编译完, 有2个警告
".\STM324xG_EVAL\STM324xG_EVAL.axf" - 0 Error(s), 2 Warning(s).
去看一下, 都是LWIP1.4.1中的警告, 不用管.
..\..\..\..\Utilities\Third_Party\lwip-1.4.1\src\core\tcp_out.c(845): warning:  #550-D: variable "tcphdr" was set but never used
    struct tcp_hdr *tcphdr;
..\..\..\..\Utilities\Third_Party\lwip-1.4.1\src\core\tcp_out.c(1367): warning:  #550-D: variable "tcphdr" was set but never used
    struct tcp_hdr *tcphdr;
..\..\..\..\Utilities\Third_Party\lwip-1.4.1\src\core\tcp_out.c: 2 warnings, 0 errors
单步一下, 看起来正常.
研究一下热插拔的实现
将开发板插上网线, 连上插在本本上的USB hub的USB转网口接口
将程序单步跑起来, 看了一眼, 板子跑起来后, 液晶屏上还有当前IP.
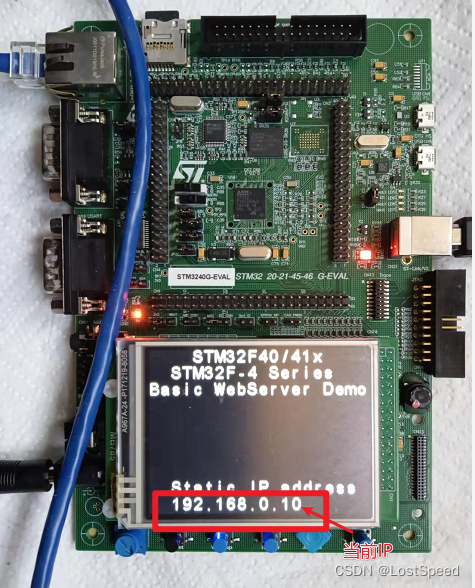
因为我的USB转网口的网卡, IP是192.168.2.100. 先去固件工程中, 将板子静态IP改为192.168.2.10.
去 LwIP_Init() 中看, 静态IP是用宏来搞的.
void LwIP_Init(void)
{
  struct ip_addr ipaddr;
  struct ip_addr netmask;
  struct ip_addr gw;
#ifndef USE_DHCP
  uint8_t iptab[4] = {0};
  uint8_t iptxt[20];
#endif
  /* Create tcp_ip stack thread */
  tcpip_init( NULL, NULL );

  /* IP address setting */
#ifdef USE_DHCP
  ipaddr.addr = 0;
  netmask.addr = 0;
  gw.addr = 0;
#else
  IP4_ADDR(&ipaddr, IP_ADDR0, IP_ADDR1, IP_ADDR2, IP_ADDR3);
  IP4_ADDR(&netmask, NETMASK_ADDR0, NETMASK_ADDR1 , NETMASK_ADDR2, NETMASK_ADDR3);
  IP4_ADDR(&gw, GW_ADDR0, GW_ADDR1, GW_ADDR2, GW_ADDR3);
#endif
跳到这些宏定义, 看到在main.h中定义.
改成和本本匹配的静态IP设置.
看到官方定义MAC地址时, 只要第一个字节的bit1, bit0是偶数, 就是一个合法的MAC地址.
和物理机上的网卡配置(ipconfig /all)对比了一下, 果真是这样.
/* Uncomment SERIAL_DEBUG to enables retarget of printf to  serial port (COM1 on STM32 evalboard)
for debug purpose */
//#define SERIAL_DEBUG

/* MAC ADDRESS*/
#define MAC_ADDR0   02
#define MAC_ADDR1   00
#define MAC_ADDR2   00
#define MAC_ADDR3   00
#define MAC_ADDR4   00
#define MAC_ADDR5   00

/*Static IP ADDRESS*/
#define IP_ADDR0   192
#define IP_ADDR1   168
#define IP_ADDR2   2 // 0
#define IP_ADDR3   10

/*NETMASK*/
#define NETMASK_ADDR0   255
#define NETMASK_ADDR1   255
#define NETMASK_ADDR2   255
#define NETMASK_ADDR3   0

/*Gateway Address*/
#define GW_ADDR0   192
#define GW_ADDR1   168
#define GW_ADDR2   2 // 0
#define GW_ADDR3   1

/* MII and RMII mode selection, for STM324xG-EVAL Board(MB786) RevB ***********/
停掉工程, 编译, 重新单步跑起来, 从本本(192.168.2.100)ping板子(192.168.2.10), 可以ping通.
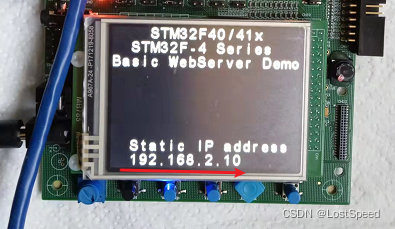
看板子液晶屏上显示的静态IP已经变成了192.168.2.10
试一下将网线从HUB这边拔掉啥情况?
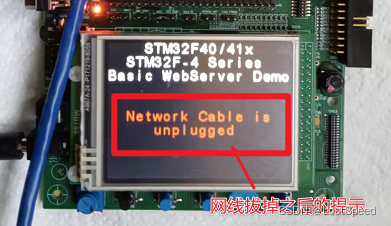
插上网线看看啥情况?
插上网线后, 立马显示静态IP.
现在来研究一下官方咋实现的网线热插拔.
官方板子跑起来后, 拔网线, 在LED上会有提示信息"Network Cable is unplugged", 就从这里入手.
在工程中搜索"Network Cable is", 可以看到在ETH_link_callback()中有写这句
    /* Display message on the LCD */
    LCD_DisplayStringLine(Line5, (uint8_t*)"  Network Cable is  ");
    LCD_DisplayStringLine(Line6, (uint8_t*)"     unplugged   ");
ETH_link_callback()的实现
/**
  * @brief  Link callback function, this function is called on change of link status.
  * @param  The network interface
  * @retval None
  */
void ETH_link_callback(struct netif *netif)
{
  __IO uint32_t timeout = 0;
 uint32_t tmpreg,RegValue;

  struct ip_addr ipaddr;
  struct ip_addr netmask;
  struct ip_addr gw;
#ifndef USE_DHCP
  uint8_t iptab[4] = {0};
  uint8_t iptxt[20];
#endif /* USE_DHCP */

  /* Clear LCD */
  LCD_ClearLine(Line4);
  LCD_ClearLine(Line5);
  LCD_ClearLine(Line6);
  LCD_ClearLine(Line7);
  LCD_ClearLine(Line8);
  LCD_ClearLine(Line9);

  if(netif_is_link_up(netif))
  {
    /* Restart the autonegotiation */
    if(ETH_InitStructure.ETH_AutoNegotiation != ETH_AutoNegotiation_Disable)
    {
      /* Reset Timeout counter */
      timeout = 0;

      /* Enable Auto-Negotiation */
      ETH_WritePHYRegister(DP83848_PHY_ADDRESS, PHY_BCR, PHY_AutoNegotiation);

      /* Wait until the auto-negotiation will be completed */
      do
      {
        timeout++;
      } while (!(ETH_ReadPHYRegister(DP83848_PHY_ADDRESS, PHY_BSR) & PHY_AutoNego_Complete) && (timeout < (uint32_t)PHY_READ_TO));

      /* Reset Timeout counter */
      timeout = 0;

      /* Read the result of the auto-negotiation */
      RegValue = ETH_ReadPHYRegister(DP83848_PHY_ADDRESS, PHY_SR);

      /* Configure the MAC with the Duplex Mode fixed by the auto-negotiation process */
      if((RegValue & PHY_DUPLEX_STATUS) != (uint32_t)RESET)
      {
        /* Set Ethernet duplex mode to Full-duplex following the auto-negotiation */
        ETH_InitStructure.ETH_Mode = ETH_Mode_FullDuplex;
      }
      else
      {
        /* Set Ethernet duplex mode to Half-duplex following the auto-negotiation */
        ETH_InitStructure.ETH_Mode = ETH_Mode_HalfDuplex;
      }
      /* Configure the MAC with the speed fixed by the auto-negotiation process */
      if(RegValue & PHY_SPEED_STATUS)
      {
        /* Set Ethernet speed to 10M following the auto-negotiation */
        ETH_InitStructure.ETH_Speed = ETH_Speed_10M;
      }
      else
      {
        /* Set Ethernet speed to 100M following the auto-negotiation */
        ETH_InitStructure.ETH_Speed = ETH_Speed_100M;
      }

      /*------------------------ ETHERNET MACCR Re-Configuration --------------------*/
      /* Get the ETHERNET MACCR value */
      tmpreg = ETH->MACCR;

      /* Set the FES bit according to ETH_Speed value */
      /* Set the DM bit according to ETH_Mode value */
      tmpreg |= (uint32_t)(ETH_InitStructure.ETH_Speed | ETH_InitStructure.ETH_Mode);

      /* Write to ETHERNET MACCR */
      ETH->MACCR = (uint32_t)tmpreg;

      _eth_delay_(ETH_REG_WRITE_DELAY);
      tmpreg = ETH->MACCR;
      ETH->MACCR = tmpreg;
    }

    /* Restart MAC interface */
    ETH_Start();

#ifdef USE_DHCP
    ipaddr.addr = 0;
    netmask.addr = 0;
    gw.addr = 0;


    DHCP_state = DHCP_START;
#else
    IP4_ADDR(&ipaddr, IP_ADDR0, IP_ADDR1, IP_ADDR2, IP_ADDR3);
    IP4_ADDR(&netmask, NETMASK_ADDR0, NETMASK_ADDR1 , NETMASK_ADDR2, NETMASK_ADDR3);
    IP4_ADDR(&gw, GW_ADDR0, GW_ADDR1, GW_ADDR2, GW_ADDR3);
#endif /* USE_DHCP */

    netif_set_addr(&xnetif, &ipaddr , &netmask, &gw);

    /* When the netif is fully configured this function must be called.*/
    netif_set_up(&xnetif);

#ifdef USE_LCD
    /* Set the LCD Text Color */
    LCD_SetTextColor(Green);

    /* Display message on the LCD */
    LCD_DisplayStringLine(Line5, (uint8_t*)"  Network Cable is  ");
    LCD_DisplayStringLine(Line6, (uint8_t*)"    now connected   ");

    /* Set the LCD Text Color */
    LCD_SetTextColor(White);

  #ifndef USE_DHCP
    /* Display static IP address */
    iptab[0] = IP_ADDR3;
    iptab[1] = IP_ADDR2;
    iptab[2] = IP_ADDR1;
    iptab[3] = IP_ADDR0;
    sprintf((char*)iptxt, "  %d.%d.%d.%d", iptab[3], iptab[2], iptab[1], iptab[0]);
    LCD_DisplayStringLine(Line8, (uint8_t*)"  Static IP address   ");
    LCD_DisplayStringLine(Line9, iptxt);

    /* Clear LCD */
    LCD_ClearLine(Line5);
    LCD_ClearLine(Line6);
  #endif /* USE_DHCP */
#endif /* USE_LCD */
  }
  else
  {
    ETH_Stop();
#ifdef USE_DHCP
    DHCP_state = DHCP_LINK_DOWN;
    dhcp_stop(netif);

#endif /* USE_DHCP */

    /*  When the netif link is down this function must be called.*/
    netif_set_down(&xnetif);
#ifdef USE_LCD
    /* Set the LCD Text Color */
    LCD_SetTextColor(Red);

    /* Display message on the LCD */
    LCD_DisplayStringLine(Line5, (uint8_t*)"  Network Cable is  ");
    LCD_DisplayStringLine(Line6, (uint8_t*)"     unplugged   ");

    /* Set the LCD Text Color */
    LCD_SetTextColor(White);
#endif /* USE_LCD */
  }
}
ETH_link_callback()是网络连接状态改变时的回调函数.
if (netif_is_link_up(netif)) {
// 网线插入正常
// ...
}  else {
		ETH_Stop();
#ifdef USE_DHCP
		DHCP_state = DHCP_LINK_DOWN;
		dhcp_stop(netif);
#endif /* USE_DHCP */
		/*  When the netif link is down this function must be called.*/
		netif_set_down(&xnetif);
#ifdef USE_LCD
		/* Set the LCD Text Color */
		LCD_SetTextColor(Red);
		/* Display message on the LCD */
		LCD_DisplayStringLine(Line5, (uint8_t*)"  Network Cable is  ");
		LCD_DisplayStringLine(Line6, (uint8_t*)"     unplugged   ");
		/* Set the LCD Text Color */
		LCD_SetTextColor(White);
#endif /* USE_LCD */
	}
在不是 netif_is_link_up(netif) 状态时(此时就是网线被拔掉), 将网卡停掉, DHCP停掉, 将网卡状态设置为掉线, 显示网线被拔掉的提示信息.
看看 ETH_link_callback() 哪里注册的回调?
看到 在 LwIP_Init()最后面注册了网卡状态回调.
void LwIP_Init(void)
{
struct ip_addr ipaddr;
struct ip_addr netmask;
struct ip_addr gw;
#ifndef USE_DHCP
uint8_t iptab[4] = {0};
uint8_t iptxt[20];
#endif
/* Create tcp_ip stack thread */
tcpip_init( NULL, NULL );
/* IP address setting */
#ifdef USE_DHCP
ipaddr.addr = 0;
netmask.addr = 0;
gw.addr = 0;
#else
IP4_ADDR(&ipaddr, IP_ADDR0, IP_ADDR1, IP_ADDR2, IP_ADDR3);
IP4_ADDR(&netmask, NETMASK_ADDR0, NETMASK_ADDR1 , NETMASK_ADDR2, NETMASK_ADDR3);
IP4_ADDR(&gw, GW_ADDR0, GW_ADDR1, GW_ADDR2, GW_ADDR3);
#endif
/* - netif_add(struct netif *netif, struct ip_addr *ipaddr,
struct ip_addr *netmask, struct ip_addr *gw,
void *state, err_t (* init)(struct netif *netif),
err_t (* input)(struct pbuf *p, struct netif *netif))
Adds your network interface to the netif_list. Allocate a struct
netif and pass a pointer to this structure as the first argument.
Give pointers to cleared ip_addr structures when using DHCP,
or fill them with sane numbers otherwise. The state pointer may be NULL.
The init function pointer must point to a initialization function for
your ethernet netif interface. The following code illustrates it's use.*/
netif_add(&xnetif, &ipaddr, &netmask, &gw, NULL, ðernetif_init, &tcpip_input);
/* Registers the default network interface.*/
netif_set_default(&xnetif);
if (EthStatus == (ETH_INIT_FLAG | ETH_LINK_FLAG))
{
/* Set Ethernet link flag */
xnetif.flags |= NETIF_FLAG_LINK_UP;
/* When the netif is fully configured this function must be called.*/
netif_set_up(&xnetif);
#ifdef USE_DHCP
DHCP_state = DHCP_START;
#else
#ifdef USE_LCD
iptab[0] = IP_ADDR3;
iptab[1] = IP_ADDR2;
iptab[2] = IP_ADDR1;
iptab[3] = IP_ADDR0;
sprintf((char*)iptxt, " %d.%d.%d.%d", iptab[3], iptab[2], iptab[1], iptab[0]);
LCD_DisplayStringLine(Line8, (uint8_t*)" Static IP address ");
LCD_DisplayStringLine(Line9, iptxt);
#endif
#endif /* USE_DHCP */
}
else
{
/* When the netif link is down this function must be called.*/
netif_set_down(&xnetif);
#ifdef USE_DHCP
DHCP_state = DHCP_LINK_DOWN;
#endif /* USE_DHCP */
/* Set the LCD Text Color */
LCD_SetTextColor(Red);
/* Display message on the LCD */
LCD_DisplayStringLine(Line5, (uint8_t*)" Network Cable is ");
LCD_DisplayStringLine(Line6, (uint8_t*)" not connected ");
/* Set the LCD Text Color */
LCD_SetTextColor(White);
}
/* Set the link callback function, this function is called on change of link status*/
netif_set_link_callback(&xnetif, ETH_link_callback);
}
netif_set_link_callback的实现(netif.c)
#if LWIP_NETIF_LINK_CALLBACK
/**
 * Set callback to be called when link is brought up/down
 */
void netif_set_link_callback(struct netif *netif, netif_status_callback_fn link_callback)
{
  if (netif) {
    netif->link_callback = link_callback;
  }
}
#endif /* LWIP_NETIF_LINK_CALLBACK */
注册回调时, 就是将回调指针赋值为自己的回调函数.
看看 netif的回调指针 link_callback在哪用?
link_callback 用在LWIP的代码中.
Z:\STM32F4xx_DSP_StdPeriph_Lib_V1.8.0\Utilities\Third_Party\lwip-1.4.1\src\include\lwip\netif.h(164) :   netif_status_callback_fn link_callback;
Z:\STM32F4xx_DSP_StdPeriph_Lib_V1.8.0\Utilities\Third_Party\lwip-1.4.1\src\include\lwip\netif.h(297) : void netif_set_link_callback(struct netif *netif, netif_status_callback_fn link_callback);
Z:\STM32F4xx_DSP_StdPeriph_Lib_V1.8.0\Utilities\Third_Party\lwip-1.4.1\src\core\netif.c(70) : #define NETIF_LINK_CALLBACK(n) do{ if (n->link_callback) { (n->link_callback)(n); }}while(0)
Z:\STM32F4xx_DSP_StdPeriph_Lib_V1.8.0\Utilities\Third_Party\lwip-1.4.1\src\core\netif.c(162) :   netif->link_callback = NULL;
Z:\STM32F4xx_DSP_StdPeriph_Lib_V1.8.0\Utilities\Third_Party\lwip-1.4.1\src\core\netif.c(586) : void netif_set_link_callback(struct netif *netif, netif_status_callback_fn link_callback)
Z:\STM32F4xx_DSP_StdPeriph_Lib_V1.8.0\Utilities\Third_Party\lwip-1.4.1\src\core\netif.c(589) :     netif->link_callback = link_callback;
那就是说, 只要注册了这个网络状态回调, 就可以知道网线插拔状态的变化, 然后自己注册的回调中做处理就可以了.
又翻翻代码, 看到官方工程用到了PHY中断, 在中断中判断网卡接收状态. 这部分和热插拔没关系.
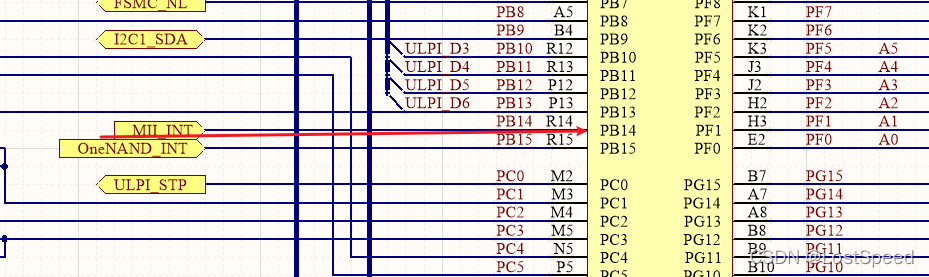
官方工程用的PHY是DP83848, 芯片上有中断输出引脚
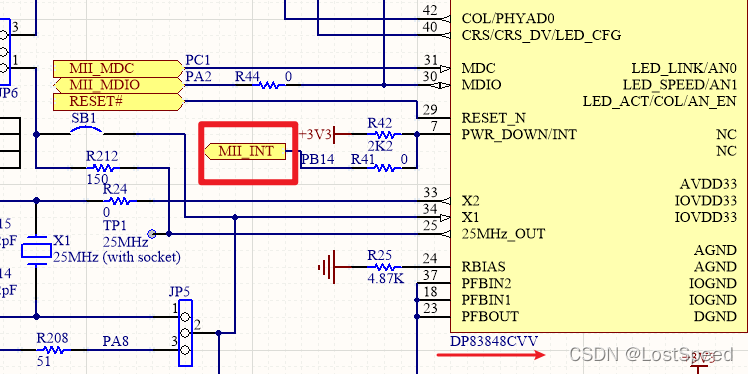
PHY的中断接到了MCU的PB14.
官方工程固件编程时, 用中断输出的通知, 来及时判断处理网卡接受状态
/* Exported types ------------------------------------------------------------*/
/* Exported constants --------------------------------------------------------*/
#define DP83848_PHY_ADDRESS       0x01

/* Specific defines for EXTI line, used to manage Ethernet link status */
#define ETH_LINK_EXTI_LINE             EXTI_Line14
#define ETH_LINK_EXTI_PORT_SOURCE      EXTI_PortSourceGPIOB
#define ETH_LINK_EXTI_PIN_SOURCE       EXTI_PinSource14
#define ETH_LINK_EXTI_IRQn             EXTI15_10_IRQn
/* PB14 */
#define ETH_LINK_PIN                   GPIO_Pin_14
#define ETH_LINK_GPIO_PORT             GPIOB
#define ETH_LINK_GPIO_CLK              RCC_AHB1Periph_GPIOB
/**
  * @brief  EXTI configuration for Ethernet link status.
  * @param PHYAddress: external PHY address
  * @retval None
  */
void Eth_Link_EXTIConfig(void)
{
	GPIO_InitTypeDef GPIO_InitStructure;
	EXTI_InitTypeDef EXTI_InitStructure;
	NVIC_InitTypeDef NVIC_InitStructure;
	/* Enable the INT (PB14) Clock */
	RCC_AHB1PeriphClockCmd(ETH_LINK_GPIO_CLK, ENABLE);
	RCC_APB2PeriphClockCmd(RCC_APB2Periph_SYSCFG, ENABLE);
	/* Configure INT pin as input */
	GPIO_InitStructure.GPIO_Mode = GPIO_Mode_IN;
	GPIO_InitStructure.GPIO_PuPd = GPIO_PuPd_NOPULL;
	GPIO_InitStructure.GPIO_Pin = ETH_LINK_PIN;
	GPIO_Init(ETH_LINK_GPIO_PORT, &GPIO_InitStructure);
	/* Connect EXTI Line to INT Pin */
	SYSCFG_EXTILineConfig(ETH_LINK_EXTI_PORT_SOURCE, ETH_LINK_EXTI_PIN_SOURCE);
	/* Configure EXTI line */
	EXTI_InitStructure.EXTI_Line = ETH_LINK_EXTI_LINE;
	EXTI_InitStructure.EXTI_Mode = EXTI_Mode_Interrupt;
	EXTI_InitStructure.EXTI_Trigger = EXTI_Trigger_Falling;
	EXTI_InitStructure.EXTI_LineCmd = ENABLE;
	EXTI_Init(&EXTI_InitStructure);
	/* Enable and set the EXTI interrupt to priority 1*/
	NVIC_InitStructure.NVIC_IRQChannel = EXTI15_10_IRQn;
	NVIC_InitStructure.NVIC_IRQChannelPreemptionPriority = 13;
	NVIC_InitStructure.NVIC_IRQChannelSubPriority = 0;
	NVIC_InitStructure.NVIC_IRQChannelCmd = ENABLE;
	NVIC_Init(&NVIC_InitStructure);
}
/**
  * @brief  This function handles External line 10 interrupt request.
  * @param  None
  * @retval None
  */
void EXTI15_10_IRQHandler(void)
{
  portBASE_TYPE xHigherPriorityTaskWoken = pdFALSE;

  if(EXTI_GetITStatus(ETH_LINK_EXTI_LINE) != RESET)
  {
    /* Give the semaphore to wakeup LwIP task */
    xSemaphoreGiveFromISR(ETH_link_xSemaphore, &xHigherPriorityTaskWoken );
  }
  /* Clear interrupt pending bit */
  EXTI_ClearITPendingBit(ETH_LINK_EXTI_LINE);

  /* Switch tasks if necessary. */
  if( xHigherPriorityTaskWoken != pdFALSE )
  {
    portEND_SWITCHING_ISR( xHigherPriorityTaskWoken );
  }
}

/**
  * @brief  This function handles ethernet DMA interrupt request.
  * @param  None
  * @retval None
  */
void ETH_IRQHandler(void)
{
  portBASE_TYPE xHigherPriorityTaskWoken = pdFALSE;

  /* Frame received */
  if ( ETH_GetDMAFlagStatus(ETH_DMA_FLAG_R) == SET)
  {
    /* Give the semaphore to wakeup LwIP task */
    xSemaphoreGiveFromISR( s_xSemaphore, &xHigherPriorityTaskWoken );
  }

  /* Clear the interrupt flags. */
  /* Clear the Eth DMA Rx IT pending bits */
  ETH_DMAClearITPendingBit(ETH_DMA_IT_R);
  ETH_DMAClearITPendingBit(ETH_DMA_IT_NIS);

  /* Switch tasks if necessary. */
  if( xHigherPriorityTaskWoken != pdFALSE )
  {
    portEND_SWITCHING_ISR( xHigherPriorityTaskWoken );
  }
}
// 如果网卡中断指示收到了东西, 就去接收网卡发来的东西.
/**
* This function is the ethernetif_input task, it is processed when a packet
* is ready to be read from the interface. It uses the function low_level_input()
* that should handle the actual reception of bytes from the network
* interface. Then the type of the received packet is determined and
* the appropriate input function is called.
*
* @param netif the lwip network interface structure for this ethernetif
*/
void ethernetif_input( void * pvParameters )
{
  struct pbuf *p;

  for( ;; )
  {
    if (xSemaphoreTake( s_xSemaphore, emacBLOCK_TIME_WAITING_FOR_INPUT)==pdTRUE)
    {
TRY_GET_NEXT_FRAME:
      p = low_level_input( s_pxNetIf );
      if   (p != NULL)
      {
        if (ERR_OK != s_pxNetIf->input( p, s_pxNetIf))
        {
          pbuf_free(p);
        }
        else
        {
          goto TRY_GET_NEXT_FRAME;
        }
      }
    }
  }
}
我们板子上用的LAN8720 + RMII, 没有中断引脚, 那就不用中断来判断网卡是否发来了东西.
用中断来判断,效率高点. 用线程轮询也是可以的.
综合以上分析,可以看出, 只要在LWIP初始化时, 加上网卡状态处理回调, 就可以得知网线热插拔的状态, 然后在回调中, 自己处理网线插入和网线拔出动作就行.
补充
官方工程中用中断通知 + 任务(Eth_Link_IT_task), 来查询网线热插拔的状态. 用netif_set_link_up()/netif_set_link_down() 将网线热插拔状态设置好,
在注册的热插拔处理回调中, 再根据网线热插拔状态, 来处理.
对于没有中断引脚的PHY(e.g. LAN8720 + RMII), 可以直接开个线程来检测网线插拔状态.
然后在热插拔回调中根据网线热插拔状态来处理.
void Eth_Link_IT_task( void* pvParameters )
{
	uint32_t pcPHYAddress;
	pcPHYAddress = ( uint32_t  ) pvParameters;

	for (;;) {
		if (xSemaphoreTake( ETH_link_xSemaphore, emacBLOCK_TIME_WAITING_ETH_LINK_IT) == pdTRUE) {
			/* Check whether the link interrupt has occurred or not */
			if (((ETH_ReadPHYRegister((uint16_t) pcPHYAddress, PHY_MISR)) & PHY_LINK_STATUS) != 0) {
				if ((ETH_ReadPHYRegister((uint16_t) pcPHYAddress, PHY_SR) & 1)) {
					netif_set_link_up(&xnetif);
				} else {
					netif_set_link_down(&xnetif);
				}
			}
		}
	}
}
通过单步, 可以知道, 只要调用了netif_set_link_up()/netif_set_link_down() , 在这2个函数里面, 就会调用注册的热插拔回调ETH_link_callback.
所以, 开个任务轮询网线热插拔的状态 + 注册网线热插拔的回调, 就可以处理网线热插拔.
有PHY中断线的通知, 只是效率高一些.
来单步一下
void Eth_Link_IT_task( void* pvParameters )
{
	uint32_t pcPHYAddress;
	pcPHYAddress = ( uint32_t  ) pvParameters;

	for (;;) {
		if (xSemaphoreTake( ETH_link_xSemaphore, emacBLOCK_TIME_WAITING_ETH_LINK_IT) == pdTRUE) {
			/* Check whether the link interrupt has occurred or not */
			if (((ETH_ReadPHYRegister((uint16_t) pcPHYAddress, PHY_MISR)) & PHY_LINK_STATUS) != 0) {
				if ((ETH_ReadPHYRegister((uint16_t) pcPHYAddress, PHY_SR) & 1)) {
					netif_set_link_up(&xnetif); // 插入网线到了这里, 单步进入看看
				} else {
					netif_set_link_down(&xnetif);
				}
			}
		}
	}
}
void netif_set_link_up(struct netif *netif )
{
  if (!(netif->flags & NETIF_FLAG_LINK_UP)) {
    netif->flags |= NETIF_FLAG_LINK_UP;

#if LWIP_DHCP
    if (netif->dhcp) {
      dhcp_network_changed(netif);
    }
#endif /* LWIP_DHCP */

#if LWIP_AUTOIP
    if (netif->autoip) {
      autoip_network_changed(netif);
    }
#endif /* LWIP_AUTOIP */

    if (netif->flags & NETIF_FLAG_UP) {
#if LWIP_ARP
      /* For Ethernet network interfaces, we would like to send a "gratuitous ARP" */
      if (netif->flags & NETIF_FLAG_ETHARP) {
        etharp_gratuitous(netif);
      }
#endif /* LWIP_ARP */

#if LWIP_IGMP
      /* resend IGMP memberships */
      if (netif->flags & NETIF_FLAG_IGMP) {
        igmp_report_groups( netif);
      }
#endif /* LWIP_IGMP */
    }
    NETIF_LINK_CALLBACK(netif); // 走到这里了, 单步进去, 就执行到了网线热插拔回调
  }
}
#if LWIP_NETIF_LINK_CALLBACK
#define NETIF_LINK_CALLBACK(n) do{ if (n->link_callback) { (n->link_callback)(n); }}while(0)
#else
#define NETIF_LINK_CALLBACK(n)
#endif /* LWIP_NETIF_LINK_CALLBACK */
那官方工程网线热插拔的处理流程, 到此, 就很清楚了.
这篇实验的目标已经达到, 一会在自己工程上, 试试加上网线热插拔的处理.


 1331
1331

 被折叠的 条评论
为什么被折叠?
被折叠的 条评论
为什么被折叠?
 到【灌水乐园】发言


