


 本文详细介绍了如何在ParaView中通过XML文件加载和构建自定义插件,包括创建服务器管理器XML以加载滤波器,设置输入属性,以及构建和编译插件的CMake过程。此外,还讨论了多输入滤波器的实现,如何将插件添加到特定菜单类别,添加图标,以及如何通过XML添加GUI参数控制。
XML插件加载
如果没有通过源码编译安装ParaView,则使用XML进行插件加载是唯一的选择。
首先,服务端管理器XML文件对于滤波器插件是必须的。用来加载滤波器插件到某个类别中的GUI XML文件是可选的。
例如,需要将vtk中的vtkCellDerivatives滤波器作为插件加载到ParaView中。首先需要编写服务器管理配置XML文件(CellDerivatives.xml),该文件和之前为新滤波器编写文件相同:
<ServerManagerConfiguration>
  <ProxyGroup name="filters">
    <SourceProxy name="MyCellDerivatives" class="vtkCellDerivatives" label="My Cell Derivatives">
      <Documentation long_help="Create point attribute array by projecting points onto an elevation vector." short_help="Create a point array representing elevation">
      </Documentation>
      <InputProperty name="Input" command="SetInputConnection">
        <ProxyGroupDomain name="groups">
          <Group name="source"/>
          <Group name="filters"/>
        </ProxyGroupDomain>
        <DataTypeDomain name="input_type">
          <DataType value="vtkDataSet"/>
        </DataTypeDomain>
      </InputProperty>
    </SourceProxy>
  </ProxyGroup>
</ServerManagerConfiguration>
至此,可以使用ParaView中的插件管理器添加该XML文件。
如果该滤波器只有一个输入,需要设置InputProperty的name属性设定为"Input"。否则该滤波器的结果可能不会正确显示在ParaView管线浏览器中。
编译为共享库(Linux)或动态链接库(Windows)
如果从源码进行插件开发,需要将插件编译成共享库或者动态链接库。顶层的CMake文件如下:
# Standard CMake boilerplate. ParaView's 'find_package' requires at least 3.8.
cmake_minimum_required(VERSION 3.8)
project(sharedlibrary)

# There five lines are required in order to set up installation directories
# (which also control build directory locations) and enable shared builds
# (CMake's default is for static build)
include(GNUInstallDirs)
set(CMAKE_RUNTIME_OUTPUT_DIRECTORY "${CMAKE_BINARY_DIR}/${CMAKE_INSTALL_BINDIR}")
set(CMAKE_LIRARY_OUTPUT_DIRECTORY "${CMAKE_BINARY_DIR}/${CMAKE_INSTALL_LIBDIR}")
set(CMAKE_ARCHIVE_OUTPUT_DIRECTORY "${CMAKE_BINARY_DIR}/${CMAKE_INSTALL_LIBDIR}")
set(BUILD_SHARED_LIBS ON)

# Find ParaView. This will bring in ParaView's CMake API and imported targets.
find_packate(ParaView REQUIRED)

# Scan the plugin file in order to set up internal data structures for bulding plugins.
paraview_plugin_scan(
  # The 'paraview.plugin' file describing the plugin.
  PLUGIN_FILES "${CMAKE_CURRENT_SOURCE_DIR}/plugin/paraview.plugin"
  # A result variable for the (enabled) plugins found during the scan
  PROVIDES_PLUGINS plugins
  # Enable plugins during this scan by defult
  ENABLE_BY_DEFAULT ON
)

# Build the plugins discovered during the scan
paraview_plugin_build(
  PLUGINS ${plugins}
)
paraview.plugin文件描述了需要进行构建的插件:
NAME
  ElevationFilter
DESCRIPTION
  An example paraview plugin containing server manager XML and the server
  manager classes to build. This plugin can be loaded on the server side.
REQUIRES_MODULES
  VTK::CommonCore
  VTK::FiltersCore
在插件文件夹中(与paraview.plugin文件同一个文件夹中),还有一个CMakeLists.txt文件来说编译信息,内容如下:
paraview_add_plugin(ElevationFiter
  VERSION "1.0"
  MODULE ElevationFilters
  MDOULE_FILES "${CMAKE_CURRENT_SOURCE_DIR}/ElevationFilters/vtk.module"
)
因为我们是在创建自定义滤波器,该滤波器需要是一个VTK Module,以此来支持获取XML中的关于该滤波器的信息。首先,该模块需要在vtk.module中声明。
NAME
  ElevationFilters
DEPENDS
  VTK::FiltersCore
PRIVATE_DEPENDS
  VTK::CommonCore
然后构建模块,将相关的服务器管理器XML文件附加到该模块。注意,由于内部管理库目标的方式,模块名不能与插件名相同。
set(classes vtkMyElevationFilter)

# Find external packages here using 'find_package'.

vtk_module_add_module(ElevationFilters
  CLASSES ${classes})

# Link to external packages here using 'vtk_module_link(ElevationFilters)'

paraview_add_server_manager_xmls(
  XMLS MyElevationFilters.xml
)
使用CMake进行该滤波器插件的构建。只要该插件加载到了ParaView,就会在Alphabetical列表中显示出来。注意,最后会有两个库,加载的是ElevationFilter插件,而不是ElevationFilters模块库文件。
多输入滤波器
如果一个滤波器需要多个输入接口,有两种方式实现:
(1)在VTK滤波器中创建辅助函数,比如SetYourInputName,该函数用于处理VTK管道寻址。
(2)通过XML文件中的编号机型寻址/访问输入连接。port_index属性指明了需要连接的输入接口。SetInputConnection函数是将使用这个port_index实际调用的命令,用于设置管道。
以下是XML文件,该文件中的滤波器拥有多输入。该滤波器将3个vtkPolyData对象作为输入。
<ServerManagerConfiguration>
  <ProxyGroup name="filters">
    <SourceProxy name="LandmarkTransformFilter" class="vtkLandmarkTransformFilters" label="LandmarkTransformFilter">
      <Documentation
         long_help="Align two point sets using vtkLandmarkTransform to compute the best transformation between the two point sets."
         short_help="vtkLandmarkTransformFilter.">
      </Documentation>

      <InputProperty name="SourceLandmarks" port_index="0" command="SetInputConnection">
        <ProxyGroupDomain name="groups">
          <Group name="sources"/>
          <Group name="filters"/>
        </ProxyGroupDomain>
        <DataTypeDomain name="input_type">
          <DataType value="vtkPolyData">
        </DataTypeDomain>
        <Documentation>
          Set the source data set. This data set that will move towards the target data set.
        </Documentation>
      </InputProperty>

      <InputProperty name="TargetLandmars" port_index="1" command="SetInputConnection">
        <ProxyGroupDomain name="groups">
          <Group name="sources"/>
          <Group name="filters"/>
        </ProxyGroupDomain>
        <DataTypeDomain name="input_type">
          <DataType value="vtkPolyData">
        </DataTypeDomain>
        <Documentation>
          Set the target data set. This data set will stay stationary.
        </Documentation>
      </InputProperty>

      <InputProperty
          name="SourceDataSet"
          port_index="2"
          command="SetInputConnection">
        <ProxyGroupDomain name="groups">
          <Group name="sources"/>
          <Group name="filters"/>
        </ProxyGroupDomain>
        <DataTypeDomain name="input_type">
          <DataType value="vtkPolyData"/>
        </DataTypeDomain>
        <Documentation>
          Set the source data set landmark points.
        </Documentation>
      </InputProperty>

      <Hints>

      </Hints>

    </SourceProxy>
  </ProxyGroup>
</ServerManagerConfiguration>
要在ParaView中设置输入,只需要在管道浏览器中选择一个输入,并且从Filters菜单中选择一个滤波器。该步骤会打开一个对话框,该对话框中对每个输入接口选择对应的对象。
将类别添加到滤波器菜单
现在假设我们需要将一个新的类别添加到滤波器菜单中,该类别为"Extensions",并且将一个滤波器显示在该菜单中。在这个案例中,我们在XML文件中添加一个提示(hint),该Hints标签会告诉ParaView用哪个类别来显示该滤波器。XML标签如下:
<Hints>
  <ShowInMenu category="Extensions" />
</Hints>
如果该类别已经存在,如"Data Analysis",那么这个滤波器会添加到这个已经存在的类别菜单中。
添加图标
一些Filters中的滤波器拥有自己的图标(如Clip)。添加图标需要编写Qt资源文件(参考MyElevation.qrc):
<RCC>
  <qresource prefix="/MyIcons">
    <file>MyElevationIcon.png</file>
  </qresource>
</RCC>
为了给该滤波器使用图标,需要在服务端管理器XML文件中的Hints标签下添加如下内容:
<Hints>
  <ShowInMenu icon=":/MyIcons/MyElevationIcon.png"/>
</Hints>
最后,在插件的CmakeLists.txt中需要包括MyElevation.qrc文件,代码如下:
paraview_add_plugin(ElevationFilter
  VERSION "1.0"
  MODULES ElevationFilters
  MODULE_FILES "${CMAKE_CURRENT_SOURCE_DIR}/ElevationFilters/vtk.module"
  UI_RESOURCES MyElevation.qrc
)
添加GUI参数控制
只需要简单的在服务端管理器XML文件中添加如下代码,就可以将滤波器的参数展示给ParaView用户。
1、按钮标签
以下标签作为按钮出现,"name"属性对应的字符串作为按钮的文字描述,这里是"My Button"。当用户点击该按钮是,会调用"command"指明的函数,这里"MyButtonClicked"被执行,该函数属于该vtk代理类中的函数。
<Property name="MyButton" command="MyButtonClicked">
</Property>
2、整形值标签
该标签作为文字框(text box)出现
<IntVectorProperty
  name="bStartByMatchingCentroids"
  command="SetbStartByMatchingCentroids"
  number_of_elements="1"
  default_values="1">
</IntVectorProperty>
3、布尔值标签
该标签作为选择控制框(check box)。该标签使用IntVectorProperty结合一个额外行(BooleanDomain)进行使用,BooleanDomain说明了这是一个选择框而不是文字框。
<IntVectorProperty
  name="bStartByMatchingCentroids"
  command="SetbStartByMatchingCentroids"
  number_of_elements="1"
  default_values="1">
  <BooleanDomain name="bool"/>
</IntVectorProperty>
4、字符串标签
该标签作为文字框出现在界面上。
<StringVectorProperty
  name="YourStringVariable"
  command="SetYourStringVariable"
  number_of_elements="1"
  default_values="1">
</StringVectorProperty>
5、浮点数标签(double)
该标签作为文字框出现
<DoubleVectorProperty
  name="YourDoubleVariable"
  command="SetYourDoubleVariable"
  number_Of_elements="1"
  default_values="1">
</DoubleVectorProperty>
6、多值浮点数标签(Double)
该标签作为文字框出现。
<DoubleVectorProperty
  name="YourDoubleVectorVariable"
  command="SetYourDoubleVectorVariable"
  number_of_elements="3"
  default_values="1.0 0.0 0.0">
</DoubleVectorProperty>
7、浮点(double)滑动调节按钮
该标签创建一个从0.0到1.0的滑动调节按钮。
<DoubleVectorProperty
  name="PercentToRemove"
  command="SetPercentToRemove"
  number_of_elements="1"
  default_value="0.1">
  <DoubleRangeDomain name="range" min="0.1" max="1.0"/>
</DoubleVectorProperty>
8、下拉列表
该示例创建一个有3个选择的下拉列表,每个选择的值都可以指定。
<IntVectorProperty
name="TransformMode"
command="SetTransformMode"
number_of_elements="1"
default_values="1">
<EnumerationDomain name="enum">
<Entry value="6" text="RigidBody"/>
<Entry value="7" text="Similarity"/>
<Entry value="12" text="Affine"/>
</EnumerationDomain>
<Documentation>
This property indicates which transform mode will be used.
</Documentation>
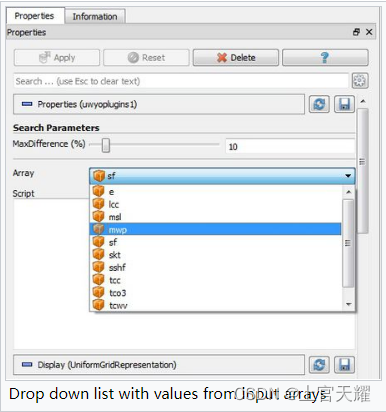
</IntvectorProperty>9、从输入数组取值的下拉列表
该示例创建了一个下拉列表,该列表的输入值是从ProgrammableFilter的输入值。
<StringVectorProperty
  name="SelectInputScalars"
  label="Array"
  command="SetInputArrayToProcess"
  number_of_elements="5"
  element_types="0 0 0 0 2"
  animateable="0">
  <ArrayListDomain
    name="array_list"
    attribute_type="Scalars"
    input_domain_name="inputs_array">
    <RequiredProperties>
      <Property name="Input" function="Input" />
    </RequiredProperties>
  </ArrayListDomain>
</StringVectorProperty>
效果如下图:
10、从文件获取输入的下拉列表
如果您需要使用文件中的值填充列表,并且能够选择/取消选择列表条目(例如,选择从文件中加载哪些变量),请使用类似于以下内容的XML:
<StringVectorProperty information_only="1" name="CellArrayInfo">
  <ArraySelectionInformationHelper attribute_name="Cell" />
</StringVectorProperty>

<StringVectorProperty
  command="SetCellArrayStatus"
  element_types="2 0"
  information_property="CellArrayInfo"
  label="Cell Arrays"
  name="CellArrayStatus"
  number_of_elements="0"
  number_of_elements_per_command="2"
  repeat_command="1">
  <ArraySelectionDmoain name="array_list>
    <RequiredProperties>
      <Property function="ArrayList" name="CellArrayInfo"/>
    </RequiredProperties>
  </ArraySelectionDomain>
  <Documentation>
    ThisP property lists which cell-centered arrays to read.
  </Documentation>
</StringVectorProperty>
也可以使用以下的方式:
<StringVectorProperty
  command="SetCellArrayStatus
  element_type="2 0"
  information_property="CellArrayInfo"
  label="Cell Arrays"
  name="CellArrayStatus"
  number_of_elements="0"
  number_of_elements_per_command="2"
  repeat_command="1">
  <ArrayListDomain name="array_list" attribute_type="Scalars" input_domain_name="input_array">
    <RequiredProperties>
      <Property name="Input" function="Input"/>
    </RequiredProperties>
  </ArrayListDomain>
</StringVectorProperty>
结果如下:


 3681
3681

 被折叠的 条评论
为什么被折叠?
被折叠的 条评论
为什么被折叠?
 到【灌水乐园】发言


