


debug模式
debug模式使用一个默认的debug.keystore进行签名。
这个默认签名(keystore)是不需要密码的,它的默认位置在C:\Users\<用户名>\.Android\debug.keystore,如果不存在Android studio会自动创建它。
例如我的debug.keystore就在C:\Users\Administrator\.android\debug.keystore。
release模式
在我们正式发布项目的时候是不能使用debug.keystore的。开发过程中我们也可以使用发布模式运行。可以通过如下设置:
BuildVariants-Build Variant-debug/release
如果项目需要细分开发dev和生产pro版本,每个版本中都包含debug和release模式,可以这么设置:
就细分成四种模式:
release模式需要配置签名才能运行,这时就需要一个keystore
如果没有就需要创建,已经创建过keystore请跳过此步骤
1.创建keystore,并生成我们的apk(打包)
第一步: Build --->> Generate Signed APK
第二步:Create New···(已经创建过keystore选Choose existing···)
第三步:填写相关信息
设置keystore路径、密码,设置key:别名、密码、有效期,证书等
Key store path:存放路径
Key
Alias:别名
Validity(years):有效期(一般默认25年)
Certificate:证书
First and Last Name:姓名
Organization Unit:组织单位
Organization:组织
City or Locality:城市或地区
State or Province:州或省
Country Code(XX):国家代码(XX),中国:86
第四步:输入key、keystore密码
第五步:选择发布app的路径,默认即可 选择release方式发布
OK,发布成功,可以到 刚才设置的目标文件夹下面找到发布的apk
那对一些人来说,这样也太麻烦了,每次都得输入相关信息,还得进行选择,那么有更简单快捷的方法吗?答案是有的。
我们可以在项目的app目录下的build.gradle中进行签名的配置。
2.release模式配置keystore
Project structure-signing,输入已创建的keystore信息
使得签名生效需配置Build Types
点击OK即可,然后查看对应build.gradle的配置文件应该是这样的。当然了,你也可以通过直接在build.gradle里面写下面这段。
 1 signingConfigs {
 2         release {
 3             keyAlias 'androiddebugkey'
 4             keyPassword 'android'
 5             storeFile file('C:/Users/ssc/.android/debug.keystore')
 6             storePassword 'android'
 7         }
 8     }
 9
10     ·········
11
12 buildTypes {
13         release {
              //是否混淆
14             minifyEnabled false
              //是否移除无用资源
15             zipAlignEnabled true
              //混淆的配置文件
16             proguardFiles getDefaultProguardFile('proguard-android.txt'), 'proguard-rules.pro'
17             signingConfig signingConfigs.release
18         }
19 }
上述的配置虽然配置简单,但是存在不安全性,假如你的项目是开源的,你把签名文件的配置密码之类的信息用明文写在build.gradle里面,那是不是很不安全呢?
可以将签名文件的配置密码之类的信息直接写在local.properties下,因为在Git版本控制的项目中,我们可以看到我们项目project模式根目录下有一个.gitignore的文件,里面的配置大概如下所示
我们可以看到/local.properties,意思就是说local.properties默认是不添加到版本控制里面的,因为local.properties存储的是我们环境资源的一些相关信息,如sdk的路径。故我们可以在local.properties下配置签名信息而不用担心密钥外泄。对于开源项目来说,是非常好的。
在local.properties下直接添加相关信息
在build.gradle里,为了不用明文显示,我们首先要获得key的相关配置,所以我们可以在app的build.gradle里
android {}之上新增代码
 1 def keystoreFilepath = ''
 2 def keystorePSW = ''
 3 def keystoreAlias = ''
 4 def keystoreAliasPSW = ''
 5 // default keystore file, PLZ config file path in local.properties
 6 def keyfile = file('s.keystore.temp')
 7
 8 Properties properties = new Properties()
 9 // local.properties file in the root director
10 properties.load(project.rootProject.file('local.properties').newDataInputStream())
11 keystoreFilepath = properties.getProperty("keystore.path")
12
13 if (keystoreFilepath) {
14     keystorePSW = properties.getProperty("keystore.password")
15     keystoreAlias = properties.getProperty("keystore.alias")
16     keystoreAliasPSW = properties.getProperty("keystore.alias_password")
17     keyfile = file(keystoreFilepath)
18 }
View Code
app/build.gradle下的signingConfigs可以改为:
| 1 2 3 4 5 6 7 8 |
|
设置后Signing中keystore值无需关心
相应的,buildTypes也可以配置成这样
 1 buildTypes {
 2         release {
 3             minifyEnabled false
 4             proguardFiles getDefaultProguardFile('proguard-android.txt'), 'proguard-rules.pro'
 5 //            signingConfig signingConfigs.release
 6             //签名文件存在,则签名
 7             if (keyfile.exists()) {
 8                 println("WITH -> buildTypes -> release: using jks key")
 9                 signingConfig signingConfigs.release
10             } else {
11                 println("WITH -> buildTypes -> release: using default key")
12             }
13             23       }
24     }
到此,前面配置完成。
附:查询keystore的相关信息,如查看sha1的值;可以在运行窗口,定位到keystore所在的路径,执行cd C:\Users\ssc\.android
执行这条语句后就能显示Key的所有信息(以android默认keystore为例)
keytool -list -v -keystore xxx.jks
如果release和debug模式想要統一配置,使用正式发布的keystore
android {
    signingConfigs {
        config {
            keyAlias 'myalias'
            keyPassword 'mypswd'
            storeFile file("./keystore/***.jks")
            storePassword '******'
        }
    }
    buildTypes {
        release {
            debuggable false
            minifyEnabled true //启用Proguard
            shrinkResources true //是否清理无用资源,依赖于minifyEnabled
            useProguard true
            signingConfig signingConfigs.config
            proguardFiles getDefaultProguardFile('proguard-android.txt'), 'proguard-rules.pro'
        }
        debug {
            debuggable true
            minifyEnabled true //启用Proguard
            shrinkResources true //是否清理无用资源,依赖于minifyEnabled
            useProguard true
            signingConfig signingConfigs.config
            proguardFiles getDefaultProguardFile('proguard-android.txt'), 'proguard-rules.pro'
        }
    }
二、多渠道打包
多渠道打包的作用:apk--发布到市场上(渠道就是可以下载apk的地方)
1.0:发布到不同渠道上的apk,标记不同的渠道,目的是为了统计该渠道的下载量,留存率等等数据
2.0:了解下载量
3.0:针对性打广告
如果不多渠道打包的话,一个apk包投到数十个市场上,你怎么知道那个市场上下载量最大----多渠道主要是为了运营
下面就说说几种多渠道打包的方式。
第一种:友盟多渠道打包
友盟做为三方平台中的佼佼者,有着很多的优秀的轮子。友盟统计能够检测出APK下载的渠道,并进行统计,根据优秀的渠道对其下一步的投资。
不多说,直接上代码:
1、首先是AndroidManifest中添加:
android:name="UMENG_CHANNEL"
android:value="${UMENG_CHANNEL_VALUE}"
2、其次在build.gradle中添加,baidu {}为指定渠道名称简写:
 productFlavors {
   baidu {}
   xiaomi {}
   qihu360 {}
   yingyongbao {}
   huawei {}
 }
 productFlavors.all {
   flavor -> flavor.manifestPlaceholders = [UMENG_CHANNEL_VALUE: name]
}
3、在APK后面加上版本号方法:
Android Studio 2.3版本:
 applicationVariants.all { variant ->
         variant.outputs.each { output ->
             def outputFile = output.outputFile
             if (outputFile != null && outputFile.name.endsWith('.apk')) {
                 def fileName = "driver_${variant.productFlavors[0].name}_v${defaultConfig.versionName}.apk"
                 output.outputFile = new File(outputFile.parent, fileName)
             }
         }
     }
Android Studio 3.0版本:
flavorDimensions 'api' productFlavors {
    ... }
    android.applicationVariants.all { variant ->
         variant.outputs.all {
            outputFileName = "driver_${variant.productFlavors[0].name}_v${variant.versionName}.apk"
        }
    }
4、下面我在第一次开启APP的介绍界面添加获取渠道号的方法,并且上传到参数。
private String getChannel() {
    try {
        PackageManager pm = getPackageManager();
        ApplicationInfo appInfo = pm.getApplicationInfo(getPackageName(), PackageManager.GET_META_DATA);
        return appInfo.metaData.getString("UMENG_CHANNEL");
      } catch (PackageManager.NameNotFoundException ignored) {
    }
    return "";
}
5、打包上线:
image
缺点:很明显,缺点就是既繁琐又恶心。
第二种:美团多渠道打包Walle
在Android 7.0推出了新的应用签名方案APK Signature Scheme v2后,之前快速生成渠道包的方式已经行不通了。于是推出了最新的渠道包工具Walle(文章地址)
新一代渠道包生成工具完全是基于ZIP文件格式和APK Signing Block存储格式而构建,基于文件的二进制流进行处理,有着良好的处理速度和兼容性,能够满足不同的语言编写的要求, 该工具主要有四部分组成:
1、用于写入ID-value信息的Java类库
2、Gradle构建插件用来和Android的打包流程进行结合
3、用于读取ID-value信息的Java类库
4、用于供com.android.application使用的读取渠道信息的AAR
这样,每打一个渠道包只需复制一个APK,然后在APK中添加一个ID-value即可,这种打包方式速度非常快,对一个30M大小的APK包只需要100多毫秒(包含文件复制时间)就能生成一个渠道包,而在运行时获取渠道信息只需要大约几毫秒的时间。
基本操作:
1、配置根build.gradle:
 buildscript {
   dependencies {
         classpath 'com.meituan.android.walle:plugin:1.1.6'
    }
}
2、配置App build.gradle:
applyplugin:'walle'
  dependencies {
  compile'com.meituan.android.walle:library:1.1.6'
}
3、配置插件
walle {
//指定渠道包的输出路径
apkOutputFolder=newFile("${project.buildDir}/outputs/channels");
//定制渠道包的APK的文件名称
apkFileNameFormat='${appName}-${packageName}-${channel}-${buildType}-v${versionName}-${versionCode}-${buildTime}.apk';
//渠道配置文件
channelFile=newFile("${project.getProjectDir()}/channel")}
配置项具体解释:
apkOutputFolder:指定渠道包的输出路径, 默认值为new File("${project.buildDir}/outputs/apk")
apkFileNameFormat:定制渠道包的APK的文件名称, 默认值为'${appName}-${buildType}-${channel}.apk'
可使用以下变量:
projectName - 项目名字

appName - App模块名字

packageName - applicationId (App包名packageName)

buildType - buildType (release/debug等)

channel - channel名称 (对应渠道打包中的渠道名字)

versionName - versionName (显示用的版本号)

versionCode - versionCode (内部版本号)

buildTime - buildTime (编译构建日期时间)

fileSHA1 - fileSHA1 (最终APK文件的SHA1哈希值)

flavorName - 编译构建 productFlavors 名

channelFile:包含渠道配置信息的文件路径。 具体内容格式详见:[渠道配置文件示例](https://github.com/Meituan-Dianping/walle/blob/master/app/channel),支持使用#号添加注释。
4、获取渠道信息:
Stringchannel=WalleChannelReader.getChannel(this.getApplicationContext());
5、生成渠道包:
在Terminal命令行中输入:
./gradlew clean assembleReleaseChannels
写的有些流水账了,最好的博文就是官方文档
第三种:腾讯开源的多渠道VasDolly
第四种:三方打包工具(推荐)
链接:https://pan.baidu.com/s/1dTsq7cZq8kqFbql-KhutuQ 密码:3zu7
使用方法:
1、拷贝需要打包的APK到根目录
2、增加或者修改channel文件中的渠道列表
3、运行publish.exe文件
代码设置:
compile 'com.meituan.android.walle:library:1.0.5'
 ChannelInfo channelInfo = WalleChannelReader.getChannelInfo(getApplicationContext());
 String channelName = channelInfo.getChannel();  (渠道名称)
 Map<String, String> extraInfo = channelInfo.getExtraInfo();  (额外信息)
速度极快,简单方便,从此爱上打包
打包方法多种多样,也大同小异,重要的是明白其中的原理,对Android签名和ZIP文件的格式的深入了解,值得学习和反思。
三、Gradle統一配置
这里我们来看一下和 app 目录下的 build.gradle 有什么区别:
app 目录下的 build.gradle 是:apply plugin:com.android.application
Module 库下的 build.gradle 是:apply plugin:com.android.library
其它的就是版本的不一样了,要素是一样的,这里就是我们今天着重要来介绍的,这里我们看到编译的 SDK 版本和编译的 Tools 版本以及支持 SDK 的最低版本等的版本号都是不一样的,这里我们就需要来统一,而我们总不能每次都来手动配置,当 Module 增多时则容易出错
解决办法:
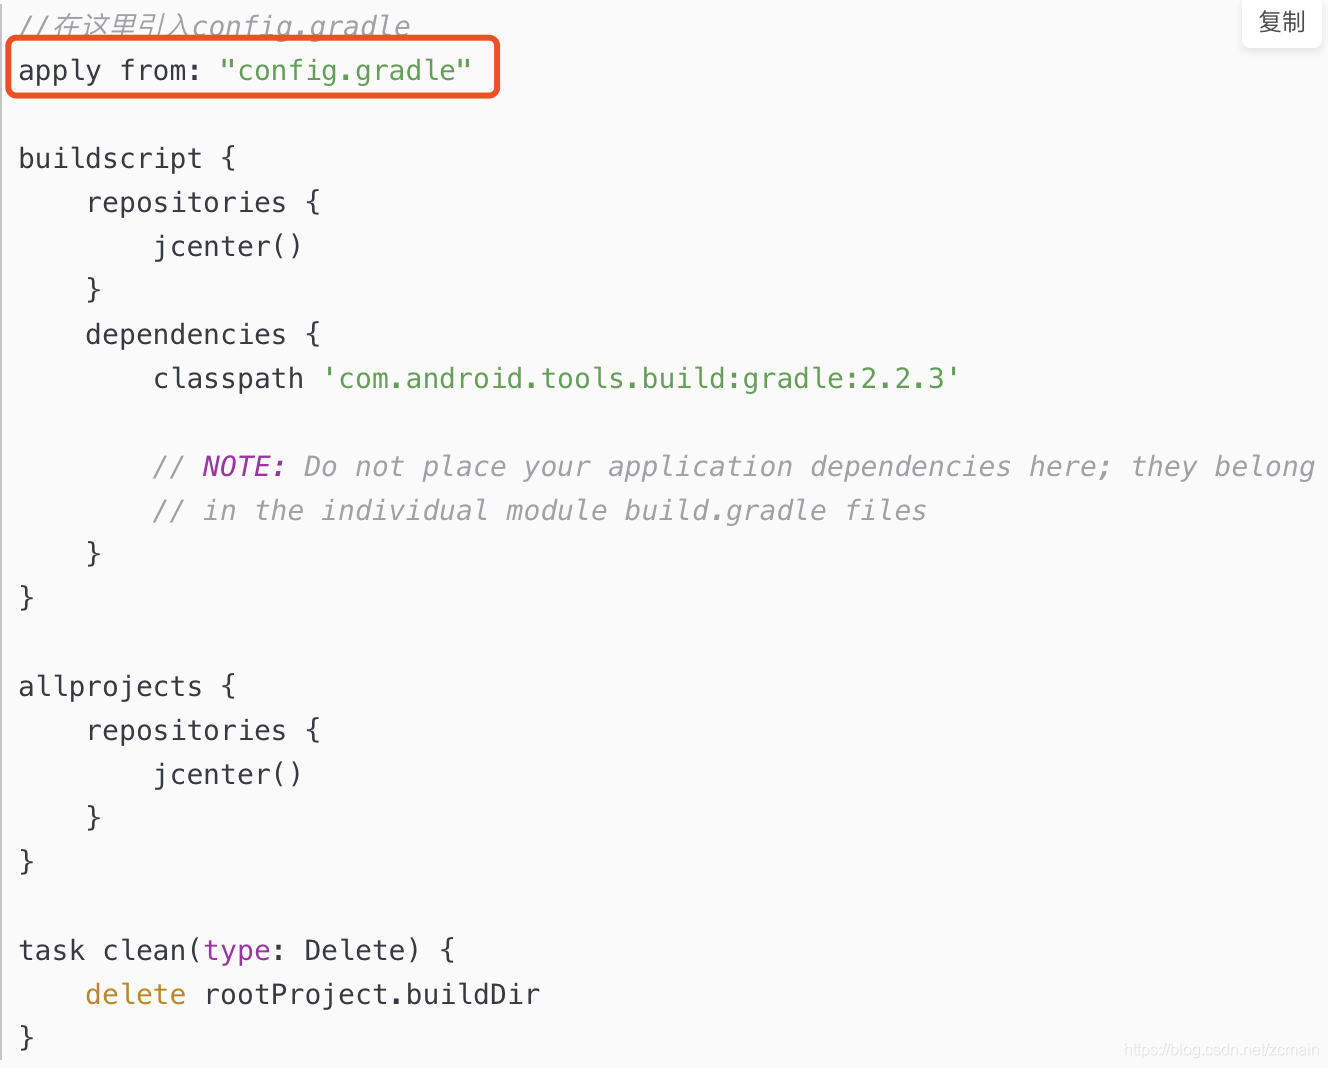
方法一:在项目的根目录的 build.gradle 里进行统一配置如下
-
/*在根目录中配置公用供子模块调用*/ -
ext { -
//Android -
compileSdkVersion = 25 -
buildToolsVersion = "25.0.2" -
minSdkVersion = 15 -
targetSdkVersion = 25 -
//Version -
supportLibrary = "25.1.0" -
//supportLibraries dependencies -
supportDependencies = [ -
supportAppcompat: "com.android.support:appcompat-v7:${supportLibrary}", -
] -
}
配置完后工程根目录的 build.gradle 情况:
-
//构建脚本 -
buildscript { -
repositories { -
//依赖的仓库 -
jcenter() -
} -
dependencies { -
//项目依赖的Gradle版本 -
classpath 'com.android.tools.build:gradle:2.2.3' -
// NOTE: Do not place your application dependencies here; they belong -
// in the individual module build.gradle files -
} -
} -
allprojects { -
repositories { -
jcenter() -
} -
} -
task clean(type: Delete) { -
delete rootProject.buildDir -
} -
/*在根目录中配置公用供子模块调用*/ -
ext { -
//Android -
compileSdkVersion = 25 -
buildToolsVersion = "25.0.2" -
minSdkVersion = 15 -
targetSdkVersion = 25 -
//Version -
supportLibrary = "25.1.0" -
//supportLibraries dependencies -
supportDependencies = [ -
supportAppcompat: "com.android.support:appcompat-v7:${supportLibrary}", -
] -
}
接下来我们在 app 的 build.gradle 中进行调用如下:
-
apply plugin: 'com.android.application' -
android { -
compileSdkVersion rootProject.ext.compileSdkVersion -
buildToolsVersion rootProject.ext.buildToolsVersion -
defaultConfig { -
applicationId "com.example.qiudengjiao.activitytest" -
minSdkVersion rootProject.ext.minSdkVersion -
targetSdkVersion rootProject.ext.targetSdkVersion -
versionCode 1 -
versionName "1.0" -
testInstrumentationRunner "android.support.test.runner.AndroidJUnitRunner" -
} -
buildTypes { -
release { -
minifyEnabled false -
proguardFiles getDefaultProguardFile('proguard-android.txt'), 'proguard-rules.pro' -
} -
} -
} -
dependencies { -
compile fileTree(include: ['*.jar'], dir: 'libs') -
androidTestCompile('com.android.support.test.espresso:espresso-core:2.2.2', { -
exclude group: 'com.android.support', module: 'support-annotations' -
}) -
compile 'junit:junit:4.12' -
compile rootProject.ext.supportDependencies.supportAppcompat -
}
在 Module 的 build.gradle 中进行调用如下:
-
apply plugin: 'com.android.library' -
android { -
compileSdkVersion rootProject.ext.compileSdkVersion -
buildToolsVersion rootProject.ext.buildToolsVersion -
defaultConfig { -
minSdkVersion rootProject.ext.minSdkVersion -
targetSdkVersion rootProject.ext.targetSdkVersion -
versionCode 1 -
versionName "1.0" -
testInstrumentationRunner "android.support.test.runner.AndroidJUnitRunner" -
} -
buildTypes { -
release { -
minifyEnabled false -
proguardFiles getDefaultProguardFile('proguard-android.txt'), 'proguard-rules.pro' -
} -
} -
} -
dependencies { -
compile fileTree(dir: 'libs', include: ['*.jar']) -
androidTestCompile('com.android.support.test.espresso:espresso-core:2.2.2', { -
exclude group: 'com.android.support', module: 'support-annotations' -
}) -
testCompile 'junit:junit:4.12' -
compile rootProject.ext.supportDependencies.supportAppcompat -
}
这样我们就完成了使用 Gradle 对项目中 app 下的 build.gradle 和 Module 中的 build.gradle 依赖进行统一配置的解决,以此类推,更多的 Module 也是如此配置,以后需要版本的更改我们只需要去根目录 build.gradle 修改即可
方法二
因为每个人都有自己的配置习惯,这里我们再提供一种配置以供大家参考,这里我们在主项目的根目录下创建 config.gradle 来配置需要的相关配置信息如下:
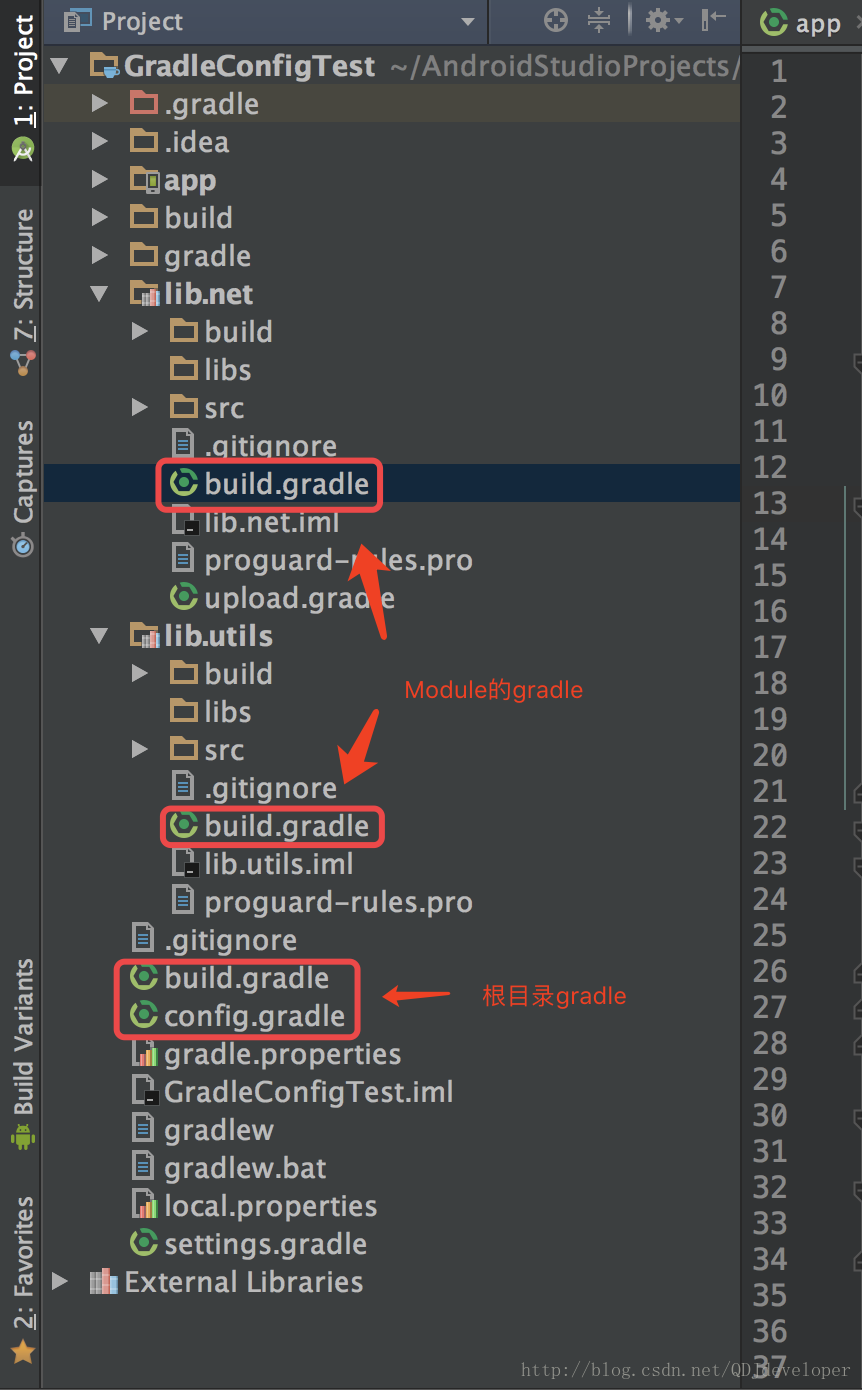
config.gradle 里面的配置信息:
-
/** -
* 在主项目的根目录下创建config.gradle文件 -
* 在这里单独处理统一依赖问题 -
* 注意需要在根目录的build.gradle中进行引入 -
*/ -
ext { -
android = [ -
compileSdkVersion: 25, -
buildToolsVersion: "25.0.2", -
minSdkVersion : 15, -
targetSdkVersion : 25 -
] -
//Version -
supportLibrary = "25.1.0" -
//supportLibraries dependencies -
supportDependencies = [ -
supportAppcompat: "com.android.support:appcompat-v7:${supportLibrary}", -
supportV4 : "com.android.support:support-v4:${supportLibrary}", -
suppoutDesign : "com.android.support:design:${supportLibrary}" -
] -
}
然后我们需要在根目录的 build.gradle 中把 config.gradle 引入进来,这里特别注意是在根目录的 build.gradle 中引入
apply from: "config.gradle" 引入后的根目录 build.gradle 如下:
接下来我们就可以在 Module 中引入使用了,如下:
-
apply plugin: 'com.android.library' -
//android配置 -
def config = rootProject.ext.android -
//相关库依赖 -
def librarys = rootProject.ext.supportDependencies -
android { -
compileSdkVersion config.compileSdkVersion -
buildToolsVersion config.buildToolsVersion -
defaultConfig { -
minSdkVersion config.minSdkVersion -
targetSdkVersion config.targetSdkVersion -
versionCode 1 -
versionName "1.0" -
testInstrumentationRunner "android.support.test.runner.AndroidJUnitRunner" -
} -
buildTypes { -
release { -
minifyEnabled false -
proguardFiles getDefaultProguardFile('proguard-android.txt'), 'proguard-rules.pro' -
} -
} -
} -
dependencies { -
compile fileTree(dir: 'libs', include: ['*.jar']) -
androidTestCompile('com.android.support.test.espresso:espresso-core:2.2.2', { -
exclude group: 'com.android.support', module: 'support-annotations' -
}) -
testCompile 'junit:junit:4.12' -
//在这里使用库的依赖 -
compile librarys.supportAppcompat -
compile librarys.supportV4 -
compile librarys.suppoutDesign -
}
到这里我们就成功的引入到了 Module 的 build.gradle 中,以后每个 Module 中的引入都是这样,实现了和方法一 同样的功能,个人感觉第二种更好一点,大家自己选择吧,毕竟各有所好,好了,到这里就给大家分享完了在项目中使用 Gradle 统一配置依赖,希望对大家有用
四、Android Studio插件利器
提高开发效率的插件推荐
1、GsonFormat
2、Butterknife/Android Code Generator
3、Android Selectors Generate
注意:同時不適合安裝太多插件,避免過多消耗内存,造成卡頓。
五、代码检测及性能分析工具
1、代码检测工具——Android Lint
2、性能分析工具——Monitor


 985
985


 被折叠的 条评论
为什么被折叠?
被折叠的 条评论
为什么被折叠?
 到【灌水乐园】发言


