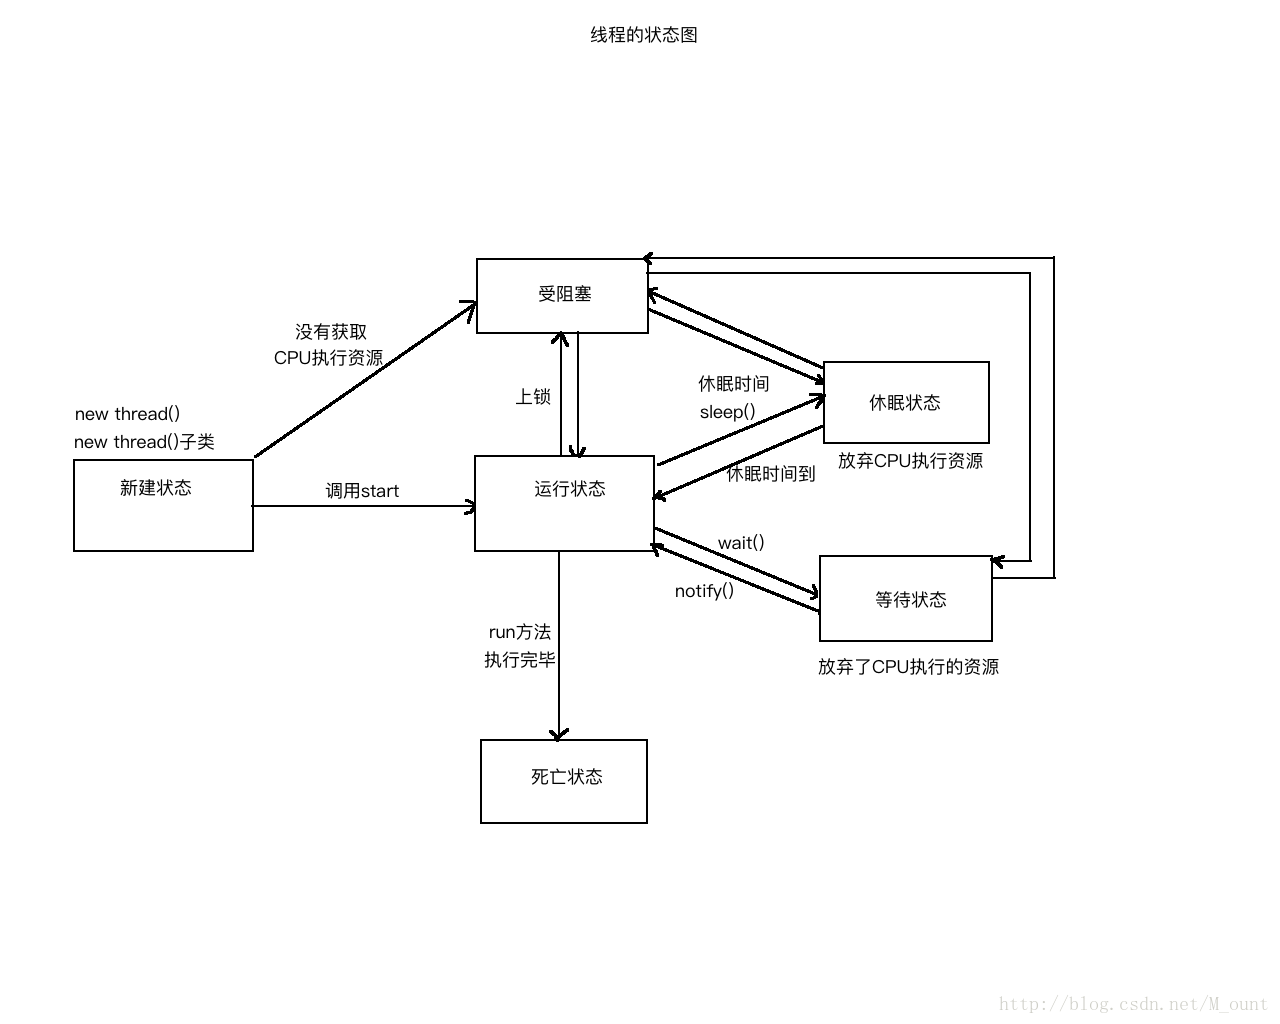
线程的六种状态:
新建状态(new 线程对象)
运行状态(调用start)
受阻塞状态(等待CPU的执行资源)
休眠状态(调用sleep(时间)方法)
等待状态(调用了wait 方法)
死亡状态(run方法执行完毕)六种状态关系图:
匿名内部类方式:
概论:相当于创建一个该类的子类对象书写形式:
new 父类名() {
  重写父类方法
};
举例:
public static void fun () {
new Thread() {
@Override
public void run () {
for (int i = 0 ; i < 50 ; i++) {
System.out .println(Thread.currentThread().getName() + "-" + i);
}
}
}
}
public static void fun () {
Thread thread = new Thread(new Runnable() {
@Override
public void run () {
for (int i = 0 ; i < 50 ; i++) {
System.out .println(Thread.currentThread().getName() + "-" + i);
}
}
});
thread.start();
}同步锁(同步代码块):
注意:锁可以是任意对象,但要保证锁的唯一书写形式:
synchronized (对象锁) {

}
同步锁规则:
1.线程遇到锁就进同步代码块,并且携带锁;
2.当线程执行完代码块中的代码时,把锁返还;
3.线程没有遇到锁会在同步代码块外等着,遇到锁才能进
举例(卖票问题):
class TitketsRunnable implements Runnable {private int titkets = 50 ;
private Object obj = new Object();
@Override
public void run() {
while (true ) {
synchronized (obj) {
if (titkets > 0 ) {
try {
Thread.sleep(10 );
} catch (InterruptedException e) {
e.printStackTrace();
}
System.out.println(Thread.currentThread().getName() + "剩余" + titkets + "张票" );
titkets--;
} else {
break ;
}
}
Thread.yield();
}
}
}
class TitketsRunnable implements Runnable {private int titkets = 50 ;
@Override
public void run() {
while (true ) {
if (sellTitkets()) {
break ;
}
Thread.yield();
}
}
public synchronized boolean sellTitkets() {
if (titkets > 0 ) {
try {
Thread.sleep(10 );
} catch (InterruptedException e) {
e.printStackTrace();
}
System.out.println(Thread.currentThread().getName() + "剩余" + titkets + "张票" );
titkets--;
return false ;
} else {
return true ;
}
}
}public static void main (String[] args) {
TitketsRunnable tRunnable = new TitketsRunnable();
Thread t1 = new Thread(tRunnable);
Thread t2 = new Thread(tRunnable);
Thread t3 = new Thread(tRunnable);
t1.start();
t2.start();
t3.start();
}模拟线程死锁:
class LockA {private LockA() {
}
public static final LockA LOCK_A = new LockA();
}
class LockB {private LockB() {
}
public static final LockB LOCK_B = new LockB();
}
class DeadLockRunnanle implements Runnable {private boolean isTrue = true ;
@Override
public void run() {
while (true ) {
if (isTrue) {
synchronized (LockA.LOCK_A) {
System.out.println("if...LOCK_A" );
synchronized (LockB.LOCK_B) {
System.out.println("if...LOCK_B" );
}
}
} else {
synchronized (LockB.LOCK_B) {
System.out.println("else...LOCK_B" );
synchronized (LockA.LOCK_A) {
System.out.println("else...LOCK_A" );
}
}
}
isTrue = !isTrue;
}
}
}public static void main (String[] args) {
DeadLockRunnanle dlr = new DeadLockRunnanle();
Thread t1 = new Thread(dlr);
Thread t2 = new Thread(dlr);
t1.start();
t2.start();
}Lock(接口锁):
该接口是JDK1.5之后出现的书写形式:
lock .lick();
try {
写操作共享数据的代码
} finally {
lock .unlock();
}举例:
class BTitkets implements Runnable {private int titkets = 50 ;
private ReentrantLock lock = new ReentrantLock();
@Override
public void run() {
while (true ) {
lock.lock();
try {
try {
Thread.sleep(10 );
} catch (InterruptedException e) {
e.printStackTrace();
}
if (titkets > 0 ) {
System.out.println(Thread.currentThread().getName() + "剩余" + titkets + "张票" );
titkets--;
}else {
break ;
}
} finally {
lock.unlock();
}
Thread.yield();
}
}
}public static void main (String[] args) {
BTitkets titkets = new BTitkets();
Thread t1 = new Thread(titkets);
Thread t2 = new Thread(titkets);
Thread t3 = new Thread(titkets);
t1.start();
t2.start();
t3.start();
}接口实现线程的好处:
1. 避免直接继承Thread 类的局限性(避免单继承)
2. 接口即插即用 减少类与类之间联系(可以解耦)interrupt(停止线程):
只要线程停了就叫停止线程举例:
class StopRunnable implements Runnable {public boolean isOver = false ;
@Override
public void run() {
while (!Thread.currentThread().isInterrupted()) {
try {
Thread.sleep(1000 );
} catch (InterruptedException e) {
e.printStackTrace();
}
System.out.println(Thread.currentThread().getName() + "...run" );
}
}
}public static void main (String[] args) {
StopRunnable sr = new StopRunnable();
Thread thread = new Thread(sr);
thread.start();
try {
Thread.sleep(3000 );
} catch (InterruptedException e) {
e.printStackTrace();
}
thread.interrupt();
System.out .println("利用标记停止线程" );
try {
Thread.sleep(1000 );
} catch (InterruptedException e) {
e.printStackTrace();
}
System.out .println("主线程结束" );
}总结:
interrupt () 方法实际上,设置了布尔值
调用interrupt 方法时,如果线程中有wait () (等待)或者sleep () (休眠),会抛出一个InterruptedException 异常,并且清除中断状态
调用interrupt 方法时,如果线程中没有等待或者休眠,会设置中断状态(true /false 的改变)测试中断状态:
注意:
1.interrupt方法 尽量不要使用,如果遇到等待状态可以使用该方法,强行清除该方法
2.如果要停止线程直接使用标记法,
举例:
class InterruptThread extends Thread {public boolean isOver = false ;
@Override
public synchronized void run() {
while (true ) {
try {
wait();
} catch (InterruptedException e) {
e.printStackTrace();
}
System.out.println(Thread.currentThread().getName() + "...run" );
}
}
}public static void main (String[] args) {
InterruptThread t1 = new InterruptThread();
InterruptThread t2 = new InterruptThread();
t1.start();
t2.start();
for (int i = 0 ; i < 50 ; i++) {
if (i == 25 ) {
t1.interrupt();
t2.interrupt();
break ;
}
System.out .println(i + "----" );
}
System.out .println("主线程结束" );
}总结:
线程1 带着锁进来,遇到wait 方法放弃CPU的执行权,等待着,锁还回去;
线程2 进来了,也遇到wait 方法了,放弃CPU的执行权,也等着了;
两个线程都进入冷冻(中断)状态,要解决冷冻(中断)状态,可调用interrupt方法,清除该状态举例:
需求:
Person类 姓名 性别
开启两个线程:一个对Person对象进行赋值,一个对Person对象进行打印;
要求:一次打印 张三 男,一次打印 zhangsan nv,间隔输出
class SetRunnable implements Runnable {private Person p;
private boolean isTrue = true ;
public SetRunnable() {
super ();
}
public SetRunnable(Person p) {
super ();
this .p = p;
}
@Override
public void run() {
while (true ) {
synchronized (p) {
if (p.flag == true ) {
try {
p.wait();
} catch (InterruptedException e) {
e.printStackTrace();
}
}
if (isTrue) {
p.name = "张三" ;
p.gender = "男" ;
} else {
p.name = "zhangsan" ;
p.gender = "nv" ;
}
isTrue = !isTrue;
p.flag = true ;
p.notify();
}
}
}
}
class PrintRunnable implements Runnable {private Person p;
public PrintRunnable() {
super ();
}
public PrintRunnable(Person p) {
super ();
this .p = p;
}
@Override
public void run() {
while (true ) {
synchronized (p) {
if (p.flag == false ) {
try {
p.wait();
} catch (InterruptedException e) {
e.printStackTrace();
}
}
System.out.println(p.name + " " + p.gender);
p.flag = false ;
p.notify();
}
}
}
}
class Person {public String name;
public String gender;
public boolean flag = false ;
}public static void main (String[] args) {
Person person = new Person();
SetRunnable sr = new SetRunnable(person);
Thread st = new Thread(sr);
PrintRunnable pr = new PrintRunnable(person);
Thread pt = new Thread(pr);
st.start();
pt.start();
}优化后的代码:
class SetRunnable1 implements Runnable {private Person1 p;
private boolean isTrue = true ;
public SetRunnable1() {
super ();
}
public SetRunnable1(Person1 p) {
super ();
this .p = p;
}
@Override
public void run() {
while (true ) {
if (isTrue) {
p.SetPreson("张三" , "男" );
} else {
p.SetPreson("zhangsan" , "nv" );
}
isTrue = !isTrue;
}
}
}
class PrintRunnable1 implements Runnable {private Person1 p;
public PrintRunnable1() {
super ();
}
public PrintRunnable1(Person1 p) {
super ();
this .p = p;
}
@Override
public void run() {
while (true ) {
p.printP();
}
}
}
class Person1 {public String name;
public String gender;
public boolean flag = false ;
public synchronized void SetPreson(String name, String gender) {
if (flag == true ) {
try {
this .wait();
} catch (InterruptedException e) {
e.printStackTrace();
}
}
this .name = name;
this .gender = gender;
flag = true ;
this .notify();
}
public synchronized void printP() {
if (flag == false ) {
try {
this .wait();
} catch (InterruptedException e) {
e.printStackTrace();
}
}
System.out.println(this .name + " " + this .gender);
flag = false ;
this .notify();
}
}总结:
1. 先保证要操作都是同一个对象
2. 要保证数据安全 需要使用锁 并且要使用同一把锁
3. 保证操作的逻辑顺序要对(先赋值 再打印)用wait 和notify


 14万+
14万+

 被折叠的 条评论
为什么被折叠?
被折叠的 条评论
为什么被折叠?
 到【灌水乐园】发言


