


第一部分:容器的基本实现
一 基本用法
配置文件 beanFactoryTest.xml
<span style="font-size:14px;"><?xml version="1.0" encoding="UTF-8"?>
<beans xmlns="http://www.springframework.org/schema/beans"
    xmlns:xsi="http://www.w3.org/2001/XMLSchema-instance"
    xsi:schemaLocation="
       http://www.springframework.org/schema/beans
       http://www.springframework.org/schema/beans/spring-beans-3.1.xsd">

    <bean id="myTestBean" class="com.zhangyiwen.website03.base_exercise.spring.MyTestBean"/>
</beans></span>
java代码
public void testSimpleLoad(){
    BeanFactory bf = new XmlBeanFactory(new ClassPathResource(
            "beanFactoryTest.xml"));
    MyTestBean bean = (MyTestBean) bf.getBean("myTestBean");
    System.out.println(bean.getTestStr());
}
以上代码的基本功能
a.读取配置文件beanFactoryTest.xml
b.根据beanFactoryTest.xml中的位置找到对应的类的配置,并实例化
c.调用实例化后的实例
二 核心类介绍
2.1 DefaultListableBeanFactory
类结构图如下
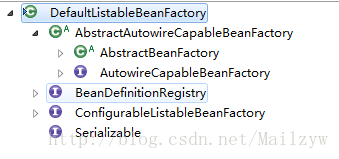
1)DefaultListableBeanFactory继承AbstractAutowireCapableBeanFactory,并实现了ConfigurableListableBeanFactory和BeanDefinitionRegistry
2)AbstractAutowireCapableBeanFactory:综合AbstractBeanFactory并对接口AutowireCapableBeanFactory进行实现
AbstractBeanFactory:对单例的注册及获取,对FactoryBean的特殊处理,提供配置Factory的各种方法
AutowireCapableBeanFactory:提供创建Bean、自动注入、初始化以及应用bean的后处理器的接口
3)ConfigurableListableBeanFactory:BeanFactory配置清单等
4)BeanDefinitionRegistry定义对BeanDefinition的各种增删改操作
2.2 XmlBeanFactory
对DefaultListableBeanFactory进行了扩展,主要用于从XML文档中读取BeanDefinition
唯独与父类不同的是增加了XmlBeanDefinitionReader类型的reader属性,用于对资源文件进行读取、解析和注册
2.3 XmlBeanDefinitionReader
Spring的大部分功能都是以配置作为切入点的,该类就是用于对资源文件进行读取、解析和注册。
0)大致脉络
资源文件路径->Resource文件->Document文件->解析Document及Element
1)该类继承了AbstractBeanDefinitionReader,通过继承父类中的方法,使用ResourceLoader将资源文件路径转换为对应的Resource文件
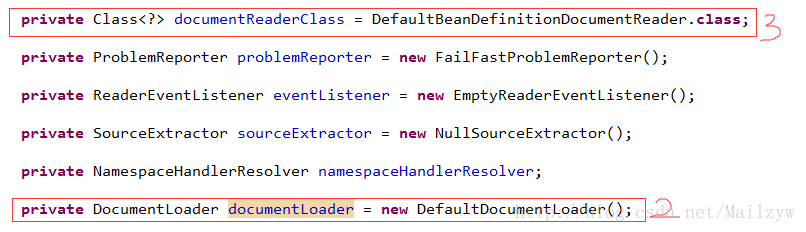
2)通过自己包含的DocumentLoader对Resource资源进行转换,将Resource文件转换为Document文件
3)通过自己包含的DefaultBeanDefinitionDocumentReader类对Document进行解析
三 容器的基础XmlBeanFactory
3.1 配置文件封装
BeanFactory bf = new XmlBeanFactory(new ClassPathResource("beanFactoryTest.xml"));在java中,将不同来源的资源抽象成URL,通过注册不同的handler(URLStreamHandler)来处理不同来源的资源的读取逻辑。
Spring对其内部使用到的资源实现了自己的抽象结构:Resource接口来封装底层资源。
Spring的配置文件读取是通过进行封装的。
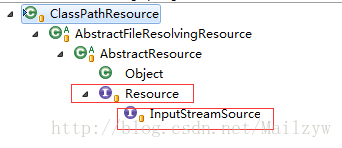
InputStreamSource封装任何能返回InputStream的类
Resource接口抽象了所有Spring内部使用到的底层资源:File、URL、Classpath等
1)它定义了3个判断当前资源状态的方法:存在性(exists)、可读性(isReadable)、打开状态(isOpen)
2)Resource接口还提供了不同资源到URL、URI、File类型的转换
当通过Resource相关类完成了对配置文件的封装后,配置文件的读取工作就全权交给XmlBeanDefinitionReader来处理了。
3.2 加载Bean
通过调用XmlBeanDefinitionReader类型的reader的loadBeanDefinitions(Resource resource)方法,来开始整个资源的加载:
1)对传入的resource参数做封装,目的是考虑到Resource可能存在编码要求
new EncodedResource(resource)
2)通过SAX读取XML文件的方式准备InputSource对象
InputStream inputStream = encodedResource.getResource().getInputStream();
InputSource inputSource = new InputSource(inputStream);
3)将顺便的数据通过参数传入真正的核心处理部分doLoadBeanDefinitions
doLoadBeanDefinitions(inputSource, encodedResource.getResource());
核心部分 doLoadBeanDefinitions(inputSource, encodedResource.getResource()):
1)获取对XML文件的验证模式(DTD或XSD)
int validationMode = getValidationModeForResource(resource);
2)加载XML文件,得到对应的Document
Document doc = this.documentLoader.loadDocument(inputSource, getEntityResolver(), this.errorHandler, validationMode, isNamespaceAware());
3)根据返回的Document注册Bean信息
registerBeanDefinitions(doc, resource);
以上三个步骤支撑着整个Spring容器部分的实现基础。
解析及注册BeanDefinitions:registerBeanDefinitions(doc, resource);
1)实例化BeanDefinitionDocumentReader
BeanDefinitionDocumentReader documentReader = createBeanDefinitionDocumentReader();
BeanDefinitionDocumentReader 是一个接口,真正的实例类型是DefaultBeanDefinitionDocumentReader
2)documentReader.registerBeanDefinitions(doc, createReaderContext(resource))的功能
a.提取root:Element root = doc.getDocumentElement();
b.再次将root作为参数继续BeanDefinition的注册:doRegisterBeanDefinitions(root);-->注册Bean信息的真正核心
<span style="font-size:12px;">	protected void doRegisterBeanDefinitions(Element root) {
                //1 处理profile属性
                String profileSpec = root.getAttribute(PROFILE_ATTRIBUTE);
		if (StringUtils.hasText(profileSpec)) {
			Assert.state(this.environment != null, "Environment must be set for evaluating profiles");
			String[] specifiedProfiles = StringUtils.tokenizeToStringArray(
					profileSpec, BeanDefinitionParserDelegate.MULTI_VALUE_ATTRIBUTE_DELIMITERS);
			if (!this.environment.acceptsProfiles(specifiedProfiles)) {
				return;
			}
		}

                //专门处理解析
		BeanDefinitionParserDelegate parent = this.delegate;
		this.delegate = createHelper(this.readerContext, root, parent);

		preProcessXml(root);
                //2 解析并注册BeanDefinition
                /*
                 对于根节点或者子节点,如果是默认命名空间的话则采用parseDefaultElement(ele, delegate)方法进行解析
                 否则使用delegate.parseCustomElement(ele)方法对自定义明明空间进行解析
                */
                <strong>parseBeanDefinitions(root, this.delegate);</strong>
                postProcessXml(root);

		this.delegate = parent;
	}</span>
对于默认标签解析与自定义标签解析,将在下一章博客继续...
四 默认标签的解析——以默认标签<bean>标签的解析和注册为例
4.1 解析BeanDefinition
Beandefinition是一个接口,是配置文件<bean>元素标签在容器中的内部表示形式。
其中RootBeanDefinition是最常用的实现类,它对应一般性的<bean>元素标签;GenericBeanDefinition是一站式服务类。两者都继承了AbstractBeanDefinition
Spring通过BeanDefinition将配置文件中的<bean>配置信息转换为容器的内部表示,并将这些BeanDefinition注册到BeanDefinitionRegistry中。
Spring容器的BeanDefinitionRegistry就像是Spring配置信息的内存数据库,主要是以map的形式保存,后续操作直接从BeanDefinitionRegistry中读取配置信息
4.2 注册解析的BeanDefinition
public static void registerBeanDefinition(BeanDefinitionHolder definitionHolder, BeanDefinitionRegistry registry)
1)通过BeanName的注册
a.对AbstractBeanDefinition进行校验
b.对beanName已经注册的情况进行处理(抛出异常或者直接覆盖)
c.加入map缓存:将beanDefinition直接放入map中,使用beanName作为key
d.清除解析之前留下的对应beanName的缓存
2)通过别名的注册
a.处理一些特殊情况:alias与beanName相同、alias覆盖处理、alias循环检查
b.注册alias
4.3 通知监听器解析及注册完成
getReaderContext().fireComponentRegistered(new BeanComponentDefinition(bdHolder));
开发人员可以通过注册监听器的方式将处理逻辑写入监听器中,则注册BeanDefinition事件发生时,处理逻辑就会执行
补充 spring相关使用示例
5.1 constructor-arg使用
配置文件
    <bean id="helloBean2" class="com.zhangyiwen.website03.base_exercise.spring.constructor_arg.HelloBean">
    	<constructor-arg index="0"><value>张益文</value></constructor-arg>
        <constructor-arg index="1"><value>你好</value></constructor-arg>
    </bean>
示例Bean
public class HelloBean {

	private String name;
	private String word;

	public HelloBean() {
	}

	public HelloBean(String name, String word) {
		this.name = name;
		this.word = word;
	}

	@Override
	public String toString() {
		return "HelloBean [name=" + name + ", word=" + word + "]";
	}

}
测试代码
		HelloBean bean = (HelloBean) bf.getBean("helloBean2");
		System.out.println(bean.toString());
输出结果
HelloBean [name=张益文, word=你好]5.2 import标签的使用
配置文件
<?xml version="1.0" encoding="UTF-8"?>
<beans xmlns="http://www.springframework.org/schema/beans"
    xmlns:xsi="http://www.w3.org/2001/XMLSchema-instance"
    xsi:schemaLocation="
       http://www.springframework.org/schema/beans
       http://www.springframework.org/schema/beans/spring-beans-3.1.xsd">
    <import resource="customerContext.xml" />
    <import resource="systemContext.xml" />
</beans>


 596
596


 被折叠的 条评论
为什么被折叠?
被折叠的 条评论
为什么被折叠?
 到【灌水乐园】发言


