


文章目录
1. 简介
1.1 什么是 Consul
-
Consul 官网 :https://www.consul.io/intro/index.html
-
Consul 是一套开源的分布式服务发现和配置管理系统,由 HashiCorp 公司用 Go 语言开发
-
提供了微服务系统中的服务治理、配置中心、控制总线等功能。这些功能中的每一个都可以根据需要单独使用,也可以一起使用以构建全方位发服务网络,总之 Consul 提供了一种完整的服务网格解决方案。

1.2 作用
-
服务发现
提供HTTP和DNS两种发现方式
-
健康检测
支持多种协议,HTTP、TCP、Docker、Shell脚本定制化
-
Key-Value 存储
key , Value的存储方式
-
多数据中心
Consul支持多数据中心
-
可视化 Web 界面
1.3 下载地址
- 官网下载地址 :https://www.consul.io/downloads.html
- 官方安装教程 :https://learn.hashicorp.com/consul/getting-started/install.html
1.4 中文文档
1.5 启动 Consul
-
进入 CMD
-
进到 Consul 的目录
-
运行 Consul
consul agent -dev
-
访问 localhost:8500

2. 服务提供者 Provider
-
新建模块 :cloud-provider-payment-consul-8006
-
修改 POM
<dependencies> <!-- https://mvnrepository.com/artifact/org.springframework.cloud/spring-cloud-starter-consul-discovery --> <dependency> <groupId>org.springframework.cloud</groupId> <artifactId>spring-cloud-starter-consul-discovery</artifactId> </dependency> <dependency> <groupId>com.demo.springcloud</groupId> <artifactId>cloud-api-commons</artifactId> <version>${project.version}</version> </dependency> <!-- https://mvnrepository.com/artifact/org.springframework.boot/spring-boot-starter-web --> <dependency> <groupId>org.springframework.boot</groupId> <artifactId>spring-boot-starter-web</artifactId> </dependency> <!-- https://mvnrepository.com/artifact/org.springframework.boot/spring-boot-starter-web --> <dependency> <groupId>org.springframework.boot</groupId> <artifactId>spring-boot-starter-actuator</artifactId> </dependency> <!-- https://mvnrepository.com/artifact/org.springframework.boot/spring-boot-devtools --> <dependency> <groupId>org.springframework.boot</groupId> <artifactId>spring-boot-devtools</artifactId> <scope>runtime</scope> <optional>true</optional> </dependency> <!-- https://mvnrepository.com/artifact/org.projectlombok/lombok --> <dependency> <groupId>org.projectlombok</groupId> <artifactId>lombok</artifactId> <optional>true</optional> </dependency> <!-- https://mvnrepository.com/artifact/org.springframework.boot/spring-boot-starter-test --> <dependency> <groupId>org.springframework.boot</groupId> <artifactId>spring-boot-starter-test</artifactId> <scope>test</scope> </dependency> </dependencies> -
编写 YML
server: port: 8006 spring: application: name: consul-provider-payment # Consul 注册中心地址 cloud: consul: host: localhost port: 8500 discovery: service-name: ${spring.application.name} -
编写主启动类
@SpringBootApplication @EnableDiscoveryClient public class ConsulMain8006 { public static void main(String[] args) { SpringApplication.run(ConsulMain8006.class, args); } } -
业务类
-
Controller
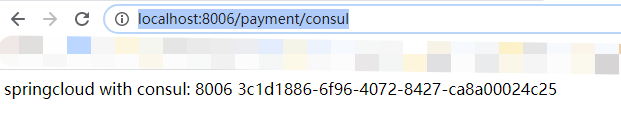
@RestController
@Slf4j
public class PaymentController {

    @Value("${server.port}")
    private String serverPort;

    @GetMapping(value = "/payment/consul")
    public String paymentConsul(){
        return "springcloud with consul: "+serverPort+"\t"+ UUID.randomUUID().toString();
    }
}
-
启动测试

访问 http://localhost:8006/payment/consul
3. 服务消费者 Consumer
-
新建模块 :cloud-consumer-order-Consul-80
-
修改 POM
<dependencies> <!-- https://mvnrepository.com/artifact/org.springframework.cloud/spring-cloud-starter-consul-discovery --> <dependency> <groupId>org.springframework.cloud</groupId> <artifactId>spring-cloud-starter-consul-discovery</artifactId> </dependency> <dependency> <groupId>com.demo.springcloud</groupId> <artifactId>cloud-api-commons</artifactId> <version>${project.version}</version> </dependency> <!-- https://mvnrepository.com/artifact/org.springframework.boot/spring-boot-starter-web --> <dependency> <groupId>org.springframework.boot</groupId> <artifactId>spring-boot-starter-web</artifactId> </dependency> <!-- https://mvnrepository.com/artifact/org.springframework.boot/spring-boot-starter-web --> <dependency> <groupId>org.springframework.boot</groupId> <artifactId>spring-boot-starter-actuator</artifactId> </dependency> <!-- https://mvnrepository.com/artifact/org.springframework.boot/spring-boot-devtools --> <dependency> <groupId>org.springframework.boot</groupId> <artifactId>spring-boot-devtools</artifactId> <scope>runtime</scope> <optional>true</optional> </dependency> <!-- https://mvnrepository.com/artifact/org.projectlombok/lombok --> <dependency> <groupId>org.projectlombok</groupId> <artifactId>lombok</artifactId> <optional>true</optional> </dependency> <!-- https://mvnrepository.com/artifact/org.springframework.boot/spring-boot-starter-test --> <dependency> <groupId>org.springframework.boot</groupId> <artifactId>spring-boot-starter-test</artifactId> <scope>test</scope> </dependency> </dependencies> -
编写 YML
server: port: 80 spring: application: name: consul-consumer-order cloud: consul: host: localhost port: 8500 discovery: service-name: ${spring.application.name} -
编写主启动类
@SpringBootApplication @EnableDiscoveryClient public class OrderConsulMain80 { public static void main(String[] args) { SpringApplication.run(OrderConsulMain80.class, args); } } -
业务类
-
配置 RestTemplate Bean
@Configuration public class ApplicationContextConfig { @Bean @LoadBalanced public RestTemplate getRestTemplate(){ return new RestTemplate(); } } -
Controller
@Slf4j
@RestController
public class OrderConroller {
    public static final String INVOME_URL = "http://consul-provider-payment";

    @Resource
    private RestTemplate restTemplate;

    @GetMapping("/consumer/payment/consul")
    public String payment (){
        String result = restTemplate.getForObject(INVOME_URL+"/payment/consul",String.class);
        return result;
    }
}
-
启动测试

访问 http://localhost/consumer/payment/consul

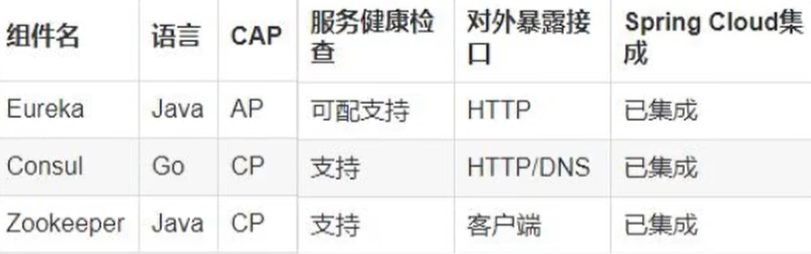
4. 三个注册中心异同点
- 对比的是 Eureka、Zookeeper、Consul
4.1 背景
- NoSQL 的 CAP 原则
C:Consistency(强一致性)
A:Availability(可用性)
P:Partition tolerance(分区容错)
- 分布式系统中,以上三个原则最多只能满足其中的两个。
- 因为是分布式系统,分区容错性 P 是一定要满足的,所以就在 A、C 中取舍
4.2 对比
- Eureka 选择的是 AP(可用性、分区容错性)
- Eureka选择了保证可用性,Eureka 的各个节点都是平等的,某些节点挂掉不会对正常工作产生很大的影响,剩余的节点依旧可以提供注册和查询服务。在客户端向注册中心注册服务时发现连接失败,会自动切换其他节点,只要还有一台注册中心在,就能保证服务的可用性,只不过查询到的信息可能不是最新的
- Eureka 还有一种自我保护机制:如果在 15分钟 内超过 85% 的节点都没有正常的心跳,就认为客户端与注册中心出现了网络故障,此时会出现以下情况:
- Eureka 不再从注册列表中移除因为长时间没收到心跳而过期的服务
- Eureka 仍然能够接收新服务的注册和查询请求,但是不会被同步到其他节点上,即保证当前节点依然可用
- 当网络稳定时,当前实例新的注册信息会被同步到其他节点中
- Zookeeper / Consul 选择的是 CP(强一致性、分区容错性)
- 当注册中心查询服务列表时,可以容忍注册中心返回的是几分钟以前的注册信息,但不能接收服务直接挂掉。
- 当主节点(master)因为某些原因与其他节点失去连接时,剩余节点会重新进行领导者(leader)的选举。问题在于选举的时间太长——30s~120s,且选举期间整个ZookKeeper 集群不可用,就导致了服务的瘫痪。在云部署的环境下,因为网络是的ZK集群失去master是较大概率的事情,也就会导致服务短暂瘫痪是较大概率的,是不可取的。
4.2 图表


 147
147


 被折叠的 条评论
为什么被折叠?
被折叠的 条评论
为什么被折叠?
 到【灌水乐园】发言


