


在线下载nagios程序和插件
wget http://prdownloads.sourceforge.net/sourceforge/nagiosplug/nagios-plugins-1.4.15.tar.gz (现在最新版本的插件)
wget http://sourceforge.net/projects/nagios-cn/files/sourcecode/zh_CN%203.2.3/nagios-cn-3.2.3.tar.bz2/download(最新版为3.3.1,装上去觉得界面变得不好看,顺便就找了个中文版的)


![]()
用户和组的准备


开始安装主程序
![]()
./configure --prefix=/usr/local/nagios --with-nagios-user=nagios --with-nagios-group=nagios --with-command-group=nagcmd

完成以后发现执行make all命令的时候出现以下错误
![]()
貌似CentOS下默认系统没有安装编译器,安装一下:
yum -y install gcc automake autoconf libtool make

继续做make all操作,发现最后报错了,

先执行make clean操作,然后再执行 ./configure && make all 操作通过(问题分享)接着再执行以下命令即可,没有出现任何状况.
![]()
![]()
![]()
![]()
![]()
接下来安装插件
![]()
./configure --with-nagios-user=nagios --with-nagios-group=nagios
![]()
![]()
添加访问页面用户nagiosadmin及密码(需要安装apache2才能使用 htpasswd ,或者在apache服务器上拷贝此命令工具),这里要记住此密码不要忘记了.
htpasswd -c /usr/local/nagios/etc/htpasswd.users nagiosadmin (别忘记将这个加入到nginx.conf)
yum install httpd httpd-devel (如果没有htpasswd工具可以yum安装apache)

如果你添加的管理员不是 nagiosadmin (默认的),例如改成
htpasswd -c /usr/local/nagios/etc/htpasswd.users miltonzhong ,那么你需要修改配置文件
vi /usr/local/nagios/etc/cgi.cfg
authorized_for_system_information=nagiosadmin,miltonzhong
authorized_for_configuration_information=nagiosadmin,miltonzhong
authorized_for_system_commands=nagiosadmin,miltonzhong
authorized_for_all_services=nagiosadmin,miltonzhong
authorized_for_all_hosts=nagiosadmin,miltonzhong
authorized_for_all_service_commands=nagiosadmin,miltonzhong
authorized_for_all_host_commands=nagiosadmin,miltonzhong
接下来启动相关服务


这里有个小错:
service nagios start
这个是因为当时安装nagios没有设好权限,不过可以通过如下操作来完善它:
用命令 vi /etc/passwd
检查配置文件是否正确
/usr/local/nagios/bin/nagios -v /usr/local/nagios/etc/nagios.cfg
![]()
[经验分享:由于这一串检查的命令很长,应用率也比较高,这里我们可以自定义一个命令来代替这一长串的命令
编辑.bashrc这个文件
![]()
在里面用alias 来自定义一个命令来代替,这里我用check

用source命令在当前bash环境下读取并执行bashrc中的命令
![]()
这样我们自定义的命令就生效了,以后只要输入check就可以检查nagios配置文件是否存在错误了,简单方便.]
发现没有警告和错误就表示通过了

现在就可以用http://serverip/nagios 方式访问nagios web访问控制台了.
开了防火墙记得要开放80端口,要不然连接不到,或者直接关闭防火墙用命令service iptables stop关闭即可.

问题分享:进入页面的时候点主机或其它选项的时候报此错误,后面百度一下原来是开启了selinux强制访问控制安全模块所致
如果你开启了selinux 需要配置如下二步:
chcon -R -t httpd_sys_content_t /usr/local/nagios/sbin/
chcon -R -t httpd_sys_content_t /usr/local/nagios/share/
或者直接关闭 selinux
nginx 配置文件:
########################NAGIOS#################
server
{
listen 80;
server_name www.nagios.cn;
index index.html index.htm index.php;
root /usr/local/nagios/share;
auth_basic "Nagios Access";
#auth_basic_user_file /usr/local/nagios/etc/nagiospasswd;
location ~ .*\.(php|php5)?$
{
#fastcgi_pass unix:/tmp/php-cgi.sock;
fastcgi_pass 127.0.0.1:9000;
fastcgi_index index.php;
include fcgi.conf;
}
location ~ .*\.(cgi|pl)?$
{
gzip off;
root /usr/local/nagios/sbin;
### rewrite ^/nagios/cgi-bin/(.*)\.cgi /$1.cgi break;
fastcgi_pass unix:/usr/local/nginx/logs/perl-fcgi.sock;
fastcgi_param SCRIPT_FILENAME /usr/local/nagios/sbin$fastcgi_script_name;
fastcgi_index index.cgi;
fastcgi_read_timeout 60;
fastcgi_param REMOTE_USER $remote_user;
include fcgi.conf;
auth_basic "Nagios Access";
### auth_basic_user_file /usr/local/nagios/etc/nagiospasswd;
auth_basic_user_file /usr/local/nagios/etc/htpasswd.users;
}
# location /nagios
# {
# alias /usr/local/nagios/share/images;
# auth_basic "Nagios Access";
# auth_basic_user_file /usr/local/nagios/etc/nagiospasswd;
# }
log_format wwwlogs '$remote_addr - $remote_user [$time_local] "$request" '
'$status $body_bytes_sent "$http_referer" '
'"$http_user_agent" $http_x_forwarded_for';
access_log /home/logs/access_www.log wwwlogs;
}
配置完nginx.conf后,要重新启动nginx ,重新启动 nagios
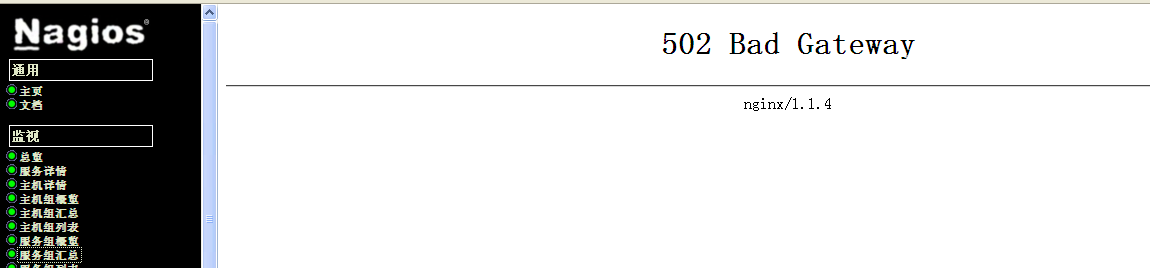
Nagios依赖PHP环境和perl环境。由于Nginx不支持Perl的CGI,这里就需要先来搭建Perl环境。让Nginx支持Perl的CGI。否则会出现 502 错误:
记得安装nrpe,否则无法监控客户端,出现127 miss错误
一、给Nginx加上对Perl的CGI支持
让Nginx支持Perl的CGI方法有好几种,基本原理都是通过Perl的FCGI模块实现。具体哪一个更好,目前没时间验证。下面的方法就是其中一种:
1、安装FCGI模块
wget http://search.cpan.org/CPAN/authors/id/F/FL/FLORA/FCGI-0.73.tar.gz
tar xvzf FCGI-0.73.tar.gz
cd FCGI-0.73
perl Makefile.PL
make
make install
cd ..

如果出现以下错误:
Can't locate ExtUtils/MakeMaker.pm in @INC (@INC contains: /usr/local/lib64/perl5 /usr/local/share/perl5 /usr/lib64/perl5/vendor_perl /usr/share/perl5/vendor_perl /usr/lib64/perl5 /usr/share/perl5 .) at Makefile.PL line 1.
则
yum install perl-CPAN
2、安装FCGI-ProcManager模块
wget http://search.cpan.org/CPAN/authors/id/G/GB/GBJK/FCGI-ProcManager-0.19.tar.gz
tar xvzf FCGI-ProcManager-0.19.tar.gz
cd FCGI-ProcManager-0.19
perl Makefile.PL
make
make install
cd ..
3、安装IO和IO::ALL模块
wget http://search.cpan.org/CPAN/authors/id/G/GB/GBARR/IO-1.25.tar.gz
tar zxvf IO-1.25.tar.gz
cd IO-1.25
perl Makefile.PL
make
make install
cd ..

wget http://search.cpan.org/CPAN/authors/id/I/IN/INGY/IO-All-0.41.tar.gz
tar zxvf IO-All-0.41.tar.gz
cd IO-All-0.41
perl Makefile.PL
make
make install
cd ..
4、下载Perl脚本
这个脚本的目的就是产生一个PERL的FastCGI接口,让Nginx可以以CGI方式处理Perl。
wget http://www.mike.org.cn/wp-content/uploads/2011/07/perl-fcgi.zip
unzip perl-fcgi.zip
cp perl-fcgi.pl /usr/local/webserver/nginx/
注:建议把这个脚本放在Nginx安装目录。
修改脚本权限
chmod 755 /usr/local/webserver/nginx/perl-fcgi.pl
5、建立一个CGI启动/停止脚本
这个SHELL脚本只是为了方便管理上面的Perl脚本。脚本中的www为nginx的运行用户,请据自己的实际情况调整。
注意事项:不能用root用户执行(会提示). 要用与Nginx相同身份的用户执行。否则可能会在Nginx Log中提示 Permision Denied。
vi /usr/local/webserver/nginx/start_perl_cgi.sh

#!/bin/bash
#set -x
dir=/usr/local/webserver/nginx/

stop ()
{
#pkill  -f  $dir/perl-fcgi.pl
kill $(cat $dir/logs/perl-fcgi.pid)
rm $dir/logs/perl-fcgi.pid 2>/dev/null
rm $dir/logs/perl-fcgi.sock 2>/dev/null
echo "stop perl-fcgi done"
}

start ()
{
rm $dir/now_start_perl_fcgi.sh 2>/dev/null

chown www.www $dir/logs
echo "$dir/perl-fcgi.pl -l $dir/logs/perl-fcgi.log -pid $dir/logs/perl-fcgi.pid -S $dir/logs/perl-fcgi.sock" >>$dir/now_start_perl_fcgi.sh

chown www.www $dir/now_start_perl_fcgi.sh
chmod u+x $dir/now_start_perl_fcgi.sh

sudo -u www $dir/now_start_perl_fcgi.sh
echo "start perl-fcgi done"
}

case $1 in
stop)
stop
;;
start)
start
;;
restart)
stop
start
;;
esac
修改SHELL脚本权限
chmod 755 /usr/local/webserver/nginx/start_perl_cgi.sh启动脚本
/usr/local/webserver/nginx/start_perl_cgi.sh start正常情况下在/usr/local/webserver/nginx/logs下生成perl-fcgi.sock这个文件,如果没有生成,请检查下上面的步聚。
注意:启动这些脚本后,启动服务后,如果浏览器出现 “某个路径找不到某些文件”的情况下
创建没有的路径

将以下文件拷贝或者做软连接到 /usr/local/nagios/sbin/nagios/cgi-bin/ 下

如果有以下错误:则

如果没有了502错误,但是还是有错,没有图片显示出来,只有文字,那么

错误:
/usr/local/nagios/sbin/nagios/cgi-bin/trends.cgi: error while loading shared libraries: libiconv.so.2: cannot open shared object file: No such file or directory
/usr/local/nagios/sbin/nagios/cgi-bin/trends.cgi: error while loading shared libraries: libiconv.so.2: cannot open shared object file: No such file or directory
/usr/local/nagios/sbin/nagios/cgi-bin/trends.cgi: error while loading shared libraries: libiconv.so.2: cannot open shared object file: No such file or directory
解决方法:
在/usr/local/lib下却能找到libiconv.so.2,解决方法是将/usr/local/lib路径添加到/etc/ld.so.conf文件中,然后用ldconfig命令加载
如果有乱码情况,改成 /usr/lib ,然后ldconfig
最后访问 www.nagios.cn 用 miltonzhong 登录访问 nagios
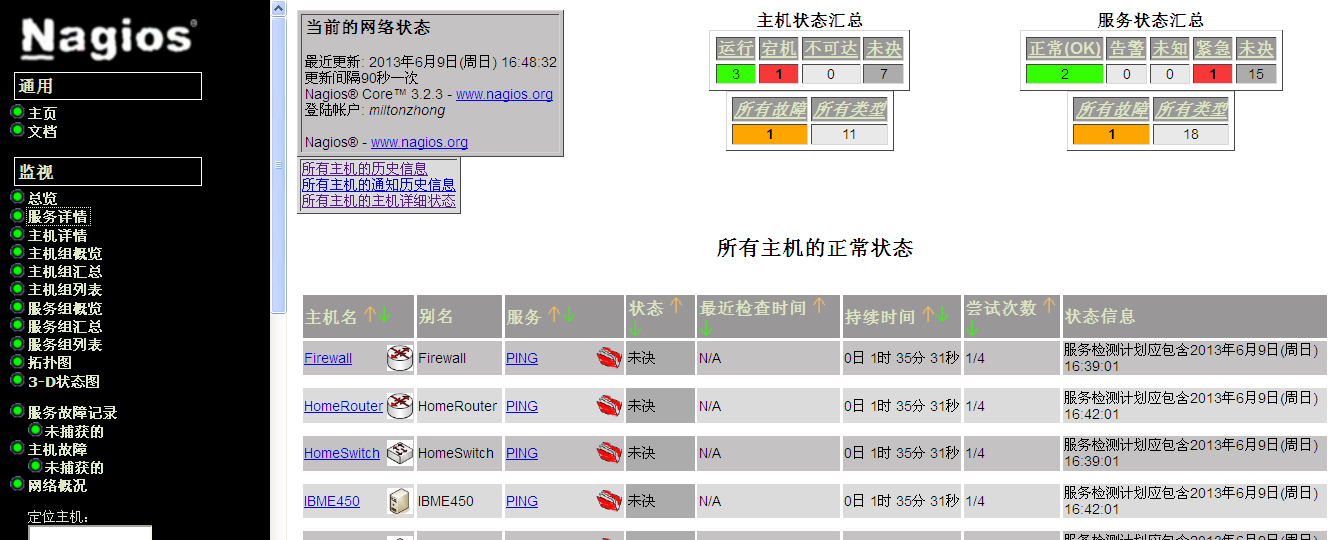
中文 nagios 安装完毕。
注意:115.com存有安装文件(以上案例成功的安装文件)


 358
358


 被折叠的 条评论
为什么被折叠?
被折叠的 条评论
为什么被折叠?
 到【灌水乐园】发言


