


之前在总结java类型信息的时候看到了动态代理,这次就顺便把代理模式总结一遍,有一些使用到java的rmi机制,虽然能生成stub,但是卡在了客户端java动态下载stub这一个文件这块,所以只能是手动添加进去,对代理模式影响不大
关于head first 设计模式对rmi的介绍:
http://blog.csdn.net/ccf19881030/article/details/9500221
使用rmi的详细步骤
http://www.blogjava.net/zhenyu33154/articles/320245.html
java动态加载(有兴趣的小伙伴可以去看看)
http://blog.csdn.net/jackiezhw/article/details/1631846
1、远程代理
比如:客户对象需要调用远程方法,我们设计一些辅助对象,帮客户对象进行真正的沟通。客户调用客户辅助对象上的方法,仿佛客户辅助对象就是真正的服务,其实他只是负责为我们转发这些请求
客户对象——客户辅助对象
服务对象——服务辅助对象
首先客户对象调用客户辅助对象某方法
客户辅助对象跟服务辅助对象发起请求
服务辅助对象向服务对象发起请求
服务对象把结果返回服务辅助对象,并由服务辅助对象返回到客户辅助对象
客户辅助对象返回结果到客户对象
而客户辅助对象被称为stub(桩)、服务辅助对象被称为skeleton(骨架),桩和骨架不需要自己写,可运用rmic生成
在这里利用一个简单的例子使用rmi
服务端:
//先提供一个接口,Remote不提供任何方法,只是提供一个标记
//但对rmi来说不可以缺少
public interface MyRemote extends Remote {
	//他声明的所有方法都会抛出RemoteException
	public String sayHello() throws RemoteException;
}

//实现接口,并且在这里把main方法嵌套在里面
public class MyRemoteImpl extends UnicastRemoteObject implements MyRemote {

	protected MyRemoteImpl() throws RemoteException {}
	@Override
	public String sayHello() throws RemoteException {
		return "Service says hey";
	}

	public static void main(String[] args) {
		try {
			//客户端要访问的服务
			MyRemote service = new MyRemoteImpl();
			//绑定(真正的绑定在使用rmic命令后绑定到rmiregistry)
			Naming.rebind("RemoteHello", service);
			System.out.println("ready...");
		} catch (Exception e) {
			e.printStackTrace();
		}
	}
}//目前貌似必须要提供接口在客户端里面转换调用
public interface MyRemote extends Remote {
public String sayHello() throws RemoteException;
}
public class MyRemoteClient {
public static void main(String[] args) {
new MyRemoteClient().go();
}
public void go(){
try {
//接口在这里被使用,假设我ip是192.168.1.1
MyRemote service = (MyRemote)Naming.lookup("rmi://192.168.1.1:1099/RemoteHello");
String s = service.sayHello();
System.out.println(s);
//利用类型信息能发现他其实是MyRemoteImpl_Stub
// Object o = Naming.lookup("rmi://192.168.1.1:1099/RemoteHello");
// Class c = o.getClass();
// String s = c.getSimpleName();
// System.out.println(s);//MyRemoteImpl_Stub
} catch (Exception e) {
e.printStackTrace();
}
}
}我的客户端路径是:d:\myeclipse10\workspace\rmiClient\bin
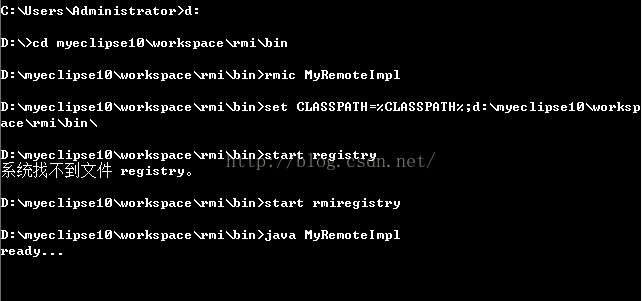
服务端路径:d:\myeclipse10\workspace\rmi\bin
1、命令行进入服务端目录
2、rmic编译MyRemoteImpl
3、在启动registry之前,set CLASSPATH=%CLASSPATH%;d:\myeclipse10\workspace\rmi\bin\设置CLASSPATH
4、执行java类
如图:成功后输出ready等待客户端连接
此时,服务端的bin目录应该有MyRemoteImpl_Stub类,我这边没有实现动态下载代码,我直接把这个桩复制到了客户端bin目录下
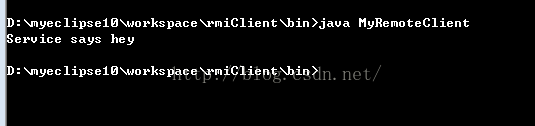
可以看到成功访问了,之前在状态模式的总结中所提到的糖果机应用:
服务端:
1、提供远程接口
public interface GumballMachineRemote extends Remote {
	public int getCount() throws RemoteException;
	public String getLocation() throws RemoteException;
	public State getState() throws RemoteException;
}public interface State extends Serializable{
//投币
public void insertQuarter();
//退币
public void ejectQuarter();
//转动
public void turnCrank();
//发放奖品
public void dispend();
}4、制作远程实现:
public class GumballMachine extends UnicastRemoteObject implements GumballMachineRemote{
	//定义一堆状态类
	private State soldOutState;
	private State hasQuarterState;
	private State noQuarterState;
	private State soldState;
	private State winnerState;
	//定义目前状态
	private State state;
	//糖果数量
	private int count;
	//位置
	private String location;
	public GumballMachine(String location,int count) throws RemoteException{
		soldOutState = new SoldOutState(this);
		hasQuarterState = new HasQuarterState(this);
		noQuarterState = new NoQuarterState(this);
		soldState = new SoldState(this);
		winnerState = new WinnerState(this);
		this.location = location;
		this.count = count;
		if(count>0){
			state = noQuarterState;
		}
	}
.....//其他代码
}public class GumballMachineTestDrive {
public static void main(String[] args) {
GumballMachineRemote gumballMachine = null;
int count = 0;
if(args.length < 2) {
System.out.println("GumballMachine<name> <inventory>");
System.exit(1);
}
try {
count = Integer.parseInt(args[1]);
gumballMachine = new GumballMachine(args[0], count);
Naming.rebind("//" + args[0] + "/gumballmachine", gumballMachine);
} catch (Exception e) {
e.printStackTrace();
}
}
}客户端:
1、监视器代码
public class GumballMonitor {
	GumballMachineRemote machine;
	public GumballMonitor(GumballMachineRemote machine){
		this.machine = machine;
	}

	public void report(){
		try {
			System.out.println("Gumball Machine: "+machine.getLocation());
			System.out.println("Current inventory: "+machine.getCount()+" gumballs");
			System.out.println("Current state: "+machine.getState());
		} catch (RemoteException e) {
			e.printStackTrace();
		}
	}
} public static void main(String[] args) {
String[] location = { "rmi://santafe.mightygumball.com/gumballmachine",
"rmi://boulder.mightygumball.com/gumballmachine",
"rmi://seattle.mightygumball.com/gumballmachine" };
GumballMonitor[] monitor = new GumballMonitor[location.length];
for (int i = 0; i < location.length; i++) {
try {
//为每个远程机器创建一个代理,客户从Register中寻找代理,也就是stub对象
GumballMachineRemote machine = (GumballMachineRemote) Naming
.lookup(location[i]);
monitor[i] = new GumballMonitor(machine);
System.out.println(monitor[i]);
} catch (Exception e) {
e.printStackTrace();
}
}
//遍历每台机器,打印报告
for (int i = 0; i < monitor.length; i++) {
monitor[i].report();
}
}
} 结果就不详细贴出来了,跟上面MyRemote例子差不多的处理方式,但是在过程中,我们会发现服务端也并不能省略各种状态,例如HasQuarter,尝试会发现报ClassNotFoundException,即使编译能够通过,这样就尴尬了:客户端会多出一堆状态类,如果把状态类都放到客户端程序正常运行(或者是我在这部分经验不足,或许真实情况并不是这样子,或者能提供更好的解决方法?)
ps:java5以后的rmi是和动态代理搭配使用,不再需要使用rmic,一切都在幕后自动处理
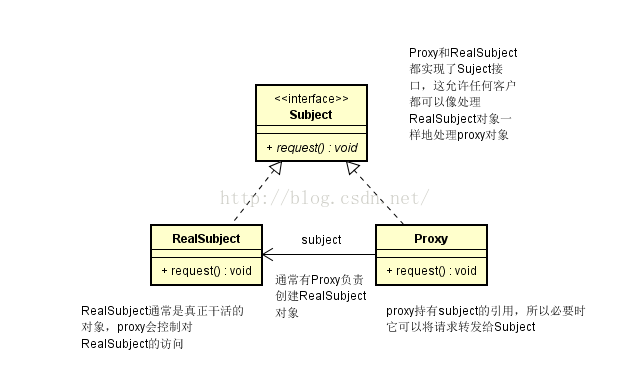
关于远程代理先总结到这里,远程代理是代理模式的一个实现,什么是代理模式:就是为另一个对象提供一个替身或者占位符以控制对这个对象的访问,而代理模式的变体非常多,先看看类图:
2、虚拟代理:java swing加载图片,未加载完成时显示正在加载,加载完成显示图片,这里唯一的疑问是:我们平常就是这样子干的,用到的时候就加载,这样虚拟代理有什么可看的?我猜想场景的意图是避免先把所有图片加载下来再显示的情况,先看代码再思考:
这里涉及三个类:
icon:swing的接口(Interface)
imageIcon:javax.swing.ImageIcon(RealSubject)
ImageProxy:这个是我们的代理(Proxy)
这里涉及的类只有ImageProxy是我们需要写的,当然我们还得把JFrame这些框架给写出来:
public class ImageProxy implements Icon {
	//这个是真实的对象,他同样是实现了Icon接口
	ImageIcon imageIcon;
	URL imageURL;
	Thread retrievalThread;
	boolean retrieving = false;

	public ImageProxy(URL url){imageURL = url;}

	@Override
	public void paintIcon(final Component c, Graphics g, int x, int y) {
		if(imageIcon!=null){
			//如果已经加载完成自然可以把图片set进去
			imageIcon.paintIcon(c, g, x, y);
		}else{
			//不过在这个例子并没有考虑缓存代理之类的问题,基本只会进入到这个分支
			//先告诉用户需要等待
			g.drawString("Loading CD cover,please wait...", x+300, y+190);
			if(!retrieving){
				retrieving = true;
				//防止阻塞界面,开启线程加载图片,加载完成重绘界面
				retrievalThread = new Thread(new Runnable() {
					@Override
					public void run() {
						try {
							//真正的对象在干活
							imageIcon = new ImageIcon(imageURL,"CD Cover");
							c.repaint();
						} catch (Exception e) {
							e.printStackTrace();
						}
					}
				});
				retrievalThread.start();
			}
		}
	}
	@Override
	public int getIconWidth() {
		if(imageIcon!=null){return imageIcon.getIconWidth();
		}else{return 800;}
	}

	@Override
	public int getIconHeight() {
		if(imageIcon!=null){return imageIcon.getIconHeight();
		}else{return 600;}
	}
}public class ImageComponent extends JComponent {
private Icon icon;
public ImageComponent(Icon icon) {
this.icon = icon;
}
public void setIcon(Icon icon) {
this.icon = icon;
}
public void paintComponent(Graphics g){
super.paintComponent(g);
int w = icon.getIconWidth();
int h = icon.getIconHeight();
int x = (800-w)/2;
int y = (600-h)/2;
icon.paintIcon(this, g, x, y);
}
}
public class ImageProxyTestDrive {
ImageComponent imageComponent;
JFrame frame = new JFrame("CD Cover Viewer");
JMenuBar menuBar;
JMenu menu;
//使用hashtable报错key、value,即名字和图片路径
Hashtable cds = new Hashtable();
public static void main(String[] args) throws Exception {
ImageProxyTestDrive testDrive = new ImageProxyTestDrive();
}
public ImageProxyTestDrive() throws Exception{
cds.put("Ambient:Music for Airports",
"http://images.amazon.com/images/P/B000003S2K.01.LZZZZZZZ.jpg");
cds.put("Buddha Bar", "http://images.amazon.com/images/P/B00009XBYK.01.LZZZZZZZ.jpg");
cds.put("Ima", "http://images.amazon.com/images/P/B0000051RM.01.LZZZZZZZ.jpg");
cds.put("Karma", "http://images.amazon.com/images/P/B000005DCB.01.LZZZZZZZ.gif");
cds.put("MCMXC A.D.", "http://images.amazon.com/images/P/B000002URV.01.LZZZZZZZ.jpg");
cds.put("Northern Exposure", "http://images.amazon.com/images/P/B000003SFN.01.LZZZZZZZ.jpg");
cds.put("Selected Ambient Works,Vol.2",
"http://images.amazon.com/images/P/B000002MNZ.01.LZZZZZZZ.jpg");
cds.put("oliver", "http://www.cs.yale.edu/homes/freeman-ekisabeth/2004/9/Oliver_sm.jpg");
URL initialURL = new URL((String) cds.get("Selected Ambient Works,Vol.2"));
menuBar = new JMenuBar();
menu = new JMenu("Favorite CDs");
menuBar.add(menu);
frame.setJMenuBar(menuBar);
//为每一个项添加事件
for(Enumeration e = cds.keys();e.hasMoreElements();){
String name = (String) e.nextElement();
JMenuItem menuItem = new JMenuItem(name);
menu.add(menuItem);
menuItem.addActionListener(new ActionListener() {
@Override
public void actionPerformed(ActionEvent e) {
imageComponent.setIcon(new ImageProxy(getCDUrl(e.getActionCommand())));
frame.repaint();
}
});
}
Icon icon = new ImageProxy(initialURL);
imageComponent = new ImageComponent(icon);
frame.getContentPane().add(imageComponent);
frame.setDefaultCloseOperation(JFrame.EXIT_ON_CLOSE);
frame.setSize(800,600);
frame.setVisible(true);
}
URL getCDUrl(String name){
try {
return new URL((String) cds.get(name));
} catch (MalformedURLException e) {
e.printStackTrace();
return null;
}
}
}结果

在这里我们看到swing帮我们做了很多工作,比如重绘,假如我们并没有swing帮我们干活,比如复写了ImageProxy中Icon的paintIcon方法,在

imageComponent.setIcon(new ImageProxy(getCDUrl(e.getActionCommand())));
frame.repaint();
并托管给ImageCompone去画图,假如在另外一个项目没有这样子的条件,是不是可以使用观察者模式去更新界面?这或许是一种实现方法
3、动态代理实现保护代理:一般来说,我创造了一个对象,有一些方法我希望访问存在限制,那么我们可以创建一个代理类去实现,废话不说,假设存在这样的场景:
存在一个系统你能更改自己的资料,但是别人不能更改你的资料,同时别人能评价你,你却不能评价自己
这就存在一种访问的限制(保护),看代码
public interface PersonBean {
	String getName();
	String getGender();
	String getHotOrNotRating();

	void setName(String name);
	void setGender(String gender);
	void setInterests(String interests);
	void setHotOrNotRating(int rating);
}

public class PersonBeanImpl implements PersonBean {

	String name;
	String gender;
	String interests;
	int rating;
	int ratingCount = 0;

	public PersonBeanImpl(String name) {this.name = name;}
	@Override
	public String getName() {return name;}
	@Override
	public String getGender() {return gender;}
	@Override
	public String getHotOrNotRating() {return interests;}
	@Override
	public void setName(String name) {this.name = name;}
	@Override
	public void setGender(String gender) {this.gender = gender;}
	@Override
	public void setInterests(String interests) {this.interests = interests;}
	@Override
	public void setHotOrNotRating(int rating) {
		this.rating = rating;
		this.ratingCount++;
	}

}//处理你“更改自己资料”的代理
public class OwnerInvocationHandler implements InvocationHandler {
PersonBean person;
public OwnerInvocationHandler(PersonBean person) {this.person = person;}
@Override
public Object invoke(Object proxy, Method method, Object[] args)
throws IllegalAccessException {
try {
if(method.getName().startsWith("get")){
return method.invoke(person, args);
}else if(method.getName().equals("setHotOrNotRating")){
throw new IllegalAccessException();
}else if(method.getName().startsWith("set")){
return method.invoke(person, args);
}
}catch (InvocationTargetException e) {
e.printStackTrace();
}
return null;
}
}
//处理“别人评价你”的代理
public class NonOwnerInvocationHandler implements InvocationHandler {
PersonBean person;
public NonOwnerInvocationHandler(PersonBean person) {this.person = person;}
@Override
public Object invoke(Object proxy, Method method, Object[] args)
throws IllegalAccessException {
try {
if(method.getName().startsWith("get")){
return method.invoke(person, args);
}else if(method.getName().equals("setHotOrNotRating")){
return method.invoke(person, args);
}else if(method.getName().startsWith("set")){
throw new IllegalAccessException();
}
}catch (InvocationTargetException e) {
e.printStackTrace();
}
return null;
}
}public class MatchMakingTestDrive {
public static void main(String[] args) {
MatchMakingTestDrive test= new MatchMakingTestDrive();
test.drive();
}
public void drive(){
//首先创建一个人
PersonBean joe = new PersonBeanImpl("joe");
//交给OwnerInvocationHandler限制某些方法
PersonBean ownerProxy = getOwnerProxy(joe);
//测试
System.out.println("Name is "+ownerProxy.getName());
ownerProxy.setInterests("bowling, Go");
System.out.println("Interests set from owner proxy");
try {
ownerProxy.setHotOrNotRating(10);
} catch (Exception e) {
System.out.println("Can't setHotOrNotRating");
}
System.out.println("Rating is "+ ownerProxy.getHotOrNotRating());
//交给NonOwnerInvocationHandler代理
PersonBean nonOwnerProxy = getNonOwnerProxy(joe);
System.out.println("Name is "+nonOwnerProxy.getName());
try {
nonOwnerProxy.setInterests("bowling, Go");
} catch (Exception e) {
System.out.println("Can't setInterests");
}
nonOwnerProxy.setHotOrNotRating(3);
System.out.println("Rating set from nonOwner proxy");
System.out.println("Rating is "+ownerProxy.getHotOrNotRating());
}
PersonBean getOwnerProxy(PersonBean person){
return (PersonBean) Proxy.newProxyInstance(
person.getClass().getClassLoader(),
person.getClass().getInterfaces(),
new OwnerInvocationHandler(person));
}
PersonBean getNonOwnerProxy(PersonBean person){
return (PersonBean) Proxy.newProxyInstance(
person.getClass().getClassLoader(),
person.getClass().getInterfaces(),
new NonOwnerInvocationHandler(person));
}
}
//Name is joe
//Interests set from owner proxy
//Can't setHotOrNotRating
//Rating is bowling, Go
//Name is joe
//Can't setInterests
//Rating set from nonOwner proxy
//Rating is bowling, Go除了以上三种代理之外,还有缓存代理、防火墙代理等等,代理模式有很多种形式,可惜网上翻来翻去都没看到比较简单像缓存代理这样子的demo,或许以后写代码或看到有demo能记下来。
以下摘自图说设计模式:
适用环境:
1、远程(Remote)代理:为一个位于不同的地址空间的对象提供一个本地 的代理对象,这个不同的地址空间可以是在同一台主机中,也可是在 另一台主机中,远程代理又叫做大使(Ambassador)。
2、虚拟(Virtual)代理:如果需要创建一个资源消耗较大的对象,先创建一个消耗相对较小的对象来表示,真实对象只在需要时才会被真正创建。
3、Copy-on-Write代理:它是虚拟代理的一种,把复制(克隆)操作延迟 到只有在客户端真正需要时才执行。一般来说,对象的深克隆是一个 开销较大的操作,Copy-on-Write代理可以让这个操作延迟,只有对象被用到的时候才被克隆。
4、保护(Protect or Access)代理:控制对一个对象的访问,可以给不同的用户提供不同级别的使用权限。
5、缓冲(Cache)代理:为某一个目标操作的结果提供临时的存储空间,以便多个客户端可以共享这些结果。
6、防火墙(Firewall)代理:保护目标不让恶意用户接近。
7、同步化(Synchronization)代理:使几个用户能够同时使用一个对象而没有冲突。
8、智能引用(Smart Reference)代理:当一个对象被引用时,提供一些额外的操作,如将此对象被调用的次数记录下来等。
代理模式优点:
1、理模式能够协调调用者和被调用者,在一定程度上降低了系 统的耦合度。
2、远程代理使得客户端可以访问在远程机器上的对象,远程机器 可能具有更好的计算性能与处理速度,可以快速响应并处理客户端请求。
3、虚拟代理通过使用一个小对象来代表一个大对象,可以减少系 统资源的消耗,对系统进行优化并提高运行速度。
4、保护代理可以控制对真实对象的使用权限。
缺点:
1、由于在客户端和真实主题之间增加了代理对象,因此 有些类型的代理模式可能会造成请求的处理速度变慢。
2、实现代理模式需要额外的工作,有些代理模式的实现 非常复杂。
参考资料:图说设计模式、head first 设计模式、设计模式


 614
614

 被折叠的 条评论
为什么被折叠?
被折叠的 条评论
为什么被折叠?
 到【灌水乐园】发言


