Django(3) Create apps in Django

To move on, you should create an app folder as a package in Django. Here are the steps.

Create apps in Django

  1. Firstly, in terminal, input this command python manage.py startapp Newsapp (NOTICE: you can change “Newsapp” to any name you like). Django(3)_Create_apps_in_Django_1.png

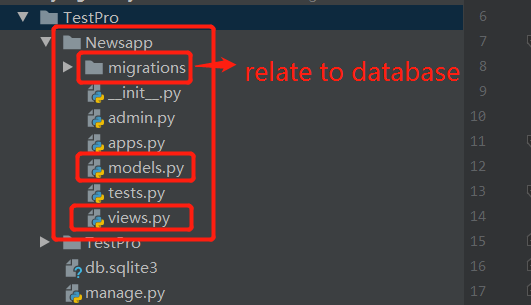
  2. And you will see the tree on the left of workbench as follows. You can find that it is approaching to MVC model. Django(3)_Create_apps_in_Django_2.png

So far, you have created an app folder as a package in Django. Hopefully, it helps.
  • 0
    点赞
  • 0
    收藏
    觉得还不错? 一键收藏
  • 0
    评论
Django 是一个基于 Python 的 Web 应用框架,Vue3 是一个流行的前端 JavaScript 框架。结合使用 Django 和 Vue3 可以构建现代化的全栈 Web 应用程序。下面是一个基本的 Django + Vue3 教程: 1. 创建 Django 项目 首先,我们需要创建一个 Django 项目。打开终端并输入以下命令: ``` django-admin startproject myproject cd myproject ``` 这将创建一个名为 `myproject` 的 Django 项目,并将您的当前工作目录更改为该项目目录。 2. 创建 Django 应用程序 接下来,我们将创建一个 Django 应用程序。在终端中运行以下命令: ``` python manage.py startapp myapp ``` 这将创建一个名为 `myapp` 的 Django 应用程序。 3. 安装 Django REST framework 现在,我们需要安装 Django REST framework。在终端中运行以下命令: ``` pip install djangorestframework ``` 这将安装 Django REST framework。 4. 创建 Vue3 项目 接下来,我们将创建一个 Vue3 项目。打开另一个终端窗口并输入以下命令: ``` vue create myproject-ui cd myproject-ui ``` 这将使用 Vue CLI 创建一个名为 `myproject-ui` 的 Vue3 项目,并将您的当前工作目录更改为该项目目录。 5. 配置 Django REST framework 现在,我们需要配置 Django REST framework。打开 `myproject/settings.py` 文件并添加以下行: ```python INSTALLED_APPS = [ # ... 'rest_framework', 'myapp', ] REST_FRAMEWORK = { 'DEFAULT_PERMISSION_CLASSES': [ 'rest_framework.permissions.AllowAny', ] } ``` 6. 创建 Vue3 组件 现在,我们将创建一个 Vue3 组件。打开 `myproject-ui/src/App.vue` 文件并添加以下行: ```html <template> <div> <h1>{{ message }}</h1> </div> </template> <script> export default { name: 'App', data() { return { message: 'Hello, World!' } } } </script> ``` 这将创建一个简单的 Vue3 组件,其中包含一个带有文本的标题。 7. 启动 Django 服务器 现在,我们将启动 Django 服务器。在终端中输入以下命令: ``` python manage.py runserver ``` 这将启动 Django 服务器并监听端口 8000。 8. 启动 Vue3 应用程序 接下来,我们将启动 Vue3 应用程序。在另一个终端窗口中输入以下命令: ``` npm run serve ``` 这将启动 Vue3 开发服务器并监听端口 8080。 9. 集成 Django 和 Vue3 现在,我们将集成 Django 和 Vue3。打开 `myproject-ui/src/main.js` 文件并添加以下行: ```javascript import { createApp } from 'vue' import App from './App.vue' const app = createApp(App) app.config.globalProperties.$djangoUrl = 'http://localhost:8000' app.mount('#app') ``` 这将创建一个 Vue3 应用程序实例,并将 `http://localhost:8000` 设置为 Django 服务器的 URL。 10. 使用 Django REST framework 提供数据 最后,我们将使用 Django REST framework 提供数据。打开 `myapp/views.py` 文件并添加以下行: ```python from django.http import JsonResponse def hello(request): return JsonResponse({'message': 'Hello, World!'}) ``` 这将创建一个简单的 Django 视图函数,该函数返回一个 JSON 响应。 11. 在 Vue3 中使用数据 最后,我们将在 Vue3 中使用数据。打开 `myproject-ui/src/App.vue` 文件并添加以下行: ```html <template> <div> <h1>{{ message }}</h1> </div> </template> <script> export default { name: 'App', data() { return { message: '' } }, mounted() { fetch(`${this.$djangoUrl}/hello`) .then(response => response.json()) .then(data => { this.message = data.message }) } } </script> ``` 这将使用 `fetch()` 函数从 Django 服务器获取数据,并将其显示在 Vue3 组件中。 现在,您已经学会了如何使用 Django 和 Vue3 构建全栈 Web 应用程序!

“相关推荐”对你有帮助么?

  • 非常没帮助
  • 没帮助
  • 一般
  • 有帮助
  • 非常有帮助
提交
评论
添加红包

请填写红包祝福语或标题

红包个数最小为10个

红包金额最低5元

当前余额3.43前往充值 >
需支付:10.00
成就一亿技术人!
领取后你会自动成为博主和红包主的粉丝 规则
hope_wisdom
发出的红包
实付
使用余额支付
点击重新获取
扫码支付
钱包余额 0

抵扣说明:

1.余额是钱包充值的虚拟货币,按照1:1的比例进行支付金额的抵扣。
2.余额无法直接购买下载,可以购买VIP、付费专栏及课程。

余额充值