


关于vue-quill-editor基于vue2.x项目中如何实现用户@功能(仿微信)
相关技术:
quill官网文档
vue-quill-editor
quill-mention
技术方案分析
老板叫我做个编辑器通用,第一天就用来找技术,有太多方案,想试过框架,想试过手写,但是对于我这么菜鸡肯定首选框架
1.textarea、input
- 这种写法不亚于手写框架,手写组件了,同事说还不如手写,你说你的 我不听不听
2.contenteditable
- HTML5新特性,表示元素是否被编辑,类似textarea输入内容,尝试了一下,注意点很多,想了解的朋友们可以去尝试
- contenteditable-MDN
- contenteditable-处理
3.富文本
- 之前参与的项目大多用wangeditor/vue-quill-editor等,拥有丰富的配置和强大的api,支持文本、图片,表情等
- vue-quill-editor
- wangeditor
- 最终确定vue-quill-editor为最终方案,原项目也是使用该富文本
效果与功能描述
目的:实现用户@
1. 效果图展示
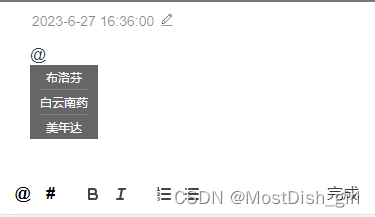
2.主要功能
- 类似微信@用户,在输入框任何地方输入@,弹框跟着光标移动
- @名称 作为主题 中间不可插入其他内容
- 删除时,将@名称 整体删除
一. 直接使用
准备工作
关于编辑器实现@,需要通过vue-quill-editor富文本编辑器和quill-mention实现
第一步 安装相关依赖
npm install vue-quill-editor --save
npm install quill-mention --save
第二步 项目引用
1.局部引入(只有一处地方使用)
<template>
  <div id="at">
    <!-- editor -->
    <quill-editor
      ref="myQuillEditor"
      v-model="content"
      :options="editorOption"
    />
    <!-- toolbar -->
    <div id="toolbar"></div>
  </div>
</template>

<script>
import "quill/dist/quill.core.css";
import "quill/dist/quill.snow.css";
import "quill/dist/quill.bubble.css";
import { quillEditor, Quill } from "vue-quill-editor"; //引入插件
//ImageExtend  在
import { ImageExtend } from "quill-image-extend-module";
Quill.register("modules/ImageExtend", ImageExtend);
import "quill-mention";
const atValues = [
  { id: 1, value: "Fredrik Sundqvist" },
  { id: 2, value: "Patrik Sjölin" },
];
const hashValues = [
  { id: 3, value: "Fredrik Sundqvist 2" },
  { id: 4, value: "Patrik Sjölin 2" },
];
export default {
  name: "at-mention",
  components: {
    quillEditor,
  },
  //获取组件实例
  computed: {
    editor() {
      return this.$refs.myQuillEditor.quill;
    },
  },
 }
</script>
2.项目配置
 editorOption: {
        placeholder: "输入文本...",
        modules: {
          history: { delay: 0 },
          ImageExtend: {
            loading: true,
            name: "file",
            headers: (xhr) => {
              //关键是这句话
              xhr.setRequestHeader(
                "Authorization",
                localStorage.getItem("sessionKey")
              );
            }, // 可选参数 设置请求头部
            // action: '/api/file/v1/uploadFile',
            response: (res) => {
              return res.data.url;
            },
            end: () => {}, // 可选参数 自定义上传结束触发的事件,无论成功或者失败
            error: () => {}, // 可选参数 上传失败触发的事件
            success: () => {}, // 可选参数  上传成功触发的事件
          },
          toolbar: {
            //container: container,//工具栏默认内容
            container: [
              //自定义内容
              ["bold"], // 加粗,斜体,下划线,删除线
              [{ list: "ordered" }], // 列表
              [{ header: 1 }, { header: 2 }],
              [{ script: "sub" }, { script: "super" }],
              [{ indent: "-1" }, { indent: "+1" }],
              [{ align: [] }], // 对齐方式
              [{ size: ["12", false, "16", "18", "20", "24", "28", "32", "36"] }], // 字体大小
              [{ font: ["song", false, "Arial", "Tahoma", "Verdana"] }], // 字体 false默认微软雅黑,其他可删减
              [{ color: [] }, { background: [] }],
              ["image"],
            ],
            handlers: {
              image: function () {
                //  触发input框选择图片文件
              },
            },
          },
        },
      },
第三步 自定义按钮
 toolbar: {
     //container: container,//工具栏默认内容
     container: [
       //自定义内容
       ["at"],
       ["zero"],
     ],
   },

//自定义tabbar按钮
mounted(){
	initButton() {
	     const editorButtonAt = document.querySelector(".ql-at");
	     editorButtonAt.innerHTML =
	       '<i style="font-size:16px;font-weight:bold;color:black;text-align:center">@</i>';

	     const editorButtonZero = document.querySelector(".ql-zero");
	     editorButtonZero.innerHTML =
	       '<i style="font-size:16px;font-weight:bold;color:black">#</i>';
	   },
}
第四步 mention配置及调用
//在editorOption.modules下配置
editorOption:{
	modules:{
		....,
		mention: {
		    // 将quill-mention 配置传递给
		    allowedChars: /^[A-Za-z\sÅÄÖåäö]*$/,
		    mentionDenotationChars: ["@", "#"],
		    source: function (searchTerm, renderList, mentionChar) {
		      let values;
		      if (mentionChar === "@") {
		        values = atValues;
		      } else {
		        values = hashValues;
		      }
		      if (searchTerm.length === 0) {
		        renderList(values, searchTerm);
		      } else {
		        const matches = [];
		        for (let i = 0; i < values.length; i++) {
		          if (
		            ~values[i].value
		              .toLowerCase()
		              .indexOf(searchTerm.toLowerCase())
		          )
		            matches.push(values[i]);
		          renderList(matches, searchTerm);
		        }
		      }
		    },
		},
	}
}

 //method方法
 // @c操作
  showHandleAt() {
      this.editor.getModule("mention").openMenu("@");
  },
    // #操作
  showHandleZero() {
    this.editor.getModule("mention").openMenu("#");
  },
二.自定义弹框操作
第一步 判断中文
 // 中文输入触发
    onCompositionstart() {
      this.isChineseInputMethod = true;
    },
    // 中文输入关闭
    onCompositionend() {
      this.isChineseInputMethod = false;
    },
第二步 判断是否是移动端操作
isMobile() {
   return navigator.userAgent.match(
     /(iPhone|iPod|Android|ios|iOS|iPad|Backerry|WebOS|Symbian|Windows Phone|Phone)/i
   );
 },
第三步 判断是否输入@
// 判断是否输入 @符号
 isAtCode(e) {
   return this.isMobile()
     ? (e.keyCode === 229 || e.keyCode === 50) &&
         e.code === "Digit2" &&
         e.key === "@"
     : ((e.keyCode === 50 && e.key === "@") ||
         (e.keyCode === 229 && e.code === "Digit2")) &&
         e.shiftKey;
 },
第四步 插入@
 // item即为用户信息
    insertItem(item) {
      const mention = this.editor.getModule("mention");
      mention.insertItem(
        { id: item.id, value: item.name, denotationChar: "@" },
        true
      );
    },
第五步 选择需要@用户
// 选择要@的用户
selectItem(item) {
  // 如果不是通过@按钮打开的弹框,则需要删除多余的@符号
  if (!this.isClickMention && this.isAtCode) {
    // 撤销一步,删除手动输入的@符号(需在modules中配置history: { delay: 0 })
    this.undo()
  }
  this.insertItem(item)
  this.show = false
},
//注意@用户的时候多了一个@符号,原因是insertItem会默认帮我们添加一个@符号,加上手动输入的@符号就多出一个@。
// 所以这里需要特殊处理一下,调用history.undo()撤销API(需要在editorOption.modules额外配置下history参数 history:{delay:0}):

// 撤销
undo () {
  this.editor.history.undo();
},
重点发现问题
- 如果直接使用,那么在mention配置中,无法获取vue,然而this的指向是mention 就无法获取动态数据,后续有研究的朋友请一定要告诉我
- 好了 就说这么多了


 796
796


 被折叠的 条评论
为什么被折叠?
被折叠的 条评论
为什么被折叠?
 到【灌水乐园】发言


