


Android基础教程——动脑学院
编辑时间:2024/3/6
来源:b站动脑学院
Android发展历程
安装是一种基于Linnux内核的自由及开放源代码的操作系统。主要用于移动设备,由谷歌公司和开放收集联盟领导及开发,Android操作系统最初由Andy Rubin开发,主要支持手机。
开发语言:Kotlin 、Java
Android开发机器配置要求
硬件要求:内容要求至少8GB,CPU要求1.5GHz以上,硬盘要求剩余空间不少于10GB,要求无线网卡和USB 插槽
对操作系统的要求:以windows为例子。必须为64位系统,至少windows7
AndroidStudio与SDK下载安装
SDK:软件开发工具包(software development kit)可以将app源代码编译为可执行的App应用。
创建工程和创建模拟器
观察App的运行日志
Android采用Log工具打印日志,它将各类日志划分为5 个等级:
Log.e 表示错误插槽,比如可能导致程序崩溃的因此
log.w 表示警告信息
log.i 表示一般信息
log.d 表示调试信息,可把程序运行时的变量值打印出来方便跟踪测试
log.v 表示冗余信息
//MyActivity.java类中
        Log.d("ning","onCreate");
方法
1.logcat查看tag为ning的日志

2.查看日志,只看见了ning:onCreate

效果如图:

环境安装可能会遇到的问题
使用真机调试运行
app的运行效果实现:
方法1:模拟器上运行app应用
方法2:使用真实手机调试APP
电脑和手机连接AVD
android debug brige

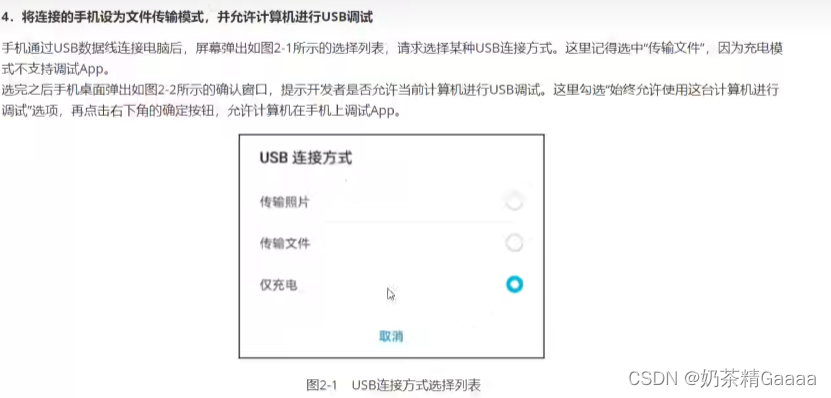
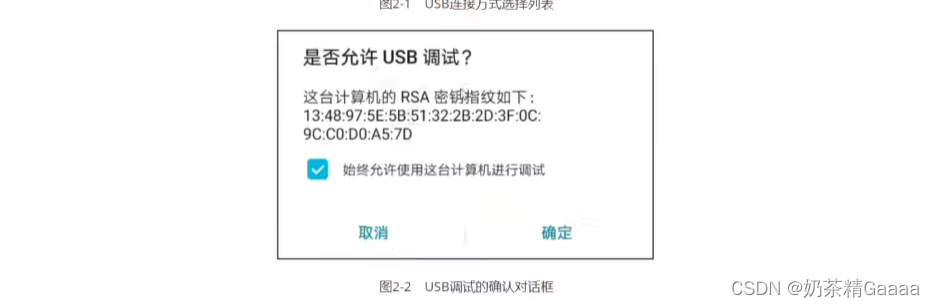
选择传输文件
Android开发涉及的编程语言
app开发主要有两大技术路线,分别原生开发和混合开发
android的官方编程语言包括java和kotlin

现在安卓开发中,jetpack compose逐渐替代xml,kotlin逐渐替代java

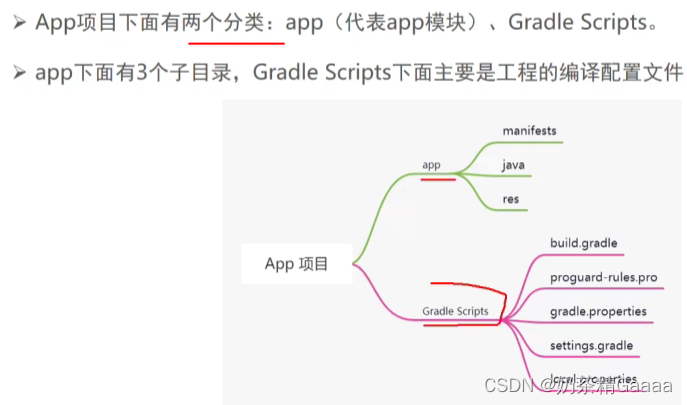
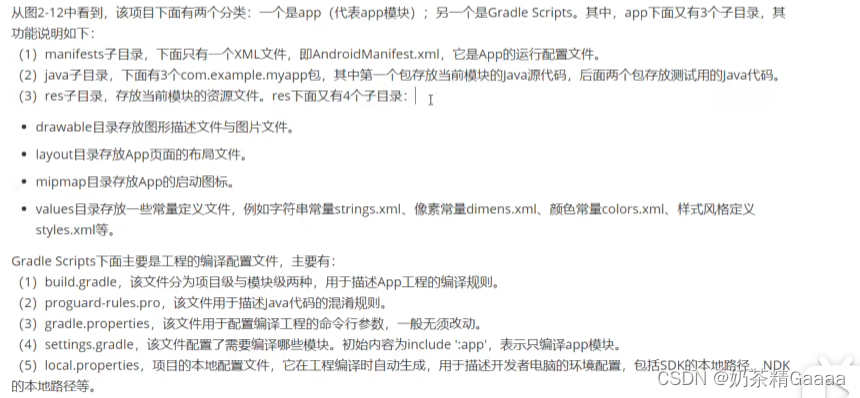
工程项目结构
app工程分为两个层次,一个是项目,外一个是模块。模块依附于项目,每个项目至少一个模块,而非运行某个项目,因为模块才对应实际的APP
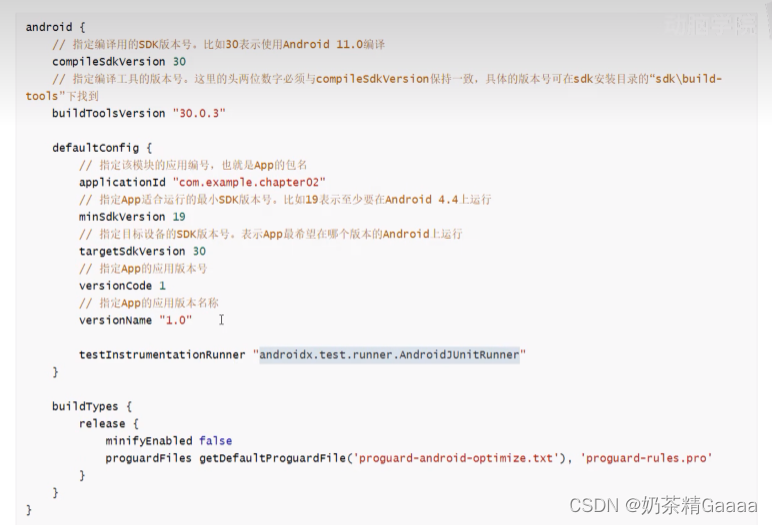
编译配置文件build.gradle
Gradle
gradle是一个项目自动化构建工具,帮我们做了依赖、打包、部署、发布、各种渠道的差异管理等工作。
项目级别的build.gradle制定了当前项目的总体编译规则
模块级 别的build.gradle对应具体模块,每个模块都要自已的build.gradle,他指定了当前模块的详细编译规则。

清单文件
每个应用的更目录中都必须巴哈一个AndroidManifest.xml,并且文件名必须一模一样,这个歌文件中包含了APP的配置项,系统需要根据里面的内容运行APP的代码,显示界面。
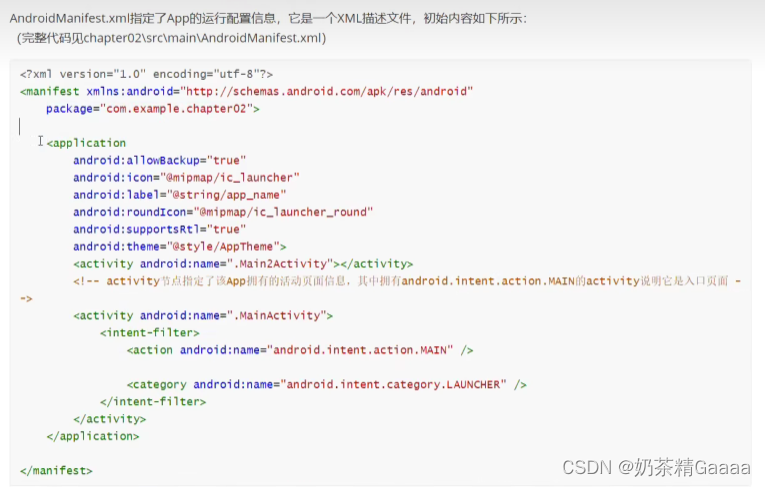
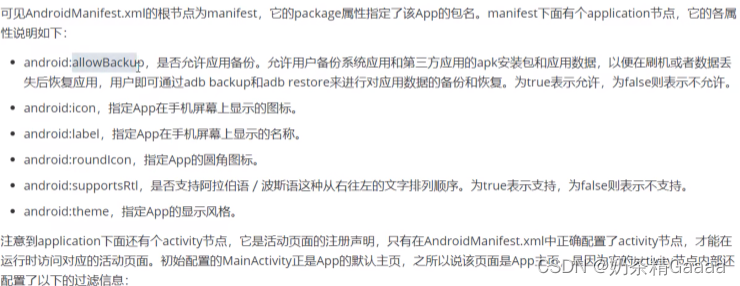


Activity:是一个应用程序,提供一个屏幕,用户可以用来交互为了完成某项任务。
界面显示和逻辑处理
利用XML描绘应用界面,使用java代码写程序逻辑
把app的界面设计域代码逻辑分开的好处:1.使用xml文件描述app界面,可以方便的把android studio上预览界面效果2.一个界面布局可以被多重代码服用,反过来一个Java代码也可以适配多个界面布局
//MainActivity.java
package com.example.myapplication;
import android.os.Bundle;
import android.util.Log;
import android.widget.TextView;
import androidx.activity.EdgeToEdge;
import androidx.appcompat.app.AppCompatActivity;
import androidx.core.graphics.Insets;
import androidx.core.view.ViewCompat;
import androidx.core.view.WindowInsetsCompat;
public class MainActivity extends AppCompatActivity {
@Override
protected void onCreate(Bundle savedInstanceState) {
super.onCreate(savedInstanceState);
return insets;
setContentView(R.layout.activity_main);
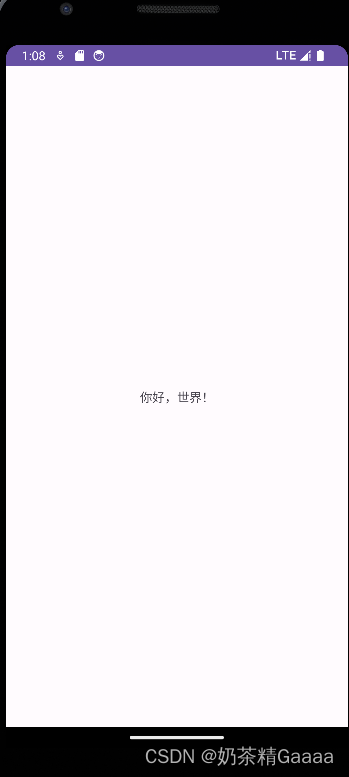
TextView tv=findViewById(R.id.tv);
tv.setText("你好,世界!");
}
//test log
// Log.d("ning","onCreate");
}
<!-- activity_main.xml -->
<LinearLayout
xmlns:android="http://schemas.android.com/apk/res/android"
android:layout_width="match_parent"
android:layout_height="match_parent"
android:orientation="vertical"
android:gravity="center">
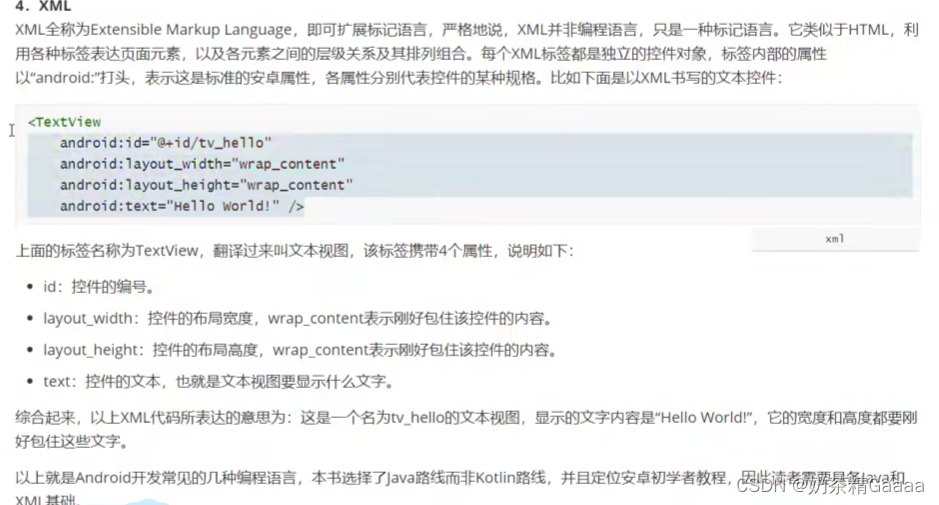
<TextView
android:id="@+id/tv"
android:layout_width="wrap_content"
android:layout_height="wrap_content"
android:text="Hello World!"/>
</LinearLayout>
Activity 创建与跳转
完整的页面创建过程包括三个步骤
- 在layout目录下创建XML文件
- 创建XML文件对应的Java代码
- 在AndroidMainfest.xml中注册页面配置

package com.example.myapplication;

import android.content.Intent;
import android.os.Bundle;
import android.util.Log;
import android.view.View;
import android.widget.Button;
import android.widget.TextView;

import androidx.activity.EdgeToEdge;
import androidx.appcompat.app.AppCompatActivity;
import androidx.core.graphics.Insets;
import androidx.core.view.ViewCompat;
import androidx.core.view.WindowInsetsCompat;

public class MainActivity extends AppCompatActivity {

    @Override
    protected void onCreate(Bundle savedInstanceState) {
        super.onCreate(savedInstanceState);

        setContentView(R.layout.activity_main);
        TextView tv=findViewById(R.id.tv);
        tv.setText("你好,世界!");

        Button button=findViewById(R.id.button);
        button.setOnClickListener(new View.OnClickListener(){

            @Override
            public void onClick(View v) {
                Intent intent=new Intent();
                intent.setClass(MainActivity.this,MainActivity2.class);
                startActivity(intent);
            }
        });
        }
        //test log
      //  Log.d("ning","onCreate");
    }
package com.example.myapplication;

import android.os.Bundle;

import androidx.annotation.Nullable;
import androidx.appcompat.app.AppCompatActivity;

public class MainActivity2 extends AppCompatActivity {
    @Override
protected  void onCreate(@Nullable Bundle savedInstanceState){
    super.onCreate(savedInstanceState);
    setContentView(R.layout.activity_main2 );
}
}
<?xml version="1.0" encoding="utf-8"?>
<!--<androidx.constraintlayout.widget.ConstraintLayout xmlns:android="http://schemas.android.com/apk/res/android"-->
<!--    xmlns:app="http://schemas.android.com/apk/res-auto"-->
<!--    xmlns:tools="http://schemas.android.com/tools"-->
<!--    android:id="@+id/main"-->
<!--    android:layout_width="match_parent"-->
<!--    android:layout_height="match_parent"-->
<!--    tools:context=".MainActivity">-->

<!--    <TextView-->
<!--        android:layout_width="wrap_content"-->
<!--        android:layout_height="wrap_content"-->
<!--        android:text="Hello World!"-->
<!--        app:layout_constraintBottom_toBottomOf="parent"-->
<!--        app:layout_constraintEnd_toEndOf="parent"-->
<!--        app:layout_constraintStart_toStartOf="parent"-->
<!--        app:layout_constraintTop_toTopOf="parent" />-->

<!--</androidx.constraintlayout.widget.ConstraintLayout>-->
<LinearLayout
    xmlns:android="http://schemas.android.com/apk/res/android"
    android:layout_width="match_parent"
    android:layout_height="match_parent"
    android:orientation="vertical"
    android:gravity="center">
    <TextView
        android:id="@+id/tv"
        android:layout_width="wrap_content"
        android:layout_height="wrap_content"
        android:text="跳转"
       />
    <Button
        android:id="@+id/button"
        android:layout_width="wrap_content"
        android:layout_height="wrap_content"
        android:text="跳转"/>

</LinearLayout>
<?xml version="1.0" encoding="utf-8"?>
<LinearLayout xmlns:android="http://schemas.android.com/apk/res/android"
    android:layout_width="match_parent"
    android:layout_height="match_parent"
    android:orientation="vertical"
    android:gravity="center">
    <TextView
        android:layout_width="wrap_content"
        android:layout_height="wrap_content"
        android:text="@string/text2"/>

</LinearLayout>
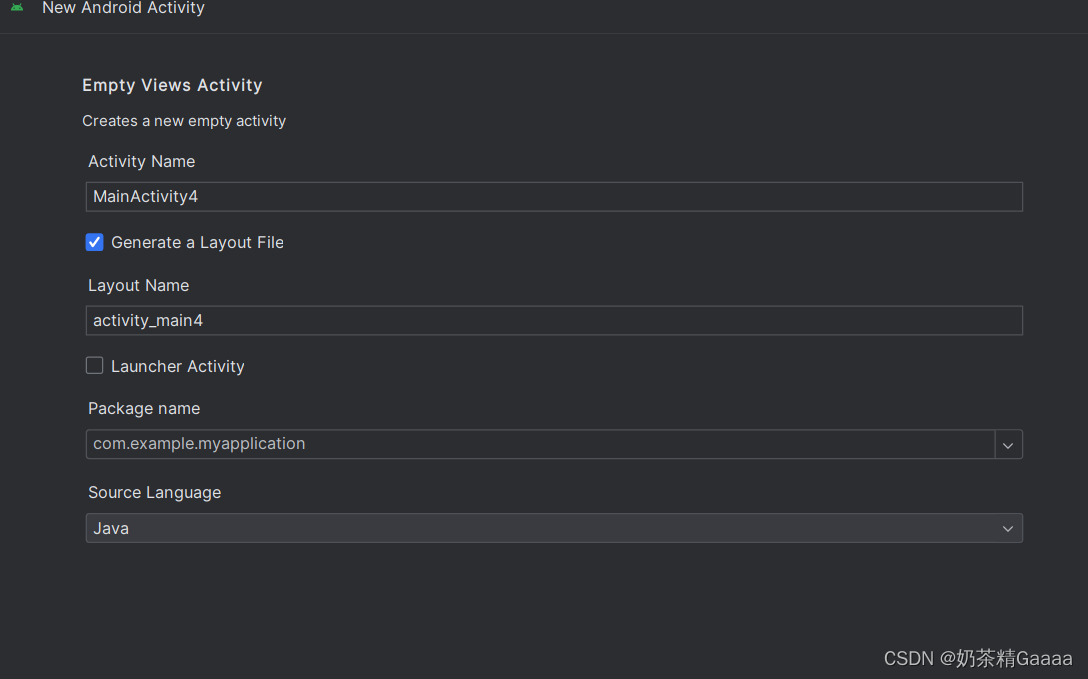
快速生成页面源码
依次选择右键菜单New——>Activity——>Empty Activity,弹出页面创建窗口
输入各项信息后,单击窗口右下角的FINISH按钮,完成新页面创建动作。
设置文本的内容
设置文本的两种方式
- 在XML文件中通过属性android.text设置文本
- 在Java代码中调用文本视图对象的setText方法设置文本
package com.example.myapplication;

import android.os.Bundle;
import android.widget.TextView;

import androidx.annotation.Nullable;
import androidx.appcompat.app.AppCompatActivity;

public class TextViewActivity extends AppCompatActivity {
    @Override
    protected void onCreate(@Nullable Bundle savedInstanceState){
        super.onCreate(savedInstanceState);
        setContentView(R.layout.activity_text_view);
        TextView tv_hello=findViewById(R.id.tv_hello);
        tv_hello.setText(R.string.hello);
    }

}
<resources>
    <string name="app_name">My Application</string>
    <string name="text2">Activity Main 2</string>
    <string name="hello">你好 世界</string>
</resources>
<?xml version="1.0" encoding="utf-8"?>
<LinearLayout xmlns:android="http://schemas.android.com/apk/res/android"
    android:layout_width="match_parent"
    android:layout_height="match_parent">
    <TextView
        android:id="@+id/tv_hello"
        android:layout_width="wrap_content"
        android:layout_height="wrap_content"
        android:text="@string/hello"/>

</LinearLayout>
设置文本的字体大小
在Java代码中调用setTextSize方法,即可指定文本大小
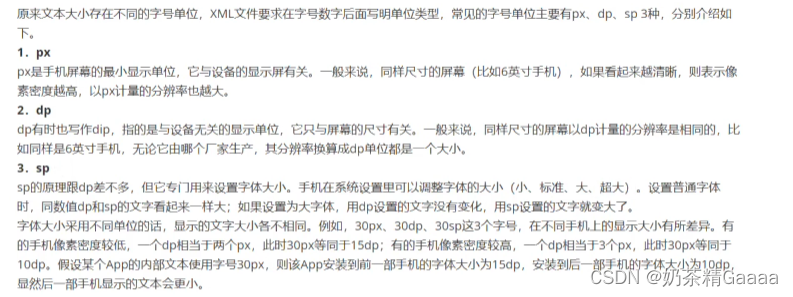
在XML文件中则通过属性android:textSize指定文本大小,此时需要指定字号单位
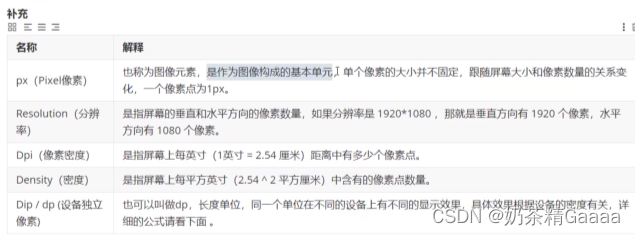
- px:他是手机屏幕最小的显示单位,与设备的显示屏有关
- dp:它是与设备无关的显示单位,只与屏幕的尺寸有关
- sp:它专门用来设置字体的大小,在系统设置中可以设置字体的大小
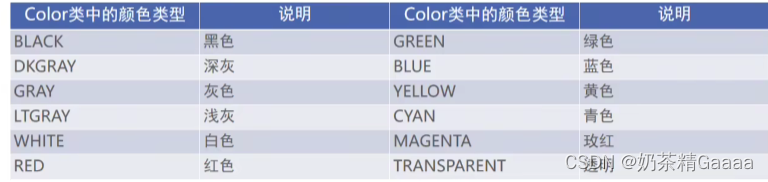
设置文本的颜色
在Java代码中调用setTextColor方法即可设置文本颜色,具体色值可从Color类取。
RGB颜色定义
1.在xml文件中则通过属性android:textColor指定文本颜色,色值由透明度alpha和RGB三原色(红色red、绿色green、蓝色blue)联合定义
2.色值有八位十六进制与六位十六进制两种表达方式,例如八位编码FFEEDDCC中,FF表示透明度,EE表示红色浓度,DD表示绿色浓度,CC表示蓝色浓度。
3.透明度为FF表示完全不透明,为00表示完全透明越浓。RGB三色的数值越大,表示的颜色浓度越浓,也就越亮;数值越小,表示颜色越淡,也就越暗。

package com.example.myapplication;

import android.graphics.Color;
import android.os.Bundle;
import android.widget.TextView;

import androidx.appcompat.app.AppCompatActivity;

public class TextColorActivity extends AppCompatActivity {
    @Override
    protected void onCreate(Bundle savedInstanceState){
        super.onCreate(savedInstanceState);
        setContentView(R.layout.activity_text_color);
       TextView tv_code_system= findViewById(R.id.tv_code_system);
        tv_code_system.setTextColor(Color.BLUE);
    }
}
<?xml version="1.0" encoding="utf-8"?>
<LinearLayout xmlns:android="http://schemas.android.com/apk/res/android"
    xmlns:tools="http://schemas.android.com/tools"

    android:layout_width="match_parent"
    android:layout_height="match_parent"
    tools:context=".TextColorActivity">
    <TextView
        android:id="@+id/tv_code_system"
        android:layout_width="wrap_content"
        android:layout_height="wrap_content"
        android:text="代码设置文本颜色"
        android:textSize="17sp"/>

</LinearLayout>
设置视图的宽高
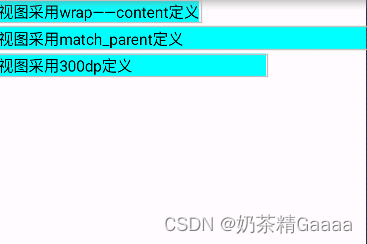
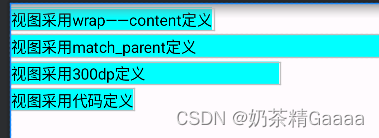
视图的宽度通过属性androd:layout_width表达,视图高度通过属性android:layout_height 表达,宽高的取值主要有下列三种
- match_parent:表示与上级视图保持一致
- wrap_content:表示与内容自适应
- 以dp为单位的具体尺寸
<?xml version="1.0" encoding="utf-8"?>
<LinearLayout xmlns:android="http://schemas.android.com/apk/res/android"
    android:layout_width="match_parent"
    android:layout_height="match_parent"
    android:orientation="vertical">

    <TextView

        android:layout_width="wrap_content"
        android:layout_height="wrap_content"
        android:layout_marginTop="5dp"
        android:background="#00ffff"
        android:text="视图采用wrap——content定义"
        android:textColor="#000000"
        android:textSize="17sp"/>
    <TextView
        android:layout_width="match_parent"
        android:layout_height="wrap_content"
        android:layout_marginTop="5dp"
        android:background="#00ffff"
        android:text="视图采用match_parent定义"
        android:textColor="#000000"
        android:textSize="17sp"/>
    <TextView
        android:layout_width="300dp"
        android:layout_height="wrap_content"
        android:layout_marginTop="5dp"
        android:background="#00ffff"
        android:text="视图采用300dp定义"
        android:textColor="#000000"
        android:textSize="17sp"/>


</LinearLayout>
在代码中设置视图宽高
首先确保消灭了中宽高属性值为wrap_content,接着打开该页面对应的Java代码,依序执行以下三个步骤:
- 调用控件对象的getLayoutParams方法,获取控件的布局参数
- 布局参数的width属性表示宽度,height属性表示高度,修改这两个属性值
- 调用控件对象的setLayoutParams方法,填入修改后布局参数使之生效
<?xml version="1.0" encoding="utf-8"?>
<LinearLayout xmlns:android="http://schemas.android.com/apk/res/android"
    android:layout_width="match_parent"
    android:layout_height="match_parent"
    android:orientation="vertical">

    <TextView

        android:layout_width="wrap_content"
        android:layout_height="wrap_content"
        android:layout_marginTop="5dp"
        android:background="#00ffff"
        android:text="视图采用wrap——content定义"
        android:textColor="#000000"
        android:textSize="17sp"/>
    <TextView
        android:layout_width="match_parent"
        android:layout_height="wrap_content"
        android:layout_marginTop="5dp"
        android:background="#00ffff"
        android:text="视图采用match_parent定义"
        android:textColor="#000000"
        android:textSize="17sp"/>
    <TextView
        android:layout_width="300dp"
        android:layout_height="wrap_content"
        android:layout_marginTop="5dp"
        android:background="#00ffff"
        android:text="视图采用300dp定义"
        android:textColor="#000000"
        android:textSize="17sp"/>
    <TextView
        android:id="@+id/tv_code"
        android:layout_width="wrap_content"
        android:layout_height="wrap_content"
        android:layout_marginTop="5dp"
        android:background="#00ffff"
        android:text="视图采用代码定义"
        android:textColor="#000000"
        android:textSize="17sp"/>


</LinearLayout>
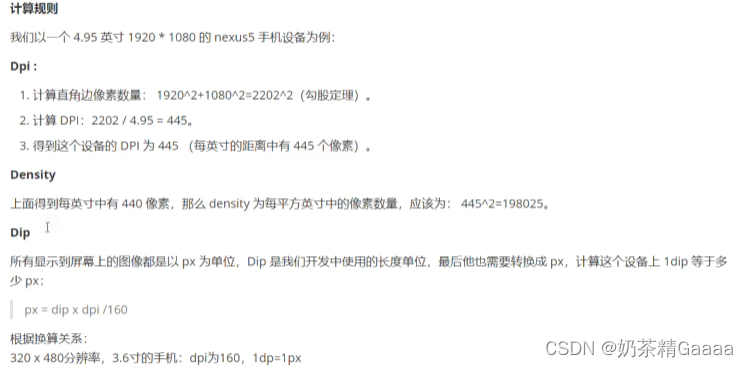
package com.example.myapplication.util;

import android.content.Context;

public class Utils {
    //根据分辨率dp转换为px
    public static  int dip2px(Context context,float dpValue){
        //根据当前手机像素密度(1个dp对应几个px)
        float scale= context.getResources().getDisplayMetrics().density;
        return (int)(dpValue*scale+0.5f);
    }
}
package com.example.myapplication;

import android.os.Bundle;
import android.view.ViewGroup;
import android.widget.TextView;

import androidx.appcompat.app.AppCompatActivity;

import com.example.myapplication.util.Utils;

public class ViewBorderActivity extends AppCompatActivity {
    @Override
    protected void onCreate(Bundle savedInstanceState){
        super.onCreate(savedInstanceState);
        setContentView(R.layout.activity_view_border);
        TextView tv_code=findViewById(R.id.tv_code);
        //获取tv_code的布局参数
        ViewGroup.LayoutParams params=tv_code.getLayoutParams();
        // 注意px的的那位,需要把dp转为px数值
        params.width= Utils.dip2px(this,300);
        tv_code.setLayoutParams(params);
    }
}
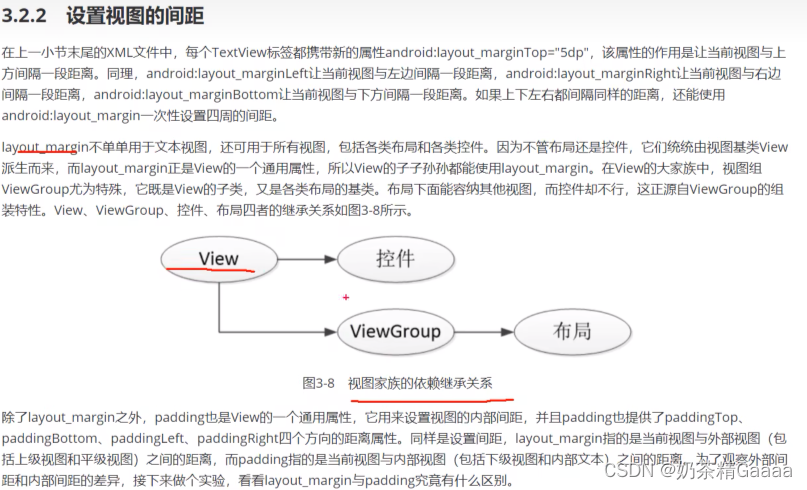
设置视图间距
设置视图间距的两种方式:
- 采用layout_margin属性,它指定了当前视图与周围平级视图之间的距离。包括layout_margin、layout_marginLeftlayout_marginTop、layout_marginRight、layout_marginBottom
- 采用padding属性、指定了当前视图与内部下级视图之间的距离。包括padding、paddingLeft、padding Top、padding Right、paddingBottom

<?xml version="1.0" encoding="utf-8"?>
<LinearLayout xmlns:android="http://schemas.android.com/apk/res/android"
    xmlns:app="http://schemas.android.com/apk/res-auto"
    xmlns:tools="http://schemas.android.com/tools"
    android:id="@+id/main"
    android:layout_width="match_parent"
    android:layout_height="300dp"
    android:orientation="vertical"
    android:background="#00AAFF">
<!--    middle yellow-->
    <LinearLayout
        android:layout_width="match_parent"
        android:layout_height="match_parent"
        android:layout_margin="20dp"
        android:background="#FFFF99"
        android:padding="60dp">
<!--        inner red-->
        <VideoView
            android:layout_width="match_parent"
            android:layout_height="match_parent"
            android:background="#FF0000">

        </VideoView>
    </LinearLayout>

</LinearLayout>
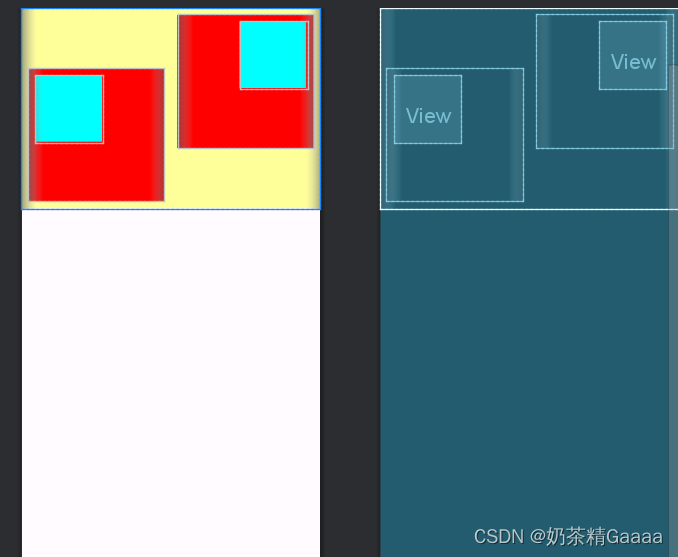
设置是视图的对齐方式
设置视图的对齐方式的两种途径:
- 采用layout_gravity属性,它指定当前视图相对于上级试图的对齐方式
- 采用gravity属性,它指定下级视图相对于当前视图的对齐方式。
layout_gravity与gravity的取值包括left、top、right、bottom还可以竖线连接各取值,例如“left|top”表示即靠左又靠上,也就是朝左上角对齐
注意:layout_gravity是自已的布局 gravity是子组件view布局
<?xml version="1.0" encoding="utf-8"?>
<LinearLayout xmlns:android="http://schemas.android.com/apk/res/android"
      android:layout_width="match_parent"
    android:layout_height="300dp"
    android:background="#ffff99"
    android:orientation="horizontal">
    <LinearLayout
        android:layout_width="0dp"
        android:layout_height="200dp"
        android:layout_weight="1"
        android:layout_margin="10dp"
        android:background="#ff0000"
        android:padding="10dp"
        android:layout_gravity="bottom"
        android:gravity="left"
        >
<View
    android:layout_width="100dp"
    android:layout_height="100dp"
    android:background="#00ffff"/>
    </LinearLayout>

    <LinearLayout
        android:layout_width="0dp"
        android:layout_height="200dp"
        android:layout_weight="1"
        android:layout_margin="10dp"
        android:layout_gravity="top"
        android:padding="10dp"
        android:background="#ff0000"
        android:gravity="right">
        <View
            android:layout_width="100dp"
            android:layout_height="100dp"
            android:background="#00ffff"/>

    </LinearLayout>

</LinearLayout>
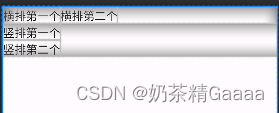
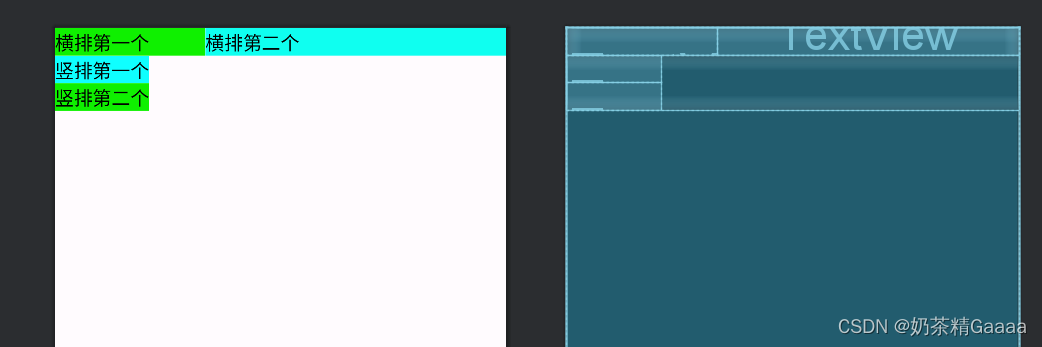
LinearLayout
线性布局内部的各视图的两种排列方式:
- orientation属性值为horizontal时,内部视图在水平方向从左到右排列
- orientation属性值为vertical时内部视图在垂直方向上从上往下排列
如果不指定orientation属性,则LinearLayout默认水平方向排列
<?xml version="1.0" encoding="utf-8"?>
<LinearLayout xmlns:android="http://schemas.android.com/apk/res/android"
   xmlns:app="http://schemas.android.com/apk/res-auto"
   xmlns:tools="http://schemas.android.com/tools"
   android:id="@+id/main"
   android:layout_width="match_parent"
   android:layout_height="match_parent"
   android:orientation="vertical"
   >
<LinearLayout
   android:layout_width="match_parent"
   android:layout_height="wrap_content"
   android:orientation="horizontal">

   <TextView
       android:layout_width="wrap_content"
       android:layout_height="wrap_content"
       android:text="横排第一个"
       android:textSize="17sp"
       android:textColor="#000000">

   </TextView>
   <TextView
       android:layout_width="wrap_content"
       android:layout_height="wrap_content"
       android:text="横排第二个"
       android:textSize="17sp"
       android:textColor="#000000">

   </TextView>
</LinearLayout>

   <LinearLayout
       android:layout_width="match_parent"
       android:layout_height="wrap_content"
       android:orientation="vertical">

       <TextView
           android:layout_width="wrap_content"
           android:layout_height="wrap_content"
           android:text="竖排第一个"
           android:textSize="17sp"
           android:textColor="#000000">

       </TextView>
       <TextView
           android:layout_width="wrap_content"
           android:layout_height="wrap_content"
           android:text="竖排第二个"
           android:textSize="17sp"
           android:textColor="#000000">

       </TextView>
   </LinearLayout>
</LinearLayout>
线性布局的权重概念,指的是线性布局的下级视图各自拥有多大比例的宽高。
权重属性名叫做layout_weight,但该属性不在LinearLayout节点设置,而在线性布局的直接下级视图设置,表示下级视图占据宽高比例。
- layout_width填0dp时,layout_weight表示水平方向的宽度比例
- layout_height填0dp时,layout_weight表示垂直方向的高度比例
<?xml version="1.0" encoding="utf-8"?>
<LinearLayout xmlns:android="http://schemas.android.com/apk/res/android"
    xmlns:app="http://schemas.android.com/apk/res-auto"
    xmlns:tools="http://schemas.android.com/tools"
    android:id="@+id/main"
    android:layout_width="match_parent"
    android:layout_height="match_parent"
    android:orientation="vertical"
    >
<LinearLayout
    android:layout_width="match_parent"
    android:layout_height="wrap_content"
    android:orientation="horizontal">

    <TextView
        android:layout_width="0dp"
        android:layout_height="wrap_content"
        android:layout_weight="1"
        android:text="横排第一个"
        android:textSize="17sp"
        android:background="#0ff000"
        android:textColor="#000000">

    </TextView>
    <TextView
        android:layout_width="0dp"
        android:layout_height="wrap_content"
        android:layout_weight="2"
        android:text="横排第二个"
        android:textSize="17sp"
        android:background="#0ffff0"

        android:textColor="#000000">

    </TextView>
</LinearLayout>

    <LinearLayout
        android:layout_width="match_parent"
        android:layout_height="wrap_content"
        android:orientation="vertical">

        <TextView
            android:layout_width="wrap_content"
            android:layout_height="wrap_content"
            android:text="竖排第一个"
            android:textSize="17sp"
            android:background="#0fffff"

            android:textColor="#000000">

        </TextView>
        <TextView
            android:layout_width="wrap_content"
            android:layout_height="wrap_content"
            android:text="竖排第二个"
            android:textSize="17sp"
            android:background="#0ff000"

            android:textColor="#000000">

        </TextView>
    </LinearLayout>
</LinearLayout>
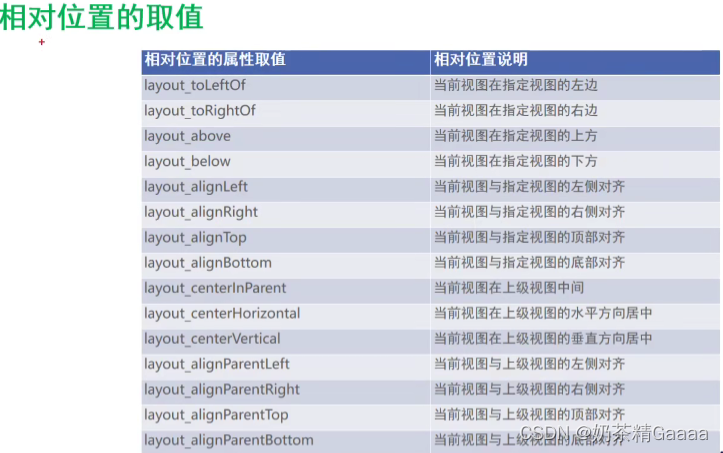
RelativeLayout
相对布局下级视图位置由其他视图决定。用于确定下级视图位置的参照物分为两种:
- 与该视图自身平级的视图
- 该视图的上级视图(也就是它归属的RelativeLayout)
如果不设定下级视图的参照物,那么下级视图默认显示在RelativeLayout内部的左上角

<?xml version="1.0" encoding="utf-8"?>
<RelativeLayout xmlns:android="http://schemas.android.com/apk/res/android"
    xmlns:app="http://schemas.android.com/apk/res-auto"
    xmlns:tools="http://schemas.android.com/tools"
    android:id="@+id/main"
    android:layout_width="match_parent"
    android:layout_height="150dp"
    tools:context=".util.RelativeLayoutActivity">
<TextView
    android:id="@+id/tv_center"
    android:layout_width="wrap_content"
    android:layout_height="wrap_content"
    android:layout_centerInParent="true"
    android:background="#ffffff"
    android:text="我在中间"
    android:textSize="11sp"
    android:textColor="#000000"/>
    <TextView
        android:id="@+id/tv_center_horizontal"
        android:layout_width="wrap_content"
        android:layout_height="wrap_content"
        android:background="#ffffff"
        android:layout_centerHorizontal="true"

        android:text="我在水平中间"
        android:textSize="11sp"
        android:textColor="#000000"/>
    <TextView
        android:id="@+id/tv_center_vertical"
        android:layout_width="wrap_content"
        android:layout_height="wrap_content"
        android:background="#ffffff"
        android:layout_centerVertical="true"

        android:text="我在垂直中间"
        android:textSize="11sp"
        android:textColor="#000000"/>
    <TextView
        android:id="@+id/tv_parent_left"
        android:layout_width="wrap_content"
        android:layout_height="wrap_content"
        android:background="#ffffff"
        android:layout_alignParentLeft="true"

        android:text="我在上级左边对齐"
        android:textSize="11sp"
        android:textColor="#000000"/>
    <TextView
        android:id="@+id/tv_parent_right"
        android:layout_width="wrap_content"
        android:layout_height="wrap_content"
        android:background="#ffffff"
        android:layout_alignParentRight="true"

        android:text="我在上级右边对齐"
        android:textSize="11sp"
        android:textColor="#000000"/>
    <TextView
        android:id="@+id/tv_parent_top"
        android:layout_width="wrap_content"
        android:layout_height="wrap_content"
        android:background="#ffffff"
        android:layout_alignParentTop="true"

        android:text="我在上级顶部对齐"
        android:textSize="11sp"
        android:textColor="#000000"/>
    <TextView
        android:id="@+id/tv_parent_bottom"
        android:layout_width="wrap_content"
        android:layout_height="wrap_content"
        android:background="#ffffff"
        android:layout_alignParentBottom="true"

        android:text="我在上级底部对齐"
        android:textSize="11sp"
        android:textColor="#000000"/>
    <TextView
        android:id="@+id/tv_left_center"
        android:layout_width="wrap_content"
        android:layout_height="wrap_content"

        android:layout_toLeftOf="@id/tv_center"
        android:layout_alignTop="@id/tv_center"
        android:background="#ffffff"

        android:text="我在中间左边"
        android:textSize="11sp"
        android:textColor="#000000"/>
    <TextView
        android:id="@+id/tv_right_center"
        android:layout_width="wrap_content"
        android:layout_height="wrap_content"
        android:layout_toRightOf="@id/tv_center"
        android:layout_alignBottom="@id/tv_center"
        android:background="#ffffff"
        android:text="我在中间右边"
        android:textSize="11sp"
        android:textColor="#000000"/>
    <TextView
        android:id="@+id/tv_above_center"
        android:layout_width="wrap_content"
        android:layout_height="wrap_content"
        android:layout_above="@id/tv_center"
        android:layout_alignLeft="@id/tv_center"
        android:background="#ffffff"
        android:text="我在中间上面"
        android:textSize="11sp"
        android:textColor="#000000"/>
    <TextView
        android:id="@+id/tv_below_center"
        android:layout_width="wrap_content"
        android:layout_height="wrap_content"
        android:layout_below="@id/tv_center"
        android:layout_alignRight="@id/tv_center"
        android:background="#ffffff"
        android:text="我在中间下面"
        android:textSize="11sp"
        android:textColor="#000000"/>

</RelativeLayout>
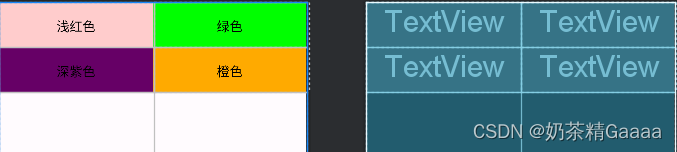
GirdLayout
网格布局支持多行多列的表格排列
网格布局默认从左到右、从上到下排列,他新增加两个属性:
- columnCount属性,它指定网格的列数,即每行能放多少个视图
- rowCount属性,它指定了网络的行数,即每列能放多少个视图
<?xml version="1.0" encoding="utf-8"?>
<GridLayout xmlns:android="http://schemas.android.com/apk/res/android"
    xmlns:app="http://schemas.android.com/apk/res-auto"
    xmlns:tools="http://schemas.android.com/tools"
    android:id="@+id/main"
    android:layout_width="match_parent"
    android:layout_height="match_parent"
    android:columnCount="2"
    android:rowCount="2"
    tools:context=".GridLayoutActivity">
    <TextView
        android:layout_width="0dp"
        android:layout_columnWeight="1"
        android:layout_height="60dp"
        android:background="#ffcccc"
        android:text="浅红色"
        android:gravity="center"

        android:textColor="#000000"
        android:textSize="17sp" />
    <TextView
        android:layout_width="0dp"
        android:layout_columnWeight="1"
        android:layout_height="60dp"
        android:background="#00ff00"
        android:text="绿色"
        android:gravity="center"
        android:textColor="#000000"
        android:textSize="17sp" />
    <TextView
        android:layout_width="0dp"
        android:layout_columnWeight="1"
        android:layout_height="60dp"
        android:background="#660066"
        android:text="深紫色"
        android:gravity="center"

        android:textColor="#000000"
        android:textSize="17sp" />
    <TextView
        android:layout_width="0dp"
        android:layout_columnWeight="1"
        android:layout_height="60dp"
        android:background="#ffaa00"
        android:text="橙色"
        android:gravity="center"

        android:textColor="#000000"
        android:textSize="17sp" />


</GridLayout>
ScrollView
滚动视图有两种:
- ScrollView,它是垂直方向的滚动视图,垂直方向滚动时,layout_width属性值设置为match_parent,layout_height属性值设置为wrap_content
- HorizontalScrollView,它是水平方向的滚动视图,水平方向滚蛋时,layout_width属性值设置为wrap_content,layout_height设置为match_parent

<?xml version="1.0" encoding="utf-8"?>
<LinearLayout xmlns:android="http://schemas.android.com/apk/res/android"
    xmlns:app="http://schemas.android.com/apk/res-auto"
    xmlns:tools="http://schemas.android.com/tools"
    android:id="@+id/main"
    android:layout_width="match_parent"
    android:layout_height="match_parent"

    android:orientation="vertical">
    <HorizontalScrollView
        android:layout_width="wrap_content"
        android:layout_height="200dp">
        <LinearLayout
            android:layout_width="wrap_content"
            android:layout_height="match_parent"
            android:orientation="horizontal">
            <View
                android:layout_width="300dp"
                android:layout_height="match_parent"
                android:background="#aaffff">

            </View>
            <View
                android:layout_width="300dp"
                android:layout_height="match_parent"
                android:background="#ffff00">

            </View>
        </LinearLayout>
    </HorizontalScrollView>
    <ScrollView
        android:layout_width="match_parent"
        android:layout_height="wrap_content">
        <LinearLayout
            android:layout_width="wrap_content"
            android:layout_height="match_parent"
            android:orientation="vertical">
            <View
                android:layout_width="match_parent"
                android:layout_height="400dp"
                android:background="#00ff00">

            </View>
            <View
                android:layout_width="match_parent"
                android:layout_height="400dp"
                android:background="#ffffaa">

            </View>
        </LinearLayout>
    </ScrollView>

</LinearLayout>
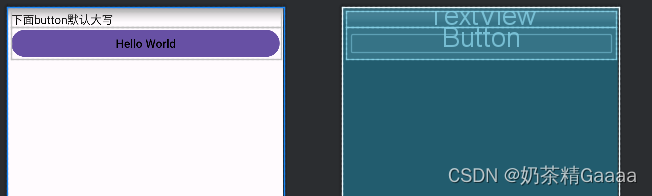
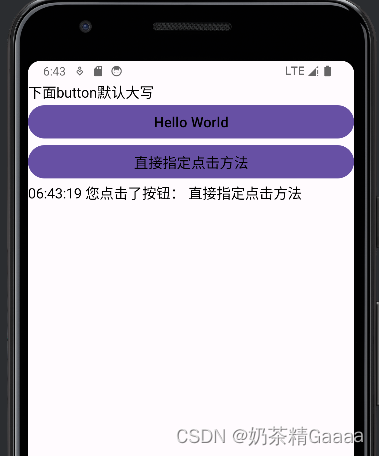
Button
按钮控件Button由TextView派生而来,他们之间的区别有
- Button拥有默认的按钮北京,而TextView默认无背景
- Button的内部文本默认居中对齐,而TextView的内部文本默认靠左对齐
- Button会默认将英文字母转为大写,而TextView保持原始的英文大小写
<?xml version="1.0" encoding="utf-8"?>
<LinearLayout xmlns:android="http://schemas.android.com/apk/res/android"
    xmlns:app="http://schemas.android.com/apk/res-auto"
    xmlns:tools="http://schemas.android.com/tools"
    android:id="@+id/main"
    android:layout_width="match_parent"
    android:layout_height="match_parent"
    tools:context=".ButtonStyleActivity"
    android:orientation="vertical"
    android:padding="5dp">
<TextView
    android:layout_width="match_parent"
    android:layout_height="wrap_content"
    android:text="下面button默认大写"
    android:textColor="@color/black"
    android:textSize="17sp"/>
    <Button
        android:layout_width="match_parent"
        android:layout_height="wrap_content"
        android:text="Hello World"
        android:textAllCaps="false"
        android:textColor="@color/black"
        android:textSize="17sp"/>

</LinearLayout>
按钮控件的新增加属性
与TextView相比,Button增加了两个新属性
- textAllCaps属性,它指定了是否将英文字母转为大写,为true食表示自动转为大写,为false是表示不自动转为大写
- onClick属性,它用力啊接管用户的点击动作,指定了点击按钮时要触发哪个方法
package com.example.myapplication;

import android.os.Bundle;

import androidx.activity.EdgeToEdge;
import androidx.appcompat.app.AppCompatActivity;
import androidx.core.graphics.Insets;
import androidx.core.view.ViewCompat;
import androidx.core.view.WindowInsetsCompat;
import android.view.View;
import android.widget.Button;
import android.widget.TextView;

import com.example.myapplication.util.DateUtil;

public class ButtonStyleActivity extends AppCompatActivity {

    private TextView tv_result;

    @Override
    protected void onCreate(Bundle savedInstanceState) {
        super.onCreate(savedInstanceState);
        EdgeToEdge.enable(this);
        setContentView(R.layout.activity_button_style);
        tv_result = findViewById(R.id.tv_result);

        ViewCompat.setOnApplyWindowInsetsListener(findViewById(R.id.main), (v, insets) -> {
            Insets systemBars = insets.getInsets(WindowInsetsCompat.Type.systemBars());
            v.setPadding(systemBars.left, systemBars.top, systemBars.right, systemBars.bottom);
            return insets;
        });


    }
    public void doClick(View view){
        String desc=String.format("%s 您点击了按钮: %s", DateUtil.getNowTime(),((Button)view).getText());
        tv_result.setText(desc);
    }
}
package com.example.myapplication.util;

import java.text.SimpleDateFormat;
import java.util.Date;
import java.util.logging.SimpleFormatter;

public class DateUtil {
    public static String getNowTime(){
        SimpleDateFormat sdf=new SimpleDateFormat("HH:mm:ss");
        return sdf.format(new Date());
    }
}
<?xml version="1.0" encoding="utf-8"?>
<LinearLayout xmlns:android="http://schemas.android.com/apk/res/android"
    xmlns:app="http://schemas.android.com/apk/res-auto"
    xmlns:tools="http://schemas.android.com/tools"
    android:id="@+id/main"
    android:layout_width="match_parent"
    android:layout_height="match_parent"
    tools:context=".ButtonStyleActivity"
    android:orientation="vertical"
    android:padding="5dp">
<TextView
    android:layout_width="match_parent"
    android:layout_height="wrap_content"
    android:text="下面button默认大写"
    android:textColor="@color/black"
    android:textSize="17sp"/>
    <Button
        android:layout_width="match_parent"
        android:layout_height="wrap_content"
        android:text="Hello World"
        android:textAllCaps="false"
        android:textColor="@color/black"
        android:textSize="17sp"
       />
    <Button
        android:layout_width="match_parent"
        android:layout_height="wrap_content"
        android:text="直接指定点击方法"
        android:textAllCaps="false"
        android:textColor="@color/black"
        android:textSize="17sp"
        android:onClick="doClick"/>
    <TextView
        android:id="@+id/tv_result"
        android:layout_width="match_parent"
        android:layout_height="wrap_content"
        android:text="显示点击按钮后的结果"
        android:textColor="@color/black"
        android:textSize="17sp"/>
</LinearLayout>
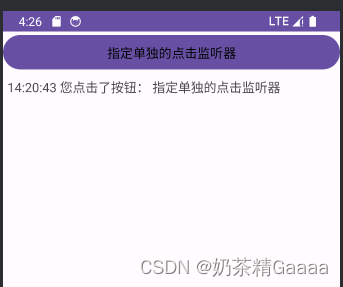
点击事件
监听器,意思就是专门监听控件的动作行为。只有控件发生了指定的动作,监听器才会触发开关去执行对于的代码逻辑
按钮控件有两种常用的监听器
- 点击监听器,通过setOnClickListener方法设置。按钮被按住少于500毫米时,会触发点击事件
- 长按监听器,通过setOnLongClickListener方法设置。按钮被按住超过500毫秒时,会触发长按事件

package com.example.myapplication;

import android.os.Bundle;
import android.view.View;
import android.widget.Button;
import android.widget.TextView;

import androidx.activity.EdgeToEdge;
import androidx.appcompat.app.AppCompatActivity;
import androidx.core.graphics.Insets;
import androidx.core.view.ViewCompat;
import androidx.core.view.WindowInsetsCompat;

import com.example.myapplication.util.DateUtil;

public class BttonClickActivity extends AppCompatActivity implements  View.OnClickListener {
private TextView tv_result;
    @Override
    protected void onCreate(Bundle savedInstanceState) {
        super.onCreate(savedInstanceState);
        setContentView(R.layout.activity_btton_click);
        tv_result=findViewById(R.id.tv_result);
        Button btn_click_single=findViewById(R.id.btn_click_single);
        btn_click_single.setOnClickListener(new MyOnClickListener(tv_result));

        Button btn_click_public=findViewById(R.id.btn_click_public);
        btn_click_public.setOnClickListener(this);


    }

    @Override
    public void onClick(View v) {
        if(v.getId()==R.id.btn_click_public){
            String desc=String.format("%s 您点击了按钮: %s", DateUtil.getNowTime(),((Button)v).getText());
            tv_result.setText(desc);
        }
    }

    static class MyOnClickListener implements View.OnClickListener{
        private final TextView tv_result;
        public MyOnClickListener(TextView tv_result){
            this.tv_result=tv_result;
        }
        @Override
        public void onClick(View v){
            String desc=String.format("%s 您点击了按钮: %s", DateUtil.getNowTime(),((Button)v).getText());
            tv_result.setText(desc);

        }
    }
}
<?xml version="1.0" encoding="utf-8"?>
<LinearLayout xmlns:android="http://schemas.android.com/apk/res/android"
    xmlns:app="http://schemas.android.com/apk/res-auto"
    xmlns:tools="http://schemas.android.com/tools"
    android:id="@+id/main"
    android:layout_width="match_parent"
    android:layout_height="match_parent"
    tools:context=".BttonClickActivity"
    android:orientation="vertical">
<Button
    android:id="@+id/btn_click_single"
    android:layout_width="match_parent"
    android:layout_height="wrap_content"
    android:text="指定单独的点击监听器"
    android:textColor="#000000"
    android:textSize="15sp"/>
    <Button
        android:id="@+id/btn_click_public"
        android:layout_width="match_parent"
        android:layout_height="wrap_content"
        android:text="指定公共的点击监听器"
        android:textColor="#000000"
        android:textSize="15sp"/>
    <TextView
        android:id="@+id/tv_result"
        android:layout_width="match_parent"
        android:layout_height="wrap_content"
        android:padding="5dp"
        android:textSize="15sp"
        android:text="这里查看按钮的点击结果"/>

</LinearLayout>
长按点击事件
package com.example.myapplication;

import android.os.Bundle;
import android.view.View;
import android.widget.Button;
import android.widget.TextView;

import androidx.activity.EdgeToEdge;
import androidx.appcompat.app.AppCompatActivity;
import androidx.core.graphics.Insets;
import androidx.core.view.ViewCompat;
import androidx.core.view.WindowInsetsCompat;

import com.example.myapplication.util.DateUtil;

public class activity_button_long_click extends AppCompatActivity {

    @Override
    protected void onCreate(Bundle savedInstanceState) {
        super.onCreate(savedInstanceState);
        setContentView(R.layout.activity_button_long_click);
        TextView tv_result=findViewById(R.id.tv_result);
        Button btn_long_click=findViewById(R.id.btn_long_click);
        btn_long_click.setOnLongClickListener(v -> {
            String desc=String.format("%s 您点击了按钮: %s", DateUtil.getNowTime(),((Button)v).getText());
            tv_result.setText(desc);
            return true;
        });
    }
}
<?xml version="1.0" encoding="utf-8"?>
<LinearLayout xmlns:android="http://schemas.android.com/apk/res/android"
    xmlns:tools="http://schemas.android.com/tools"
    android:id="@+id/main"
    android:layout_width="match_parent"
    android:layout_height="match_parent"
    tools:context=".BttonClickActivity"
    android:orientation="vertical">
    <Button
        android:id="@+id/btn_long_click"
        android:layout_width="match_parent"
        android:layout_height="wrap_content"
        android:text="指定长按的点击监听器"
        android:textColor="#000000"
        android:textSize="15sp"/>

    <TextView
        android:id="@+id/tv_result"
        android:layout_width="match_parent"
        android:layout_height="wrap_content"
        android:padding="5dp"
        android:textSize="15sp"
        android:text="这里查看按钮的点击结果"/>

</LinearLayout>
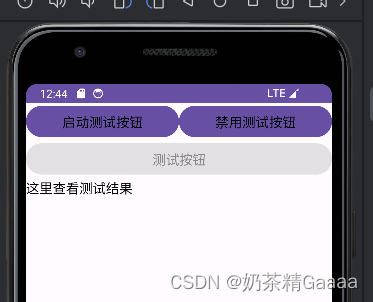
禁用恢复按钮
在实际业务中,按钮弹出拥有两种状态,即不可用状态和可用状态,他们在外观上和功能上的区别如下:
- 不可用按钮:按钮不允许点击,即使点击也没反应,同时按钮文字为灰色
- 可用按钮:按钮允许点击,点击按钮会粗发点击事件,同时按钮文字为正常的黑色;
是否允许点击由enabled属性控制,属性值为true表示允许点击,为false表示不允许点击
package com.example.myapplication;

import android.graphics.Color;
import android.os.Bundle;
import android.view.View;
import android.widget.Button;
import android.widget.TextView;

import androidx.appcompat.app.AppCompatActivity;

import com.example.myapplication.util.DateUtil;


public class ButtonEnableActivity extends AppCompatActivity implements View.OnClickListener {

    private  Button btn_test;
    private  TextView tv_result;


    @Override
    protected void onCreate(Bundle savedInstanceState) {
        super.onCreate(savedInstanceState);
        setContentView(R.layout.activity_button_enable);

        Button btn_enable = findViewById(R.id.btn_enable);
        Button btn_disable=findViewById(R.id.btn_disable);
       btn_test =findViewById(R.id.btn_test);
        tv_result=findViewById(R.id.tv_result);


        btn_enable.setOnClickListener(this);
        btn_disable.setOnClickListener(this);
        btn_test.setOnClickListener(this);

    }
    @Override
    public void onClick(View v){
        switch (v.getId()){
            case R.id.btn_enable:
                btn_test.setEnabled(true);
                btn_test.setTextColor(Color.BLACK);
                break;
            case R.id.btn_disable:
                btn_test.setEnabled(false);
                btn_test.setTextColor(Color.GRAY);
                break;
            case R.id.btn_test:
                String desc=String.format("%s 您点击了按钮: %s", DateUtil.getNowTime(),((Button)v).getText());
                tv_result.setText(desc);
                break;
        }

    }


}
<?xml version="1.0" encoding="utf-8"?>
<LinearLayout xmlns:android="http://schemas.android.com/apk/res/android"
    android:id="@+id/main"
    android:layout_width="match_parent"
    android:layout_height="match_parent"
    android:orientation="vertical">
<LinearLayout
  android:layout_width="match_parent"
    android:layout_height="wrap_content"
    android:orientation="horizontal">
    <Button
        android:id="@+id/btn_enable"
        android:layout_width="0dp"
        android:layout_weight="1"
        android:layout_height="wrap_content"
        android:textColor="#000000"
        android:textSize="17sp"
        android:text="启动测试按钮"/>
    <Button
        android:id="@+id/btn_disable"
        android:layout_width="0dp"
        android:layout_weight="1"
        android:layout_height="wrap_content"
        android:textColor="#000000"
        android:textSize="17sp"
        android:text="禁用测试按钮"/>
</LinearLayout>
    <Button
        android:id="@+id/btn_test"
        android:layout_width="match_parent"
        android:layout_height="wrap_content"
        android:textColor="#888888"
        android:textSize="17sp"
        android:text="测试按钮"
        android:enabled="false"/>
    <TextView
        android:id="@+id/tv_result"
        android:layout_width="match_parent"
        android:layout_height="wrap_content"
        android:textColor="#000000"
        android:textSize="17sp"
        android:text="这里查看测试结果"/>
</LinearLayout>
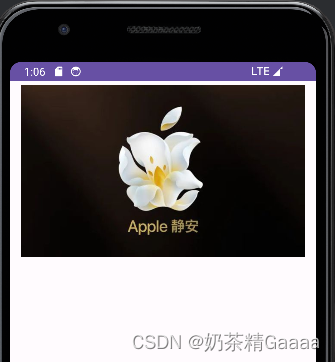
ImageView
图像视图展示的图片通常位于res/drawable***目录,设置图像视图的显示图片的显示图片有两种方式:
- 在XML文件中,通过属性android:src设置图片资源,属性格式形式为“@drawable/不含拓展名的图片名称”
- 在java代码中,调用setImageResource方法设置图片资源,方法参数格式形如“R.drawable.不含拓展名的图片名称”
<?xml version="1.0" encoding="utf-8"?>
<LinearLayout xmlns:android="http://schemas.android.com/apk/res/android"
    xmlns:app="http://schemas.android.com/apk/res-auto"
    xmlns:tools="http://schemas.android.com/tools"
    android:id="@+id/main"
    android:layout_width="match_parent"
    android:layout_height="match_parent"
    tools:context=".ImageScaleActivity"
    android:orientation="vertical">
    <ImageView
        android:id="@+id/iv_scale"
        android:layout_width="match_parent"
        android:layout_height="220dp"
        android:layout_marginTop="5dp"
        android:src="@drawable/apple"
       />
<!-- 如果用java方式显示,不用android:src="@drawable/apple"   -->

</LinearLayout>
package com.example.myapplication;

import android.os.Bundle;
import android.widget.ImageView;

import androidx.activity.EdgeToEdge;
import androidx.appcompat.app.AppCompatActivity;
import androidx.core.graphics.Insets;
import androidx.core.view.ViewCompat;
import androidx.core.view.WindowInsetsCompat;

public class ImageScaleActivity extends AppCompatActivity {

    @Override
    protected void onCreate(Bundle savedInstanceState) {
        super.onCreate(savedInstanceState);
        setContentView(R.layout.activity_image_scale);
        ImageView iv_scale=findViewById(R.id.iv_scale);
        iv_scale.setImageResource(R.drawable.apple);

    }
}


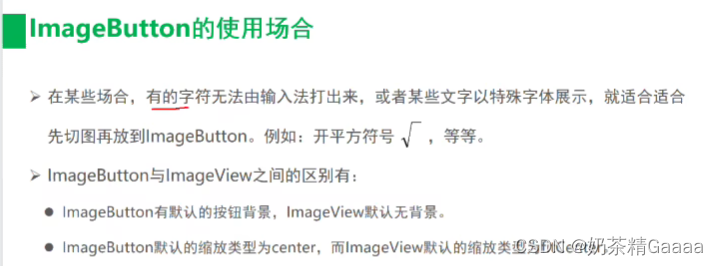
ImageButton
ImageButton是显示图片的图像按钮,但它继承ImageView,而非Button
ImageButton和Button之间区别有:
- Button既可以显示文本也可以显示图片,Imagebutton只能显示图片不能显示文本
- ImageButton上的图像可按比例缩放,而Button通过背景设置的图像会拉伸变形
- Button只能靠背景显示一张图片,而ImageButton可分别在前景和背景显示图片,从而实现两张图片的叠加效果
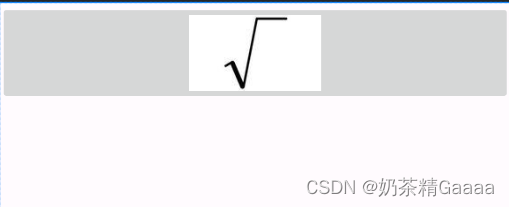
<?xml version="1.0" encoding="utf-8"?>
<LinearLayout xmlns:android="http://schemas.android.com/apk/res/android"
    xmlns:app="http://schemas.android.com/apk/res-auto"
    xmlns:tools="http://schemas.android.com/tools"
    android:id="@+id/main"
    android:layout_width="match_parent"
    android:layout_height="match_parent"
    tools:context=".ImageButtonActivity"
    android:orientation="vertical">
    <ImageButton
        android:layout_width="match_parent"
        android:layout_height="80dp"
        android:src="@drawable/sqrt"
        android:scaleType="fitCenter"/>

</LinearLayout>
同时展现文本和图像
同时展示文本与图像可能途径包括:
- 利用LinearLayout对ImageView和TextView组合布局
- 通过按钮控件Button的drawable***属性设置文本周围的图标
- drawableTop:指定文字上方的图片
- drawableBottom:指定文字下方的图片
- drawableLeft:指定文字左边的图片
- drawableRight:指定文字右边的图片
- drawablePadding:指定文字与图片的间距

<?xml version="1.0" encoding="utf-8"?>
<LinearLayout xmlns:android="http://schemas.android.com/apk/res/android"
    xmlns:app="http://schemas.android.com/apk/res-auto"
    xmlns:tools="http://schemas.android.com/tools"
    android:id="@+id/main"
    android:layout_width="match_parent"
    android:layout_height="match_parent"
    tools:context=".ImageTextActivity"
    android:orientation="vertical">
    <Button
        android:layout_width="wrap_content"
        android:layout_height="wrap_content"
        android:text="图标在左边"
        android:drawableLeft="@drawable/ali"
        android:background="#FFFFFF"
        android:drawablePadding="5dp"/>

</LinearLayout>
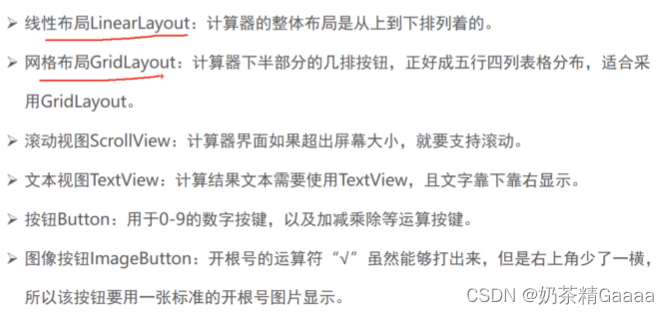
案例-计算器-界面编码

案例-计算器-逻辑处理编码
练习题
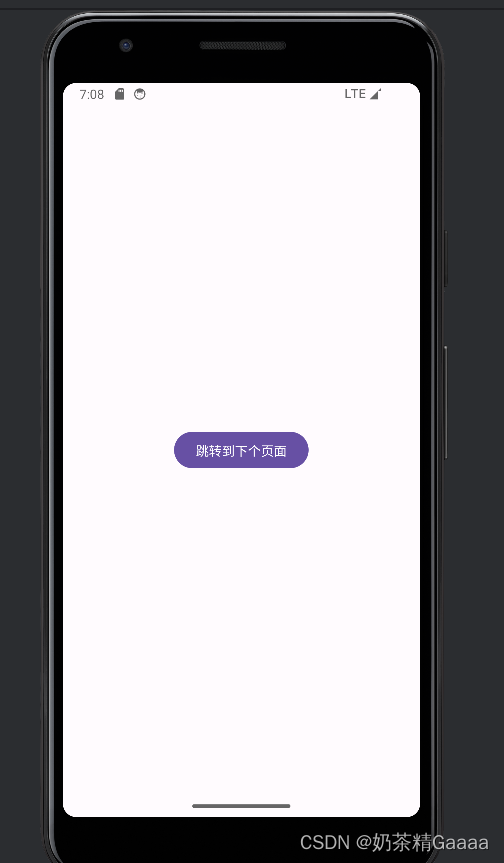
Activity启动和结束
从当前页面跳到新页面,跳转代码如下
- startActivity(new Intent(源页面.this,目标页面.class));
从当前页面回到上一页面,相当于关闭当前页面,返回代码如下
- finish();//结束当前的活动页面
package com.example.myapplication;

import android.content.Intent;
import android.os.Bundle;
import android.view.View;

import androidx.activity.EdgeToEdge;
import androidx.appcompat.app.AppCompatActivity;
import androidx.core.graphics.Insets;
import androidx.core.view.ViewCompat;
import androidx.core.view.WindowInsetsCompat;

public class ActStartActivity extends AppCompatActivity implements View.OnClickListener {

    @Override
    protected void onCreate(Bundle savedInstanceState) {
        super.onCreate(savedInstanceState);
        EdgeToEdge.enable(this);
        setContentView(R.layout.activity_act_start);

        findViewById(R.id.btn_act_next).setOnClickListener(this);
    }

    @Override
    public void onClick(View v) {
        startActivity(new Intent(this,ActFinishActivity.class));
    }
}
package com.example.myapplication;

import android.os.Bundle;
import android.view.View;

import androidx.activity.EdgeToEdge;
import androidx.appcompat.app.AppCompatActivity;
import androidx.core.graphics.Insets;
import androidx.core.view.ViewCompat;
import androidx.core.view.WindowInsetsCompat;

public class ActFinishActivity extends AppCompatActivity implements View.OnClickListener {

    @Override
    protected void onCreate(Bundle savedInstanceState) {
        super.onCreate(savedInstanceState);
        EdgeToEdge.enable(this);
        setContentView(R.layout.activity_act_finish);
      findViewById(R.id.iv_back).setOnClickListener(this);
      findViewById(R.id.btn_finish).setOnClickListener(this);

    }

    @Override
    public void onClick(View v) {
        if(v.getId()==R.id.iv_back||v.getId()==R.id.btn_finish){
            finish();
        }
    }
}
<?xml version="1.0" encoding="utf-8"?>
<LinearLayout xmlns:android="http://schemas.android.com/apk/res/android"
    xmlns:app="http://schemas.android.com/apk/res-auto"
    xmlns:tools="http://schemas.android.com/tools"
    android:id="@+id/main"
    android:layout_width="match_parent"
    android:layout_height="match_parent"
    tools:context=".ActFinishActivity"
    android:orientation="vertical">
    <ImageButton
        android:id="@+id/iv_back"
        android:layout_width="40dp"
        android:layout_height="40dp"
        android:padding="5dp"
        android:src="@drawable/ic_back"/>
    <Button
        android:id="@+id/btn_finish"
        android:layout_width="match_parent"
        android:layout_height="wrap_content"
        android:gravity="center"
        android:text="完成"/>
    <TextView
        android:layout_width="match_parent"
        android:layout_height="wrap_content"
        android:gravity="center"
        android:text="按返回键,或者点击左上角的箭头图标,或者点击完成按钮,均可关闭当前页面,返回上个页面"/>


</LinearLayout>
<?xml version="1.0" encoding="utf-8"?>
<LinearLayout xmlns:android="http://schemas.android.com/apk/res/android"
    xmlns:tools="http://schemas.android.com/tools"
    android:id="@+id/main"
    android:layout_width="match_parent"
    android:layout_height="match_parent"
    android:orientation="vertical"
    android:gravity="center">
<Button
    android:id="@+id/btn_act_next"
    android:layout_width="wrap_content"
    android:layout_height="wrap_content"
    android:text="跳转到下个页面"/>
</LinearLayout>
Activity 生命周期

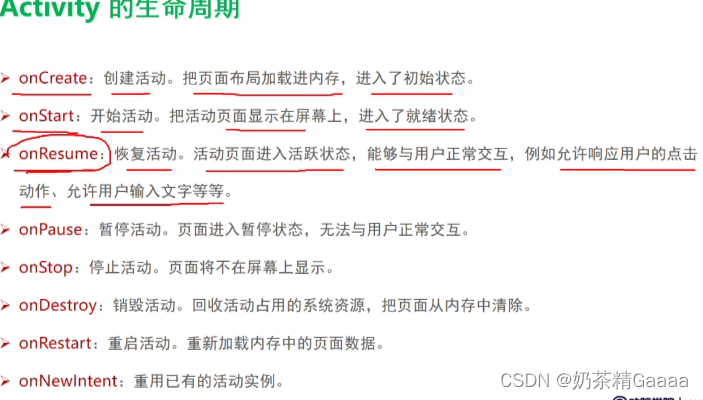
各状态之间的切换过程
打开新页面的方法调用顺序为:
- onCreate——>onStart——>onResume
关闭旧页面的方法调用顺序为:
- onPause——>onStop——>onDestory

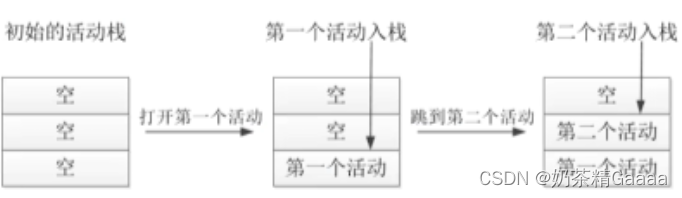
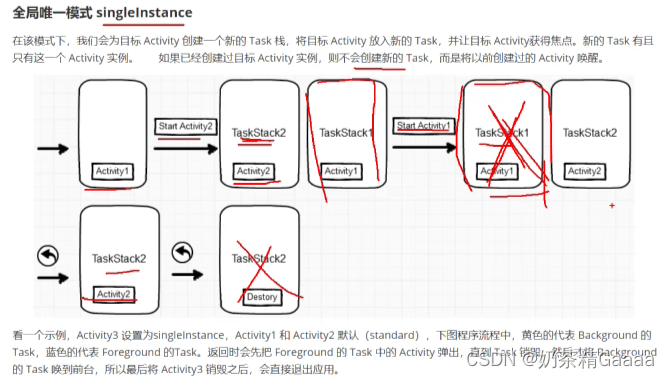
Activity 启动模式
某App先后打开两个活动,此时活动栈的变动情况如下图所示
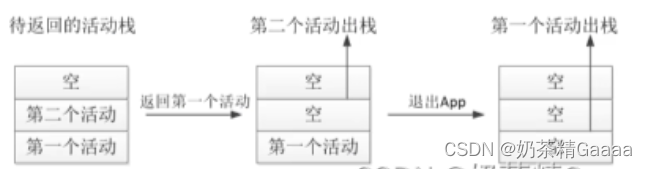
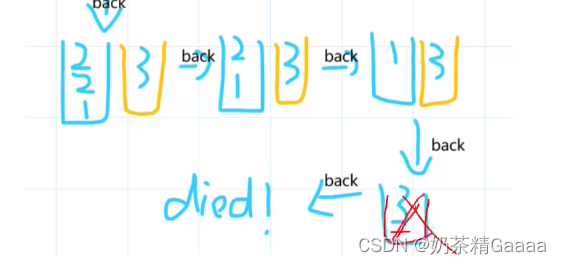
依次结束已打开的两个活动,此时活动栈的变动情况如下图所示
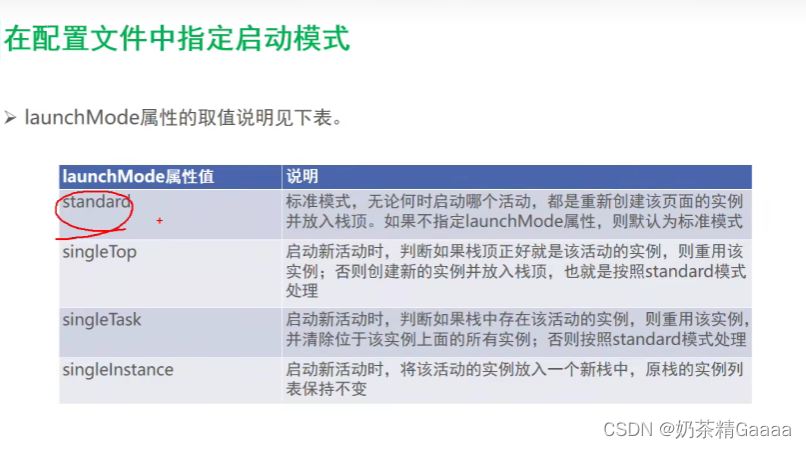
默认启动模式standard
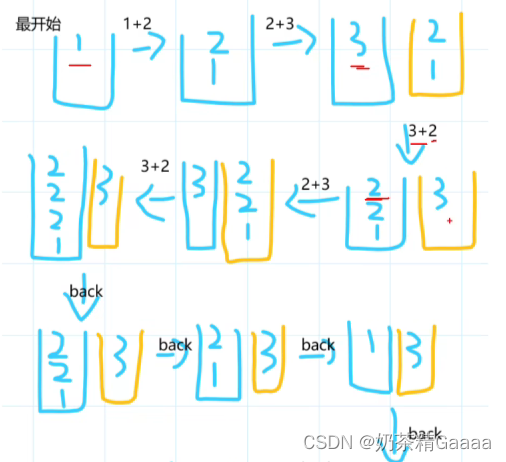
该模式可以被设定,不在manifest设定的时候,Activity的默认模式就是standard。在该模式下,启动的activity会依照启动顺序被依次压入Task栈中

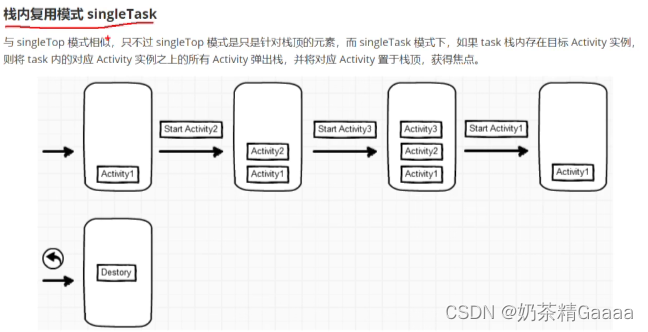
栈内复用singleTask


package com.example.myapplication;

import android.content.Intent;
import android.os.Bundle;
import android.view.View;

import androidx.activity.EdgeToEdge;
import androidx.appcompat.app.AppCompatActivity;
import androidx.core.graphics.Insets;
import androidx.core.view.ViewCompat;
import androidx.core.view.WindowInsetsCompat;

public class JumpFirstActivity extends AppCompatActivity implements View.OnClickListener {

    @Override
    protected void onCreate(Bundle savedInstanceState) {
        super.onCreate(savedInstanceState);
        EdgeToEdge.enable(this);
        setContentView(R.layout.activity_jump_first);
        findViewById(R.id.btn_jump_second).setOnClickListener(this);

    }

    @Override
    public void onClick(View v) {
        //、创建意图
        Intent intent=new Intent(this,JumpSecondActivity.class);
        intent.setFlags(Intent.FLAG_ACTIVITY_CLEAR_TOP);
startActivity(intent);
    }
}
package com.example.myapplication;

import android.content.Intent;
import android.os.Bundle;
import android.view.View;

import androidx.activity.EdgeToEdge;
import androidx.appcompat.app.AppCompatActivity;
import androidx.core.graphics.Insets;
import androidx.core.view.ViewCompat;
import androidx.core.view.WindowInsetsCompat;

public class JumpSecondActivity extends AppCompatActivity implements View.OnClickListener {

    @Override
    protected void onCreate(Bundle savedInstanceState) {
        super.onCreate(savedInstanceState);
        EdgeToEdge.enable(this);
        setContentView(R.layout.activity_jump_second);
        findViewById(R.id.btn_jump_first).setOnClickListener(this);


    }

    @Override
    public void onClick(View v) {
        Intent intent =new Intent(this, JumpFirstActivity.class);
        intent.setFlags(Intent.FLAG_ACTIVITY_CLEAR_TOP);
        startActivity(intent);

    }
}
<?xml version="1.0" encoding="utf-8"?>
<LinearLayout xmlns:android="http://schemas.android.com/apk/res/android"
xmlns:app="http://schemas.android.com/apk/res-auto"
xmlns:tools="http://schemas.android.com/tools"
android:id="@+id/main"
android:layout_width="match_parent"
android:layout_height="match_parent"
tools:context=".JumpFirstActivity"
android:orientation="vertical">
<Button
android:id="@+id/btn_jump_second"
android:layout_width="match_parent"
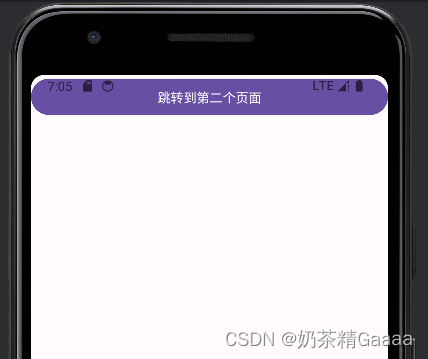
android:layout_height="wrap_content"
android:text="跳转到第二个页面"/>
</LinearLayout>
<?xml version="1.0" encoding="utf-8"?>
<LinearLayout xmlns:android="http://schemas.android.com/apk/res/android"
xmlns:app="http://schemas.android.com/apk/res-auto"
xmlns:tools="http://schemas.android.com/tools"
android:id="@+id/main"
android:layout_width="match_parent"
android:layout_height="match_parent"
tools:context=".JumpSecondActivity"
android:orientation="vertical">
<Button
android:id="@+id/btn_jump_first"
android:layout_width="match_parent"
android:layout_height="wrap_content"
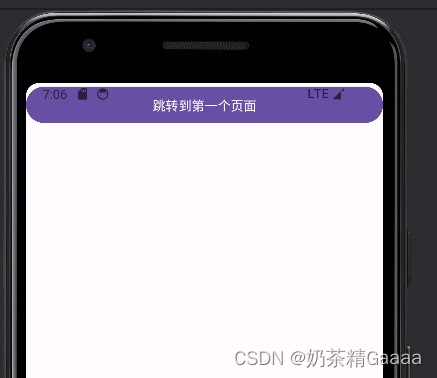
android:text="跳转到第一个页面"/>
</LinearLayout>
<?xml version="1.0" encoding="utf-8"?>
<manifest xmlns:android="http://schemas.android.com/apk/res/android"
    xmlns:tools="http://schemas.android.com/tools">

    <application
        android:allowBackup="true"
        android:dataExtractionRules="@xml/data_extraction_rules"
        android:fullBackupContent="@xml/backup_rules"
        android:icon="@mipmap/ic_launcher"
        android:label="@string/app_name"
        android:roundIcon="@mipmap/ic_launcher_round"
        android:supportsRtl="true"
        android:theme="@style/Theme.MyApplication"
        tools:targetApi="31">

        <activity
            android:name=".JumpSecondActivity"
            android:exported="false" />
        <activity
            android:name=".GridLayoutActivity"
            android:exported="false" />
        <activity
            android:name=".util.RelativeLayoutActivity"
            android:exported="false" />
        <activity
            android:name=".LinearLayoutActivity"
            android:exported="false" />
        <activity
            android:name=".ViewGravityActivity"
            android:exported="false" />
        <activity
            android:name=".ViewMarginActivity"
            android:exported="false" />
        <activity
            android:name=".TextColorActivity"
            android:exported="true">
            <intent-filter>
                <action android:name="android.intent.action.MAIN" />

                <category android:name="android.intent.category.LAUNCHER" />
            </intent-filter>
        </activity>
        <activity
            android:name=".ScrollViewActivity"
            android:exported="true">
            <intent-filter>
                <action android:name="android.intent.action.MAIN" />

                <category android:name="android.intent.category.LAUNCHER" />
            </intent-filter>
        </activity>
        <activity
            android:name=".ButtonStyleActivity"
            android:exported="true">
            <intent-filter>
                <action android:name="android.intent.action.MAIN" />

                <category android:name="android.intent.category.LAUNCHER" />
            </intent-filter>
        </activity>
        <activity
            android:name=".ActStartActivity"
            android:exported="true">
            <intent-filter>
                <action android:name="android.intent.action.MAIN" />

                <category android:name="android.intent.category.LAUNCHER" />
            </intent-filter>
        </activity> <!-- ActFinishActivity -->
        <activity
            android:name=".JumpFirstActivity"
            android:exported="true">
            <intent-filter>
                <action android:name="android.intent.action.MAIN" />

                <category android:name="android.intent.category.LAUNCHER" />
            </intent-filter>
        </activity>
    </application>

</manifest>

package com.example.myapplication;
import android.content.Intent;
import android.os.Bundle;
import android.view.View;
import androidx.activity.EdgeToEdge;
import androidx.appcompat.app.AppCompatActivity;
import androidx.core.graphics.Insets;
import androidx.core.view.ViewCompat;
import androidx.core.view.WindowInsetsCompat;
public class LogininputActivity extends AppCompatActivity implements View.OnClickListener {
@Override
protected void onCreate(Bundle savedInstanceState) {
super.onCreate(savedInstanceState);
setContentView(R.layout.activity_logininput);
findViewById(R.id.btn_jump_success).setOnClickListener(this);
}
@Override
public void onClick(View v) {
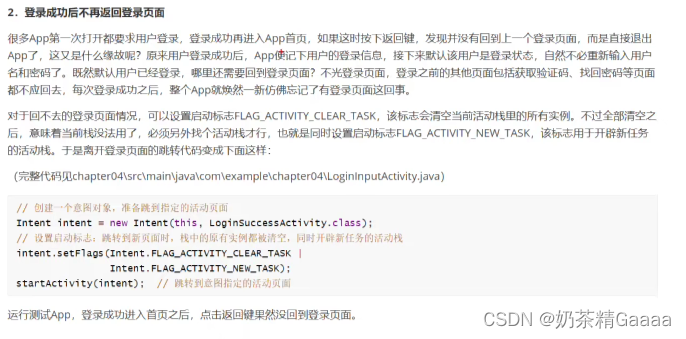
Intent intent=new Intent(this,LogininputActivity.class);
intent.setFlags(Intent.FLAG_ACTIVITY_CLEAR_TASK|Intent.FLAG_ACTIVITY_NEW_TASK);
startActivity(intent);
}
}
package com.example.myapplication;

import android.os.Bundle;

import androidx.activity.EdgeToEdge;
import androidx.appcompat.app.AppCompatActivity;
import androidx.core.graphics.Insets;
import androidx.core.view.ViewCompat;
import androidx.core.view.WindowInsetsCompat;

public class LoginSuccessActivity extends AppCompatActivity {

    @Override
    protected void onCreate(Bundle savedInstanceState) {
        super.onCreate(savedInstanceState);
        setContentView(R.layout.activity_login_success);

    }
}
<?xml version="1.0" encoding="utf-8"?>
<LinearLayout xmlns:android="http://schemas.android.com/apk/res/android"
    xmlns:app="http://schemas.android.com/apk/res-auto"
    xmlns:tools="http://schemas.android.com/tools"
    android:id="@+id/main"
    android:layout_width="match_parent"
    android:layout_height="match_parent"
    tools:context=".LoginSuccessActivity"
    android:orientation="vertical">
<TextView
    android:layout_width="wrap_content"
    android:layout_height="wrap_content"
    android:text="这里是登录成功界面,登录成功之后不必要返回登录验证"/>

</LinearLayout>
<?xml version="1.0" encoding="utf-8"?>
<LinearLayout xmlns:android="http://schemas.android.com/apk/res/android"
    xmlns:app="http://schemas.android.com/apk/res-auto"
    xmlns:tools="http://schemas.android.com/tools"
    android:id="@+id/main"
    android:layout_width="match_parent"
    android:layout_height="match_parent"
    tools:context=".LogininputActivity">

    <TextView
        android:layout_width="wrap_content"
        android:layout_height="wrap_content"
        android:text="这里是登录验证页面,此处省略了用户名和密码等输入"/>
    <Button
        android:id="@+id/btn_jump_success"
        android:layout_width="match_parent"
        android:layout_height="wrap_content"
        android:gravity="center"
        android:text="/跳转登录成功页面"/>

</LinearLayout>
在代码里面设置启动标志
- IntentFLAG_ACTIVITY_NEW_TASK:开辟一个新的任务栈
- IntentFLAG_ACTIVITY_SIGLE_TOP:当栈顶为待跳转的活动实例之时,则重用栈顶的实例
- IntentFLAG_ACTIVITY_CLEAR_TOP:当栈中存在待跳转的活动实例时,则重新创建一个新实例并清除原实例上方的所有实例
- Intent.FLAG_ACTIVITY_NO_HISTORY:栈中不保存新启动的活动实例
- Intent.FLAG_ACTIVITY_CLEAR_TASK:跳转到新页面中,栈中的原有实例被清空
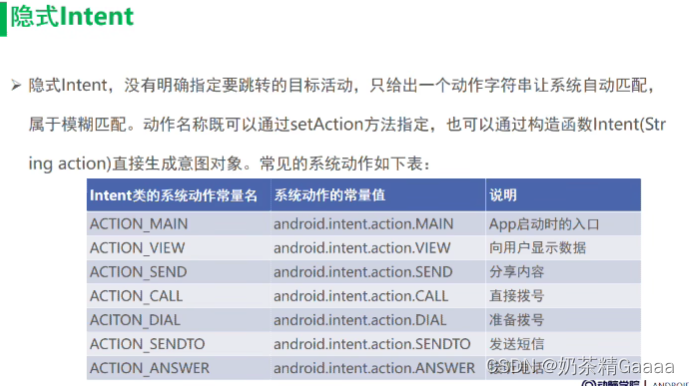
显式Intent和隐式Intent
显示Intent和隐式Intent
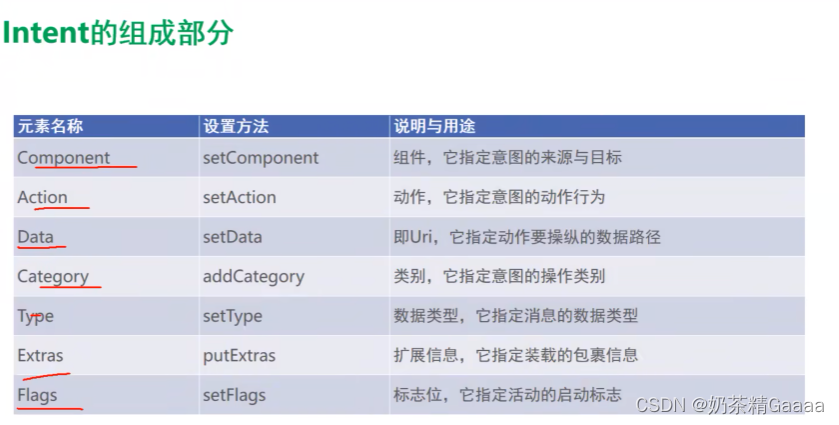
Intent是各个组件之间的信息沟通的桥梁,它用来Android各组件之间的通信,主要完成下列工作:
- 标明本次通信请求从哪里来,要怎么去
- 发起方携带本次通信请求从哪里来,要怎么去
- 发起方若想判断接收方的处理结果,意图负责让接受方传回应答的数据内容
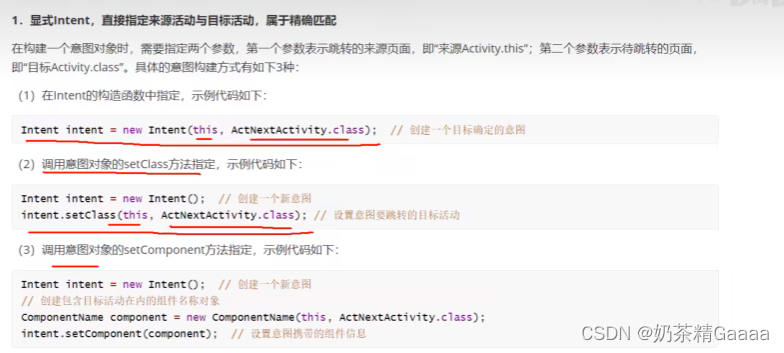
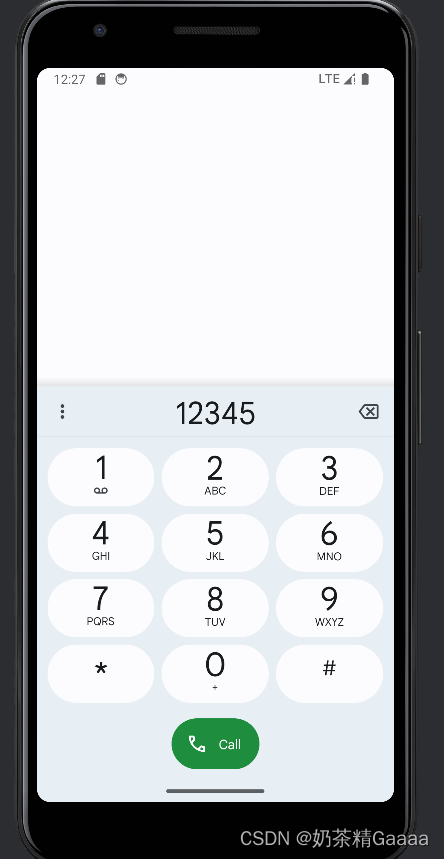
显式Intent
显式Intent直接指定来源活动与目标活动,属于精确匹配,它有三种构建方式:
- 在Intent的构造函数中指定
- 调用意图对象的setClass方法指定
- 调用意图对象的setComponent方法指定


package com.example.myapplication;
import android.content.Intent;
import android.net.Uri;
import android.os.Bundle;
import android.view.View;
import androidx.activity.EdgeToEdge;
import androidx.appcompat.app.AppCompatActivity;
import androidx.core.graphics.Insets;
import androidx.core.view.ViewCompat;
import androidx.core.view.WindowInsetsCompat;
public class ActionUriActivity extends AppCompatActivity implements View.OnClickListener {
@Override
protected void onCreate(Bundle savedInstanceState) {
super.onCreate(savedInstanceState);
EdgeToEdge.enable(this);
setContentView(R.layout.activity_action_uri);
findViewById(R.id.btn_dial).setOnClickListener(this);
findViewById(R.id.btn_sms).setOnClickListener(this);
findViewById(R.id.btn_my).setOnClickListener(this);
}
@Override
public void onClick(View v) {
Intent intent=new Intent();
String phoneNo="12345";
switch (v.getId()){
case R.id.btn_dial:
intent.setAction(Intent.ACTION_DIAL);
Uri uri= Uri.parse("tel:"+phoneNo);
intent.setData(uri);
startActivity(intent);
break;
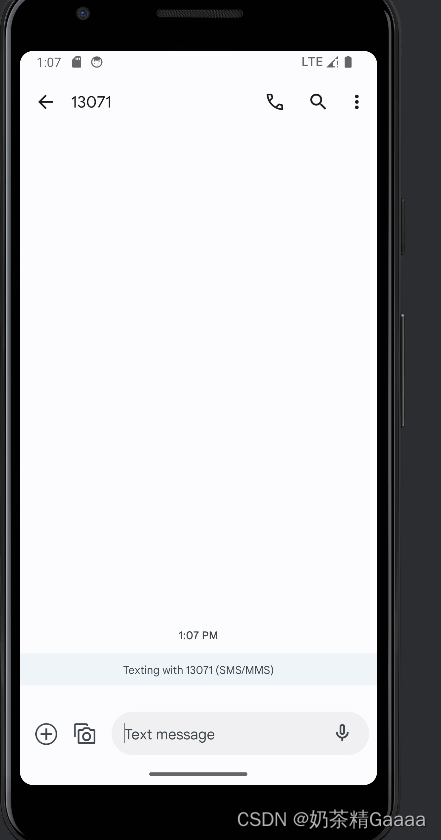
case R.id.btn_sms:
intent.setAction(Intent.ACTION_SENDTO);
Uri uri2= Uri.parse("tel:"+phoneNo);
intent.setData(uri2);
startActivity(intent);
break;
case R.id.btn_my:
intent.setAction("android.intent.action.NING");
intent.addCategory(Intent.CATEGORY_DEFAULT);
startActivity(intent);
break;
}
}
}
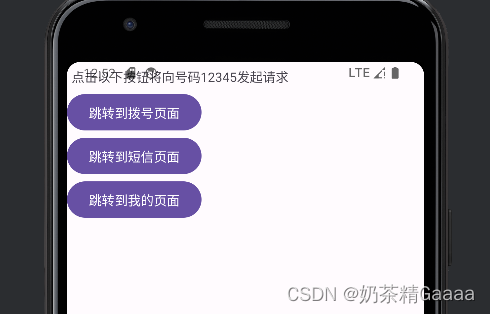
<?xml version="1.0" encoding="utf-8"?>
<LinearLayout xmlns:android="http://schemas.android.com/apk/res/android"
    xmlns:app="http://schemas.android.com/apk/res-auto"
    xmlns:tools="http://schemas.android.com/tools"
    android:id="@+id/main"
    android:layout_width="match_parent"
    android:layout_height="match_parent"
    tools:context=".ActionUriActivity"
    android:orientation="vertical">
    <TextView
        android:layout_width="match_parent"
        android:layout_height="wrap_content"
        android:padding="5dp"
        android:text="点击以下按钮将向号码12345发起请求"
        />
    />
    <Button
        android:id="@+id/btn_dial"
        android:layout_width="wrap_content"
        android:layout_height="wrap_content"
        android:text="跳转到拨号页面"/>

    <Button
        android:id="@+id/btn_sms"
        android:layout_width="wrap_content"
        android:layout_height="wrap_content"
        android:text="跳转到短信页面"/>
    />
    <Button
        android:id="@+id/btn_my"
        android:layout_width="wrap_content"
        android:layout_height="wrap_content"
        android:text="跳转到我的页面"/>
    />


</LinearLayout>
```xml
<?xml version="1.0" encoding="utf-8"?>
<manifest xmlns:android="http://schemas.android.com/apk/res/android"
    xmlns:tools="http://schemas.android.com/tools">

    <application
        android:allowBackup="true"
        android:dataExtractionRules="@xml/data_extraction_rules"
        android:fullBackupContent="@xml/backup_rules"
        android:icon="@mipmap/ic_launcher"
        android:label="@string/app_name"
        android:roundIcon="@mipmap/ic_launcher_round"
        android:supportsRtl="true"
        android:theme="@style/Theme.MyApplication"
        tools:targetApi="31">

        <activity
            android:name=".LoginSuccessActivity"
            android:exported="false" />
        <activity
            android:name=".JumpSecondActivity"
            android:exported="false" />
        <activity
            android:name=".GridLayoutActivity"
            android:exported="false" />
        <activity
            android:name=".util.RelativeLayoutActivity"
            android:exported="false" />
        <activity
            android:name=".LinearLayoutActivity"
            android:exported="false" />
        <activity
            android:name=".ViewGravityActivity"
            android:exported="false" />
        <activity
            android:name=".ViewMarginActivity"
            android:exported="false" />
        <activity
            android:name=".TextColorActivity"
            android:exported="true">
            <intent-filter>
                <action android:name="android.intent.action.MAIN" />

                <category android:name="android.intent.category.LAUNCHER" />
            </intent-filter>
        </activity>
        <activity
            android:name=".CalculatorActivity"
            android:exported="true">
            <intent-filter>
                <action android:name="android.intent.action.MAIN" />

                <category android:name="android.intent.category.LAUNCHER" />
            </intent-filter>
            <intent-filter>
                <action android:name="android.intent.action.NING" />
<!--设置成btn_my-->
                <category android:name="android.intent.category.DEFAULT" />
            </intent-filter>
        </activity>
        <activity
            android:name=".ButtonStyleActivity"
            android:exported="true">
            <intent-filter>
                <action android:name="android.intent.action.MAIN" />

                <category android:name="android.intent.category.LAUNCHER" />
            </intent-filter>
        </activity>
        <activity
            android:name=".ActStartActivity"
            android:exported="true">
            <intent-filter>
                <action android:name="android.intent.action.MAIN" />

                <category android:name="android.intent.category.LAUNCHER" />
            </intent-filter>
        </activity> <!-- ActFinishActivity -->
        <activity
            android:name=".ActionUriActivity"
            android:exported="true">
            <intent-filter>
                <action android:name="android.intent.action.MAIN" />

                <category android:name="android.intent.category.LAUNCHER" />
            </intent-filter>
        </activity>
    </application>

</manifest>
向下一个Activity发送数据


 4万+
4万+


 被折叠的 条评论
为什么被折叠?
被折叠的 条评论
为什么被折叠?
 到【灌水乐园】发言


