1.UINavigationController概述
- 就像控制器能够管理多个控件一样,UINavigationController(导航控制器)是用来管理多个控制器的
- 利用UINavigationController,可以轻松地管理多个控制器,轻松完成控制器之间的切换,典型例子就是系统自带的“设置”应用
2.UINavigationController的简单使用
- 初始化UINavigationController
- 设置导航控制器为UIWindow的根控制器
- 设置导航控制器的根控制器
- (BOOL)application:(UIApplication *)application didFinishLaunchingWithOptions:(NSDictionary *)launchOptions {
    // 1.创建窗口
    self.window = [[UIWindow alloc] initWithFrame:[UIScreen mainScreen].bounds];

    // 2.创建UIWindow根控制器
    // 2.1创建导航控制器的根控制器
    OneViewController *vc = [[OneViewController alloc] init];
    // 2.2初始化导航控制器,并同时设置vc为导航控制器的根控制器
    UINavigationController *nav = [[UINavigationController alloc] initWithRootViewController:vc];
    //initWithRootViewController方法系统底层其实就是调用导航控制器的push方法,使vc成为导航控制器的自控制器
    // 2.3设置窗口的根控制器
    self.window.rootViewController = nav;

    // 3.设置窗口可见
    [self.window makeKeyAndVisible];

    return YES;
}
3.导航控制器的视图结构
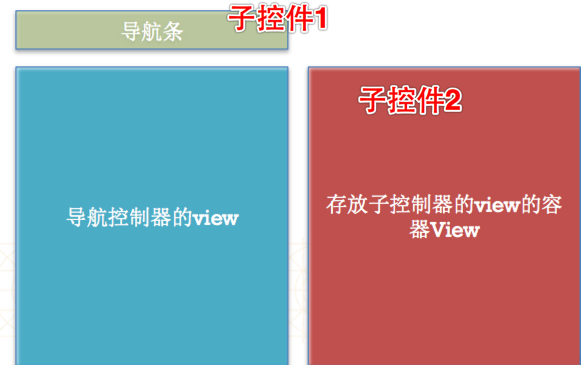
- 导航控制器的View有两个自控件:导航条和存放栈顶控制器View的容器View
4.常见属性和方法
-常见属性
// UINavigationController以栈的形式保存子控制器
@property(nonatomic,copy) NSArray *viewControllers;
@property(nonatomic,readonly) NSArray *childViewControllers;
// 栈顶控制器
@property(nullable, nonatomic,readonly,strong) UIViewController *topViewController;
// 导航条
@property(nonatomic,readonly) UINavigationBar *navigationBar;- 常见方法
// 使用push方法能将某个控制器压入栈(即让该控制器成为栈顶控制器)
// 导航控制器上永远显示的是栈顶控制器
- (void)pushViewController:(UIViewController *)viewController animated:(BOOL)animated;
// 移除当前栈顶控制器,注意当动画执行完毕后,才会移除栈顶控制器
- (UIViewController *)popViewControllerAnimated:(BOOL)animated;
// 回到指定的控制器
- (NSArray *)popToViewController:(UIViewController *)viewController animated:(BOOL)animated;
// 回到根控制器
- (NSArray *)popToRootViewControllerAnimated:(BOOL)animated;
5.设置导航条内容
- 导航栏的内容由栈顶控制器的navigationItem属性决定
// UINavigationItem有以下属性影响着导航栏的内容
// 左上角的返回按钮
@property(nonatomic,retain) UIBarButtonItem *backBarButtonItem;
// 中间的标题视图
@property(nonatomic,retain) UIView *titleView;
// 中间的标题文字
@property(nonatomic,copy)   NSString *title;
// 左上角的视图
@property(nonatomic,retain) UIBarButtonItem *leftBarButtonItem;
// 右上角的视图
@property(nonatomic,retain) UIBarButtonItem *rightBarButtonItem- 设置实例
// 1.设置导航条的标题,self是栈顶控制器
    self.navigationItem.title = @"我是标题";
    self.navigationItem.titleView = [UIButton buttonWithType:UIButtonTypeContactAdd];
// 注意:titleView的优先级高于title


// 2.设置导航条左边的内容
// 导航条上左右两边的内容默认是UIBarButtonItem类型的
// UINavigationItem:是一个模型(继承NSObject),决定导航条的内容(左边内容,中间,右边内容)
// UIBarButtonItem:是一个模型(继承NSObject),决定导航条上按钮的内容
// 以后只要看到item,通常都是苹果提供的模型,只要改模型就能修改苹果的某些控件
    UIBarButtonItem *leftItem = [[UIBarButtonItem alloc] initWithTitle:@"abc" style:UIBarButtonItemStyleDone target:self action:@selector(leftClick)];
    self.navigationItem.leftBarButtonItem = leftItem;

// 3.设置导航条右边的内容
    // 在iOS7之后,默认会把导航条上的按钮的图片渲染成蓝色.
    // 不想要渲染导航条上的按钮的图片颜色
    UIImage *image = [UIImage imageNamed:@"navigationbar_friendsearch"];
    // 告诉苹果哪个图片不要渲染
    image = [image imageWithRenderingMode:UIImageRenderingModeAlwaysOriginal];
    // 根据图片创建UIBarButtonItem
    UIBarButtonItem *rigthItem = [[UIBarButtonItem alloc] initWithImage:image style:UIBarButtonItemStyleDone target:nil action:nil];

// 4.左右两边可以设置多个按钮
    // 创建按钮
    UIButton *btn = [UIButton buttonWithType:UIButtonTypeCustom];
    // 正常
    [btn setBackgroundImage:[UIImage imageNamed:@"navigationbar_friendsearch"] forState:UIControlStateNormal];
    // 高亮
    [btn setBackgroundImage:[UIImage imageNamed:@"navigationbar_friendsearch_highlighted"] forState:UIControlStateHighlighted];
    // 导航条上的子控件位置不需要我们管理,只需要管理尺寸
    btn.frame = CGRectMake(0, 2000, 30, 30);
    UIBarButtonItem *rigthItem1 = [[UIBarButtonItem alloc] initWithCustomView:btn];
    self.navigationItem.rightBarButtonItems = @[rigthItem,rigthItem1];

// 5. 设置下一个控制器的返回按钮样式
self.navigationItem.backBarButtonItem = [[UIBarButtonItem alloc] initWithTitle:@"返回" style:UIBarButtonItemStyleDone target:nil action:nil];


 558
558


 被折叠的 条评论
为什么被折叠?


