


序言
- Springboot开箱即用,使用起来十分的便捷,但是如果我们只是知其然不知其所以然,那我们将很难熟练的驾驭它,接下来我就为大家以debug的形式为大家讲解一下Springboot配置文件的加载流程。并为大家讲解一下springboot是怎样将我们配置在yml文件中的变量赋值给对应的属性的。本文篇幅有点长,还请大家耐心观看。
环境准备
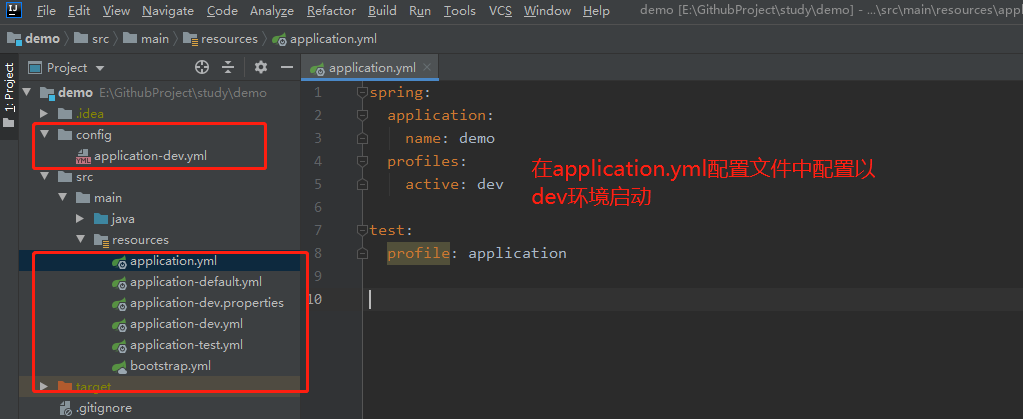
- 准备一个Springboot项目,并配置多个配置文件
- 在application.yml配置文件中指定项目以dev环境进行启动
- 在每个配置文件中都配置一个相同的配置【test.profile】,每个文件配置的属性值不同
- 编写一个测试接口,并为其注入该属性值,输出当前指定环境下的值
- 源码地址【】

调用测试接口后输出结果:
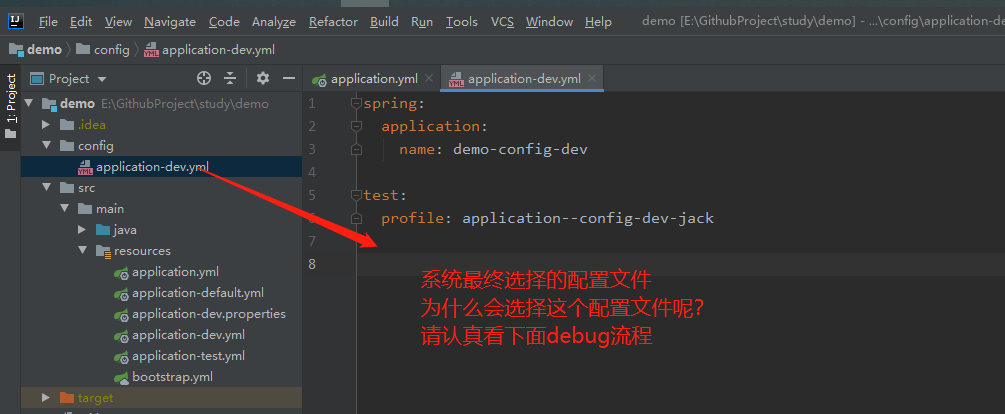
testProfileValue:application--config-dev-jack------applicationName:demo-config-dev
显然,【TestService.testProfileValue】这个属性是从config/application-dev.yml中文件中读取并配置的,那么我们接下来从源码的角度来剖析一下Springboot的配置文件的加载流程和变量赋值原理。
(一)配置文件加载流程-准备
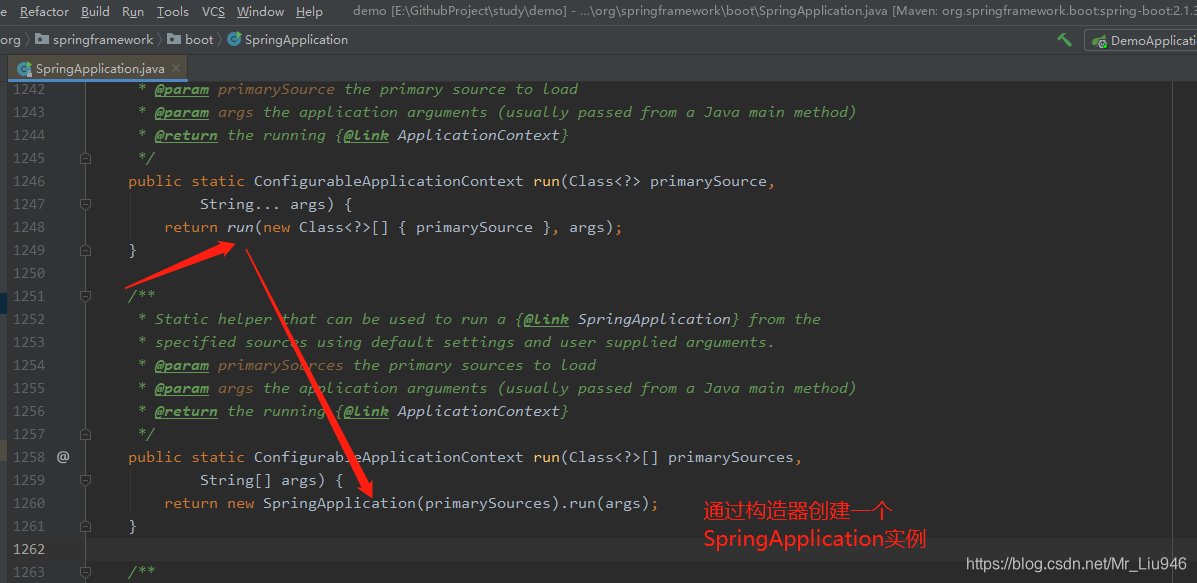
- 在主启动类打上断点,并以debug的形式启动项目,这里系统会通过new SpringApplication(primarySources)的形式创建一个SpringBoot上下文实例。
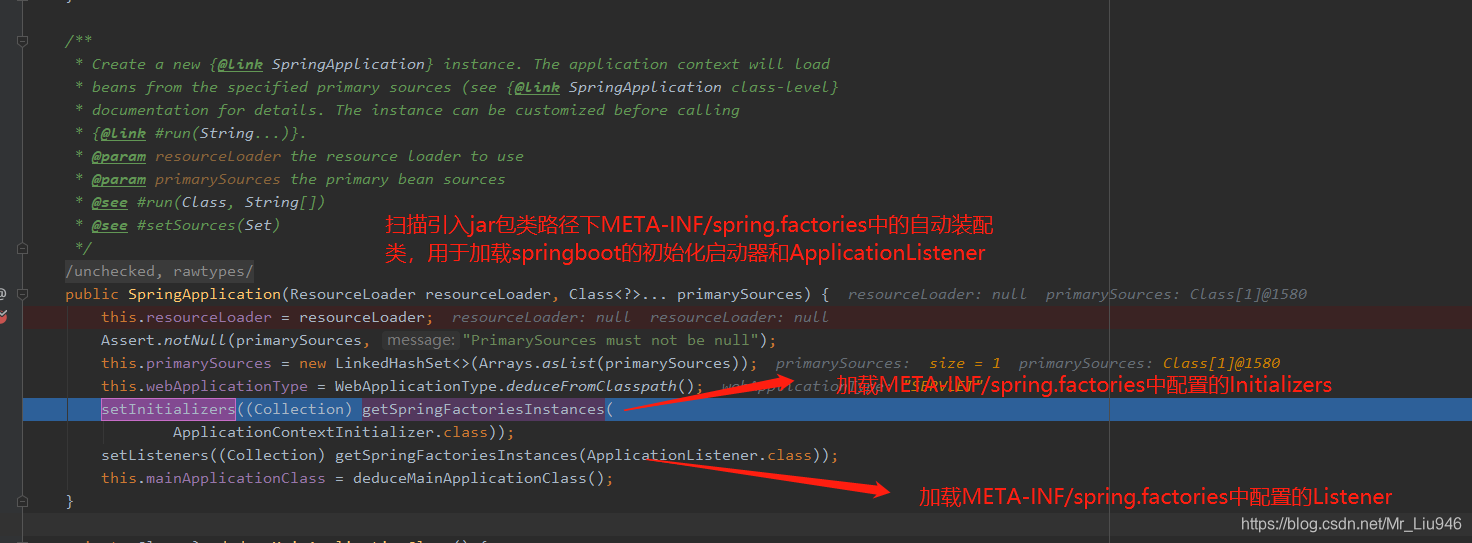
- SpringApplication构造器加载完Initializers和Listenter后开始调用run(String… args)方法启动Springboot上下文。我们debug进入到run方法中并将断点打在prepareEnvironment(listeners,applicationArguments)这一行,运行程序进入到断点中。
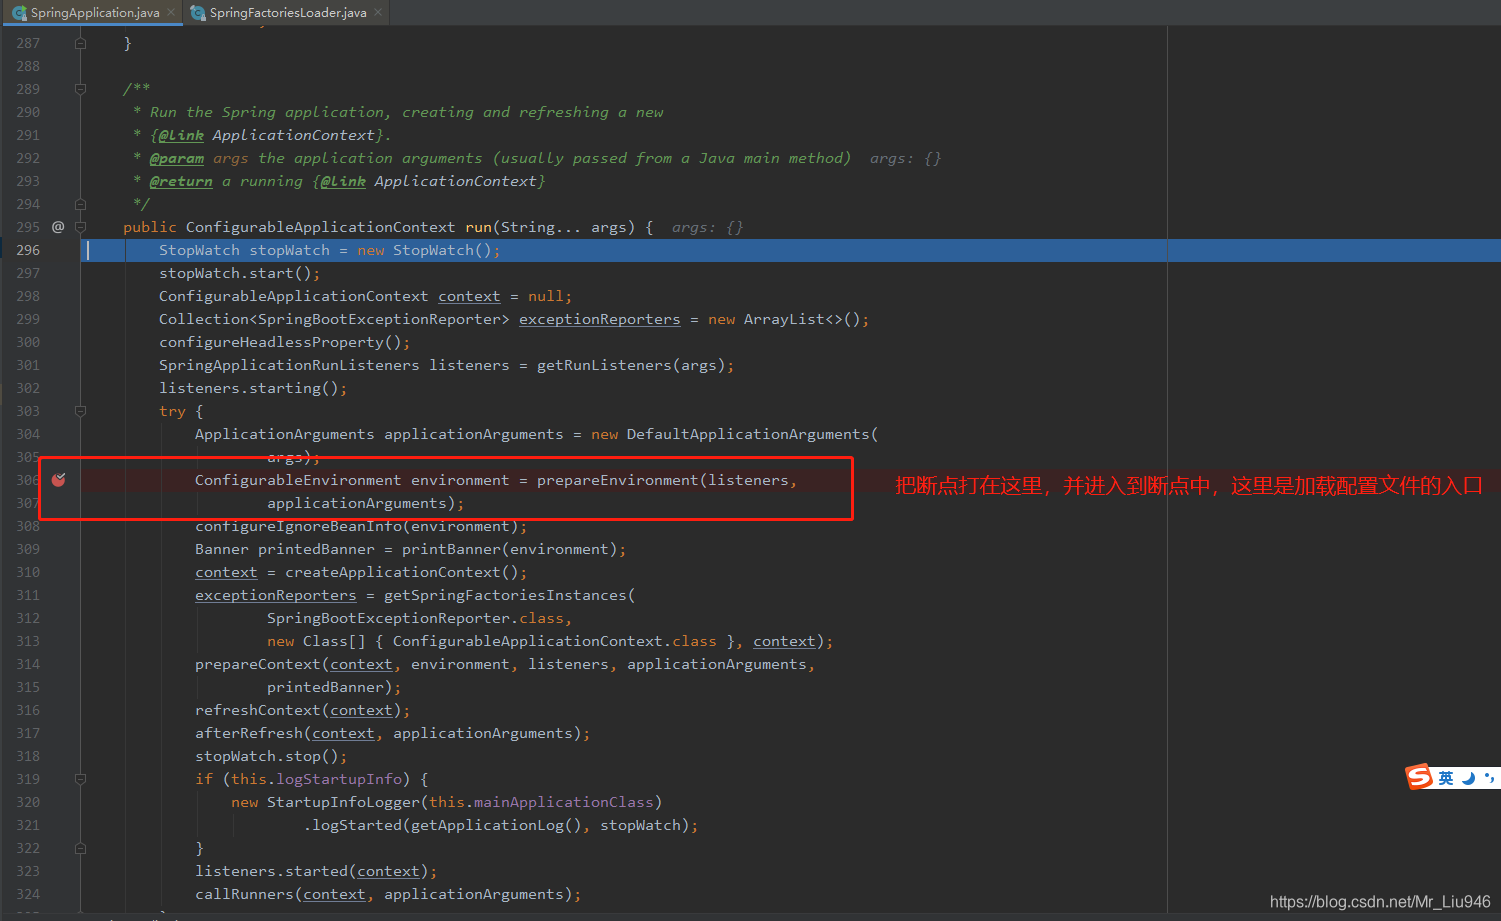
- SpringApplication#prepareEnvironment( listeners,applicationArguments),这个方法是配置文件加载的入口,它会去执行SpringApplication构造器加载到的Listener。这里我们重要关注BootstrapApplicationListener和ConfigFileApplicationListener这两个监听器。
private ConfigurableEnvironment prepareEnvironment(SpringApplicationRunListeners listeners, ApplicationArguments applicationArguments) {
    // 给容器创建一个Environment
    ConfigurableEnvironment environment = getOrCreateEnvironment();
    configureEnvironment(environment, applicationArguments.getSourceArgs());
    // 执行引入jar包类路径下META-INF/spring.factories文件中配置的监听器
    listeners.environmentPrepared(environment);
    // 将加载完成的环境变量信息绑定到Spring IOC容器中
    bindToSpringApplication(environment);
    if (!this.isCustomEnvironment) {
        environment = new EnvironmentConverter(getClassLoader())
                .convertEnvironmentIfNecessary(environment, deduceEnvironmentClass());
    }
    ConfigurationPropertySources.attach(environment);
    return environment;
}
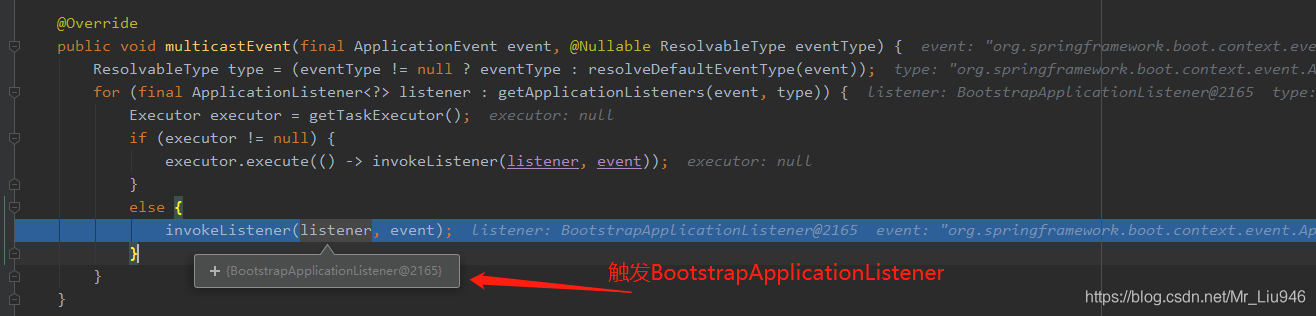
4.SpringApplication#prepareEnvironment()触发执行监听器,优先执行BootstrapApplicationListener监听器,再执行ConfigFileApplicationListener监听器。如果想学习Spring的事件监听原理的可以看一下我的另一篇博客【Spring事件监听流程分析】。
-
BootstrapApplicationListener:来自Springcloud,优先级最高,用于启动/建立Springcloud的应用上下文。须要注意的是,到此时Springboot的上下文还未创建完成,因为在创建Springboot上下文的时候通过BootstrapApplicationListener去开启了Springcloud上下文的创建流程。 这个流程“嵌套”特别像Bean初始化流程:初始化Bean A时,遇到了Bean B,就须要先去完成Bean B的初始化,再回头来继续完成Bean A的步骤。
-
在建立SpringCloud的应用的时候,使用的也是SpringApplication#run()完成的(非web),所以也会走下一整套SpringApplication的生命周期逻辑,因此请你务必区分,特别是这种case会让“绝大多数”初始化器、监听器等执行多次,若你有那种只须要执行一次的需求(好比只想让Springboot容器生命周期内执行,Springcloud生命周期不执行),请务必自行处理,不然会被执行多次而带来不可预知的结果。
-
Springcloud和Springboot应用上下文都是使用ConfigFileApplicationListener来完成加载和解析的。
1、Springboot应用上下文读取的外部化配置文件名默认是:application
2、Springcloud应用上下文读取的外部化配置文件名默认是:bootstrap
- BootstrapApplicationListener#onApplicationEvent()的部分核心源码如下:
public void onApplicationEvent(ApplicationEnvironmentPreparedEvent event) {
    // 检查是否开启了Springcloud
    ConfigurableEnvironment environment = event.getEnvironment();
    if (!environment.getProperty("spring.cloud.bootstrap.enabled", Boolean.class, true)) {
        return;
    }
    // 如果是Springcloud上下文触发的BootstrapApplicationListener这个监听器,就不执行这个监听器了
    // 避免重复执行
    if (environment.getPropertySources().contains(BOOTSTRAP_PROPERTY_SOURCE_NAME)) {
        return;
    }
    ConfigurableApplicationContext context = null;
    String configName = environment.resolvePlaceholders("${spring.cloud.bootstrap.name:bootstrap}");
    for (ApplicationContextInitializer<?> initializer : event.getSpringApplication().getInitializers()) {
        if (initializer instanceof ParentContextApplicationContextInitializer) {
            context = findBootstrapContext((ParentContextApplicationContextInitializer) initializer, configName);
        }
    }
    // 如果还未创建Springcloud上下文实例,则调用bootstrapServiceContext创建
    if (context == null) {
        context = bootstrapServiceContext(environment, event.getSpringApplication(), configName);
        event.getSpringApplication().addListeners(new CloseContextOnFailureApplicationListener(context));
    }
    apply(context, event.getSpringApplication(), environment);
}
- BootstrapApplicationListener#bootstrapServiceContext()核心源码如下:
private ConfigurableApplicationContext bootstrapServiceContext(ConfigurableEnvironment environment, final SpringApplication application,String configName) {
		/*省略非必要代码*/
		// 通过SpringApplicationBuilder构建一个Springcloud上下文实例
		SpringApplicationBuilder builder = new SpringApplicationBuilder()
				.profiles(environment.getActiveProfiles()).bannerMode(Mode.OFF)
				.environment(bootstrapEnvironment)
				// Don't use the default properties in this builder
				.registerShutdownHook(false).logStartupInfo(false)
				.web(WebApplicationType.NONE);
		final SpringApplication builderApplication = builder.application();
		if(builderApplication.getMainApplicationClass() == null){
			builder.main(application.getMainApplicationClass());
		}
		if (environment.getPropertySources().contains("refreshArgs")) {
			builderApplication.setListeners(filterListeners(builderApplication.getListeners()));
		}
		builder.sources(BootstrapImportSelectorConfiguration.class);
		// 调用Springcloud上下文实例的run方法,使用的也是SpringApplication#run()完成的
		// 这个过程会将之前的步骤再执行一次
		final ConfigurableApplicationContext context = builder.run();
		context.setId("bootstrap");
		addAncestorInitializer(application, context);
		bootstrapProperties.remove(BOOTSTRAP_PROPERTY_SOURCE_NAME);
		mergeDefaultProperties(environment.getPropertySources(), bootstrapProperties);
		return context;
	}
-
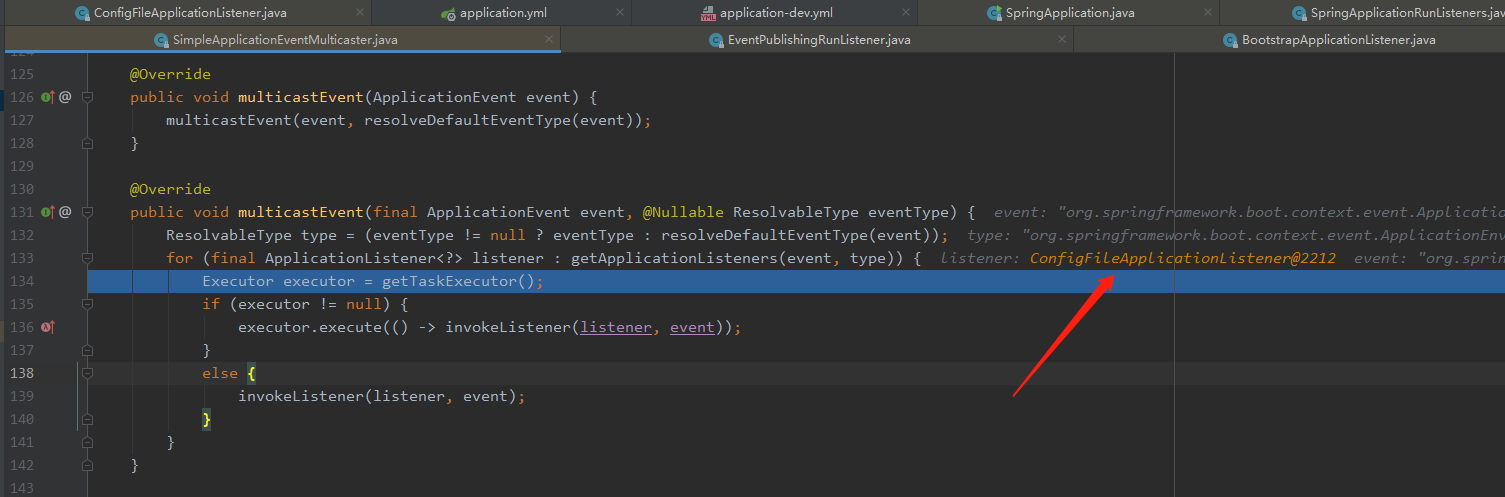
调用Springcloud上下文实例的run方法,会将之前的步骤在重复执行一次,程序又执行到遍历监听器并发布事件这里了,这里我们重点关注【ConfigFileApplicationListener】这个监听器,这个监听器会完成配置文件的加载。
-
进入断点里面之前,我先做一些说明。因为这里会创建Springcloud和Springboot两个上下文实例, 由于Springboot和Springcloud上下文实例加载配置文件的流程都是相似的,这里我们就讲解Springboot容器配置文件的加载过程。
- bootstrap.yml 可以用来定义应用级别的, 应用程序特有配置信息,可以用来配置后续各个模块中需使用的公共参数等。
- 如果application.yml的内容标签与bootstrap的标签一致,application会覆盖bootstrap, 而application.yml 里面的内容可以动态替换。
(二)配置文件加载流程-加载解析
-
ConfigFileApplicationListener#onApplicationEvent(),根据上面的流程可知,程序会触发ConfigFileApplicationListener的onApplicationEvent方法,从而加载配置文件。
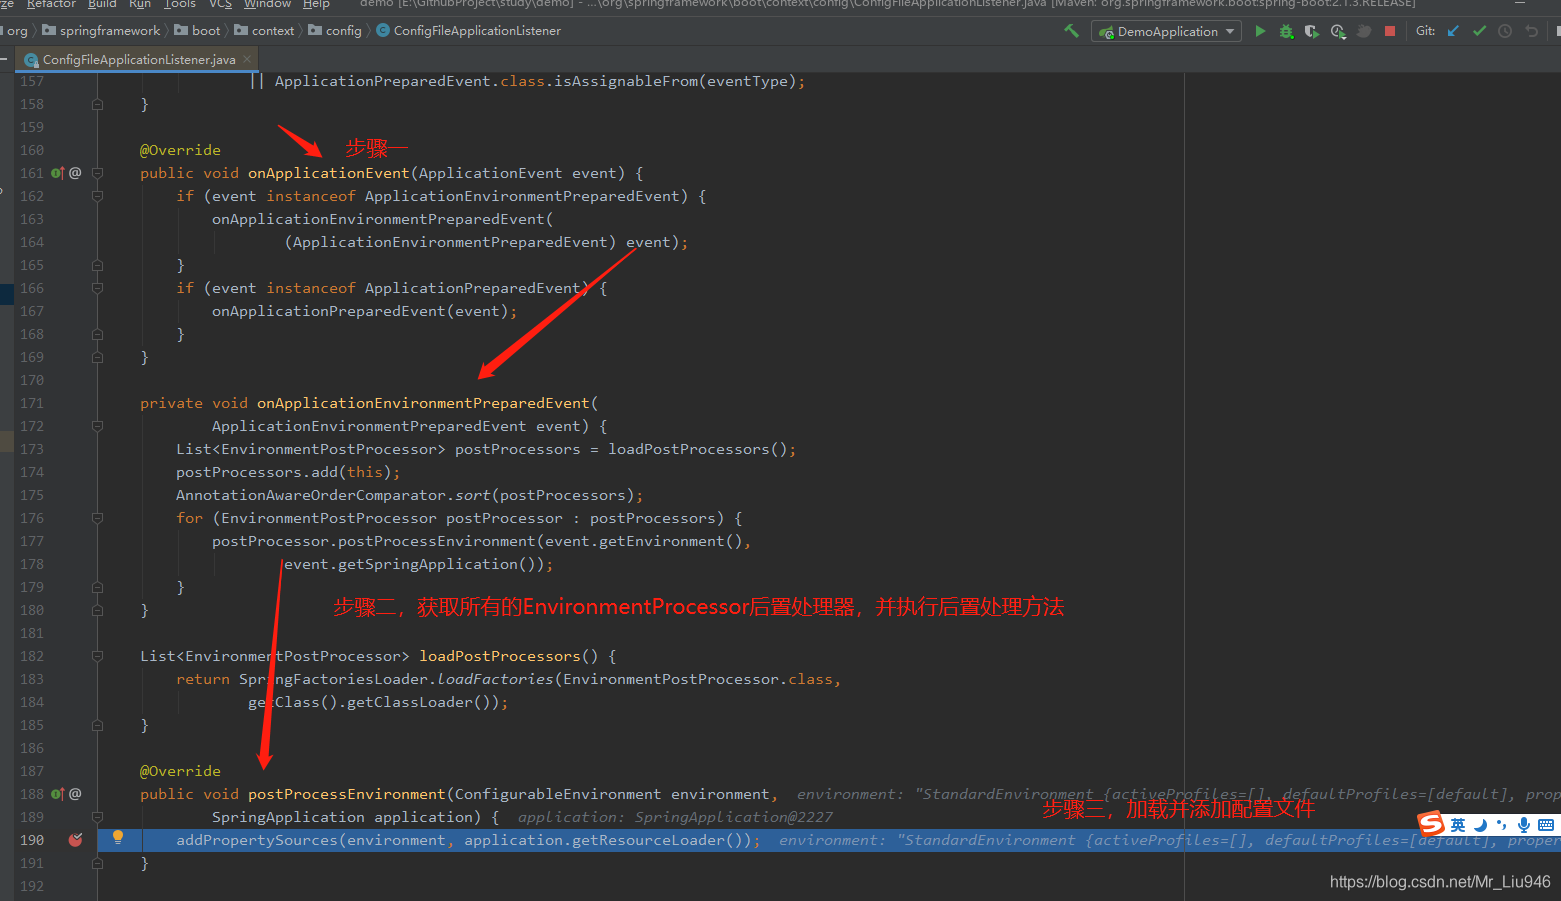
-
ConfigFileApplicationListener#addPropertySources(),流程继续执行到addPropertySources,这里会去新建一个Loader内部类,并执行load方法。
	/**
	 * 将配置文件解析并加载到environment中
	 */
	protected void addPropertySources(ConfigurableEnvironment environment,ResourceLoader resourceLoader) {
		RandomValuePropertySource.addToEnvironment(environment);
		// 创建内部类Loader,并调用load方法加载配置
		new Loader(environment, resourceLoader).load();
	}
- ConfigFileApplicationListener#Loader#load()
private class Loader {
	// 配置文件的加载优先级顺序倒叙,file:./config/配置文件的优先级最高
	private static final String DEFAULT_SEARCH_LOCATIONS = "classpath:/,classpath:/config/,file:./,file:./config/";
	// The "active profiles" property name.
	public static final String ACTIVE_PROFILES_PROPERTY = "spring.profiles.active";

	// 构造器,初始化
	Loader(ConfigurableEnvironment environment, ResourceLoader resourceLoader) {
		this.environment = environment;
		this.placeholdersResolver = new PropertySourcesPlaceholdersResolver(this.environment);
		this.resourceLoader = (resourceLoader != null) ? resourceLoader: new DefaultResourceLoader();
		this.propertySourceLoaders = SpringFactoriesLoader.loadFactories(PropertySourceLoader.class, getClass().getClassLoader());
	}

	// load方法,用于获取指定路径下的配置文件并添加到environment中
    public void load() {
    	// 存放后续要加载的配置文件
		this.profiles = new LinkedList<>();
		// 存放已经被处理的Profile
		this.processedProfiles = new LinkedList<>();
		// 标注Spring.profiles.actives是否已经被读取出来
		// 只有第一个被解析出来Spring.profiles.actives的配置文件才会被加载
		this.activatedProfiles = false;
		// 存放已经被加载的配置文件
		this.loaded = new LinkedHashMap<>();
		// 初始化profiles
		// 若环境变量中已存在spring.profiles.active变量则将其添加到profiles中
		// 若环境变量中不存在spring.profiles.active变量,则默认添加一个defaultProfile,用于加载application.yml
		initializeProfiles();
		// 1、通过默认的default首先去加载application.yml配置文件
		// 2、读取application.yml是否有配置spring.profiles.active
		// 2.1、若没有找到spring.profiles.active配置项,则循环结束,开始执行下一步
		// 2.2、若在application.yml配置中找到了spring.profiles.active配置项,则会在profiles中添加
		// 一个profile,再次进入while,并使用active指定的文件去拼接配置文件,若找到则添加到配置中
		while (!this.profiles.isEmpty()) {
			// 取出队首的配置进行加载
			Profile profile = this.profiles.poll();
			// 判断当前profile不为空且不是“default”,说明此时加载是profile为spring.profiles.active配置的配置文件
			if (profile != null && !profile.isDefaultProfile()) {
				// 将spring.profiles.active的配置添加到environment中
				addProfileToEnvironment(profile.getName());
			}
			// 根据profile加载指定路径下的配置文件
			load(profile, this::getPositiveProfileFilter,
					addToLoaded(MutablePropertySources::addLast, false));
			this.processedProfiles.add(profile);
		}
		resetEnvironmentProfiles(this.processedProfiles);
		load(null, this::getNegativeProfileFilter,addToLoaded(MutablePropertySources::addFirst, true));
		// 将已解析到的配置PropertySources倒叙并添加到environment中
		addLoadedPropertySources();
	}
}
- 初始化initializeProfiles()
private void initializeProfiles() {
    // 默认添加一个null,这样的目的是为了先出来加载application.xxx配置文件,优先级最低
    this.profiles.add(null);
    // 把当前environment中已经加载的系统级别的配置文件包装到Binder容器中
    Binder binder = Binder.get(this.environment);
    // 在Binder容器中找Spring.profiles.actives配置列表
    Set<ConfigFileApplicationListener.Profile> activatedViaProperty = getProfiles(binder, ACTIVE_PROFILES_PROPERTY);
    // 在Binder容器中找spring.profiles.include配置列表
    Set<ConfigFileApplicationListener.Profile> includedViaProperty = getProfiles(binder, INCLUDE_PROFILES_PROPERTY);
    // environment的Spring.profiles.actives属性中存在且activatedViaProperty和includedViaProperty不存在的配置
    List<ConfigFileApplicationListener.Profile> otherActiveProfiles = getOtherActiveProfiles(activatedViaProperty, includedViaProperty);
    // 将解析出的profile依次按照otherActiveProfiles、includedViaProperty和activatedViaProperty的先后顺序
    // 先添加进去的先被加载,但Spring读取使用优先级最低,因为最后会统一进行reverse操作
    this.profiles.addAll(otherActiveProfiles);
    this.profiles.addAll(includedViaProperty);
    addActiveProfiles(activatedViaProperty);
    // 在系统配置未加载到profile,此时profiles中就只有进入此方法默认添加的null
    // 此时就给profiles默认添加一个“default”,若在application.xxx中仍未配置指定的profile则会去加载此时添加的“default”
    // 若application.xxx中配置了指定的profile则会将“default”从profiles移除
    if (this.profiles.size() == 1) {
        for (String defaultProfileName : this.environment.getDefaultProfiles()) {
            ConfigFileApplicationListener.Profile defaultProfile = new ConfigFileApplicationListener.Profile(defaultProfileName, true);
            this.profiles.add(defaultProfile);
        }
    }
}
-
根据源码调用链路可知,程序继续调用Loader#load( profile, filterFactory, consumer),调用详情如下图所示:
-
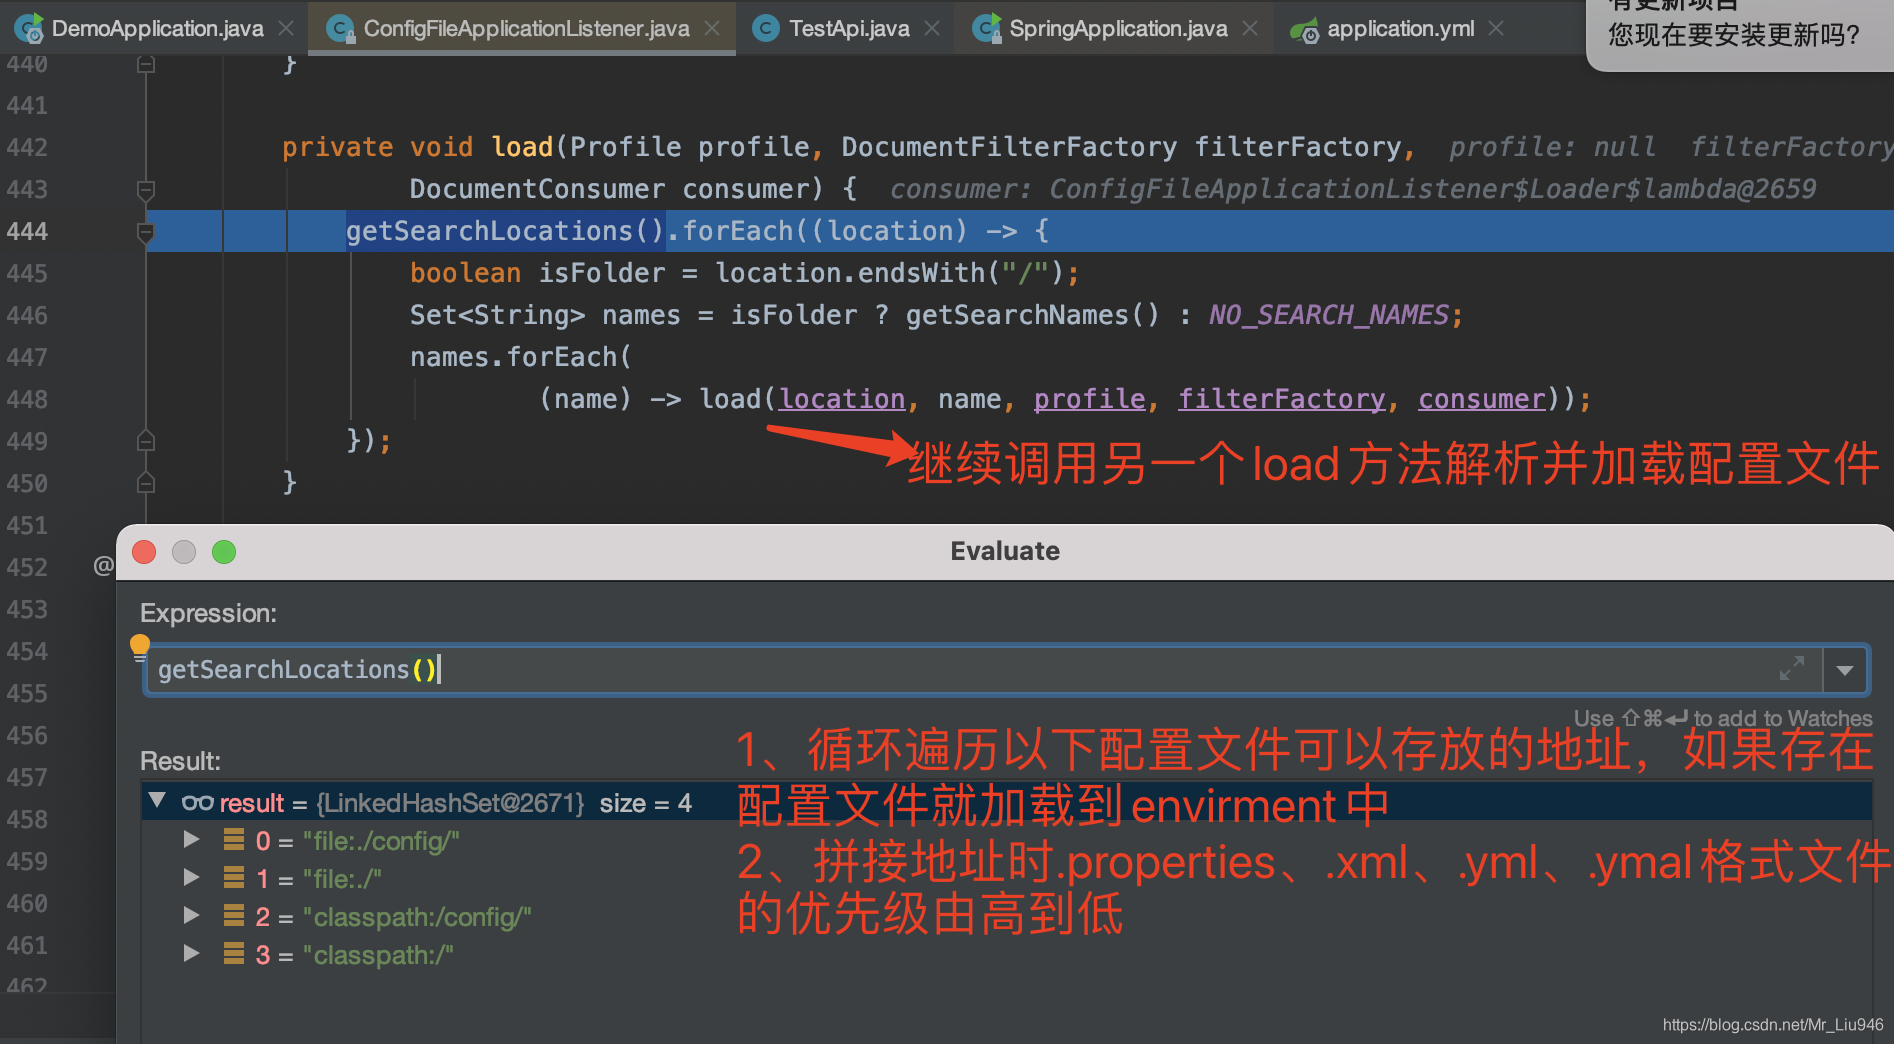
Loader#load(location, name, profile, filterFactory, consumer)
- location:总共分为"classpath:/,classpath:/config/,file:./,file:./config/",配置文件可配置的地址,加载优先级为倒序。
- name:默认为“application”。
- profile:若当前解析的不是spring.profiles.active指定的配置文件时默认为“null”,否则为spring.profiles.active指定的值。
- filterFactory:
- consumer:将加载的document添加到Loader#loaded属性集合中,用于最后的配置文件优先级排序。
private void load(String location, String name, Profile profile,DocumentFilterFactory filterFactory, DocumentConsumer consumer) {
    if (!StringUtils.hasText(name)) {
        for (PropertySourceLoader loader : this.propertySourceLoaders) {
            if (canLoadFileExtension(loader, location)) {
                load(loader, location, profile,
                        filterFactory.getDocumentFilter(profile), consumer);
                return;
            }
        }
    }
    // 临时存储判断是否已经加载过了某种扩展名类型(propertis、xml、yml、yaml)
    // 的的配置,避免重复加载
    Set<String> processed = new HashSet<>();
    // this.propertySourceLoaders,分为PropertiesPropertySourceLoader和YamlPropertySourceLoader两种
    // PropertiesPropertySourceLoader:解析properties、xml类型配置
    // YamlPropertySourceLoader:解析yml、yaml类型
    for (PropertySourceLoader loader : this.propertySourceLoaders) {
    	// fileExtension由loder类型决定,优先级顺序为properties > xml > yml > ymal
    	// 配置文件拼接规则:location + name + "-" + profile + fileExtension;
        for (String fileExtension : loader.getFileExtensions()) {
            if (processed.add(fileExtension)) {
                loadForFileExtension(loader, location + name, "." + fileExtension,
                        profile, filterFactory, consumer);
            }
        }
    }
}
- Loader#load(loader, location, profile,filter, consumer)核心解析方法,根据已拼接好地址去获取配置文件(例如:classpath:/application-dev.yml)
- 文件不存在:结束当前方法,继续执行下一次循环
- 文件存在:解析配置文件,将解析到的配置文件保存到Loader#loaded变量中。
- 文件存在时还需要尝试获取spring.profiles.active属性,规则如下:
1、若没有配置该属性值,则加载完当前fileExtension类型的配置(例如:application.properties、
xml、yml、ymal)后就不再尝试解析其他fileExtension类型的配置文件了,此时系统就默认使用加载到
的application.properties/yml配置。

2、若配置了该属性值,则读取该属性值(我们当前配置的是dev),将其添加到Loader#profiles属性
中(就是第三步中while循环的那个profiles变量值),同时Loader会将activatedProfiles属性值改为true
来标记系统已经有active这个属性值了,就算active中指定的配置文件中也配置了active这个属性,
Loader也不会再去解析该配置文件了。
- 通过上面的分析可知,spring.profiles.active这个属性值只会被优先级最高的配置文件初始化一次。
private void load(PropertySourceLoader loader, String location, Profile profile, DocumentFilter filter, DocumentConsumer consumer) {
    try {
        // 根据拼接的配置文件地址来加载配置文件
        // 例如location为classpath:application.yml
        Resource resource = this.resourceLoader.getResource(location);
        // 配置文件不存在,则返回继续查找
        if (resource == null || !resource.exists()) {
            if (this.logger.isTraceEnabled()) {
                StringBuilder description = getDescription(
                        "Skipped missing config ", location, resource, profile);
                this.logger.trace(description);
            }
            return;
        }
        String name = "applicationConfig: [" + location + "]";
        // 解析配置文件,并读取spring.profiles.active属性,将读取到的active属性赋值给document.getActiveProfiles()
        List<Document> documents = loadDocuments(loader, name, resource);
        // 保存已解析的配置文件
        List<Document> loaded = new ArrayList<>();
        for (Document document : documents) {
            if (filter.match(document)) {
                // 1、将解析到的spring.profiles.active添加到profiles中,下一次while循环就解析profile
                // 比如说这里的active为dev,则接下来就拼接并加载dev的配置文件
                // 2、将activatedProfiles属性设置为true,标注已经解析到了active属性,后续
                // 就算在后面的配置文件中解析到active属性也不会再加载改配置
                // 3、移除profiles中的“default”配置,后续将不会再加载application-defalut.yml配置
                addActiveProfiles(document.getActiveProfiles());
                // 将本次配置文件中加载到的“spring.profiles.include”中配置profile添加到profiles队列头部
                // 队列头部的配置将会先被加载,但配置使用的优先级低于后面加载的配置文件(因为配置文件加载完后会执行reverse操作)
                addIncludedProfiles(document.getIncludeProfiles());
                // 添加到已加载的配置文件
                loaded.add(document);
            }
        }
        Collections.reverse(loaded);
        if (!loaded.isEmpty()) {
        	// 将加载的document添加到Loader#loaded属性集合中,用于最后的配置文件优先级排序
        	// 根据当前加载顺序进行倒序排,由于application.yml比application-dev.yml
        	// 先加载,所以倒序后指定的application-dev.yml配置优先级更高
            loaded.forEach((document) -> consumer.accept(profile, document));
            if (this.logger.isDebugEnabled()) {
                StringBuilder description = getDescription("Loaded config file ",
                        location, resource, profile);
                this.logger.debug(description);
            }
        }
    } catch (Exception ex) {
        throw new IllegalStateException("Failed to load property "
                + "source from location '" + location + "'", ex);
    }
}
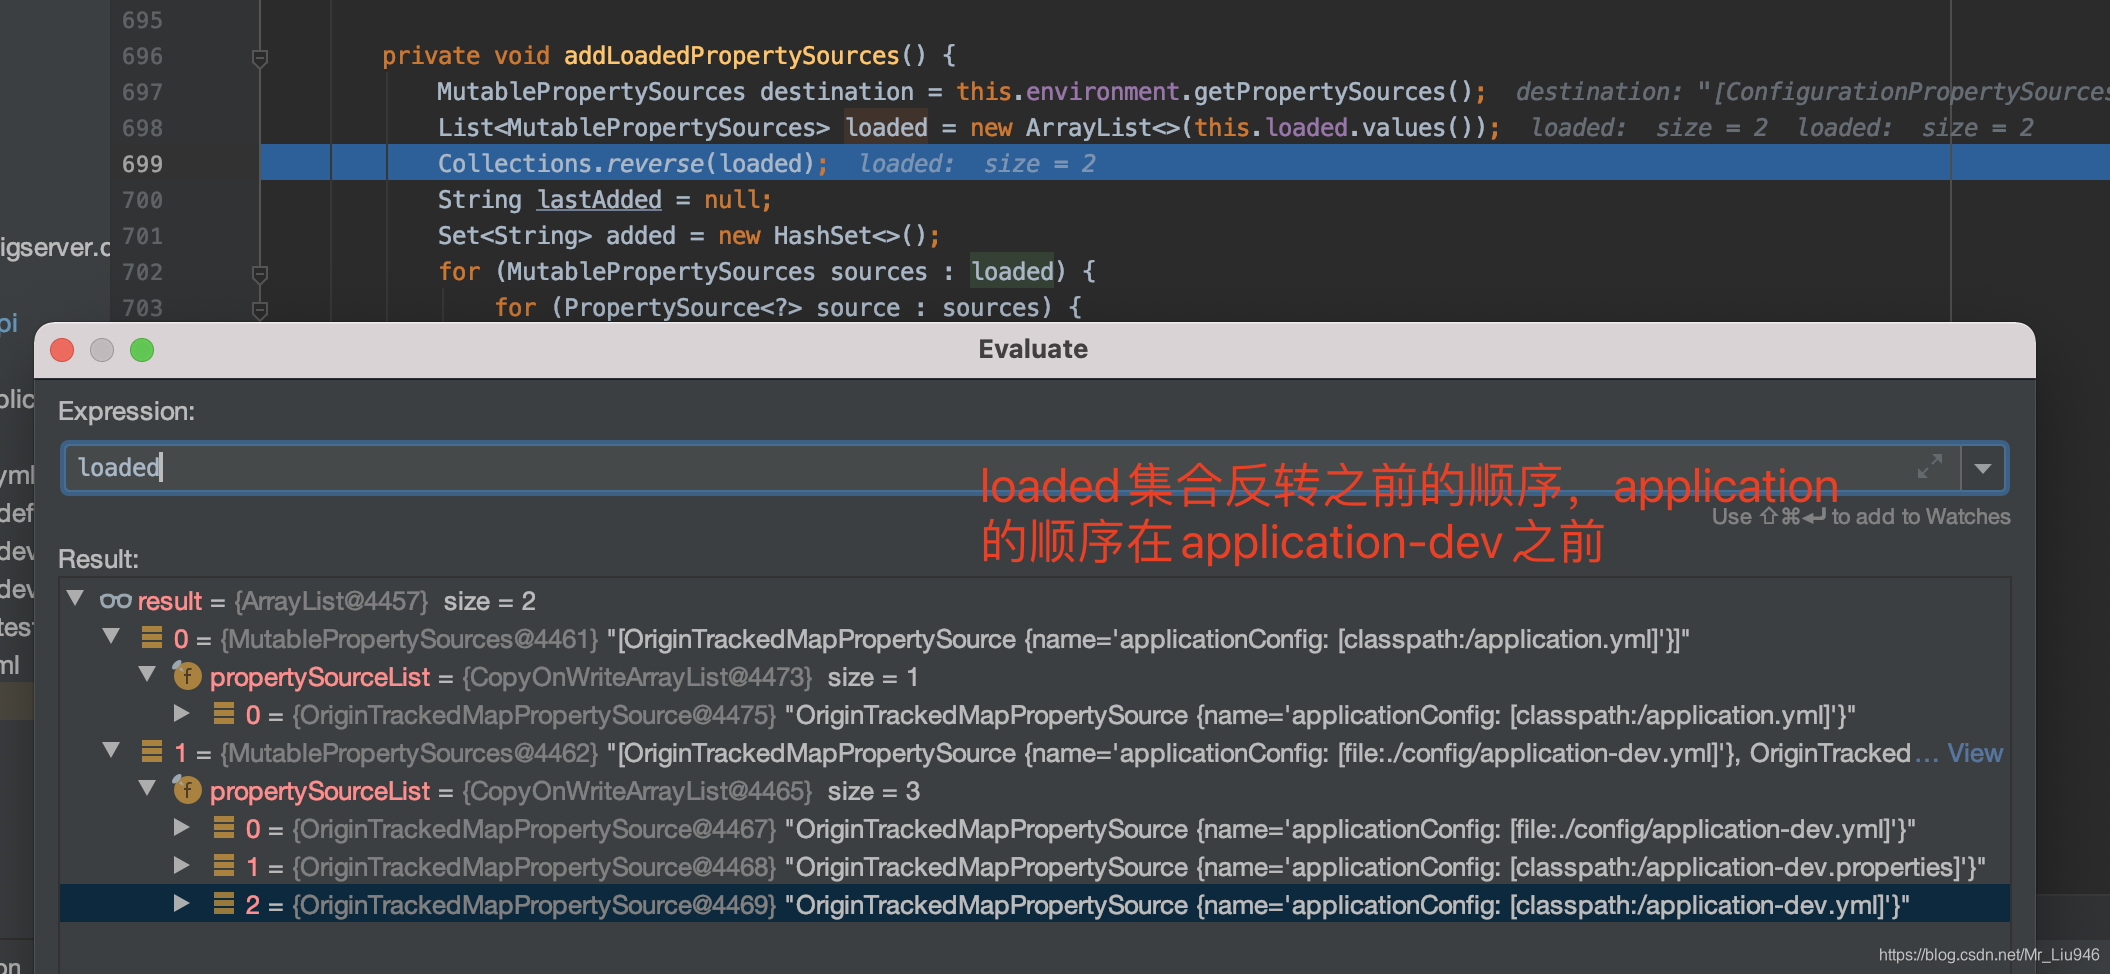
- 经过上面的步骤将所有的配置文件解析并添加到Loader#loaded属性中后,继续执行第3步中的addLoadedPropertySources() 方法,该方法会将现在loaded中保存的配置文件倒序后依次添加到environment中。
- Loader#addLoadedPropertySources()源码及详解说明如下:
private void addLoadedPropertySources() {
// 获取环境变量中已加载的配置信息
MutablePropertySources destination = this.environment.getPropertySources();
// 获取已本次Loader加载到的配置文件
List<MutablePropertySources> loaded = new ArrayList<>(this.loaded.values());
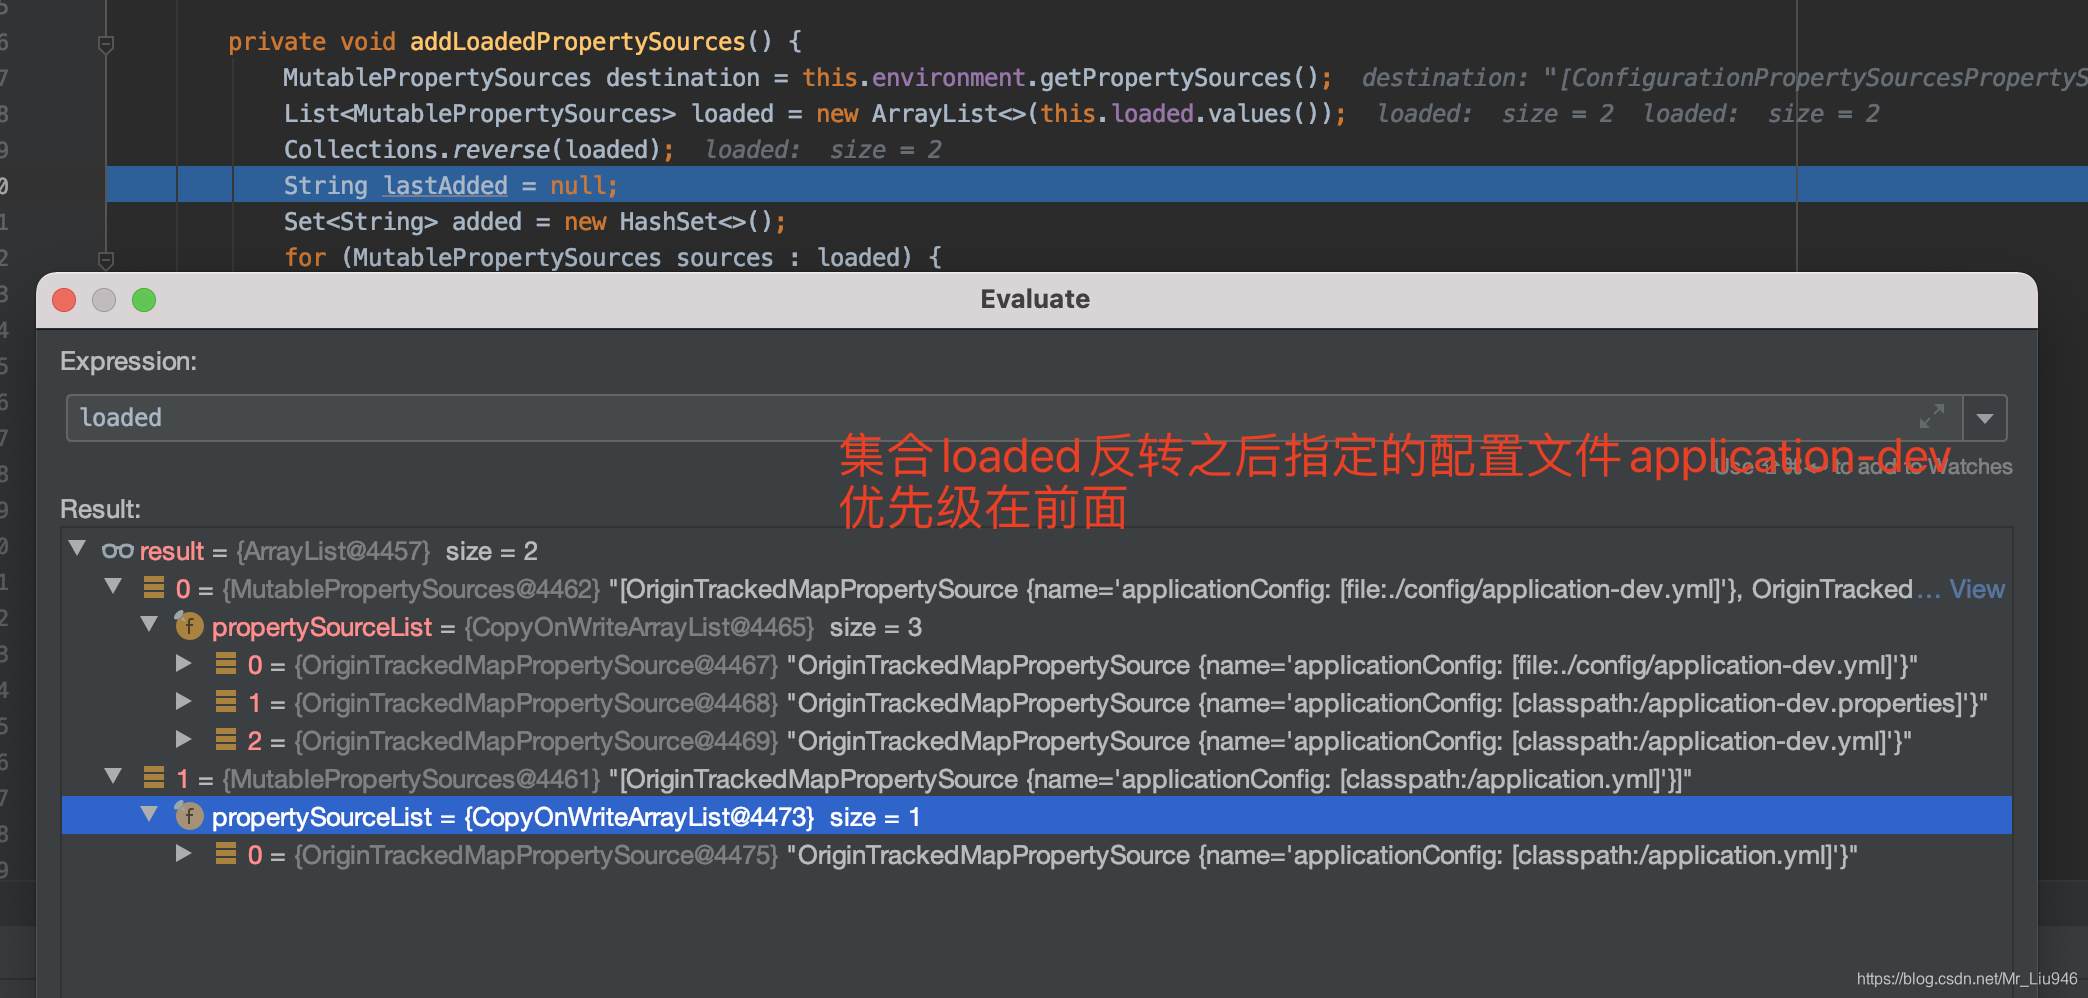
// 将已加载的配置文件倒序,更改优先级,spring.profile.active指定的优先级最高
Collections.reverse(loaded);
// 标注上一个添加到environment中的配置文件,用于确定当前配置文件插入的位置
String lastAdded = null;
// 利用set集合的属性,避免配置文件的重复添加
Set<String> added = new HashSet<>();
// 遍历并将配置添加到environment中
for (MutablePropertySources sources : loaded) {
for (PropertySource<?> source : sources) {
if (added.add(source.getName())) {
// 将已加载的配置文件添加到environment的MutablePropertySources中
addLoadedPropertySource(destination, lastAdded, source);
lastAdded = source.getName();
}
}
}
}
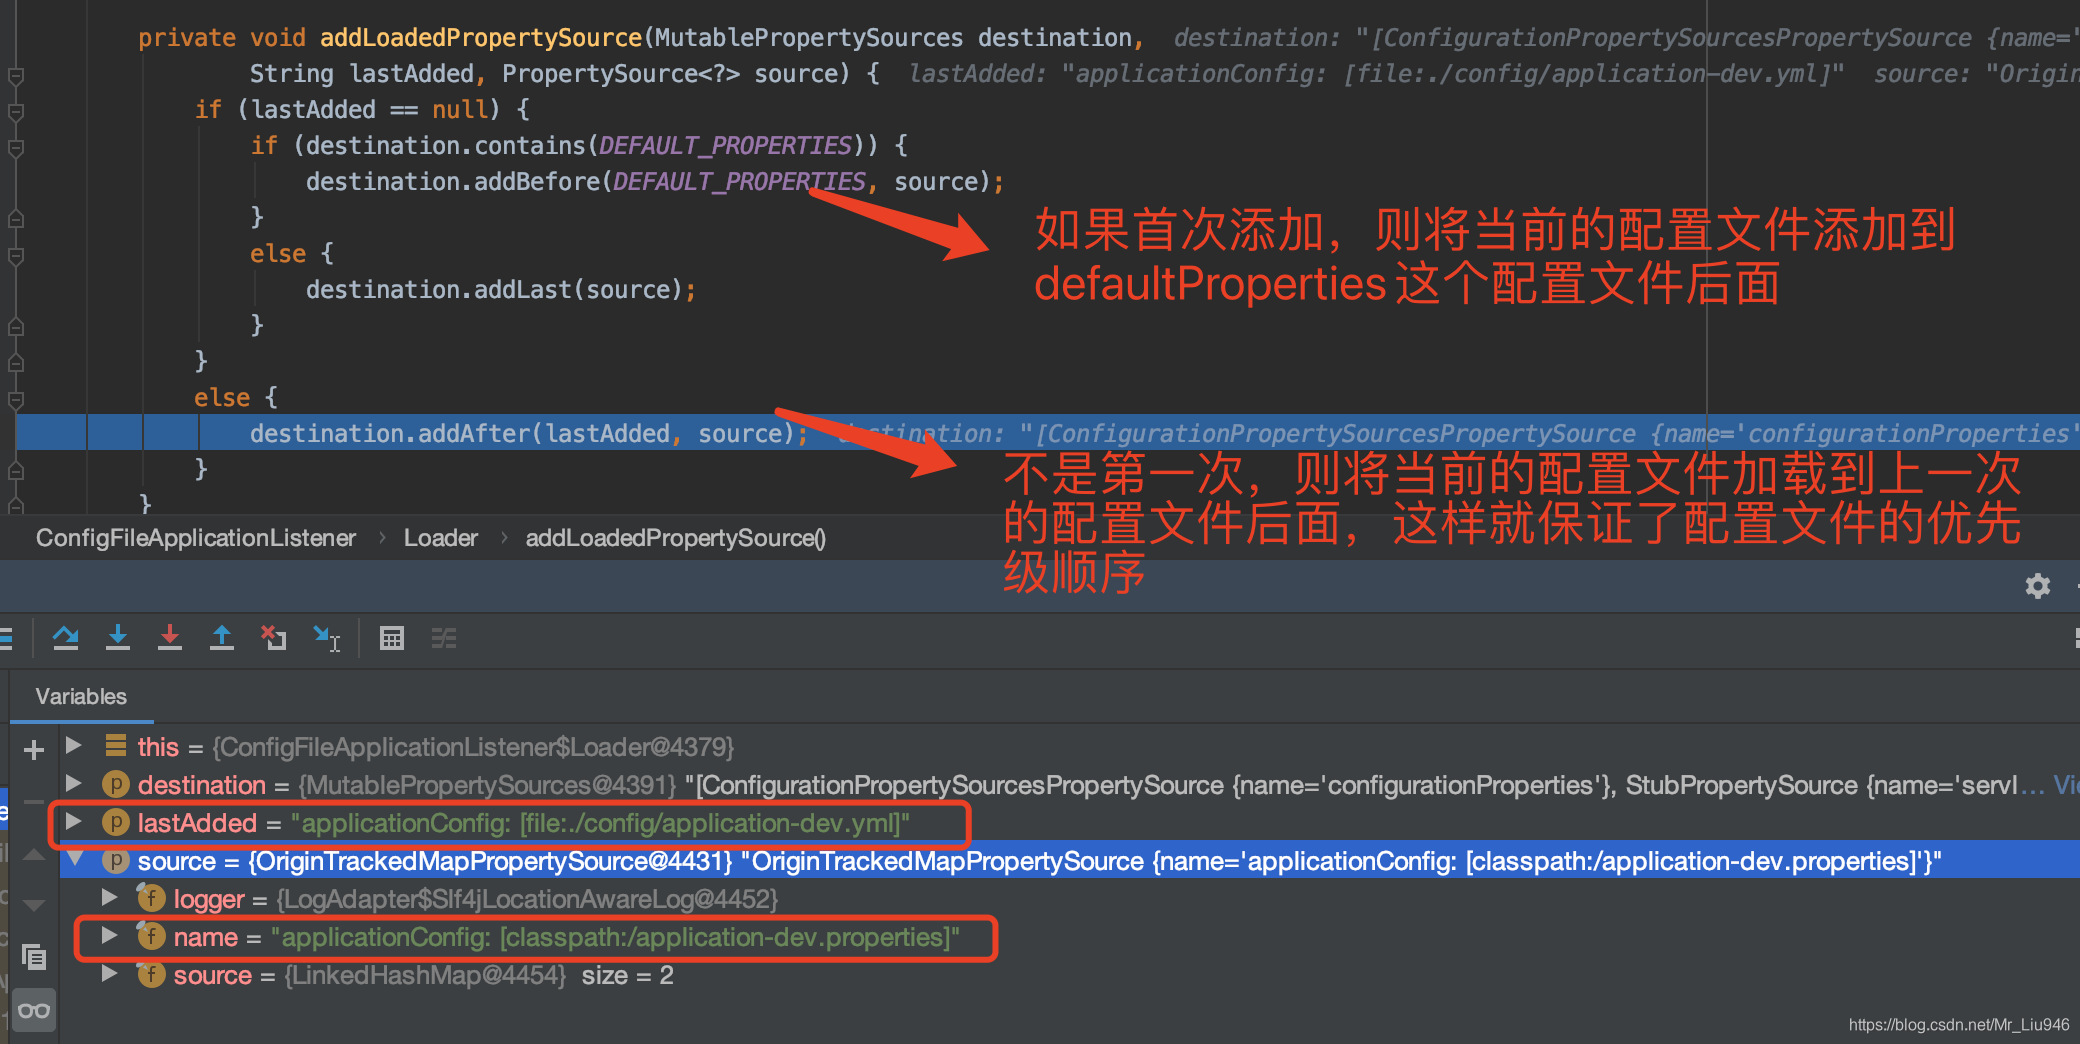
private void addLoadedPropertySource(MutablePropertySources destination, String lastAdded, PropertySource<?> source) {
if (lastAdded == null) {
// 如果系统中存在"defaultProperties"这个配置,则将第一个优先级的配置文件添加到这个配置文件的顺序之前
// 如果系统中不存在"defaultProperties"这个配置,则将第一个优先级的配置文件添加到environment中的最后一个
// defaultProperties实际为bootstrap.yml
if (destination.contains(DEFAULT_PROPERTIES)) {
destination.addBefore(DEFAULT_PROPERTIES, source);
} else {
destination.addLast(source);
}
} else {
// 将当前配置文件添加到上一个配置文件之后
destination.addAfter(lastAdded, source);
}
}
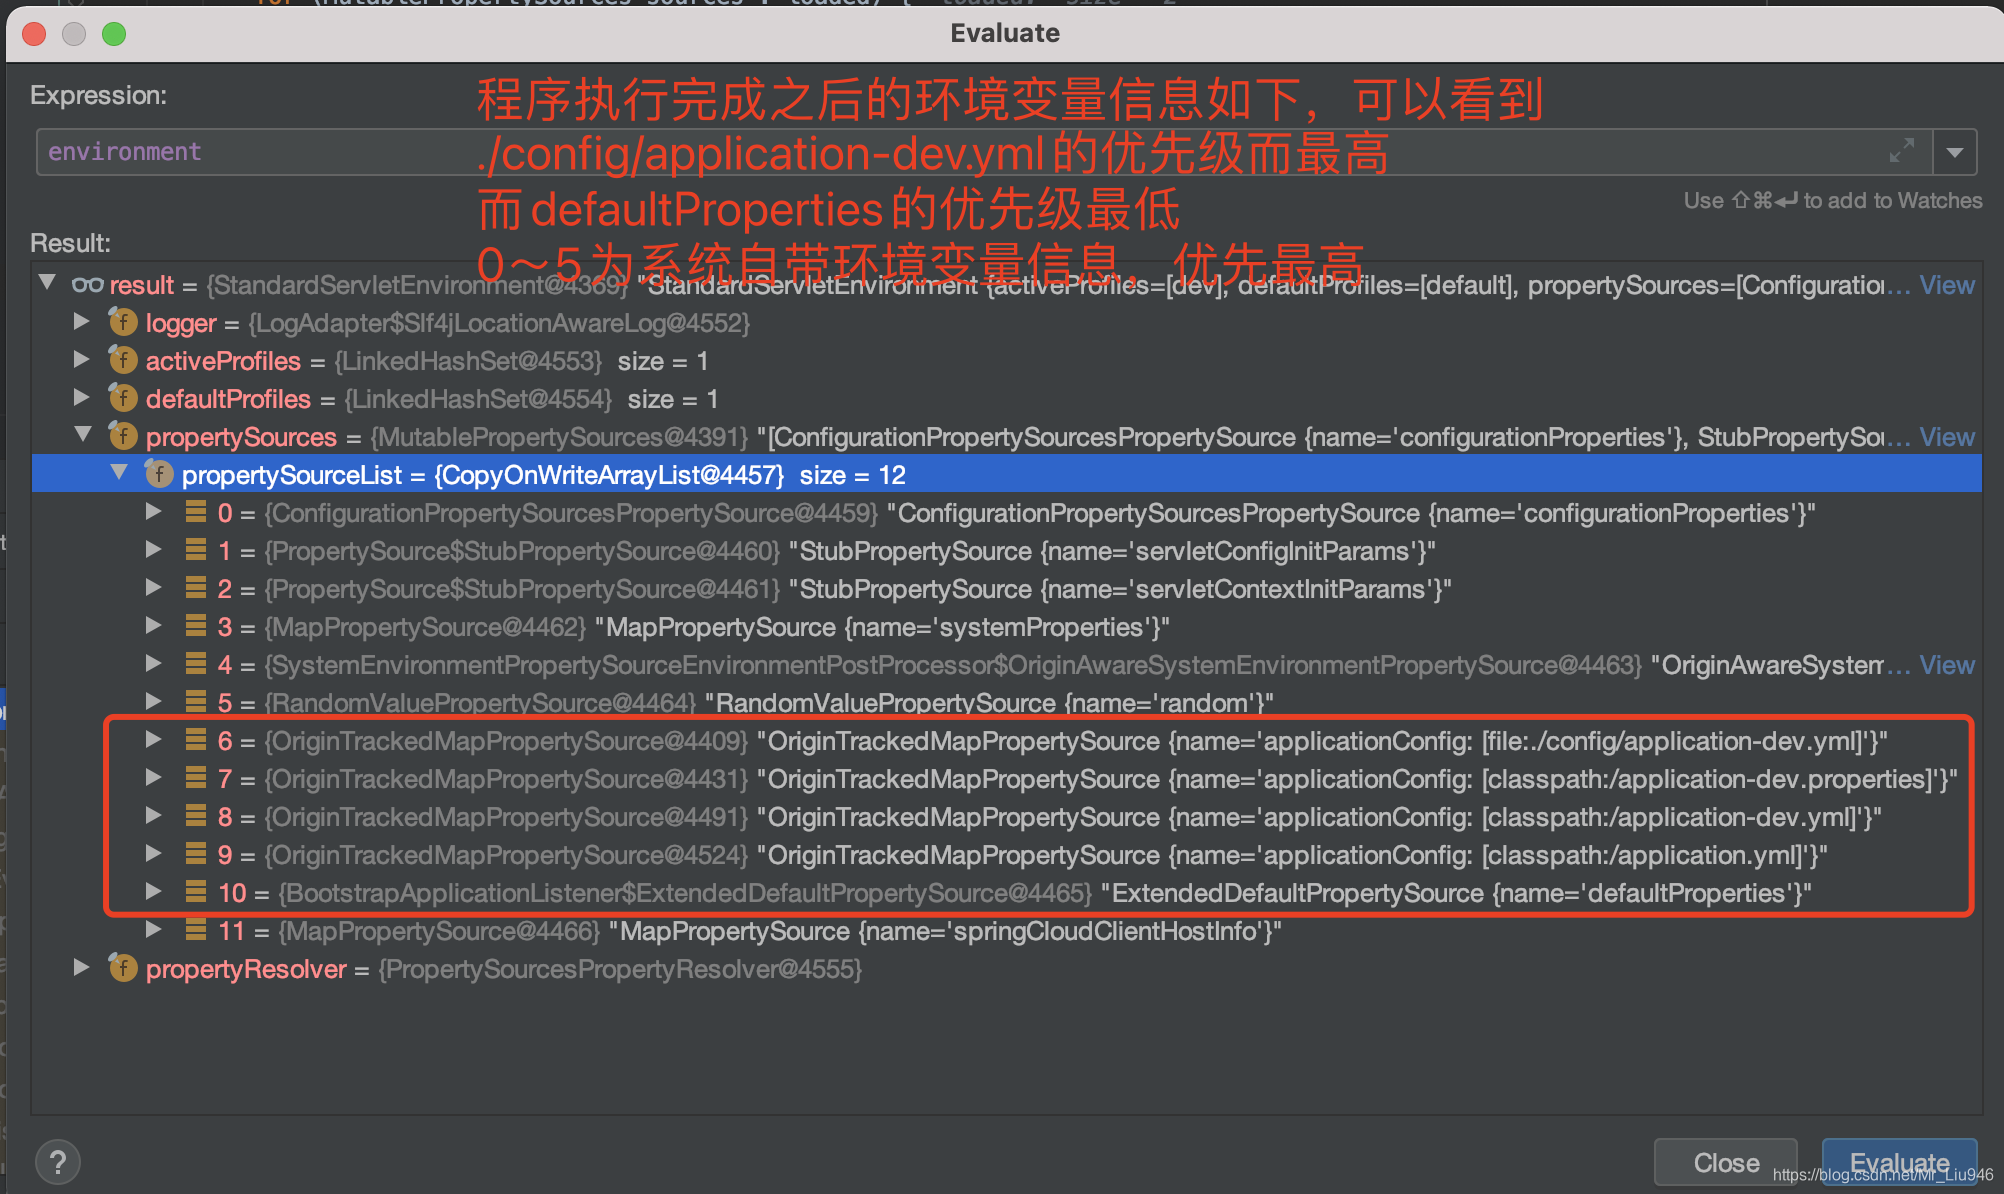
为了大家能对这个过程有一个清晰的认识,我将这一部分源码的debug流程依次截图在了下面,方便大家理解。

到此我们的配置文件的加载过程就完毕了,下一篇我将为大家讲解一下Spring是怎么将这些变量赋值给我们配置的属性的【Springboot属性赋值原理】,谢谢大家的观看。


 2692
2692


 被折叠的 条评论
为什么被折叠?
被折叠的 条评论
为什么被折叠?
 到【灌水乐园】发言


