


目录
布局管理器
布局是指组件在容器中的排列方式,主要有:
FlowLayout 流式布局
BorderLayout 边界布局
GridLayout 网格布局
CardLayout 卡片布局
BoxLayout 盒式布局
GridBagLayout 网格包布局
null 空布局(不使用布局)
注:对于一些复杂的情况,往往需要使用容器的嵌套,各容器可使用不同的布局。当容器的尺寸改变时,布局管理器会自动调整组件的排列
4.1.FlowLayout
- 该布局以行为单位依次排列各组件,一行排不下时,另起一行

- JPanel的默认布局是FlowLayout
- 构造方法
FlowLayout();
FlowLayout(int align); //align一般取值有:CENTER、LEFT、RIGHT
FlowLayout(int align, int hgap, int vgap);//hgap和vgap指定组件与容器起始边界以及组件间的水平和垂直间距,默认值为5个像素
- 例如:FlowLayout layout = new FlowLayout(FlowLayout.LEFT, 10, 10);
- 缺点:当用户对由FlowLayout布局管理的区域进行缩放时,布局发生变化

- 该布局适用于组件个数较少的情况
import javax.swing.*;
import java.awt.*;

public class JFrame_MainClass  {
    public static void main(String[] args) {
        new MyJFrame();
    }
}
class MyJFrame extends JFrame{
    private JPanel panel;
    private JButton button1,button2;
    public MyJFrame(){
        super("JPanel默认布局:FlowLayout");
    //    panel = new JPanel(); //  默认居中对齐
        panel = new JPanel(new FlowLayout(FlowLayout.LEFT)); // 设置左对齐
        button1 = new JButton("button1");
        button2 = new JButton("button2");
        panel.add(button1);
        panel.add(button2);
        this.add(panel);
        this.setSize(300,200);
        this.setLocation(200,100);
        this.setDefaultCloseOperation(JFrame.EXIT_ON_CLOSE);
        this.setVisible(true);
    }
}

4.2.BorderLayout
- 按照东、西、南、北、中5个方位排列各组件
- 顶层容器JFrame、JApplet、JDialog、JWindow的默认布局都是BorderLayout

- 构造方法:
BorderLayout( );
BorderLayout(int hgap,int vgap);//hgap和vgap指定组件间的水平和垂直间距,默认值为0个像素
- 例如:
BorderLayout lay1 = new BorderLayout( );
BorderLayout lay2 = new BorderLayout(10, 10);
- 方位的取值为:
BorderLayout.EAST 或 “East”
BorderLayout.WEST 或 “West”
BorderLayout.SOUTH 或 “South”
BorderLayout.NORTH 或 “North”
BorderLayout.CENTER 或 “Center”(默认)
设置容器布局:setLayout(方位);
- 缺点:当加入的组件超过5个时,就必须使用容器的嵌套或其它布局。
- 优点:当容器缩放时,组件相应的位置不变化,但大小改变。
import javax.swing.*;
import java.awt.*;

public class MainClass{
    public static void main(String[] args) {
        new BorderLayout_3();
    }
}
class BorderLayout_3 extends JFrame {
    public BorderLayout_3(){
       super("JFrame默认布局:BorderLayout");
       JPanel panel = new JPanel(new BorderLayout());
       JButton button1 = new JButton("按钮1");
       JButton button2 = new JButton("按钮2");
       JButton button3 = new JButton("按钮3");
       JButton button4 = new JButton("按钮4");
       JButton button5 = new JButton("按钮5");
       panel.add(button1,BorderLayout.EAST);
       panel.add(button2,BorderLayout.WEST);
       panel.add(button3,BorderLayout.SOUTH);
       panel.add(button4,BorderLayout.NORTH);
       panel.add(button5,BorderLayout.CENTER);
       this.add(panel);
       this.setSize(400,360);
       this.setLocation(300,200);
       this.setDefaultCloseOperation(JFrame.EXIT_ON_CLOSE);
       this.setVisible(true);
    }

}

4.3.GridLayout
- 按照二维网格以相同大小依次排列各组件

- 构造方法:
GridLayout();//一行、每个组件一列
GridLayout(int rows,int cols);//行列数
GridLayout(int rows, int cols, int hgap, int vgap);//行行、列列的间距,默认值为0个像素
- 例如:
GridLayout lay1 = new GridLayout(3,3);
GridLayout lay2 = new GridLayout(5,2,10,10);
- 优点:组件的相应位置不随区域的缩放而改变,只是组件的大小改变。

- 该布局适用于组件个数较多的情况。
import javax.swing.*;
import java.awt.*;

public class MainClass{
    public static void main(String[] args) {
        new GridLayout_5();
    }
}
class GridLayout_5 extends JFrame {
    private JPanel panel;
    public GridLayout_5(){
       super("GridLayout布局");
       panel = new JPanel(new GridLayout(2,3));
       for (int i = 0; i < 6; i++) {
            panel.add(new JButton("按钮"+(i+1)));
       }
       this.add(panel);
       this.setSize(400,360);
       this.setLocation(300,200);
       this.setDefaultCloseOperation(JFrame.EXIT_ON_CLOSE);
       this.setVisible(true);
    }
}

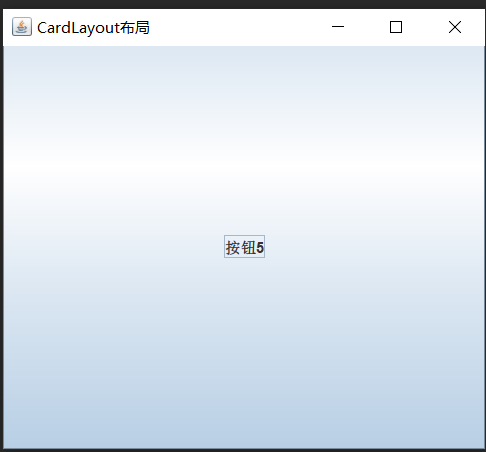
4.4.CardLayout
- 该布局以一叠卡片的形式依次排列各组件
构造方法
- CardLayout( );
- CardLayout(int hgap,int vgap);//组件与容器边界间距,默认值为0个像素
例如:
- CardLayout layout1 = new CardLayout();
- CardLayout layout2 = new CardLayout(10,10);
| 显示方法 | 功能 |
| first(Container con) | 显示容器中的第一张卡片 |
| last(Container con) | 显示容器中的最后一张卡片 |
| previous(Container con) | 显示容器中当前卡片的上一张卡片 |
| next(Container con) | 显示容器中当前卡片的下一张卡片 |
| show(Container con, String name) | 显示容器中指定名称的卡片 |
import javax.swing.*;
import java.awt.*;

class MainClass{
    public static void main(String[] args) {
        new CardLayout_4();
    }
}
class CardLayout_4 extends JFrame {
    private JPanel panel;
    private CardLayout cardLayout;
    public CardLayout_4(){
       super("CardLayout布局");
       panel = new JPanel();
       cardLayout = new CardLayout();
       panel.setLayout(cardLayout);

       for (int i = 0; i < 5; i++) {
           panel.add(new JButton("按钮"+(i+1)));
       }
       cardLayout.last(panel);  // 显示最后一张卡片(按钮)
       this.add(panel);
       this.setSize(400,360);
       this.setLocation(300,200);
       this.setDefaultCloseOperation(JFrame.EXIT_ON_CLOSE);
       this.setVisible(true);
    }
}
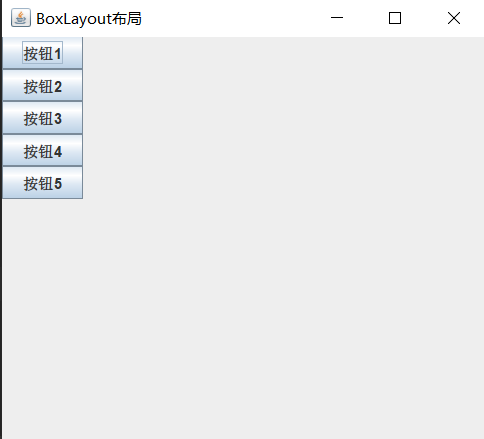
4.5.BoxLayout
- 以一行或一列的方式依次排列各组件
构造方法:
- new BoxLayout(Container con, int axis):创建一个指定容器和方向的BoxLayout对象
| 常量 | 描述 |
| BorderLayout.X_AXIS | X轴(横轴)排列 |
| BorderLayout.Y_AXIS | Y轴(纵轴)排列 |
| LINE_AXIS | 根据容器的Component Oriebtation属性,按照文字在一行中的排列方式布置组件 |
| PAGE_AXIS | 根据容器的Component Oriebtation属性,按照文本行在一页中的排列方式布置组件 |
import javax.swing.*;

public class MainClass{
    public static void main(String[] args) {
        new BoxLayout_6();
    }
}
class BoxLayout_6 extends JFrame {
    private JPanel panel;
    public BoxLayout_6(){
       super("BoxLayout布局");
       panel = new JPanel();
       panel.setLayout(new BoxLayout(panel, BoxLayout.Y_AXIS)); //  沿Y轴布置组件

       for (int i = 0; i < 5; i++) {
            panel.add(new JButton("按钮"+(i+1)));
       }
       this.add(panel);
       this.setSize(400,360);
       this.setLocation(300,200);
       this.setDefaultCloseOperation(JFrame.EXIT_ON_CLOSE);
       this.setVisible(true);
    }
}
4.6.NULL
- 不使用任何布局管理器
空布局的使用:
- 创建容器对象:JPanel panel = new JPanel( );
- 设置容器对象的布局为null:panel.setLayout(null);
- 设置组件在容器中的位置:组件对象.setBounds(x, y, width, height);
import javax.swing.*;

public class MainClass{
    public static void main(String[] args) {
        new null_7();
    }
}
class null_7 extends JFrame {
     private Jpanel panel;
     private JButton button1,button2,button3,button4,button5;
     public null_7(){
       super("null布局");
       panel = new JPanel();
       panel.setLayout(null);
       button1 = new JButton("按钮1");
       button2 = new JButton("按钮2");
       button3 = new JButton("按钮3");
       button4 = new JButton("按钮4");
       button5 = new JButton("按钮5");

       button1.setBounds(35,25,75,30);
       button2.setBounds(135,25,75,30);
       button3.setBounds(235,25,75,30);
       button4.setBounds(35,65,75,30);
       button5.setBounds(135,65,75,30);

       panel.add(button1);
       panel.add(button2);
       panel.add(button3);
       panel.add(button4);
       panel.add(button5);

       this.add(panel);
       this.setSize(400,360);
       this.setLocation(300,200);
       this.setDefaultCloseOperation(JFrame.EXIT_ON_CLOSE);
       this.setVisible(true);
    }
}

(27条消息) Swing UI——容器(一)_Stuttering Guy的博客-CSDN博客![]() https://blog.csdn.net/Mr_Morgans/article/details/125109643?csdn_share_tail=%7B%22type%22%3A%22blog%22%2C%22rType%22%3A%22article%22%2C%22rId%22%3A%22125109643%22%2C%22source%22%3A%22Mr_Morgans%22%7D&ctrtid=l9JMT(27条消息) Swing UI——基本组件(二)_Stuttering Guy的博客-CSDN博客
https://blog.csdn.net/Mr_Morgans/article/details/125109643?csdn_share_tail=%7B%22type%22%3A%22blog%22%2C%22rType%22%3A%22article%22%2C%22rId%22%3A%22125109643%22%2C%22source%22%3A%22Mr_Morgans%22%7D&ctrtid=l9JMT(27条消息) Swing UI——基本组件(二)_Stuttering Guy的博客-CSDN博客![]() https://blog.csdn.net/Mr_Morgans/article/details/125110881?csdn_share_tail=%7B%22type%22%3A%22blog%22%2C%22rType%22%3A%22article%22%2C%22rId%22%3A%22125110881%22%2C%22source%22%3A%22Mr_Morgans%22%7D&ctrtid=Kzbcx(27条消息) Swing UI——高级组件(三)_Stuttering Guy的博客-CSDN博客
https://blog.csdn.net/Mr_Morgans/article/details/125110881?csdn_share_tail=%7B%22type%22%3A%22blog%22%2C%22rType%22%3A%22article%22%2C%22rId%22%3A%22125110881%22%2C%22source%22%3A%22Mr_Morgans%22%7D&ctrtid=Kzbcx(27条消息) Swing UI——高级组件(三)_Stuttering Guy的博客-CSDN博客![]() https://blog.csdn.net/Mr_Morgans/article/details/125115383?csdn_share_tail=%7B%22type%22%3A%22blog%22%2C%22rType%22%3A%22article%22%2C%22rId%22%3A%22125115383%22%2C%22source%22%3A%22Mr_Morgans%22%7D&ctrtid=81Bbq(27条消息) Swing UI——事件处理(五)_Stuttering Guy的博客-CSDN博客
https://blog.csdn.net/Mr_Morgans/article/details/125115383?csdn_share_tail=%7B%22type%22%3A%22blog%22%2C%22rType%22%3A%22article%22%2C%22rId%22%3A%22125115383%22%2C%22source%22%3A%22Mr_Morgans%22%7D&ctrtid=81Bbq(27条消息) Swing UI——事件处理(五)_Stuttering Guy的博客-CSDN博客![]() https://blog.csdn.net/Mr_Morgans/article/details/125115417?spm=1001.2014.3001.5501
https://blog.csdn.net/Mr_Morgans/article/details/125115417?spm=1001.2014.3001.5501


 993
993


 被折叠的 条评论
为什么被折叠?
被折叠的 条评论
为什么被折叠?
 到【灌水乐园】发言


