springBoot发送邮件

第一步:添加依赖

        <!-- springboot 邮件依赖 -->
        <dependency>
            <groupId>org.springframework.boot</groupId>
            <artifactId>spring-boot-starter-mail</artifactId>
        </dependency>

第二步:添加配置

spring:
  #邮箱基本配置(必须放在spring标签下级)
  mail:
    #配置smtp服务主机地址,不同邮箱的地址不太一样
    host: smtp.exmail.qq.com
    # 协议 默认就是smtp
    protocol: smtp
    #发送者邮箱
    username: zhaoheng@xxx.cn
    #配置密码或者授权码(qq邮箱需要授权码)
    password: xxxx
    # smtp的指定端口(465或587)
    port: 465
    #默认的邮件编码为UTF-8
    default-encoding: UTF-8
    # 配置SSL 加密工厂
    properties:
      mail:
        smtp:
          auth: true
          # 使用腾讯企业邮箱发送邮件,必须使用ssl
          ssl:
            enable: true
            trust: ${spring.mail.host}
            #开启debug模式,这样邮件发送过程的日志会在控制台打印出来,方便排查错误
        debug: false

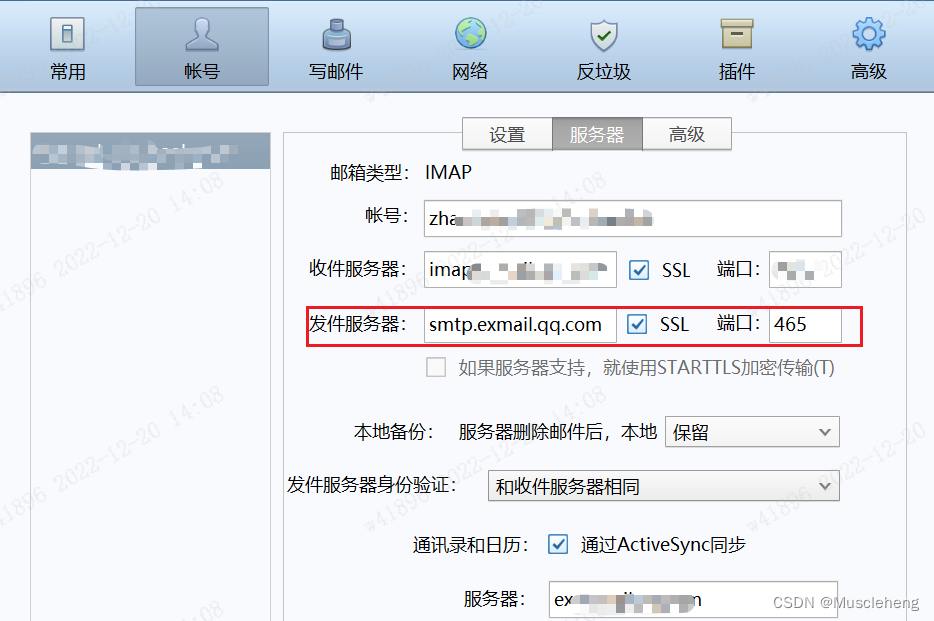
配置文件中的参数配置,不同类型的邮箱有少许差异,比如password,如果是QQ邮箱就不需要密码,而是授权码;文中的配置以腾讯企业邮箱为例,其中的 host、port来源如下:


第三部:代码编写

package com.zhh.demo.test;

import lombok.extern.slf4j.Slf4j;
import org.springframework.beans.factory.annotation.Autowired;
import org.springframework.beans.factory.annotation.Value;
import org.springframework.core.io.FileSystemResource;
import org.springframework.mail.javamail.JavaMailSender;
import org.springframework.mail.javamail.MimeMessageHelper;
import org.springframework.stereotype.Service;
import org.springframework.util.StringUtils;

import javax.mail.internet.MimeMessage;
import java.io.File;
import java.util.Date;

/**
 * @Description: 发邮件
 * @Author: zhaoheng
 * @CreateTime: 2022-12-20
 */
@Slf4j
@Service
public class MailTest {

    @Autowired
    private JavaMailSender javaMailSender;

    /** 邮件发件人 */
    @Value("${spring.mail.username}")
    private String sendMailer;

    public void sendMail() {
        MimeMessage message = javaMailSender.createMimeMessage();
        try {
            MimeMessageHelper helper = new MimeMessageHelper(message, true);
            //邮件发件人
            helper.setFrom(sendMailer);
            //邮件收件人 1或多个
            helper.setTo("zhaohengit@163.com");
            //邮件主题
            helper.setSubject("测试邮件");
            //邮件内容
            helper.setText("邮件内容。。。", true);
            //邮件发送时间
            helper.setSentDate(new Date());
            // 附件
            String filePath = "D:\\temp\\a.txt";
            if (StringUtils.hasText(filePath)) {
                FileSystemResource file = new FileSystemResource(new File(filePath));
                String fileName = filePath.substring(filePath.lastIndexOf(File.separator));
                helper.addAttachment(fileName, file);
            }
            javaMailSender.send(message);
            log.info("发送邮件成功");
        } catch (Exception e) {
            log.error("发送邮件异常!", e);
        }
    }
}

  • 0
    点赞
  • 1
    收藏
    觉得还不错? 一键收藏
  • 0
    评论
Spring Boot发送邮件需要使用JavaMailSender接口来实现。以下是一个简单的示例代码: 首先,确保在你的项目中添加了相关依赖。在pom.xml文件中添加以下代码: ```xml <dependencies> <!-- Spring Boot Starter Mail --> <dependency> <groupId>org.springframework.boot</groupId> <artifactId>spring-boot-starter-mail</artifactId> </dependency> </dependencies> ``` 然后,在你的应用程序中创建一个类来发送邮件。例如,你可以创建一个名为EmailSender的类: ```java import org.springframework.beans.factory.annotation.Autowired; import org.springframework.mail.SimpleMailMessage; import org.springframework.mail.javamail.JavaMailSender; import org.springframework.stereotype.Component; @Component public class EmailSender { @Autowired private JavaMailSender javaMailSender; public void sendEmail(String to, String subject, String text) { SimpleMailMessage message = new SimpleMailMessage(); message.setTo(to); message.setSubject(subject); message.setText(text); javaMailSender.send(message); } } ``` 在上述示例中,我们使用了@Autowired注解来自动注入JavaMailSender对象,该对象是由Spring Boot自动配置提供的。 现在,你可以在你的应用程序的任何地方使用EmailSender类来发送邮件。例如,你可以在控制器中使用它: ```java import org.springframework.beans.factory.annotation.Autowired; import org.springframework.web.bind.annotation.PostMapping; import org.springframework.web.bind.annotation.RequestBody; import org.springframework.web.bind.annotation.RestController; @RestController public class EmailController { @Autowired private EmailSender emailSender; @PostMapping("/sendEmail") public String sendEmail(@RequestBody EmailRequest emailRequest) { emailSender.sendEmail(emailRequest.getTo(), emailRequest.getSubject(), emailRequest.getText()); return "Email sent successfully!"; } } ``` 上述示例中,我们创建了一个名为EmailController的REST控制器,它接收一个包含收件人、主题和内容的EmailRequest对象,并使用EmailSender发送邮件。 请注意,你需要适当配置你的邮件服务器信息。在Spring Boot的application.properties(或application.yml)文件中添加以下配置: ```yaml spring.mail.host=your-mail-server spring.mail.port=your-mail-server-port spring.mail.username=your-username spring.mail.password=your-password spring.mail.properties.mail.smtp.auth=true spring.mail.properties.mail.smtp.starttls.enable=true ``` 以上是一个简单的示例,你可以根据你的实际需求进行修改和扩展。希望对你有帮助!

“相关推荐”对你有帮助么?

  • 非常没帮助
  • 没帮助
  • 一般
  • 有帮助
  • 非常有帮助
提交
评论
添加红包

请填写红包祝福语或标题

红包个数最小为10个

红包金额最低5元

当前余额3.43前往充值 >
需支付:10.00
成就一亿技术人!
领取后你会自动成为博主和红包主的粉丝 规则
hope_wisdom
发出的红包
实付
使用余额支付
点击重新获取
扫码支付
钱包余额 0

抵扣说明:

1.余额是钱包充值的虚拟货币,按照1:1的比例进行支付金额的抵扣。
2.余额无法直接购买下载,可以购买VIP、付费专栏及课程。

余额充值