上一篇文章介绍了ELK的使用,这里继续学习Elasticsearch的相关内容。
一,ElasticSearch的使用场景:Elasticsearch的使用场景深入详解_狂奔的蜗牛Evan的博客-CSDN博客_elasticsearch使用场景
二,ElasticSearch与关系数据库的对比
Elasticsearch | 关系数据库 |
---|---|
索引(index) | 数据库 |
类型(type) | 表,新版本默认是_doc |
映射(mapping) | 表结构 |
属性(field) | 字段 |
文档(document) | 一条记录 |
三,如何向 Elasticsearch 添加一些索引、映射和数据
- 启动 elasticsearch.bat
- 默认地址:http://localhost:9200
1)Restful API 使用方式 - 使用PostMan发送请求
- 索引操作
操作名称 | 请求方式 | 请求格式 | 演示 |
---|---|---|---|
创建索引 | PUT | /索引名称 | |
查询索引 | GET | /索引名称 | |
/索引名称1,索引名称2... | |||
/索引名称* | |||
/索引名称/_all | |||
删除索引 | DELETE | /索引名称 | |
关闭索引 | POST | /索引名称/_close | |
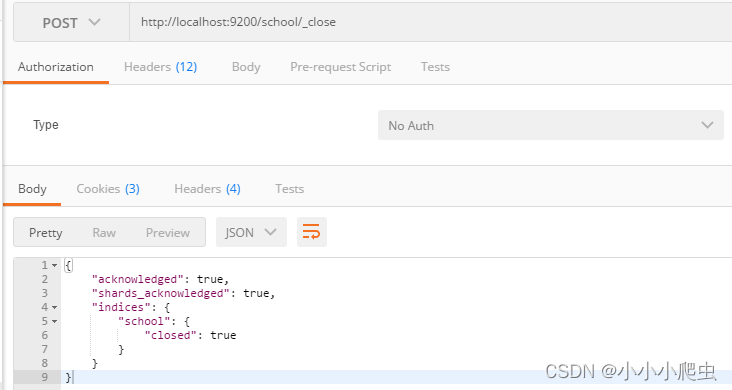
打开索引 | POST | /索引名称/_open | |
是否存在 | HEAD | /索引名称 | 响应200表示存在,404则不存在 |
索引设置 | GET | /索引名称/_settings | |
索引统计 | GET | /_stats | |
冲洗 | POST | /索引名称/_flush |
- 映射操作
操作名称 | 请求方式 | 请求格式 | 演示 |
---|---|---|---|
创建索引和映射 | PUT | /索引名称 {"mappings": { "properties": {"name": { "type": "text"}, "age": { "type": "integer"}}}} | |
添加映射 | PUT | /索引名称/_mapping { "properties":{ "name":{ "type":"text" }, "age":{ "type":"integer" }, "gender":{"type":"text"} } } | |
添加字段 | PUT | /索引名称/_mapping {"properties":{ "gender":{"type":"text"}}} | |
查询映射 | GET | /索引名称/_mapping |
- 文档操作
操作名称 | 请求方式 | 请求格式 | 演示 |
---|---|---|---|
添加文档 | POST | 不指定ID /索引名称/_doc/ | |
指定ID /索引名称/_doc/1 | |||
查询文档 | GET | 查询所有 /索引名称/_search | |
根据ID查询 /索引名称/_doc/1 | |||
删除文档 | DELETE | /索引名称/_doc/1 | |
搜索文档 | POST | 表达式搜索 /索引名称/_search { "query" : { "match" : { "name" : "张三" } } } | |
GET | 条件搜索 /索引名称/_search?q=name:张三 |
2)Kibana 使用方式 - 使用Dev-Tools
- 启动 kibana .bat
- 默认地址:http://localhost:5601
直接在左边控制台输入语句就可以执行成功了。
四,Java API 的使用方式
elasticsearch官方在8.0版本以后,已经舍弃了High level rest clint Api,推荐使用java clint api。
官方文档:Installation | Elasticsearch Java API Client [8.4] | Elastic
1)在项目中的使用
- pom.xml引入依赖包
<!-- https://mvnrepository.com/artifact/co.elastic.clients/elasticsearch-java -->
<dependency>
<groupId>co.elastic.clients</groupId>
<artifactId>elasticsearch-java</artifactId>
<version>8.4.2</version>
</dependency>
<dependency>
<groupId>com.fasterxml.jackson.core</groupId>
<artifactId>jackson-databind</artifactId>
<version>2.12.3</version>
</dependency>
<!-- https://mvnrepository.com/artifact/jakarta.json/jakarta.json-api -->
<dependency>
<groupId>jakarta.json</groupId>
<artifactId>jakarta.json-api</artifactId>
<version>2.0.1</version>
</dependency>
- application.yml 添加配置
# =========================================================================
elasticSearch:
url: 127.0.0.1
port: 9200
# ==========================================================================
- 自定义Client配置类
package com.qi.study.springboot.config;
import org.apache.http.HttpHost;
import org.elasticsearch.client.RestClient;
import org.springframework.beans.factory.annotation.Value;
import org.springframework.context.annotation.Bean;
import org.springframework.context.annotation.Configuration;
import co.elastic.clients.elasticsearch.ElasticsearchClient;
import co.elastic.clients.json.jackson.JacksonJsonpMapper;
import co.elastic.clients.transport.ElasticsearchTransport;
import co.elastic.clients.transport.rest_client.RestClientTransport;
@Configuration
public class ElasticSearchConfig {
@Value("${elasticSearch.url}")
private String url;
@Value("${elasticSearch.port}")
private Integer port;
@Bean
public ElasticsearchClient elasticsearchClient() {
// Create the low-level client
RestClient restClient = RestClient.builder(new HttpHost(url, port)).build();
// Create the transport with a Jackson mapper
ElasticsearchTransport transport = new RestClientTransport(restClient, new JacksonJsonpMapper());
// And create the API client
ElasticsearchClient client = new ElasticsearchClient(transport);
return client;
}
}
- 添加测试代码,结构如下:
Controller
studentService
elasticSearchService
2)启动测试
- 启动elasticSearch.bat
- 启动logstash 【logstash -f ./config/logstash-es.conf】
- 启动springboot
- 通过postman访问测试:
本篇文章主要是了解如何去使用ElasticSearch,有个初步的认知,更多高级搜索方法可以根据需要进一步去学习。
五,源代码下载: https://download.csdn.net/download/MyNoteBlog/86727519