


1、触摸屏种类、分别应用在哪里、屏和OS怎么配合使用?
从技术原理来区别触摸屏,可分为5类:
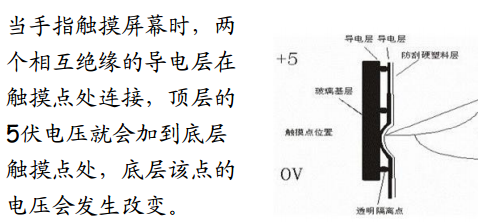
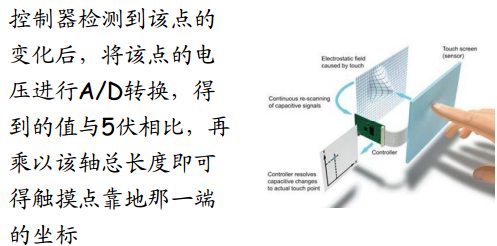
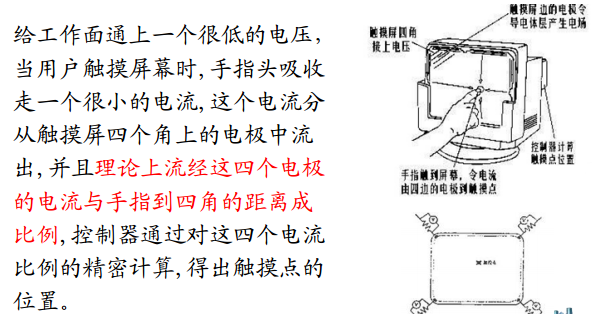
1.电阻式触摸屏
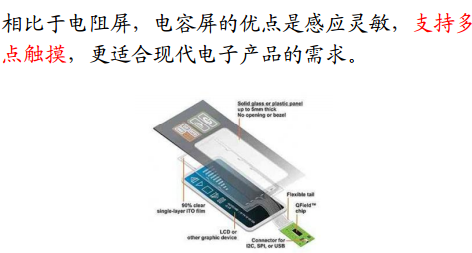
2.电容式触摸屏
3.红外线技术触摸屏
4.表面声波技术触摸屏
5.矢量压力传感技术触摸屏
红外线式和感应电容式触摸屏能够支持多点触控。多点触控带来了更多的选择,抓取、拖曳、缩放、旋转。
屏要和系统搭配才能体现优势。IPHONE和android系统支持多点触控。Windows mobiles不支持多点触控。
2、 触摸屏实现原理
》》电阻屏
》》电容屏
3、从规格书:
A/D精度 10bit ,8-channel input; 最大转换率500KSPS
链接触摸屏时,xm ym接地,xp yp接高电平。
笔点下或起来,都产生INT_TC中断,接着进行AD转换,转换好则产生INT_ADC中断。
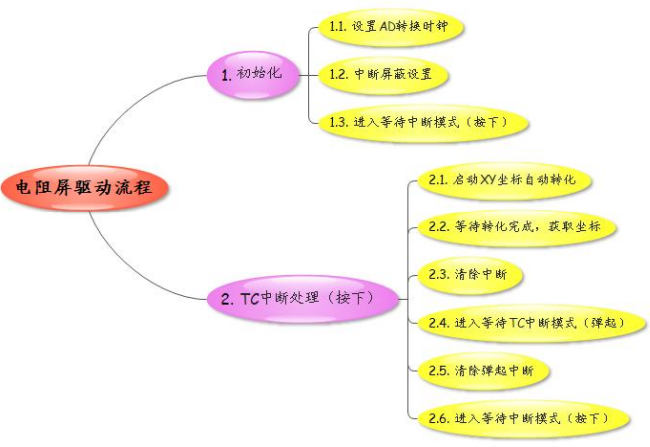
4、电阻屏驱动程序设计
5、触摸屏校验
触摸屏的坐标值和LCD的像素不是一比一的关系。且原点可能不是同一个角。
触摸屏校验2种方式:第一是4点式(2点式)。第二种三点式。
6、驱动程序代码
/***********************************************
  Copyright (C), 2015-2016, xmetc  Tech. Co., Ltd.
File  name  :   ts.c
Author      :   hhj
version     :   V1.0
Date   			:   2015-8-28
Description :  触摸屏功能函数
History     :
1  Date	        2015-8-28
   Author       hhj
   Modification   Init vision
*************************************************/
#include "2440addr.h"
#include "uart.h"
#include "def.h"
#include "ts.h"
#include "uart.h"
#include "lcd.h"
#include "iic.h"


//保存AD转换值
static int xdata,ydata;

//记录左上、右下点的坐标值
volatile static int TCx0,TCy0,TCx1,TCy1;
//记录LCD坐标与AD转换值的比例
volatile static float kX,kY;

//触摸状态标识
volatile int touchedFlag = 0;

//volatile int drawFlag = 0;

//LCD 4个坐标(显示十字)
Point TCtest[4]={
	15,15,
	13,305,
	225,305,
	225,15
};

//保存转换后的lcd坐标值
volatile Point lcdtouch;

/***********************************************
Function  name  :   tc_handler
Description     :   触摸屏中断处理函数
Input parameter :   none
Return          :   none
Others		    :
*************************************************/
void __irq tc_handler()
{

    //1. 启动xy坐标自动转换
    rADCTSC |= (1<<2);
    rADCCON |= (1<<0);

    //2. 等待转换完成
    while (!(rADCCON & (1<<15)));

    //3. 获取坐标
    xdata = rADCDAT0 & 0x3ff;
    ydata = rADCDAT1 & 0x3ff;


    uart_printf("Down!\n");

    //设置按下标识
    touchedFlag = 1;

    //4. 清除按下中断
    rSUBSRCPND |= (1<<9);
    rSRCPND |= (1<<31);
    rINTPND |= (1<<31);

    //5. 进入等待弹起中断
    rADCTSC = 0xd3;
    rADCTSC |= (1<<8);


    //等待弹起中断
    while(1)
    {

    	if(drawFlag == 1)
    	{
    	if(rSUBSRCPND &(1<<9))
    	    	break;
    }

    uart_printf("Up!\n");

    //6. 清除弹起中断
    rSUBSRCPND |= (1<<9);
    rSRCPND |= (1<<31);
    rINTPND |= (1<<31);


    //7. 再次进入等待按下中断的状态
    rADCTSC = 0xd3;

}


/***********************************************
Function  name  :   ts_init
Description     :   触摸屏初始化函数
Input parameter :   none
Return          :   none
Others		    :
*************************************************/
void ts_init()
{
    //1. 设置AD转换时钟
    rADCCON = (1<<14) | (24<<6);

    rADCDLY = 5000;

    rINTSUBMSK &= ~(1<<9);
    rSUBSRCPND |= (1<<9);

    rINTMSK &= ~(1<<31);
    rSRCPND |= (1<<31);
    rINTMOD &= ~(1<<31);
    rINTPND |= (1<<31);

    //5. 进入等待中断的模式
    rADCTSC = 0xd3;

     //4.中断处理函数
    pISR_ADC = (unsigned)tc_handler;
}


/***********************************************
Function  name  :   ts_revise
Description     :   触摸屏校验函数
Input parameter :   none
Return          :   none
Others		    :
*************************************************/
void ts_revise()
{
	 U32 i = 0;

	 TCx0=0;TCy0=0;TCx1=0;TCy1=0;

     lcd_clean(0xffff);

     touchedFlag = 0;

     for(i = 0; i < 4; i++)
     {
     	//画十字
     	lcd_draw_crose(TCtest[i].x,TCtest[i].y);

     	//等待触摸屏按下
     	while(!touchedFlag);
     	touchedFlag = 0;

     	switch(i)
     	{
     	case 0:
     		{
     			TCx0 += xdata;
     			TCy0 += ydata;
     			break;
     		}
     	case 1:
     		{
     			TCx0 += xdata;
     			TCy1 += ydata;
     			break;
     		}
     	case 2:
     		{
     			TCx1 += xdata;
     			TCy1 += ydata;
     			break;
     		}
     	case 3:
     		{
     			TCx1 += xdata;
     			TCy0 += ydata;
     			break;
     		}
     	default:
     		{
     			break;
     		}
     	}
     	lcd_clean(0xffff);
     }

     TCx0 = TCx0>>1;
     TCx1 = TCx1>>1;
     TCy0 = TCy0>>1;
     TCy1 = TCy1>>1;

     kX = (float)(TCx0 - TCx1)/(TCtest[2].x - TCtest[0].x);
     kY = (float)(TCy1 - TCy0)/(TCtest[2].y - TCtest[0].y);

     uart_printf("1 write--,TCx0,TCy0,TCx1,TCy1 :%d  %d  %d   %d \n",TCx0,TCy0,TCx1,TCy1);

}

/***********************************************
Function  name  :   ts_getpix
Description     :   获取触摸点
Input parameter :   none
Return          :   none
Others		    :
*************************************************/
void ts_getpix()
{
	while(!touchedFlag);
	touchedFlag = 0;

	lcdtouch.x = TCtest[0].x + (TCx0 - xdata)/kX;
	lcdtouch.y = TCtest[0].y + (ydata - TCy0)/kY;

	uart_printf("x = %d y = %d\n",lcdtouch.x,lcdtouch.y);

}


 2128
2128

 被折叠的 条评论
为什么被折叠?
被折叠的 条评论
为什么被折叠?
 到【灌水乐园】发言


