


上篇文章简单介绍了ovs(Open Virtual Switch)的原理和使用,但是仔细想想,单纯的ovs在云计算领域还存在着一些问题,例如:
- ovs只能做二层转发,没有三层的能力,无法在ovs上进行路由配置等操作;
- ovs没有高可用配置;
- 在虚拟化领域vm从一台物理机迁移到另一台物理机,以及容器领域container从一个节点迁移到另一个节点都是非常常见的场景,而单纯的ovs的配置只适用于当前节点。当发生上述迁移过程时,新的节点因对应的ovs没有相关配置,会导致迁移过来的vm或者container无法正常运作。
针对这些问题,我们希望有一个更上一层的逻辑能管控各个节点上的ovs配置,于是就有了本文的主题ovn(Open Virtual Network)。
what’s ovn?
OVN (Open Virtual Network) is a series of daemons that translates virtual network configuration into OpenFlow, and installs them into Open vSwitch. It is licensed under the open source Apache 2 license.
OVN provides a higher-layer abstraction then Open vSwitch, working with logical routers and logical switches, rather than flows. OVN is intended to be used by cloud management software (CMS). For details about the architecture of OVN, see the ovn-architecture manpage.
ovn提供的功能包括:
分布式虚拟路由器(distributed virtual routers)分布式虚拟交换机(distributed logical switches)访问控制列表(ACL)DHCPDNS server
架构
ovn官网对ovn的逻辑架构如下所示:
                                    CMS
                                     |
                                     |
                         +-----------|-----------+
                         |           |           |
                         |     OVN/CMS Plugin    |
                         |           |           |
                         |           |           |
                         |   OVN Northbound DB   |
                         |           |           |
                         |           |           |
                         |       ovn-northd      |
                         |           |           |
                         +-----------|-----------+
                                     |
                                     |
                           +-------------------+
                           | OVN Southbound DB |
                           +-------------------+
                                     |
                                     |
                  +------------------+------------------+
                  |                  |                  |
    HV 1          |                  |    HV n          |
  +---------------|---------------+  .  +---------------|---------------+
  |               |               |  .  |               |               |
  |        ovn-controller         |  .  |        ovn-controller         |
  |         |          |          |  .  |         |          |          |
  |         |          |          |     |         |          |          |
  |  ovs-vswitchd   ovsdb-server  |     |  ovs-vswitchd   ovsdb-server  |
  |                               |     |                               |
  +-------------------------------+     +-------------------------------+
ovn根据功能可以把节点分为两类:
central: 可以看做中心节点,central节点组件包括OVN/CMS plugin、OVN Northbound DB、ovn-northd、OVN Southbound DB。hypervisor: 可以看做工作节点,hypervisor节点组件包括ovn-controller、ovs-vswitchd、ovsdb-server。central节点相关组件和hypervisor组件可以运行在同一个物理节点上。
相关组件的功能如下:
CMS: 云管软件(Cloud Management Software),例如openstack(ovn最初就是设计给openstack用的)。OVN/CMS plugin: CMS的一部分,例如openstack的neutron plugin。它的作用是将逻辑网络配置转换成OVN理解的数据,并写到北向数据库(OVN Northbound DB)中。OVN Northbound DB: ovn北向数据库,保存CMS plugin下发的配置,它有两个客户端CMS plugin和ovn-northd。通过ovn-nbctl命令直接操作它。ovn-northd: 将OVN Northbound DB中的数据进行转换并保存到OVN Southbound DB。OVN Southbound DB: ovn南向数据库,它也有两个客户端: 上面的ovn-northd和下面的运行在每个hypervisor上的ovn-controller。通过ovn-sbctl命令直接操作它。ovn-controller: 相当于OVN在每个hypervisor上的agent。北向它连接到OVN Southbound Database学习最新的配置转换成openflow流表,南向它连接到ovs-vswitchd下发转换后的流表,同时也连接到ovsdb-server获取它需要的配置信息。ovs-vswitchd和ovs-dbserver: ovs用户态的两个进程。
安装
官方安装文档:https://github.com/ovn-org/ovn/blob/main/Documentation/intro/install/general.rst
这里我们采用源码安装方式,在具体步骤上和官方的可能会略有差异。
// 下载ovn代码
# git clone https://github.com/ovn-org/ovn.git
# cd ovn
// 如果需要特定版本,可以用git切到特定的tag再做以下操作

// ovn依赖ovs,需要把ovs代码也下载下来,这步ovn已经指定了ovs版本,不再需要再做特殊处理
# git submodule update --init

// 配置并安装ovs
# cd ovs
# ./boot.sh
# ./configure
# make
# make install

// 配置并安装ovn
# cd ..
# ./boot.sh
# ./configure
# make
# make install

// 添加ovn相关可执行文件路径到path环境变量
// 建议加到/etc/profile文件中
# export PATH=$PATH:/usr/local/share/ovn/scripts

// 执行上面命令没报错后敲ovn+tab键,检查是否安装完整
# ovn
ovn-appctl                    ovn-controller                ovn-detrace                   ovn-ic                        ovn-northd
ovn-bugtool-nbctl-show        ovn-controller-vtep           ovn_detrace.py                ovn-ic-nbctl                  ovn-sbctl
ovn-bugtool-sbctl-lflow-list  ovn-ctl                       ovn-docker-overlay-driver     ovn-ic-sbctl                  ovn-trace
ovn-bugtool-sbctl-show        ovndb-servers.ocf             ovn-docker-underlay-driver    ovn-nbctl
# ovn-appctl --version
ovn-appctl 22.06.90
Open vSwitch Library 2.17.90
启动
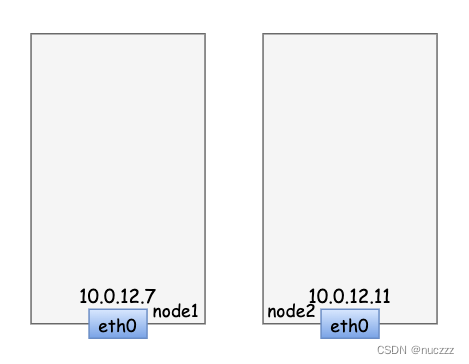
当前我这里只有两个节点,节点信息如下,假设这两台节点上都按上述步骤安装好了ovn和ovs。
- central相关组件启动
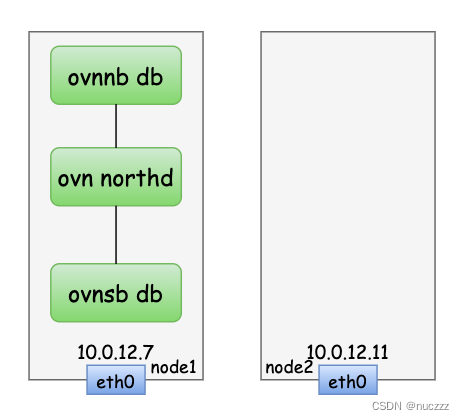
把node1作为central节点,安装central必需的三个组件:OVN Northbound DB、ovn-northd、OVN Southbound DB。
// ovn-ctl start_northd命令会自动启动北桥数据库、ovn-northd、南桥数据库三个服务
# ovn-ctl start_northd
/usr/local/etc/ovn/ovnnb_db.db does not exist ... (warning).
Creating empty database /usr/local/etc/ovn/ovnnb_db.db     [  OK  ]
Starting ovsdb-nb                                          [  OK  ]
/usr/local/etc/ovn/ovnsb_db.db does not exist ... (warning).
Creating empty database /usr/local/etc/ovn/ovnsb_db.db     [  OK  ]
Starting ovsdb-sb                                          [  OK  ]
Starting ovn-northd                                        [  OK  ]
# ps -ef|grep ovn
root     30750 30749  0 16:27 ?        00:00:00 ovsdb-server -vconsole:off -vfile:info --log-file=/usr/local/var/log/ovn/ovsdb-server-nb.log --remote=punix:/usr/local/var/run/ovn/ovnnb_db.sock --pidfile=/usr/local/var/run/ovn/ovnnb_db.pid --unixctl=/usr/local/var/run/ovn/ovnnb_db.ctl --detach --monitor --remote=db:OVN_Northbound,NB_Global,connections --private-key=db:OVN_Northbound,SSL,private_key --certificate=db:OVN_Northbound,SSL,certificate --ca-cert=db:OVN_Northbound,SSL,ca_cert --ssl-protocols=db:OVN_Northbound,SSL,ssl_protocols --ssl-ciphers=db:OVN_Northbound,SSL,ssl_ciphers /usr/local/etc/ovn/ovnnb_db.db
root     30766 30765  0 16:27 ?        00:00:00 ovsdb-server -vconsole:off -vfile:info --log-file=/usr/local/var/log/ovn/ovsdb-server-sb.log --remote=punix:/usr/local/var/run/ovn/ovnsb_db.sock --pidfile=/usr/local/var/run/ovn/ovnsb_db.pid --unixctl=/usr/local/var/run/ovn/ovnsb_db.ctl --detach --monitor --remote=db:OVN_Southbound,SB_Global,connections --private-key=db:OVN_Southbound,SSL,private_key --certificate=db:OVN_Southbound,SSL,certificate --ca-cert=db:OVN_Southbound,SSL,ca_cert --ssl-protocols=db:OVN_Southbound,SSL,ssl_protocols --ssl-ciphers=db:OVN_Southbound,SSL,ssl_ciphers /usr/local/etc/ovn/ovnsb_db.db
root     30774     1  0 16:27 ?        00:00:00 ovn-northd: monitoring pid 30775 (healthy)
root     30775 30774  0 16:27 ?        00:00:00 ovn-northd -vconsole:emer -vsyslog:err -vfile:info --ovnnb-db=unix:/usr/local/var/run/ovn/ovnnb_db.sock --ovnsb-db=unix:/usr/local/var/run/ovn/ovnsb_db.sock --no-chdir --log-file=/usr/local/var/log/ovn/ovn-northd.log --pidfile=/usr/local/var/run/ovn/ovn-northd.pid --detach --monitor
root     32414 17217  0 16:31 pts/0    00:00:00 grep --color=auto ovn
启动后关系逻辑如下所示:
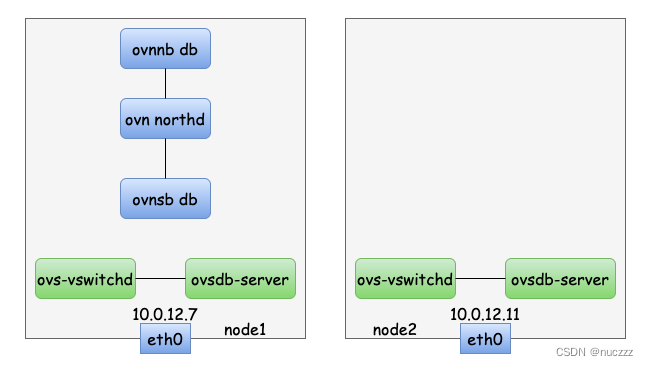
- hypervisor相关组件启动
hypervisor节点包含三个组件:ovn controller、ovs-vswitchd和ovsdb-server。如果之前已经启动了ovs,先停掉。我这里因为上篇文章用的systemctl启动的ovs,因此用systemctl命令停止ovs服务:
# systemctl stop openvswitch
# ps -ef|grep ovs
root      5547  3991  0 16:42 pts/0    00:00:00 grep --color=auto ovs
两个hypervisor节点上都启动ovs:
// 创建所需目录
# mkdir -p /usr/local/var/run/openvswitch
# mkdir -p /usr/local/var/log/openvswitch

// 创建数据库
# ovsdb-tool create /usr/local/etc/openvswitch/conf.db /usr/local/share/openvswitch/vswitch.ovsschema

// 启动ovsdb-server
# ovsdb-server --remote=punix:/usr/local/var/run/openvswitch/db.sock \
  --remote=db:Open_vSwitch,Open_vSwitch,manager_options \
  --private-key=db:Open_vSwitch,SSL,private_key \
  --bootstrap-ca-cert=db:Open_vSwitch,SSL,ca_cert --pidfile --detach

# ovs-vsctl --no-wait init

// 启动ovs-vswitchd
// 环境变量建议写到/etc/profile
# export DB_SOCK=/usr/local/var/run/openvswitch/db.sock
# ovs-vswitchd unix:$DB_SOCK --pidfile --detach --log-file=/usr/local/var/log/openvswitch/ovs-vswitchd.log

// 验证ovs安装是否正确
# ovs-vsctl --version
ovs-vsctl (Open vSwitch) 2.17.90
DB Schema 8.3.0
安装完ovs后,逻辑关系如下:
两个节点上都启动ovn ctroller
# ovn-ctl start_controller
Starting ovn-controller                                    [  OK  ]

// ovn controler启动后会自动创建br-int网桥
# ovs-vsctl show
17aaf222-5a88-4416-a455-1663d9eeff57
    Bridge br-int
        fail_mode: secure
        datapath_type: system
        Port br-int
            Interface br-int
                type: internal
安装完ovn-controller后,逻辑关系如下:
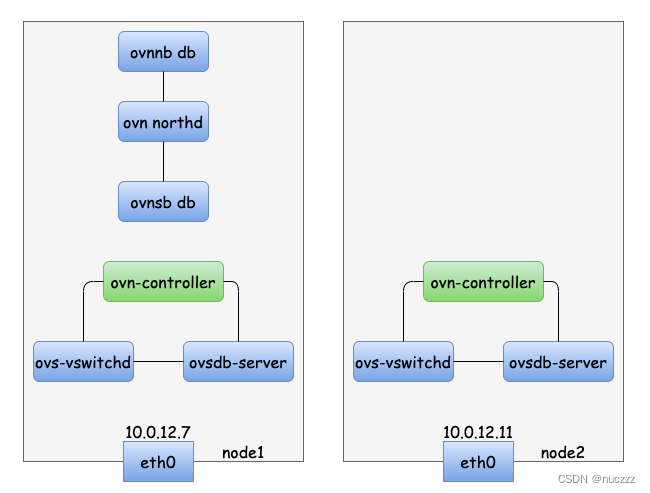
可以看出此时hypervisor并没有和central关联起来(也就是ovn-controller没有和南向数据库连接)。可以在node1上通过ovn-nbctl命令验证:
# ovn-nbctl show
#
- hypervisor连接central
// ovn-northd之所以能连上南向数据和北向数据库,是因为它们部署在同一台机器上,通过unix sock连接
// central节点开放北向数据库端口6441,该端口主要给CMS plugins连接使用,在本文中非必须步骤(本文在操作过程中未开启)
# ovn-nbctl set-connection ptcp:6641:10.0.12.7

// central节点开放南向数据库端口6442,该端口给ovn controller连接
# ovn-sbctl set-connection ptcp:6642:10.0.12.7
# netstat -ntlp|grep 6642
tcp        0      0 10.0.12.7:6642          0.0.0.0:*               LISTEN      10007/ovsdb-server
# ps -ef|grep 10007
root     10006     1  0 16:51 ?        00:00:00 ovsdb-server: monitoring pid 10007 (healthy)
root     10007 10006  0 16:51 ?        00:00:00 ovsdb-server -vconsole:off -vfile:info --log-file=/usr/local/var/log/ovn/ovsdb-server-sb.log --remote=punix:/usr/local/var/run/ovn/ovnsb_db.sock --pidfile=/usr/local/var/run/ovn/ovnsb_db.pid --unixctl=/usr/local/var/run/ovn/ovnsb_db.ctl --detach --monitor --remote=db:OVN_Southbound,SB_Global,connections --private-key=db:OVN_Southbound,SSL,private_key --certificate=db:OVN_Southbound,SSL,certificate --ca-cert=db:OVN_Southbound,SSL,ca_cert --ssl-protocols=db:OVN_Southbound,SSL,ssl_protocols --ssl-ciphers=db:OVN_Southbound,SSL,ssl_ciphers /usr/local/etc/ovn/ovnsb_db.db
root     23333 17217  0 18:31 pts/0    00:00:00 grep --color=auto 10007

// node1上ovn-controller连接南向数据库
// ovn-remote:指定南向数据库连接地址
// ovn-encap-ip:指定ovs/controller本地ip
// ovn-encap-type:指定隧道协议,这里用的是geneve
// system-id:节点标识
# ovs-vsctl set Open_vSwitch . external-ids:ovn-remote="tcp:10.0.12.7:6642" external-ids:ovn-encap-ip="10.0.12.7" external-ids:ovn-encap-type=geneve external-ids:system-id=node1

// node2上ovn-controller连接南向数据库
# ovs-vsctl set Open_vSwitch . external-ids:ovn-remote="tcp:10.0.12.7:6642" external-ids:ovn-encap-ip="10.0.12.11" external-ids:ovn-encap-type=geneve external-ids:system-id=node2

// 查看南向数据库信息
# ovn-sbctl show
Chassis node2
    hostname: VM-12-11-centos
    Encap geneve
        ip: "10.0.12.11"
        options: {csum="true"}
Chassis node1
    hostname: VM-12-7-centos
    Encap geneve
        ip: "10.0.12.7"
        options: {csum="true"}
此时,两个节点上的ovn controller都已连接上南向数据库,ovn环境安装完毕:

简单实践
在做以下实验验证时需要注意MAC地址的合法性,不要误配置。
MAC地址分为三类:
- 广播地址(全F)
FF:FF:FF:FF:FF:FF- 主播地址(第一个字节为奇数)
X1:XX:XX:XX:XX:XX
X3:XX:XX:XX:XX:XX
X5:XX:XX:XX:XX:XX
X7:XX:XX:XX:XX:XX
X9:XX:XX:XX:XX:XX
XB:XX:XX:XX:XX:XX
XD:XX:XX:XX:XX:XX
XF:XX:XX:XX:XX:XX- 可用MAC地址(第一个字节为偶数)
X0:XX:XX:XX:XX:XX
X2:XX:XX:XX:XX:XX
X4:XX:XX:XX:XX:XX
X6:XX:XX:XX:XX:XX
X8:XX:XX:XX:XX:XX
XA:XX:XX:XX:XX:XX
XC:XX:XX:XX:XX:XX
XE:XX:XX:XX:XX:XX
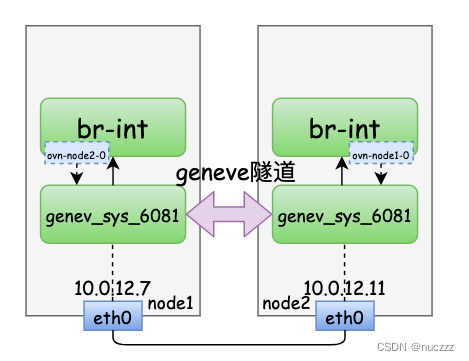
geneve隧道
在上面的安装步骤中,ovn controller连接南向数据库时,我们指定了external-ids:ovn-encap-type=geneve参数,此时看看两个节点上的ovs信息如下,我们会发现两个节点上都有一个ovn创建的ovs交换机br-int,而且br-int交换机上我们添加的节点port/interface类型为geneve:
// node1上查看ovs信息
# ovs-vsctl show
b3623bb4-3d3a-4474-8f63-fe11395ab09c
    Bridge br-int
        fail_mode: secure
        datapath_type: system
        Port br-int
            Interface br-int
                type: internal
        Port ovn-node2-0
            Interface ovn-node2-0
                type: geneve
                options: {csum="true", key=flow, remote_ip="10.0.12.11"}

// node2上查看ovs信息
# ovs-vsctl show
17aaf222-5a88-4416-a455-1663d9eeff57
    Bridge br-int
        fail_mode: secure
        datapath_type: system
        Port ovn-node1-0
            Interface ovn-node1-0
                type: geneve
                options: {csum="true", key=flow, remote_ip="10.0.12.7"}
        Port br-int
            Interface br-int
                type: internal

// 查看geneve隧道link
# ip link | grep gene
35: genev_sys_6081: <BROADCAST,MULTICAST,UP,LOWER_UP> mtu 65000 qdisc noqueue master ovs-system state UNKNOWN mode DEFAULT group default qlen 1000
// 查看geneve隧道link详情,从dstport 6081可以看出geneve隧道udp端口是6081
# ip -d link show genev_sys_6081
35: genev_sys_6081: <BROADCAST,MULTICAST,UP,LOWER_UP> mtu 65000 qdisc noqueue master ovs-system state UNKNOWN mode DEFAULT group default qlen 1000
    link/ether 86:96:05:1e:cf:ca brd ff:ff:ff:ff:ff:ff promiscuity 1
    geneve id 0 dstport 6081 external udp6zerocsumrx
    openvswitch_slave addrgenmode eui64 numtxqueues 1 numrxqueues 1 gso_max_size 65536 gso_max_segs 65535
// 查看geneve隧道udp端口,最后一列为“-”表示这个端口是内核态程序监听
# netstat -nulp|grep 6081
udp        0      0 0.0.0.0:6081            0.0.0.0:*                           -
udp6       0      0 :::6081                 :::*                                -
于是当前逻辑信息如下:
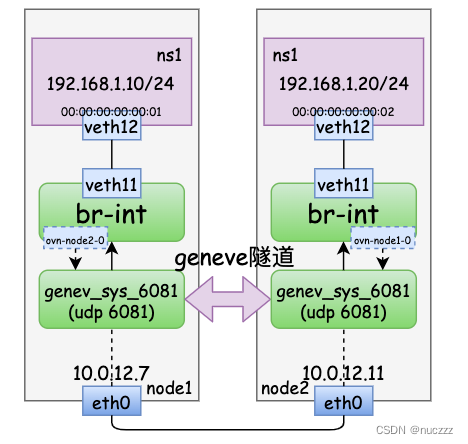
我们再在每个节点上创建一个ns1的网络命名空间,并且在ovs交换机上创建一组port和interfacce,然后把interface放到网络命名空间下:
// node1上执行
# ip netns add ns1
# ip link add veth11 type veth peer name veth12
# ip link set veth12 netns ns1
# ip link set veth11 up
# ip netns exec ns1 ip link set veth12 address 00:00:00:00:00:01
# ip netns exec ns1 ip link set veth12 up
# ovs-vsctl add-port br-int veth11
# ip netns exec ns1 ip addr add 192.168.1.10/24 dev veth12

// node2上执行,注意veth12的ip和和node1上veth12 ip在同一个子网
# ip netns add ns1
# ip link add veth11 type veth peer name veth12
# ip link set veth12 netns ns1
# ip link set veth11 up
# ip netns exec ns1 ip link set veth12 address 00:00:00:00:00:02
# ip netns exec ns1 ip link set veth12 up
# ovs-vsctl add-port br-int veth11
# ip netns exec ns1 ip addr add 192.168.1.20/24 dev veth12

// 查看node1上br-int交换机信息
# ovs-vsctl show
b3623bb4-3d3a-4474-8f63-fe11395ab09c
    Bridge br-int
        fail_mode: secure
        datapath_type: system
        Port br-int
            Interface br-int
                type: internal
        Port veth11
            Interface veth11
        Port ovn-node2-0
            Interface ovn-node2-0
                type: geneve
                options: {csum="true", key=flow, remote_ip="10.0.12.11"}

// node2上查看br-int信息
# ovs-vsctl show
17aaf222-5a88-4416-a455-1663d9eeff57
    Bridge br-int
        fail_mode: secure
        datapath_type: system
        Port ovn-node1-0
            Interface ovn-node1-0
                type: geneve
                options: {csum="true", key=flow, remote_ip="10.0.12.7"}
        Port br-int
            Interface br-int
                type: internal
        Port veth11
            Interface veth11

// 现在从node1上的ns1 ping node2上的ns1是不通的
// 因为它们是不同主机上的网络,二/三层广播域暂时还不可达
# ip netns exec ns1 ping -c 1 192.168.1.20
connect: 网络不可达
此时逻辑关系如下:
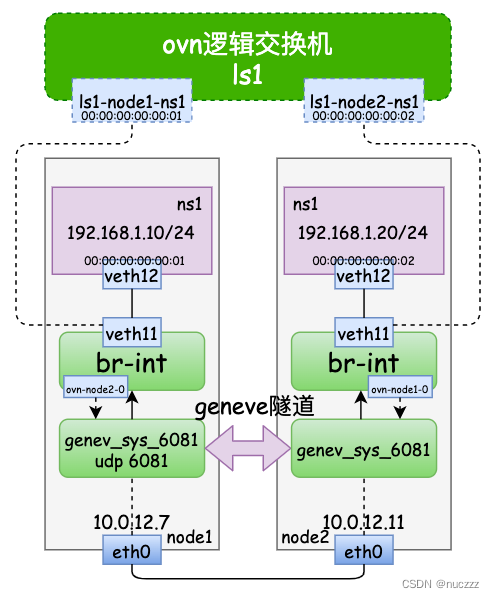
逻辑交换机(Logical Switch)
为了使node1和node2上两个连接到ovs交换机的ns能正常通信,我们借助ovn的逻辑交换机,注意逻辑交换机是北向数据库概念:
// 添加逻辑交换机
# ovn-nbctl ls-add ls1

// 添加并设置用于连接node1的端口,注意mac地址要和veth pair网络命名空间内的那端匹配起来
# ovn-nbctl lsp-add ls1 ls1-node1-ns1
# ovn-nbctl lsp-set-addresses ls1-node1-ns1 00:00:00:00:00:01
# ovn-nbctl lsp-set-port-security ls1-node1-ns1 00:00:00:00:00:01

// 添加并设置用于连接node2的端口,注意mac地址要匹配起来
# ovn-nbctl lsp-add ls1 ls1-node2-ns1
# ovn-nbctl lsp-set-addresses ls1-node2-ns1 00:00:00:00:00:02
# ovn-nbctl lsp-set-port-security ls1-node2-ns1 00:00:00:00:00:02

// 查看逻辑交换机信息
# ovn-nbctl show
switch d9bc0c6a-83cc-4919-a176-17e971e2f022 (ls1)
    port ls1-node2-ns1
        addresses: ["00:00:00:00:00:02"]
    port ls1-node1-ns1
        addresses: ["00:00:00:00:00:01"]

// node1上执行,veth11端口连接逻辑交换机端口
# ovs-vsctl set interface veth11 external-ids:iface-id=ls1-node1-ns1

// node2上执行,veth11端口连接逻辑交换机端口
# ovs-vsctl set interface veth11 external-ids:iface-id=ls1-node2-ns1

// 再次查看南向数据库信息,发现端口已连接
# ovn-sbctl show
Chassis node2
    hostname: VM-12-11-centos
    Encap geneve
        ip: "10.0.12.11"
        options: {csum="true"}
    Port_Binding ls1-node2-ns1
Chassis node1
    hostname: VM-12-7-centos
    Encap geneve
        ip: "10.0.12.7"
        options: {csum="true"}
    Port_Binding ls1-node1-ns1

// node1上验证网络连通性
# ip netns exec ns1 ping -c  1 192.168.1.20
PING 192.168.1.20 (192.168.1.20) 56(84) bytes of data.
64 bytes from 192.168.1.20: icmp_seq=1 ttl=64 time=1.11 ms
--- 192.168.1.20 ping statistics ---
1 packets transmitted, 1 received, 0% packet loss, time 0ms
rtt min/avg/max/mdev = 1.110/1.110/1.110/0.000 ms

// node2上验证网络连通性
# ip netns exec ns1 ping -c 1 192.168.1.10
PING 192.168.1.10 (192.168.1.10) 56(84) bytes of data.
64 bytes from 192.168.1.10: icmp_seq=1 ttl=64 time=0.785 ms
--- 192.168.1.10 ping statistics ---
1 packets transmitted, 1 received, 0% packet loss, time 0ms
rtt min/avg/max/mdev = 0.785/0.785/0.785/0.000 ms
此时逻辑关系如下图所示:
geneve隧道验证
我们基于上述从node1上的ns1 ping node2上的ns1的例子,抓包看看各个相关组件报文,验证geneve隧道封解包(不用关注打印时间,我这里是多次执行拿到的数据):
// node1上ns1 ping node2上ns1
# ip netns exec ns1 ping -c 1 192.168.1.20
PING 192.168.1.20 (192.168.1.20) 56(84) bytes of data.
64 bytes from 192.168.1.20: icmp_seq=1 ttl=64 time=1.00 ms
--- 192.168.1.20 ping statistics ---
1 packets transmitted, 1 received, 0% packet loss, time 0ms
rtt min/avg/max/mdev = 1.009/1.009/1.009/0.000 ms

// node1上ns1中的veth12抓包
# ip netns exec ns1 tcpdump -i veth12 -n
tcpdump: verbose output suppressed, use -v or -vv for full protocol decode
listening on veth12, link-type EN10MB (Ethernet), capture size 262144 bytes
22:23:11.364011 IP 192.168.1.10 > 192.168.1.20: ICMP echo request, id 24275, seq 1, length 64
22:23:11.365000 IP 192.168.1.20 > 192.168.1.10: ICMP echo reply, id 24275, seq 1, length 64
22:23:16.364932 ARP, Request who-has 192.168.1.20 tell 192.168.1.10, length 28
22:23:16.365826 ARP, Reply 192.168.1.20 is-at 00:00:00:00:00:02, length 28

// node1上veth12的另一端veth11抓包
# tcpdump -i veth11 -n
tcpdump: verbose output suppressed, use -v or -vv for full protocol decode
listening on veth11, link-type EN10MB (Ethernet), capture size 262144 bytes
22:25:11.225987 IP 192.168.1.10 > 192.168.1.20: ICMP echo request, id 25166, seq 1, length 64
22:25:11.226914 IP 192.168.1.20 > 192.168.1.10: ICMP echo reply, id 25166, seq 1, length 64
22:25:16.236933 ARP, Request who-has 192.168.1.20 tell 192.168.1.10, length 28
22:25:16.237563 ARP, Request who-has 192.168.1.10 tell 192.168.1.20, length 28
22:25:16.237627 ARP, Reply 192.168.1.10 is-at 00:00:00:00:00:01, length 28
22:25:16.237649 ARP, Reply 192.168.1.20 is-at 00:00:00:00:00:02, length 28

// node1上genev_sys_6081网卡抓包
# tcpdump -i genev_sys_6081 -n
tcpdump: verbose output suppressed, use -v or -vv for full protocol decode
listening on genev_sys_6081, link-type EN10MB (Ethernet), capture size 262144 bytes
22:28:15.872064 IP 192.168.1.10 > 192.168.1.20: ICMP echo request, id 26492, seq 1, length 64
22:28:15.872717 IP 192.168.1.20 > 192.168.1.10: ICMP echo reply, id 26492, seq 1, length 64
22:28:20.877100 ARP, Request who-has 192.168.1.20 tell 192.168.1.10, length 28
22:28:20.877640 ARP, Request who-has 192.168.1.10 tell 192.168.1.20, length 28
22:28:20.877654 ARP, Reply 192.168.1.20 is-at 00:00:00:00:00:02, length 28
22:28:20.877737 ARP, Reply 192.168.1.10 is-at 00:00:00:00:00:01, length 28

// node1上eth0抓包,可以看出数据包经过genev_sys_6081后做了geneve封装
# tcpdump -i eth0 port 6081 -n
tcpdump: verbose output suppressed, use -v or -vv for full protocol decode
listening on eth0, link-type EN10MB (Ethernet), capture size 262144 bytes
22:30:23.446147 IP 10.0.12.7.51123 > 10.0.12.11.6081: Geneve, Flags [C], vni 0x1, options [8 bytes]: IP 192.168.1.10 > 192.168.1.20: ICMP echo request, id 27458, seq 1, length 64
22:30:23.446659 IP 10.0.12.11.50319 > 10.0.12.7.6081: Geneve, Flags [C], vni 0x1, options [8 bytes]: IP 192.168.1.20 > 192.168.1.10: ICMP echo reply, id 27458, seq 1, length 64
22:30:28.461137 IP 10.0.12.7.49958 > 10.0.12.11.6081: Geneve, Flags [C], vni 0x1, options [8 bytes]: ARP, Request who-has 192.168.1.20 tell 192.168.1.10, length 28
22:30:28.461554 IP 10.0.12.11.61016 > 10.0.12.7.6081: Geneve, Flags [C], vni 0x1, options [8 bytes]: ARP, Request who-has 192.168.1.10 tell 192.168.1.20, length 28
22:30:28.461571 IP 10.0.12.11.61016 > 10.0.12.7.6081: Geneve, Flags [C], vni 0x1, options [8 bytes]: ARP, Reply 192.168.1.20 is-at 00:00:00:00:00:02, length 28
22:30:28.461669 IP 10.0.12.7.49958 > 10.0.12.11.6081: Geneve, Flags [C], vni 0x1, options [8 bytes]: ARP, Reply 192.168.1.10 is-at 00:00:00:00:00:01, length 28

===================跨主机===================

// node2上eth0抓包
# tcpdump -i eth0 port 6081 -n
tcpdump: verbose output suppressed, use -v or -vv for full protocol decode
listening on eth0, link-type EN10MB (Ethernet), capture size 262144 bytes
22:23:11.364189 IP 10.0.12.7.51123 > 10.0.12.11.6081: Geneve, Flags [C], vni 0x1, options [8 bytes]: IP 192.168.1.10 > 192.168.1.20: ICMP echo request, id 24275, seq 1, length 64
22:23:11.364662 IP 10.0.12.11.50319 > 10.0.12.7.6081: Geneve, Flags [C], vni 0x1, options [8 bytes]: IP 192.168.1.20 > 192.168.1.10: ICMP echo reply, id 24275, seq 1, length 64
22:23:16.365086 IP 10.0.12.7.49958 > 10.0.12.11.6081: Geneve, Flags [C], vni 0x1, options [8 bytes]: ARP, Request who-has 192.168.1.20 tell 192.168.1.10, length 28
22:23:16.365487 IP 10.0.12.11.61016 > 10.0.12.7.6081: Geneve, Flags [C], vni 0x1, options [8 bytes]: ARP, Reply 192.168.1.20 is-at 00:00:00:00:00:02, length 28

// node2上genev_sys_6081网卡抓包,可以看到数据包从genev_sys_6081出来后做了geneve解封
# tcpdump -i genev_sys_6081 -n
tcpdump: verbose output suppressed, use -v or -vv for full protocol decode
listening on genev_sys_6081, link-type EN10MB (Ethernet), capture size 262144 bytes
22:25:11.226186 IP 192.168.1.10 > 192.168.1.20: ICMP echo request, id 25166, seq 1, length 64
22:25:11.226553 IP 192.168.1.20 > 192.168.1.10: ICMP echo reply, id 25166, seq 1, length 64
22:25:16.237070 ARP, Request who-has 192.168.1.20 tell 192.168.1.10, length 28
22:25:16.237162 ARP, Request who-has 192.168.1.10 tell 192.168.1.20, length 28
22:25:16.237203 ARP, Reply 192.168.1.20 is-at 00:00:00:00:00:02, length 28
22:25:16.237523 ARP, Reply 192.168.1.10 is-at 00:00:00:00:00:01, length 28

// node2上veth11抓包
# tcpdump -i veth11 -n
tcpdump: verbose output suppressed, use -v or -vv for full protocol decode
listening on veth11, link-type EN10MB (Ethernet), capture size 262144 bytes
22:28:15.872198 IP 192.168.1.10 > 192.168.1.20: ICMP echo request, id 26492, seq 1, length 64
22:28:15.872235 IP 192.168.1.20 > 192.168.1.10: ICMP echo reply, id 26492, seq 1, length 64
22:28:20.876913 ARP, Request who-has 192.168.1.10 tell 192.168.1.20, length 28
22:28:20.877274 ARP, Request who-has 192.168.1.20 tell 192.168.1.10, length 28
22:28:20.877287 ARP, Reply 192.168.1.20 is-at 00:00:00:00:00:02, length 28
22:28:20.877613 ARP, Reply 192.168.1.10 is-at 00:00:00:00:00:01, length 28

// node2上ns1中的veth12抓包
# ip netns exec ns1 tcpdump -i veth12 -n
tcpdump: verbose output suppressed, use -v or -vv for full protocol decode
listening on veth12, link-type EN10MB (Ethernet), capture size 262144 bytes
22:30:23.446212 IP 192.168.1.10 > 192.168.1.20: ICMP echo request, id 27458, seq 1, length 64
22:30:23.446242 IP 192.168.1.20 > 192.168.1.10: ICMP echo reply, id 27458, seq 1, length 64
22:30:28.460912 ARP, Request who-has 192.168.1.10 tell 192.168.1.20, length 28
22:30:28.461260 ARP, Request who-has 192.168.1.20 tell 192.168.1.10, length 28
22:30:28.461272 ARP, Reply 192.168.1.20 is-at 00:00:00:00:00:02, length 28
22:30:28.461530 ARP, Reply 192.168.1.10 is-at 00:00:00:00:00:01, length 28
通过上面的抓包分析,我们可以看出geneve隧道在ovn/ovs跨主机通信的重要作用,同时也能看到ovn逻辑交换机可以把不同宿主机上的二层网络打通,或者说ovn逻辑交换机可以把ovs二层广播域扩展到跨主机。
逻辑路由器(Logical Router)
前面我们验证了ovn逻辑交换机跨主机同子网的通信,那不同子网间又该如何通信呢?这就要用到ovn的逻辑路由器了。
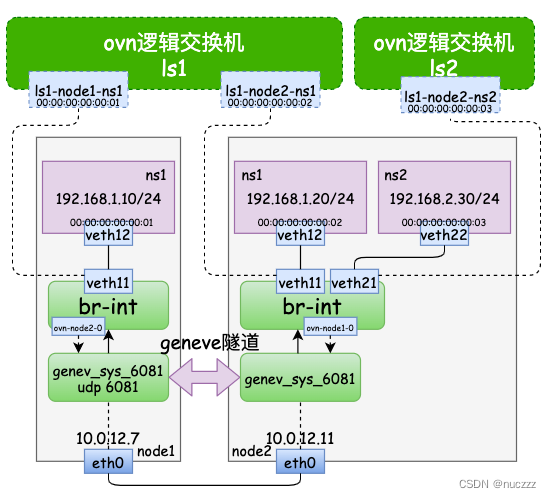
我们先在node2上再创建个网络命名空间ns2,ip设置为另外一个子网192.168.2.30/24,并且再增加一个逻辑交换机。逻辑如下图所示:
// node2上执行
# ip netns add ns2
# ip link add veth21 type veth peer name veth22
# ip link set veth22 netns ns2
# ip link set veth21 up
# ip netns exec ns2 ip link set veth22 address 00:00:00:00:00:03
# ip netns exec ns2 ip link set veth22 up
# ovs-vsctl add-port br-int veth21
# ip netns exec ns2 ip addr add 192.168.2.30/24 dev veth22

// node1上用ovn命令新增一个逻辑交换机,并配置好端口
# ovn-nbctl ls-add ls2
# ovn-nbctl lsp-add ls2 ls2-node2-ns2
# ovn-nbctl lsp-set-addresses ls2-node2-ns2 00:00:00:00:00:03
# ovn-nbctl lsp-set-port-security ls2-node2-ns2 00:00:00:00:00:03

// node2上ovs交换机端口和ovn逻辑交换机端口匹配起来
# ovs-vsctl set interface veth21 external-ids:iface-id=ls2-node2-ns2

// 查看北向数据库和南向数据库信息
# ovn-nbctl show
switch d9bc0c6a-83cc-4919-a176-17e971e2f022 (ls1)
    port ls1-node2-ns1
        addresses: ["00:00:00:00:00:02"]
    port ls1-node1-ns1
        addresses: ["00:00:00:00:00:01"]
switch f91f1342-21c7-41e5-a30d-21d930dd626a (ls2)
    port ls2-node2-ns2
        addresses: ["00:00:00:00:00:03"]
# ovn-sbctl show
Chassis node2
    hostname: VM-12-11-centos
    Encap geneve
        ip: "10.0.12.11"
        options: {csum="true"}
    Port_Binding ls2-node2-ns2
    Port_Binding ls1-node2-ns1
Chassis node1
    hostname: VM-12-7-centos
    Encap geneve
        ip: "10.0.12.7"
        options: {csum="true"}
    Port_Binding ls1-node1-ns1
创建ovn逻辑路由器连接两个逻辑交换机:
// 添加逻辑路由器
# ovn-nbctl lr-add lr1
// 逻辑路由器添加连接交换机ls1的端口
# ovn-nbctl lrp-add lr1 lr1-ls1 00:00:00:00:11:00 192.168.1.1/24
// 逻辑路由器添加连接交换机ls2的端口
# ovn-nbctl lrp-add lr1 lr1-ls2 12:00:00:00:12:00 192.168.2.1/24

// 逻辑路由器连接逻辑交换机ls1
# ovn-nbctl lsp-add ls1 ls1-lr1
# ovn-nbctl lsp-set-type ls1-lr1 router
# ovn-nbctl lsp-set-addresses ls1-lr1 00:00:00:00:11:00
# ovn-nbctl lsp-set-options ls1-lr1 router-port=lr1-ls1

// 逻辑路由器连接逻辑交换机ls2
# ovn-nbctl lsp-add ls2 ls2-lr1
# ovn-nbctl lsp-set-type ls2-lr1 router
# ovn-nbctl lsp-set-addresses ls2-lr1 00:00:00:00:12:00
# ovn-nbctl lsp-set-options ls2-lr1 router-port=lr1-ls2

// 查看北向数据库和南向数据库信息
# ovn-nbctl show
switch d9bc0c6a-83cc-4919-a176-17e971e2f022 (ls1)
    port ls1-lr1
        type: router
        addresses: ["00:00:00:00:11:00"]
        router-port: lr1-ls1
    port ls1-node2-ns1
        addresses: ["00:00:00:00:00:02"]
    port ls1-node1-ns1
        addresses: ["00:00:00:00:00:01"]
switch f91f1342-21c7-41e5-a30d-21d930dd626a (ls2)
    port ls2-lr1
        type: router
        addresses: ["00:00:00:00:12:00"]
        router-port: lr1-ls2
    port ls2-node2-ns2
        addresses: ["00:00:00:00:00:03"]
router 288624e0-1cff-49e9-b296-42a491b2ac5c (lr1)
    port lr1-ls2
        mac: "00:00:00:00:12:00"
        networks: ["192.168.2.1/24"]
    port lr1-ls1
        mac: "00:00:00:00:12:00"
        networks: ["192.168.1.1/24"]
# ovn-sbctl show
Chassis node2
    hostname: VM-12-11-centos
    Encap geneve
        ip: "10.0.12.11"
        options: {csum="true"}
    Port_Binding ls2-node2-ns2
    Port_Binding ls1-node2-ns1
Chassis node1
    hostname: VM-12-7-centos
    Encap geneve
        ip: "10.0.12.7"
        options: {csum="true"}
    Port_Binding ls1-node1-ns1
此时逻辑关系如下图所示:
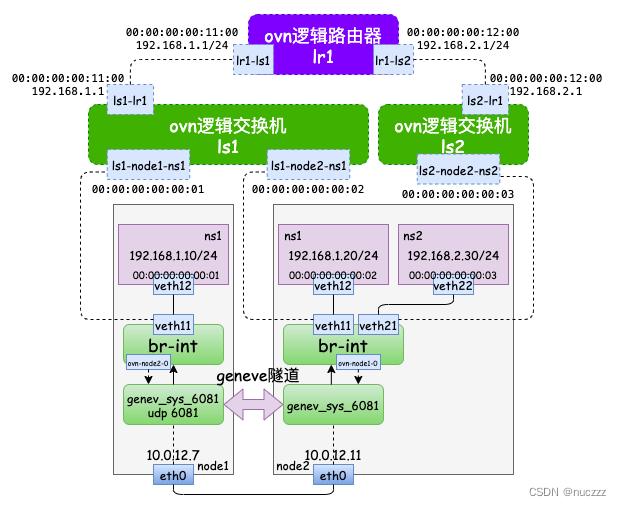
从node1的ns1(192.168.1.10/24) ping node2的ns2(192.168.2.30),验证跨节点不同子网的连通性:
# ip netns exec ns1 ping -c 1 192.168.2.30
connect: 网络不可达
# 查看ns1上的路由配置,显然此时没有到192.168.2.0/24网段的路由
# ip netns exec ns1 ip route show
# ip netns exec ns1 route -n
Kernel IP routing table
Destination     Gateway         Genmask         Flags Metric Ref    Use Iface
192.168.1.0     0.0.0.0         255.255.255.0   U     0      0        0 veth12
因为路由器是三层概念,我们先给ovs的相关port配置上ip:
# ovn-nbctl lsp-set-addresses ls1-node1-ns1 "00:00:00:00:00:01 192.168.1.10"
# ovn-nbctl lsp-set-addresses ls1-node2-ns1 "00:00:00:00:00:02 192.168.1.20"
# ovn-nbctl lsp-set-addresses ls2-node2-ns2 "00:00:00:00:00:03 192.168.2.30"
再给三个网络命名空间添加默认路由,网关为ovn逻辑路由器对应的port ip:
// node1上ns1
# ip netns exec ns1 ip route add default via 192.168.1.1 dev veth12

// node2上ns1
# ip netns exec ns1 ip route add default via 192.168.1.1 dev veth12

// node2上ns2
# ip netns exec ns2 ip route add default via 192.168.2.1
dev veth22
再次查看下南北向数据库信息:
# ovn-nbctl show
switch d9bc0c6a-83cc-4919-a176-17e971e2f022 (ls1)
    port ls1-lr1
        type: router
        addresses: ["00:00:00:00:11:00 192.168.1.1"]
        router-port: lr1-ls1
    port ls1-node2-ns1
        addresses: ["00:00:00:00:00:02 192.168.1.20"]
    port ls1-node1-ns1
        addresses: ["00:00:00:00:00:01 192.168.1.10"]
switch f91f1342-21c7-41e5-a30d-21d930dd626a (ls2)
    port ls2-lr1
        type: router
        addresses: ["00:00:00:00:12:00 192.168.2.1"]
        router-port: lr1-ls2
    port ls2-node2-ns2
        addresses: ["00:00:00:00:00:03 192.168.2.30"]
router 288624e0-1cff-49e9-b296-42a491b2ac5c (lr1)
    port lr1-ls2
        mac: "00:00:00:00:12:00"
        networks: ["192.168.2.1/24"]
    port lr1-ls1
        mac: "00:00:00:00:11:00"
        networks: ["192.168.1.1/24"]

# ovn-sbctl show
Chassis node2
    hostname: VM-12-11-centos
    Encap geneve
        ip: "10.0.12.11"
        options: {csum="true"}
    Port_Binding ls2-node2-ns2
    Port_Binding ls1-node2-ns1
Chassis node1
    hostname: VM-12-7-centos
    Encap geneve
        ip: "10.0.12.7"
        options: {csum="true"}
    Port_Binding ls1-node1-ns1
于是此时有如下逻辑关系:
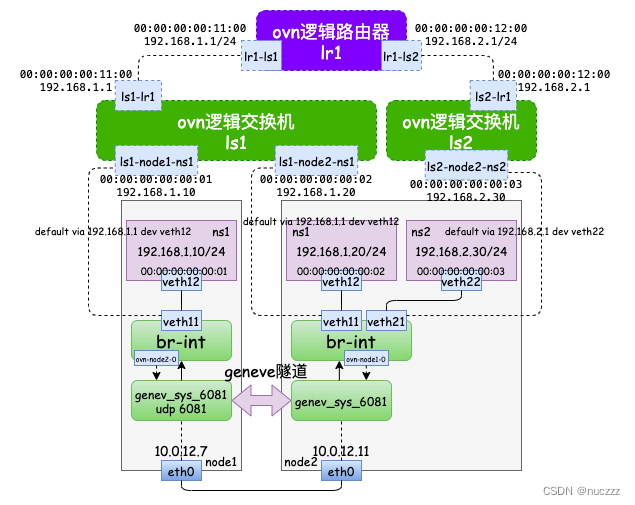
验证网络连通性:
// node1上ns1连通网关
# ip netns exec ns1 ping -c 1 192.168.1.1
PING 192.168.1.1 (192.168.1.1) 56(84) bytes of data.
64 bytes from 192.168.1.1: icmp_seq=1 ttl=254 time=0.250 ms
--- 192.168.1.1 ping statistics ---
1 packets transmitted, 1 received, 0% packet loss, time 0ms
rtt min/avg/max/mdev = 0.250/0.250/0.250/0.000 ms

// node2上ns2连通网关
# ip netns exec ns2 ping -c 1 192.168.2.1
PING 192.168.2.1 (192.168.2.1) 56(84) bytes of data.
64 bytes from 192.168.2.1: icmp_seq=1 ttl=254 time=0.516 ms
--- 192.168.2.1 ping statistics ---
1 packets transmitted, 1 received, 0% packet loss, time 0ms
rtt min/avg/max/mdev = 0.516/0.516/0.516/0.000 ms

// node1上ns1 ping node2上ns2
# ip netns exec ns1 ping -c 1 192.168.2.30
PING 192.168.2.30 (192.168.2.30) 56(84) bytes of data.
64 bytes from 192.168.2.30: icmp_seq=1 ttl=63 time=1.23 ms
--- 192.168.2.30 ping statistics ---
1 packets transmitted, 1 received, 0% packet loss, time 0ms
rtt min/avg/max/mdev = 1.239/1.239/1.239/0.000 ms
总结
本文简单验证了ovn逻辑交换机和逻辑路由器的功能。需要注意的是,ovn逻辑交换机/逻辑路由器是北向数据库概念,经过ovn-northd“翻译”到了南向数据库中,再通过hypervisor上的ovn-controller同步到ovs/ovsdb-server,最终形成ovs的port和流表等数据。
在本文中,ovn逻辑交换机通过geneve隧道,把二层广播域扩展到了不同主机上的ovs;而ovn逻辑路由器则是把三层广播域扩展到了不同主机上的ovs,从而实现跨主机的网络通信。
ovn逻辑交换机和ovn逻辑路由器都会在所有的hypervisor中生成对应的流表数据,这也是ovn网络高可用以及解决文章开头提到实例迁移等问题的原理。限于篇幅和能力,本文未对流表这部分内容做过多展开,有待读者自行分析。
微信公众号卡巴斯同步发布,欢迎大家关注。


 1572
1572


 被折叠的 条评论
为什么被折叠?
被折叠的 条评论
为什么被折叠?
 到【灌水乐园】发言


