


简介
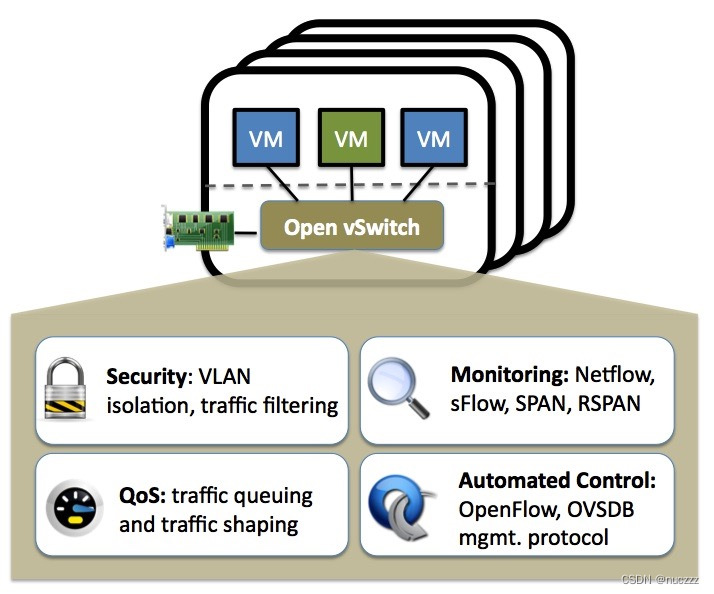
OVS(Open vSwitch)是在开源 Apache 2.0 许可下获得许可的生产级多层虚拟交换机。它旨在通过编程扩展实现大规模网络自动化,同时仍支持标准管理接口和协议(例如 NetFlow、sFlow、IPFIX、RSPAN、CLI、LACP、802.1ag)。此外,它旨在支持跨多个物理服务器的分布,类似于 VMware 的 vNetwork 分布式 vswitch 或 Cisco 的 Nexus 1000V。常在SDN(Software Defined Network,软件定义网络)领域能看到ovs的身影。
原理
组件
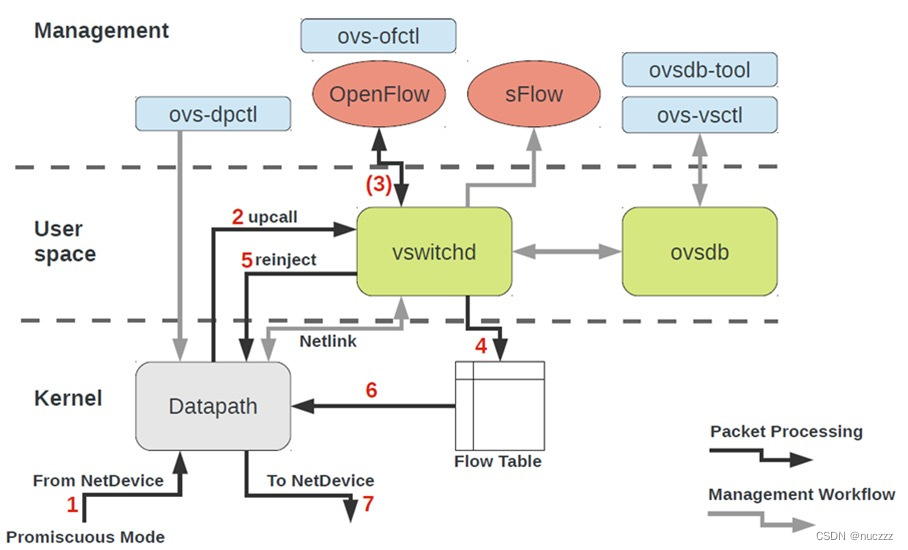
ovs由三个组件组成:dataPath、vswitchd和ovsdb。
- dataPath(opevswitch.ko)
openvswitch.ko是ovs的内核模块,当openvswitch.ko模块被加载到内核时,会在网卡上注册一个钩子函数,每当网络包到达网卡时这个钩子函数就会被调用。openvswitch.ko模块在处理网络包时,会先匹配内核中能不能匹配到策略(内核流表)来处理,如果匹配到了策略,则直接在内核态根据该策略做网络包转发,这个过程全程在内核中完成,处理速度非常快,也称之为fast path(快速通道);如果内核中没有匹配到相应策略,则把数据包交给用户态的vswitchd进程处理,此时叫作slow path(慢通道)。dataPath模块可以通过ovs-dpctl命令来配置。
- vswitchd
vswitchd是ovs的核心模块,它工作在用户空间(user space),负责与OpenFlow控制器、第三方软件通信。vswitchd接收到数据包时,会去匹配用户态流表,如果匹配成功则根据相关规则转发;如果匹配不成功,则会根据OpenFlow协议规范处理,把数据包上报给控制器(如果有)或者丢弃。
- ovsdb
ovs数据库,存储整个ovs的配置信息,包括接口、交换内容、vlan、虚拟交换机信息等。
术语
ovs有很多术语,我们选取一些常见的术语做解释。
- Bridge
网桥,也就是交换机(不过是虚拟的,即vSwitch),一台主机中可以创建多个网桥。当数据包从网桥的某个端口进来后,网桥会根据一定的规则把该数据包转发到另外的端口,也可以修改或者丢弃报文。
- Port
交换机的端口,有以下几种类型:
Normal: 将物理网卡添加到bridge时它们会成为Port,类型为Normal。此时物理网卡配置ip已没有意义,它已经“退化成一根网线”只负责数据报文的进出。Normal类型的Port常用于vlan模式下多台物理主机相连的那个口,交换机的一端属于Trunk模式。Internal: 此类型的Port,ovs会自动创建一个虚拟网卡接口(Interface),此端口收到数据都会转发给这块网卡,从网卡发出的数据也会通过Port交给ovs处理。当ovs创建一个新的Bridge时,会自动创建一个与网桥同名的Internal Port,同时也会创建一个与网桥同名的Interface。另外,Internal Port可配置IP地址,然后将其up,即可实现ovs三层网络。Patch: 与veth pair功能类似,常用于连接两个Bridge。Tunnel: 实现overlay网络,支持GRE、vxlan、STT、Geneve和IPSec等隧道协议。
- Interface
网卡,虚拟的(TUN/TAP)或物理的都可以。
- Controller
控制器,ovs可以接收一个或多个OpenFlow控制器的管理,主要功能为下发流表来控制转发规则。
- FlowTable
流表,ovs进行数据转发的核心功能,定义了端口之间的转发数据规则。每条流表规则可以分为匹配和动作两部分,“匹配”决定哪些数据将被处理,“动作”则决定了这些数据将被如何处理。
安装
以官网tar包安装方式为例,来看看ovs的安装过程。安装前先看看机器信息:
# uname -a
Linux VM-12-7-centos 3.10.0-1160.45.1.el7.x86_64 #1 SMP Wed Oct 13 17:20:51 UTC 2021 x86_64 x86_64 x86_64 GNU/Linux
下载
ovs官网下载对应版本tar包:https://www.openvswitch.org/download/,本文以当前最新版本的ovs:https://www.openvswitch.org/releases/openvswitch-2.17.2.tar.gz
上传并解压
上传ovs压缩包到rpm对应目录下并解压:
# mkdir -p ~/rpmbuild/SOURCES
// 拷贝ovs tar包到~/rpmbuild/SOURCES目录下
# cd ~/rpmbuild/SOURCES/
# ls
openvswitch-2.17.2.tar.gz
# tar -zvxf openvswitch-2.17.2.tar.gz
安装依赖
# yum install wget openssl-devel python-sphinx gcc make python-devel openssl-devel kernel-devel graphviz kernel-debug-devel autoconf automake rpm-build redhat-rpm-config libtool python-twisted-core python-zope-interface PyQt4 desktop-file-utils libcap-ng-devel groff checkpolicy selinux-policy-devel gcc-c++ python-six unbound unbound-devel python3-devel python3-sphinx -y
构建rpm包
# pwd
/root/rpmbuild/SOURCES
# rpmbuild -bb --nocheck openvswitch-2.17.2/rhel/openvswitch-fedora.spec
yum安装
# yum localinstall ~/rpmbuild/RPMS/x86_64/openvswitch-2.17.2-1.el7.x86_64.rpm -y
安装验证
# ovs-vsctl --version
ovs-vsctl (Open vSwitch) 2.17.2
DB Schema 8.3.0
启动并验证
# systemctl enable openvswitch
Created symlink from /etc/systemd/system/multi-user.target.wants/openvswitch.service to /usr/lib/systemd/system/openvswitch.service.
# systemctl start openvswitch
# ps -ef | grep openvswitch
openvsw+ 13719     1  0 17:21 ?        00:00:00 ovsdb-server /etc/openvswitch/conf.db -vconsole:emer -vsyslog:err -vfile:info --remote=punix:/var/run/openvswitch/db.sock --private-key=db:Open_vSwitch,SSL,private_key --certificate=db:Open_vSwitch,SSL,certificate --bootstrap-ca-cert=db:Open_vSwitch,SSL,ca_cert --user openvswitch:openvswitch --no-chdir --log-file=/var/log/openvswitch/ovsdb-server.log --pidfile=/var/run/openvswitch/ovsdb-server.pid --detach
openvsw+ 13795     1  0 17:21 ?        00:00:00 ovs-vswitchd unix:/var/run/openvswitch/db.sock -vconsole:emer -vsyslog:err -vfile:info --mlockall --user openvswitch:openvswitch --no-chdir --log-file=/var/log/openvswitch/ovs-vswitchd.log --pidfile=/var/run/openvswitch/ovs-vswitchd.pid --detach
root     14073 27590  0 17:22 pts/1    00:00:00 grep --color=auto openvswitch
# ovs-vsctl show
a42fb670-8260-4a09-9af6-b28a5382adb3
    ovs_version: "2.17.2"
简单实践
创建ovs交换机
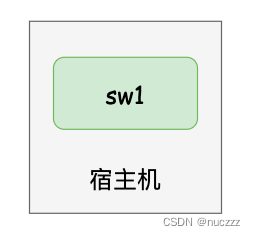
我们在宿主机上创建一个名为sw1的ovs交换机:
# ovs-vsctl add-br sw1
# ovs-vsctl list-br
sw1
# ovs-vsctl show
a42fb670-8260-4a09-9af6-b28a5382adb3
    Bridge sw1
        Port sw1
            Interface sw1
                type: internal
    ovs_version: "2.17.2"
简单访问

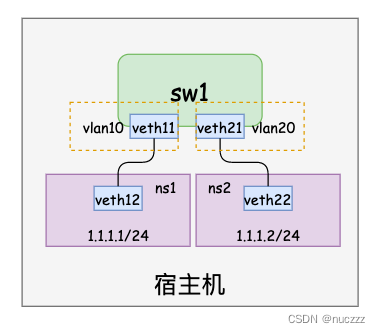
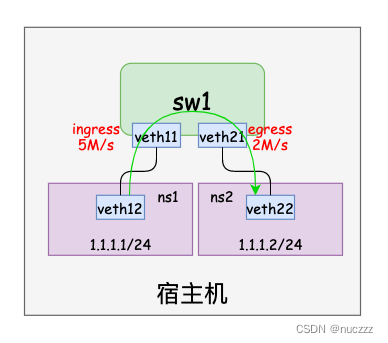
我们在宿主机上用网络命名空间代替访问节点,如下图所示,网络命名空间通过veth pair与ovs交换机连接,配置好ip并验证连通性。
// 创建两个网络命名空间
# ip netns add ns1
# ip netns add ns2
# ip netns show
ns2
ns1


// 创建两个veth pair,并分别把这两个veth pair的一端放到上述两个网络命名空间
// 第一个网络命名空间配置
# ip link add veth11 type veth peer name veth12
# ip link set veth12 netns ns1
# ip link set veth11 up
# ip netns exec ns1 ip link set veth12 up
// 第二个网络网名空间配置
# ip link add veth21 type veth peer name veth22
# ip link set veth22 netns ns2
# ip link set veth21 up
# ip netns exec ns2 ip link set veth22 up


// 把veth11和veth21插到ovs交换机上
# ovs-vsctl add-port sw1 veth11
# ovs-vsctl add-port sw1 veth21
# ovs-vsctl show
a42fb670-8260-4a09-9af6-b28a5382adb3
    Bridge sw1
        Port veth21
            Interface veth21
        Port sw1
            Interface sw1
                type: internal
        Port veth11
            Interface veth11
    ovs_version: "2.17.2"


// 网络命名空间内配置ip
// ns1配置ip
# ip netns exec ns1 ip addr add 1.1.1.1/24 dev veth12
# ip netns exec ns1 ifconfig veth12
veth12: flags=4163<UP,BROADCAST,RUNNING,MULTICAST>  mtu 1500
        inet 1.1.1.1  netmask 255.255.255.0  broadcast 0.0.0.0
        inet6 fe80::8c75:26ff:fe3a:74c0  prefixlen 64  scopeid 0x20<link>
        ether 8e:75:26:3a:74:c0  txqueuelen 1000  (Ethernet)
        RX packets 8  bytes 656 (656.0 B)
        RX errors 0  dropped 0  overruns 0  frame 0
        TX packets 8  bytes 656 (656.0 B)
        TX errors 0  dropped 0 overruns 0  carrier 0  collisions 0

// ns2配置ip
# ip netns exec ns2 ip addr add 1.1.1.2/24 dev veth22
# ip netns exec ns2 ifconfig veth22
veth22: flags=4163<UP,BROADCAST,RUNNING,MULTICAST>  mtu 1500
        inet 1.1.1.2  netmask 255.255.255.0  broadcast 0.0.0.0
        inet6 fe80::784e:6bff:feb0:68e  prefixlen 64  scopeid 0x20<link>
        ether 7a:4e:6b:b0:06:8e  txqueuelen 1000  (Ethernet)
        RX packets 8  bytes 656 (656.0 B)
        RX errors 0  dropped 0  overruns 0  frame 0
        TX packets 8  bytes 656 (656.0 B)
        TX errors 0  dropped 0 overruns 0  carrier 0  collisions 0


// 验证连通性
// ns1 ping ns2
# ip netns exec ns1 ping -c 1 1.1.1.2
PING 1.1.1.2 (1.1.1.2) 56(84) bytes of data.
64 bytes from 1.1.1.2: icmp_seq=1 ttl=64 time=0.350 ms
--- 1.1.1.2 ping statistics ---
1 packets transmitted, 1 received, 0% packet loss, time 0ms
rtt min/avg/max/mdev = 0.350/0.350/0.350/0.000 ms

// ns2 ping ns1
# ip netns exec ns2 ping -c 1 1.1.1.1
PING 1.1.1.1 (1.1.1.1) 56(84) bytes of data.
64 bytes from 1.1.1.1: icmp_seq=1 ttl=64 time=0.044 ms
--- 1.1.1.1 ping statistics ---
1 packets transmitted, 1 received, 0% packet loss, time 0ms
rtt min/avg/max/mdev = 0.044/0.044/0.044/0.000 ms
vlan隔离
基于前面的环境,我们把插在ovs交换机上的两个虚拟网络设备对端口分别打上不同的tag(默认是0),也就是配置到不同的vlan里,再验证网络连通性:
# ovs-vsctl show
a42fb670-8260-4a09-9af6-b28a5382adb3
    Bridge sw1
        Port veth21
            Interface veth21
        Port sw1
            Interface sw1
                type: internal
        Port veth11
            Interface veth11
    ovs_version: "2.17.2"
// 设置两个端口的vlan tag
# ovs-vsctl set port veth11 tag=10
# ovs-vsctl set port veth21 tag=20

// 验证连通性
// ns1 ping ns2,vlan tag不同,不能通信
# ip netns exec ns1 ping -c 1 1.1.1.2
PING 1.1.1.2 (1.1.1.2) 56(84) bytes of data.
^C
--- 1.1.1.2 ping statistics ---
1 packets transmitted, 0 received, 100% packet loss, time 0ms

// ns2 ping ns1,vlan tag不同,不能通信
# ip netns exec ns2 ping -c 1 1.1.1.1
PING 1.1.1.1 (1.1.1.1) 56(84) bytes of data.
^C
--- 1.1.1.1 ping statistics ---
1 packets transmitted, 0 received, 100% packet loss, time 0ms
流表
我们先把上述两个ovs端口的vlan tag再改为0,使得两个网名命名空间可以通信:
# ovs-vsctl set port veth11 tag=0
# ovs-vsctl set port veth21 tag=0
# ip netns exec ns1 ping -c 1 1.1.1.2
PING 1.1.1.2 (1.1.1.2) 56(84) bytes of data.
64 bytes from 1.1.1.2: icmp_seq=1 ttl=64 time=0.301 ms
--- 1.1.1.2 ping statistics ---
1 packets transmitted, 1 received, 0% packet loss, time 0ms
rtt min/avg/max/mdev = 0.301/0.301/0.301/0.000 ms
# ip netns exec ns2 ping -c 1 1.1.1.1
PING 1.1.1.1 (1.1.1.1) 56(84) bytes of data.
64 bytes from 1.1.1.1: icmp_seq=1 ttl=64 time=0.226 ms

--- 1.1.1.1 ping statistics ---
1 packets transmitted, 1 received, 0% packet loss, time 0ms
rtt min/avg/max/mdev = 0.226/0.226/0.226/0.000 ms
看看此时ovs默认的流表:
# ovs-ofctl dump-flows sw1
 cookie=0x0, duration=2373.019s, table=0, n_packets=28, n_bytes=1736, priority=0 actions=NORMAL
此时ovs就类似于传统交换机,我们给ovs交换机添加一条优先级为2(数字越大优先级越高,高于默认表项的0优先级)的流表项,把veth11进来的请求都drop掉,看看ns1是否还能ping通ns2:
# ovs-ofctl add-flow sw1 "priority=2,in_port=veth11,actions=drop"
# ovs-ofctl dump-flows sw1
 cookie=0x0, duration=19.327s, table=0, n_packets=0, n_bytes=0, priority=2,in_port=veth11 actions=drop
 cookie=0x0, duration=4738.907s, table=0, n_packets=28, n_bytes=1736, priority=0 actions=NORMAL

// 再看看ns1与ns2的连通性,连接不通
# ip netns exec ns1 ping -c 1 1.1.1.2
PING 1.1.1.2 (1.1.1.2) 56(84) bytes of data.
^C
--- 1.1.1.2 ping statistics ---
1 packets transmitted, 0 received, 100% packet loss, time 0ms

// 删除该表项,ns1与ns2又能正常通信
# ovs-ofctl del-flows sw1 "in_port=veth11"
# ovs-ofctl dump-flows sw1
 cookie=0x0, duration=5369.839s, table=0, n_packets=28, n_bytes=1736, priority=0 actions=NORMAL
# ip netns exec ns1 ping -c 1 1.1.1.2
PING 1.1.1.2 (1.1.1.2) 56(84) bytes of data.
64 bytes from 1.1.1.2: icmp_seq=1 ttl=64 time=0.278 ms
--- 1.1.1.2 ping statistics ---
1 packets transmitted, 1 received, 0% packet loss, time 0ms
rtt min/avg/max/mdev = 0.278/0.278/0.278/0.000 ms
QoS限速和整流
ovs本身并没有实现QoS功能,QoS功能的实现是在内核中,ovs只是能够配置部分支持的QoS类型。如果遇到ovs不支持的QoS类型,可以通过patch或者tc工具来支持。
QoS在ovs中的使用和传统网络一样,主要分为两种:
- Policing管制:用于控制接口上接收分组(ingress)的速率,是一种简单的QoS的功能,通过简单的丢包机制实现接口速率的限制,它既可以作用于物理接口,也可以作用于虚拟接口;
- Shaping整流:是作用于接口上的出口流量(egress)策略,可以实现多个QoS队列,不同队列里面处理不同策略,一般用这种方式。
再配置ovs ingress和egress之前,我们先用iperf看看没有配置QoS时的网络测试:
// ns1网络命名空间执行如下命令,iperf参数解释:
// -c 1.1.1.2: 指定server端ip为1.1.1.2,也就是ns2网络命名空间ip
// -p 5566: 指定server端口
// -b 10m: udp模式使用的带宽为10m/s
// -t 5: 传输的总时间为5s
// -i 1: 每次传输间隔为1s
// -u: 使用udp方式而不是tcp方式
# ip netns exec ns1 iperf -c 1.1.1.2 -p 5566 -b 10m -t 5 -i 1 -u
------------------------------------------------------------
Client connecting to 1.1.1.2, UDP port 5566
Sending 1470 byte datagrams, IPG target: 1176.00 us (kalman adjust)
UDP buffer size:  208 KByte (default)
------------------------------------------------------------
[  3] local 1.1.1.1 port 60893 connected with 1.1.1.2 port 5566
[ ID] Interval       Transfer     Bandwidth
[  3]  0.0- 1.0 sec  1.19 MBytes  10.0 Mbits/sec
[  3]  1.0- 2.0 sec  1.19 MBytes  10.0 Mbits/sec
[  3]  2.0- 3.0 sec  1.19 MBytes  10.0 Mbits/sec
[  3]  3.0- 4.0 sec  1.19 MBytes  10.0 Mbits/sec
[  3]  0.0- 5.0 sec  5.96 MBytes  10.0 Mbits/sec
[  3] Sent 4252 datagrams
[  3] Server Report:
[  3]  0.0- 5.0 sec  5.96 MBytes  10.0 Mbits/sec   0.000 ms    0/ 4252 (0%)

// ns2网络命名空间执行如下命令,参数解释:
// -s: iperf服务器模式
// -p 5566: 指定server端口
// -i 1: 每次传输间隔为1s
// -u: 使用udp方式而不是tcp方式
# ip netns exec ns2 iperf -s -p 5566 -i 1 -u
------------------------------------------------------------
Server listening on UDP port 5566
Receiving 1470 byte datagrams
UDP buffer size:  208 KByte (default)
------------------------------------------------------------
[  3] local 1.1.1.2 port 5566 connected with 1.1.1.1 port 60893
[ ID] Interval       Transfer     Bandwidth        Jitter   Lost/Total Datagrams
[  3]  0.0- 1.0 sec  1.19 MBytes  10.0 Mbits/sec   0.002 ms    0/  851 (0%)
[  3]  1.0- 2.0 sec  1.19 MBytes  10.0 Mbits/sec   0.003 ms    0/  850 (0%)
[  3]  2.0- 3.0 sec  1.19 MBytes  10.0 Mbits/sec   0.002 ms    0/  851 (0%)
[  3]  3.0- 4.0 sec  1.19 MBytes  10.0 Mbits/sec   0.001 ms    0/  850 (0%)
[  3]  4.0- 5.0 sec  1.19 MBytes  10.0 Mbits/sec   0.001 ms    0/  850 (0%)
[  3]  0.0- 5.0 sec  5.96 MBytes  10.0 Mbits/sec   0.001 ms    0/ 4252 (0%)
从上面结果可以看出,ns1出来的10m/s的带宽数据到ns2时也是10m/s,也就是相当于没有限制。
- ingress

给ns1网络命名空间对应的ovs interface(veth11)配置入口流量(ingress)最高带宽为5M/s(参考资料:https://docs.openvswitch.org/en/latest/howto/qos/):
# ovs-vsctl set interface veth11 ingress_policing_rate=5000 ingress_policing_burst=500
# ovs-vsctl --columns=ingress_policing_rate,ingress_policing_burst list interface veth11
ingress_policing_rate: 5000
ingress_policing_burst: 500

// ns1网络命名空间继续按照10M/s的带宽打流量
# ip netns exec ns1 iperf -c 1.1.1.2 -p 5566 -b 10m -t 5 -i 1 -u
------------------------------------------------------------
Client connecting to 1.1.1.2, UDP port 5566
Sending 1470 byte datagrams, IPG target: 1176.00 us (kalman adjust)
UDP buffer size:  208 KByte (default)
------------------------------------------------------------
[  3] local 1.1.1.1 port 54372 connected with 1.1.1.2 port 5566
[ ID] Interval       Transfer     Bandwidth
[  3]  0.0- 1.0 sec  1.19 MBytes  10.0 Mbits/sec
[  3]  1.0- 2.0 sec  1.19 MBytes  10.0 Mbits/sec
[  3]  2.0- 3.0 sec  1.19 MBytes  10.0 Mbits/sec
[  3]  3.0- 4.0 sec  1.19 MBytes  10.0 Mbits/sec
[  3]  0.0- 5.0 sec  5.96 MBytes  10.0 Mbits/sec
[  3] Sent 4252 datagrams
[  3] Server Report:
[  3]  0.0- 5.3 sec  2.98 MBytes  4.77 Mbits/sec  15.646 ms 2125/ 4253 (50%)

// ns2网络命名空间观察带宽情况,发现已被限速
# ip netns exec ns2 iperf -s -p 5566 -i 1 -u
------------------------------------------------------------
Server listening on UDP port 5566
Receiving 1470 byte datagrams
UDP buffer size:  208 KByte (default)
------------------------------------------------------------
[  3] local 1.1.1.2 port 5566 connected with 1.1.1.1 port 54372
[ ID] Interval       Transfer     Bandwidth        Jitter   Lost/Total Datagrams
[  3]  0.0- 1.0 sec   659 KBytes  5.40 Mbits/sec   0.003 ms  392/  851 (46%)
[  3]  1.0- 2.0 sec   599 KBytes  4.90 Mbits/sec   0.003 ms  433/  850 (51%)
[  3]  2.0- 3.0 sec   600 KBytes  4.92 Mbits/sec   0.002 ms  434/  852 (51%)
[  3]  3.0- 4.0 sec   599 KBytes  4.90 Mbits/sec   0.004 ms  433/  850 (51%)
[  3]  4.0- 5.0 sec   599 KBytes  4.90 Mbits/sec  15.647 ms  433/  850 (51%)
[  3]  0.0- 5.3 sec  2.98 MBytes  4.77 Mbits/sec  15.647 ms 2125/ 4253 (50%)
- egress
前面的ingress配置不用清除,继续给ns2网络命名空间对应的ovs port(veth21)配置出口流量(egress)QoS(参考资料:https://docs.openvswitch.org/en/latest/faq/qos/):
// 给veth21配置最大出口流量带宽为2M/s
// 参数解释:
// --: 用于把命令分割成单独解析的命令行
// \: 用于换行
// set port veth21 qos=@newqos: 设置veth21端口QoS规则名为newqos
// id=@newqos create qos type=linux-htb queues=0=@q0: 创建qosrule1规则,类型为linux-htb,连接key值为0的队列q0
// id=@q0 create queue other-config:max-rate=2000000: 创建 q0 队列,设置最大带宽为2M/s
// 返回数据第一行是QoS id(7a86db32-b323-48f8-820e-63f4ed395d72)
// 返回数据第二行是queue id(23bbb7fe-00ba-4f57-9257-9ce8e2038053)
// 可以用ovs-vsctl list port/qos/queue查看相关数据
# ovs-vsctl set port veth21 qos=@newqos -- \
--id=@newqos create qos type=linux-htb queues=0=@q0 -- \
--id=@q0 create queue other-config:max-rate=2000000
dde4bd09-c686-41c3-9da6-4c3ef6fcbb60
abfbede7-bdac-4b93-ab5c-216e7c47648d


// 查看port veth21
# ovs-vsctl --columns=qos list port veth21
qos                 : dde4bd09-c686-41c3-9da6-4c3ef6fcbb60


// 查看qos
# ovs-vsctl list qos
_uuid               : dde4bd09-c686-41c3-9da6-4c3ef6fcbb60
external_ids        : {}
other_config        : {}
queues              : {0=abfbede7-bdac-4b93-ab5c-216e7c47648d}
type                : linux-htb


// 查看queue
# ovs-vsctl list queue
_uuid               : abfbede7-bdac-4b93-ab5c-216e7c47648d
dscp                : []
external_ids        : {}
other_config        : {max-rate="2000000"}


// tc查看相关配置是否生效
# tc -d -s qdisc show dev veth21
qdisc htb 1: root refcnt 2 r2q 10 default 1 direct_packets_stat 0 ver 3.17 direct_qlen 1000
 Sent 0 bytes 0 pkt (dropped 0, overlimits 0 requeues 0)
 backlog 0b 0p requeues 0
# tc -d -s class show dev veth21
class htb 1:1 parent 1:fffe prio 0 quantum 1500 rate 12Kbit ceil 2Mbit linklayer ethernet burst 1563b/1 mpu 0b cburst 1564b/1 mpu 0b level 0
 Sent 0 bytes 0 pkt (dropped 0, overlimits 0 requeues 0)
 backlog 0b 0p requeues 0
 lended: 0 borrowed: 0 giants: 0
 tokens: 16291666 ctokens: 97750

class htb 1:fffe root rate 10Gbit ceil 10Gbit linklayer ethernet burst 1250b/1 mpu 0b cburst 1250b/1 mpu 0b level 7
 Sent 0 bytes 0 pkt (dropped 0, overlimits 0 requeues 0)
 backlog 0b 0p requeues 0
 lended: 0 borrowed: 0 giants: 0
 tokens: 18 ctokens: 18
打流量验证:
// ns1网络命名空间继续打10M/s的流量
# ip netns exec ns1 iperf -c 1.1.1.2 -p 5566 -b 10m -t 5 -i 1 -u
------------------------------------------------------------
Client connecting to 1.1.1.2, UDP port 5566
Sending 1470 byte datagrams, IPG target: 1176.00 us (kalman adjust)
UDP buffer size:  208 KByte (default)
------------------------------------------------------------
[  3] local 1.1.1.1 port 41000 connected with 1.1.1.2 port 5566
[ ID] Interval       Transfer     Bandwidth
[  3]  0.0- 1.0 sec   983 KBytes  8.06 Mbits/sec
[  3]  1.0- 2.0 sec  1.41 MBytes  11.8 Mbits/sec
[  3]  2.0- 3.0 sec  1.06 MBytes  8.91 Mbits/sec
[  3]  3.0- 4.0 sec  1.06 MBytes  8.89 Mbits/sec
[  3]  0.0- 5.2 sec  5.90 MBytes  9.47 Mbits/sec
[  3] Sent 4212 datagrams
[  3] Server Report:
[  3]  0.0- 5.5 sec  1.28 MBytes  1.95 Mbits/sec  22.792 ms 3298/ 4212 (78%)

// ns2网络命名空间观察带宽数据,发现已被限速到2M/s
# ip netns exec ns2 iperf -s -p 5566 -i 1 -u
------------------------------------------------------------
Server listening on UDP port 5566
Receiving 1470 byte datagrams
UDP buffer size:  208 KByte (default)
------------------------------------------------------------
[  3] local 1.1.1.2 port 5566 connected with 1.1.1.1 port 41000
[ ID] Interval       Transfer     Bandwidth        Jitter   Lost/Total Datagrams
[  3]  0.0- 1.0 sec   240 KBytes  1.96 Mbits/sec   7.412 ms   46/  213 (22%)
[  3]  1.0- 2.0 sec   237 KBytes  1.94 Mbits/sec  17.413 ms  816/  981 (83%)
[  3]  2.0- 3.0 sec   238 KBytes  1.95 Mbits/sec   9.372 ms  609/  775 (79%)
[  3]  3.0- 4.0 sec   237 KBytes  1.94 Mbits/sec   6.783 ms  808/  973 (83%)
[  3]  4.0- 5.0 sec   237 KBytes  1.94 Mbits/sec  13.762 ms  613/  778 (79%)
[  3]  0.0- 5.5 sec  1.28 MBytes  1.95 Mbits/sec  22.792 ms 3298/ 4212 (78%)
我们把veth21 egress带宽限速改为8M/s(大于veth11 ingress的带宽5M/s),如下图所示:
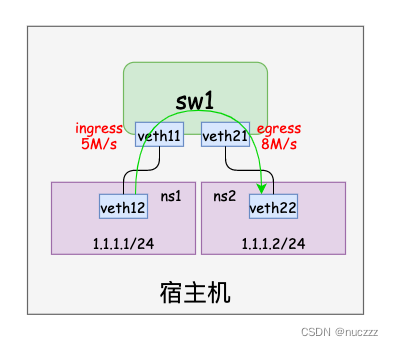
理论上ns2网络命名空间是以整条链路最低带宽为基准接收数据包的,也就是5M/s:
// 修改veth21 egress带宽为8M/s
# ovs-vsctl set queue abfbede7-bdac-4b93-ab5c-216e7c47648d other_config:max-rate=8000000
# ovs-vsctl list queue
_uuid               : abfbede7-bdac-4b93-ab5c-216e7c47648d
dscp                : []
external_ids        : {}
other_config        : {max-rate="8000000"}
# tc class show dev veth21
class htb 1:1 parent 1:fffe prio 0 rate 12Kbit ceil 8Mbit burst 1563b cburst 1563b
class htb 1:fffe root rate 10Gbit ceil 10Gbit burst 1250b cburst 1250b

// ns1网络命名空间依旧按10M/s打流量
# ip netns exec ns1 iperf -c 1.1.1.2 -p 5566 -b 10m -t 5 -i 1 -u
------------------------------------------------------------
Client connecting to 1.1.1.2, UDP port 5566
Sending 1470 byte datagrams, IPG target: 1176.00 us (kalman adjust)
UDP buffer size:  208 KByte (default)
------------------------------------------------------------
[  3] local 1.1.1.1 port 44151 connected with 1.1.1.2 port 5566
[ ID] Interval       Transfer     Bandwidth
[  3]  0.0- 1.0 sec  1.19 MBytes  10.0 Mbits/sec
[  3]  1.0- 2.0 sec  1.19 MBytes  10.0 Mbits/sec
[  3]  2.0- 3.0 sec  1.19 MBytes  10.0 Mbits/sec
[  3]  3.0- 4.0 sec  1.19 MBytes  10.0 Mbits/sec
[  3]  0.0- 5.0 sec  5.96 MBytes  10.0 Mbits/sec
[  3] Sent 4252 datagrams
[  3] Server Report:
[  3]  0.0- 5.3 sec  2.98 MBytes  4.77 Mbits/sec  15.646 ms 2125/ 4253 (50%)

// 观察ns2网络命名空间带宽,约为5M/s,符合预期
# ip netns exec ns2 iperf -s -p 5566 -i 1 -u
------------------------------------------------------------
Server listening on UDP port 5566
Receiving 1470 byte datagrams
UDP buffer size:  208 KByte (default)
------------------------------------------------------------
[  3] local 1.1.1.2 port 5566 connected with 1.1.1.1 port 44151
[ ID] Interval       Transfer     Bandwidth        Jitter   Lost/Total Datagrams
[  3]  0.0- 1.0 sec   659 KBytes  5.40 Mbits/sec   0.003 ms  392/  851 (46%)
[  3]  1.0- 2.0 sec   599 KBytes  4.90 Mbits/sec   0.003 ms  433/  850 (51%)
[  3]  2.0- 3.0 sec   600 KBytes  4.92 Mbits/sec   0.002 ms  434/  852 (51%)
[  3]  3.0- 4.0 sec   599 KBytes  4.90 Mbits/sec   0.003 ms  433/  850 (51%)
[  3]  4.0- 5.0 sec   599 KBytes  4.90 Mbits/sec  15.647 ms  433/  850 (51%)
[  3]  0.0- 5.3 sec  2.98 MBytes  4.77 Mbits/sec  15.647 ms 2125/ 4253 (50%)
端口镜像
端口镜像是交换机的标准功能之一,ovs虚拟交换机也支持该功能。端口镜像简单来说就是把一个端口的报文拷贝到另一个端口,可以用来实现流量监控等功能。
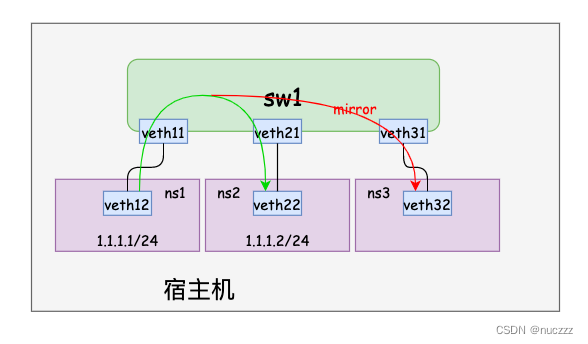
如上图所示,我们再增加一个网络命名空间ns3和一个veth pair,使得ns3网络命名空间可以看到ns1访问ns2的数据包:
// 初始化ns3网络命名空间和veth pair(ns3网络命名空间下的veth32暂时可以不用配置ip),并把veth pair一端插到ovs交换机上
# ip netns add ns3
# ip link add veth31 type veth peer name veth32
# ip link set veth32 netns ns3
# ip link set veth31 up
# ip netns exec ns3 ip link set veth32 up
# ovs-vsctl add-port sw1 veth31

// 创建端口镜像
# ovs-vsctl -- --id=@p2 get port veth21 \
-- --id=@p3 get port veth31 \
-- --id=@m create mirror name=m0 select_dst_port=@p2 output_port=@p3 \
-- set bridge sw1 mirrors=@m
267f272d-3f7d-4ef0-904e-c191723d23c7

// 查看端口镜像
# ovs-vsctl list mirror
_uuid               : 267f272d-3f7d-4ef0-904e-c191723d23c7
external_ids        : {}
name                : m0
output_port         : 459c141d-0e4a-4ed1-a37a-4615516df1e3
output_vlan         : []
select_all          : false
select_dst_port     : [35c25f4a-ea72-4003-87a5-87bbd076ee56]
select_src_port     : []
select_vlan         : []
snaplen             : []
statistics          : {tx_bytes=0, tx_packets=0}
ns1网络命名空间ping ns2网络命名空间,查看ns3网络命名空间是否能抓到数据包:
// ns1网络命名空间下ping
# ip netns exec ns1 ping -c 1 1.1.1.2
PING 1.1.1.2 (1.1.1.2) 56(84) bytes of data.
64 bytes from 1.1.1.2: icmp_seq=1 ttl=64 time=0.320 ms
--- 1.1.1.2 ping statistics ---
1 packets transmitted, 1 received, 0% packet loss, time 0ms
rtt min/avg/max/mdev = 0.320/0.320/0.320/0.000 ms

// ns2网络命名空间抓包
# ip netns exec ns2 tcpdump -i veth21 -n icmp
tcpdump: veth21: No such device exists
(SIOCGIFHWADDR: No such device)
[root@VM-12-7-centos ~]# ip netns exec ns2 tcpdump -i veth22 -n icmp
tcpdump: verbose output suppressed, use -v or -vv for full protocol decode
listening on veth22, link-type EN10MB (Ethernet), capture size 262144 bytes
17:02:17.637835 IP 1.1.1.1 > 1.1.1.2: ICMP echo request, id 4309, seq 1, length 64
17:02:17.637870 IP 1.1.1.2 > 1.1.1.1: ICMP echo reply, id 4309, seq 1, length 64

// ns3网络命名空间抓包
# ip netns exec ns3 tcpdump -i veth32 -n icmp
tcpdump: verbose output suppressed, use -v or -vv for full protocol decode
listening on veth32, link-type EN10MB (Ethernet), capture size 262144 bytes
17:02:17.637836 IP 1.1.1.1 > 1.1.1.2: ICMP echo request, id 4309, seq 1, length 64
注意ns3网络命名空间只有ns1->ns2的包,没有ns->ns1的包,这是因为mirror配置的规则是select_dst_port=@p2 output_port=@p3。
总结
相比于其它虚拟交换机/网桥(例如docker0和普通的linux bridge),ovs有着更加丰富的功能和生态,目前在openstack和kubernetes容器网络(ovn-kubernetes、kube-ovn)都能看到它的身影。本文仅仅简单介绍了ovs的基本原理和单机使用,后续会更新ovs跨主机隧道通信和ovn/ovs等内容,敬请期待。
微信公众号卡巴斯同步发布,欢迎大家关注。


 7310
7310


 被折叠的 条评论
为什么被折叠?
被折叠的 条评论
为什么被折叠?
 到【灌水乐园】发言


