


9、数据校验
(1)SpringMVC 自己没有数据校验,他使用的是 JSR 303 校验,自带的主要包括以下一些校验规则:
- @Null 限制只能为null
- @NotNull 限制必须不为null
- @AssertFalse 限制必须为false
- @AssertTrue 限制必须为true
- @DecimalMax(value) 限制必须为一个不大于指定值的数字
- @DecimalMin(value) 限制必须为一个不小于指定值的数字
- @Digits(integer,fraction) 限制必须为一个小数,且整数部分的位数不能超过integer,小数部分的位数不能超过fraction
- @Future 限制必须是一个将来的日期
- @Max(value) 限制必须为一个不大于指定值的数字
- @Min(value) 限制必须为一个不小于指定值的数字
- @Past 限制必须是一个过去的日期
- @Pattern(value) 限制必须符合指定的正则表达式
- @Size(max,min) 限制字符长度必须在min到max之间
- @Past 验证注解的元素值(日期类型)比当前时间早
- @NotEmpty 验证注解的元素值不为null且不为空(字符串长度不为0、集合大小不为0)
- @NotBlank 验证注解的元素值不为空(不为null、去除首位空格后长度为0),不同于@NotEmpty,@NotBlank只应用于字符串且在比较时会去除字符串的空格
- @Email 验证注解的元素值是Email,也可以通过正则表达式和flag指定自定义的email格式
(2)校验方法:
① 引入依赖 hibernate-validator
② 在需要校验的类的属性上加上校验注解,具体注解见 (1)
③ 在需要校验的入参对象前面加上 @Valid属性
注:需要配置 mvc:annotation-driven 方可生效
(3)错误消息显示:利用 form:errors 标签来显示。
<form:form action="${pageContext.request.contextPath }/robin/addEmployee" method="POST" modelAttribute="employee">
    <c:if test="${employee.id == null}">
        <%--国际化显示--%>
        <fmt:message key="i18n.lastName"/> : <form:input path="lastName"/>
        <%--错误显示--%>
        <form:errors path="lastName"/>
    </c:if>
</form:form>
注:在错误信息显示国际化的时候,其国际化资源文件 *.properties 的格式为:
校验类名.requestScope中的被校验对象名.属性名=??
NotEmpty.employee.lastName=lastName不能为空
Past.employee.birth=birth应该在今天之前
10、国际化
(1)先需要准备国际化资源文件,*.properties 。(中文名为 i18n_zh_CN.properties 英文名为 i18n_en_US.properties )
i18n.lastName=姓名
i18n.age=年龄
i18n.department=公寓
i18n.birth=生日
i18n.salary=薪水
(2)然后配置国际化资源文件(配置 ResourceBundleMessageSource 的 bean 的 basename 属性)
    <bean id="messageSource"
          class="org.springframework.context.support.ResourceBundleMessageSource">
        <property name="basename" value="i18n"/>
    </bean>
(3)然后在页面中利用 fmt:message 标签就可以使用了,此时页面会根据浏览器的语言,选择对应的资源文件并显示对应的i18n.lastName 的值。
<fmt:message key="i18n.lastName"/>(4)如果需要自定义更改显示语言,可以使用 LocalChangeInterceptor 和 SessionLocalResolver 类来实现。
① 配置 SessionLocaleResolver 和 LocaleChangeInterceptor
    <bean id="localeResolver"
          class="org.springframework.web.servlet.i18n.SessionLocaleResolver"/>

    <mvc:interceptors>
        <bean class="org.springframework.web.servlet.i18n.LocaleChangeInterceptor"/>
    </mvc:interceptors>
注:SessionLocaleResolver bean的 id 必须是localeResover,LocaleChangeInterceptor 必须配置在 mvc:interceptors 标签内
② 页面的 url 中需要携带 Locale 参数,这样页面跳转的时候就可以根据 url 中指定的语言来匹配国际化资源文件并显示
<a href="showI18n?locale=zh_CN">中文</a>③ 原理:若 Session 中有 Locale,SpringMVC 每次会从 Session 中去获取 Locale 来使用, 若没有则选用默认的Locale。
LocalChangeInterceptor 的作用是将 url 中的 Locale 参数转换为 Locale 对象,SessionLocalResolver 的作用是将 Locale对象设置到 Session 中。

(5)在程序中获取 Locale 信息
① 如果要查看Locale信息,则直接将 Locale 作为目标方法的入参传入即可
② 如果需要查看某属性对应的显示信息可以通过 ResourceBundleMessageSource 对象来获取。
    @Autowired
    private ResourceBundleMessageSource messageSource;

    @RequestMapping("/showI18n")
    public String showI18n(Locale locale) {
        System.out.println("message:" + messageSource.getMessage("i18n.lastName",null,locale));
        return "input";
    }
11、自定义拦截器
(1)实现过程
① 定义一个自己的拦截器类,该类需要实现 HandlerInterceptor 接口。
② 在配置文件中,在 mvc:interceptors 标签内,配置拦截器的 bean。
    <mvc:interceptors>
        <bean class="com.robin.springmvc.interceptors.FirstInterceptor"/>
    </mvc:interceptors>
(2)说明
① HandlerInterceptor 接口有三个方法:preHandle、postHandle、afterCompletion
执行的顺序为:preHandle ==> 目标方法 ==> postHandle ==> 渲染视图 ==> afterCompletion
② preHandle 方法的返回值如果是 false,那么SpringMVC 将不会再继续执行其他拦截器和目标方法。
③ 拦截器默认会拦截所有请求,如果需要过滤拦截请求,需要配置 mvc:interceptor 标签的 mvc:mapping 和 mvc:exclude-mapping 标签
   <mvc:interceptors>
        <bean class="com.robin.springmvc.interceptors.FirstInterceptor"/>
        <mvc:interceptor>
            <mvc:mapping path="/**"/>
            <mvc:exclude-mapping path="/robin/showInput"/>
            <bean class="com.robin.springmvc.interceptors.SecondInterceptor"/>
        </mvc:interceptor>
    </mvc:interceptors>
(3)拦截器的执行顺序:
① preHandle 按照配置顺序执行。
② postHandle 和 afterCompletion 按照配置顺序的逆序执行
③ postHandle 和目标方法的执行会依赖于 preHandle 的返回值,若多个拦截器中任意一个拦截器返回 false, 那么postHandle 和目标方法都不会再执行了,但是之前执行过preHandle 的拦截器,都会执行 afterCompletion 方法(释放资源)。
④ 原理:preHandle 是从0 ~ length 遍历,而 postHandle 是从 length ~ 0 遍历,afterCompletion 是从 interceptorIndex ~ 0 遍历,interceptorIndex 是在遍历 preHandle 时记录的下标。
12、异常处理
(1)实现过程:
① 加入 ExceptionHandlerResolver 的 bean。
<bean class="org.springframework.web.servlet.mvc.method.annotation.ExceptionHandlerExceptionResolver"/>
② 在 Controller 中加入异常处理方法,并标识 @ExceptionHandler 注解。(有个默认属性value,用于指明需要处理的异常类的数组,如果不设置,则默认处理所有异常)
    @ExceptionHandler({ArithmeticException.class})
    public String handleException(Exception ex) {
        System.out.println(ex.getMessage());
        return "success";
    }
③ 也可以不将异常处理方法放在 Controller 中,可以新建一个异常处理类然后在类上标识 @ControllerAdvice 注解,当然在异常处理方法上还是需要加上 @ExceptionHandler 注解。
(2)如果需要将异常信息返回给页面,不能将异常放到 RequestScope 的 map 中,这样会报错, 需要将异常放到 ModelAndView 对象中返回。
(3)异常优先级。
① 异常 ==> 寻找当前异常类对应的处理函数 ==> 寻找其父类的处理函数 ==> 执行处理函数(如果存在)==> 调用 afterCompletion(如果有拦截器)。 注意:并不会调用 postHandle。
② 异常 ==> 寻找 Controller 中的处理函数 ==> 寻找 ControllerAdvice 中的处理函数 ==> 执行处理函数(如果存在)==> 调用 afterCompletion(如果有拦截器)。 注意:并不会调用 postHandle。
③ 异常 ==> 在 Controller 和 ControllerAdvice 中寻找对应的处理方法 ==> 返回(如果找不到)==> 调用 afterCompletion (如果有拦截器)==> 转向SimpleMappingExceptionResolver 的 bean 中对应的页面(如果配置了)。
(4)SimpleMappingExceptionResolver 是系统默认的异常处理方法,配置的时候需要指定异常对应的页面,那么在没有找到异常处理函数的情况下 SpringMVC 会转向 SimpleMappingExceptionResolver 中配置的该异常对应的页面,并把异常放到requestScope 中,默认名为 exception,也可以通过 exceptionAttribute 来配置,页面就可以通过这个名字来获取异常信息。
   <bean class="org.springframework.web.servlet.handler.SimpleMappingExceptionResolver">
        <property name="exceptionAttribute" value="ex"/>
        <property name="exceptionMappings">
            <props>
                <prop key="java.lang.ArithmeticException">error</prop>
            </props>
        </property>
    </bean>
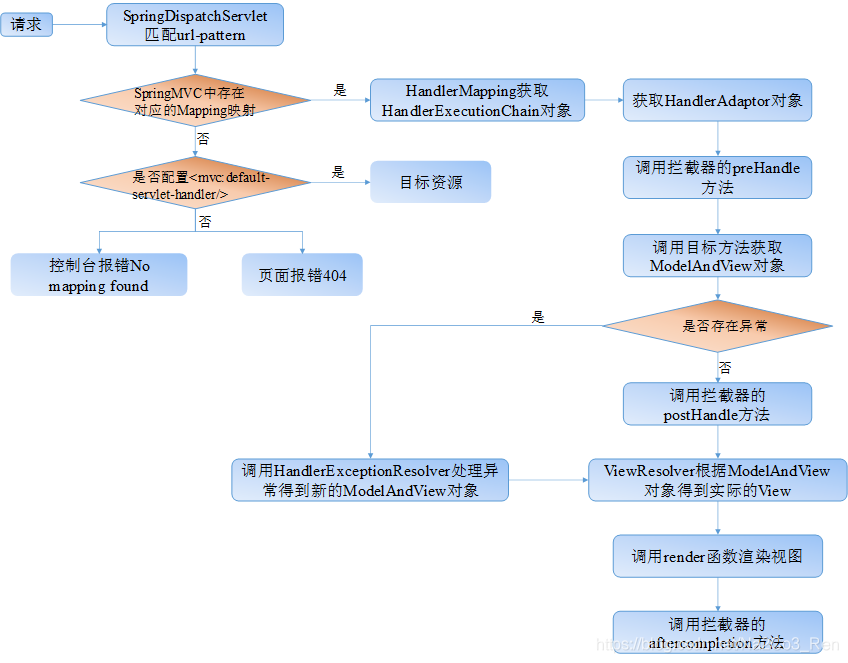
13、SpringMVC 执行流程


 1508
1508


 被折叠的 条评论
为什么被折叠?
被折叠的 条评论
为什么被折叠?
 到【灌水乐园】发言


