


很清楚的是每一个View的实现过程都需要经过onMeasure()来测量出高度和宽度,就是需要实现onMeasure()计算出一个View应有的宽和和长度。在这个方法中需要两个参数来widthMeasureSpec和heightMeasureSpec来确定该View的宽度和高度。
首先,我们需要清楚MeasureSpec这个来,因为widthMeasureSpec,heightMeasureSpec都是通过这个来获取到的。
MeasureSpec.EXACTLY:代表的是父类layout中希望布局的大小是确定的,比如说match_parent, 300dp等能清楚知道表达view的大小。
MeasureSpec.AT_MOST:代表是父类layout中希望布局的大小是至少的即wrap_content,而我们当然可以自定这个值也是文章的主要内容。
MeasureSpec.UNSPECIFIED:代表的是父类中的布局大小是自定义,在实际中比较少碰到。
按我自己的理解就是EXACTLY,AT_MOST,UNSPECIFIED这三个模式都是根据layout_width/layout_height来确定,也就是说你给这个View设置的layout_width/layout_height是多少那么mode就等于EXACTLY,AT_MOST,的某一个值了,当然MesureSpec还有个specSize用来代表我们在layout_width/layout_height设置的值是多少。
如果我们在没有重写onMeasure()这个方法的话,默认的specSize是match_parent,specMode是EXACTLY的。
我们通过下面的自定view来实现一个类似TextView的功能。
 /**
     *  super.setMeasuredDimension在默认的设置中的width和height都是等于Match_Parent
     * @param widthMeasureSpec :代表当前控件在布局中所设置的宽度// wrap_content match_parent 300dp
     * @param heightMeasureSpec : 代表当前控件在布局所设置的高度// ...........
     */
    @Override
    protected void onMeasure(int widthMeasureSpec, int heightMeasureSpec) {

//        super.setMeasuredDimension(widthMeasureSpec, heightMeasureSpec);

        int widthMode = MeasureSpec.getMode(widthMeasureSpec);
        int widthSize = MeasureSpec.getSize(widthMeasureSpec);
        int heightMode = MeasureSpec.getMode(heightMeasureSpec);
        int heightSize = MeasureSpec.getSize(heightMeasureSpec);
        int width;
        int height;

        // 计算控件的宽度
        if (widthMode == MeasureSpec.EXACTLY) {
            width = widthSize;
        } else {
            width = getPaddingLeft() + getPaddingRight() + textRect.width();// 左右的padding以及字的长度
        }

        // 计算控件的高度
        if (heightMode == MeasureSpec.EXACTLY) {
            height = heightSize;
        } else {
            height = getPaddingBottom() + getPaddingTop() + textRect.height();// 上下的padding以及字的高度
        }

        setMeasuredDimension(width, height);

    }
为了验证下默认的情况下注释掉重写的代码后的效果是:
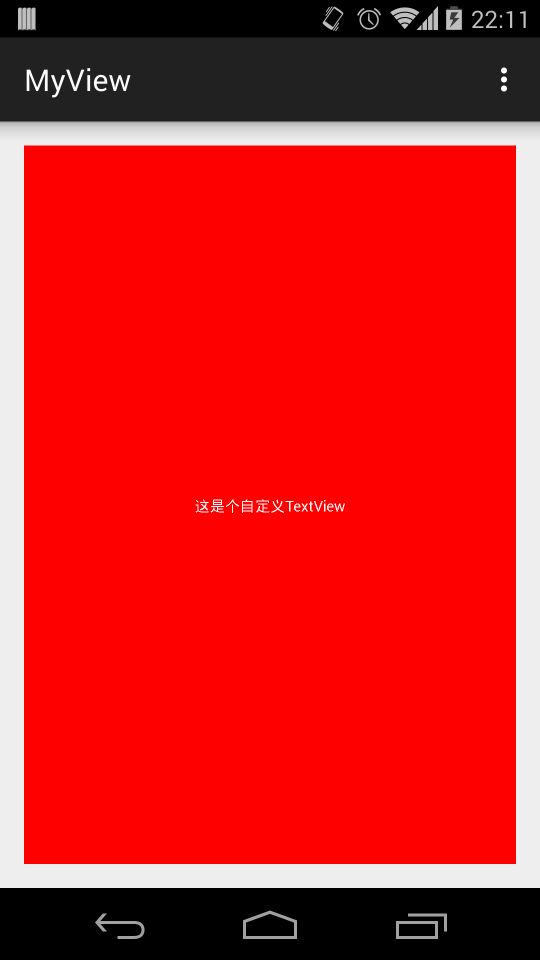
所以说默认的specSize是match_parent,specMode是EXACTLY的,那么我们重写后的效果如下:
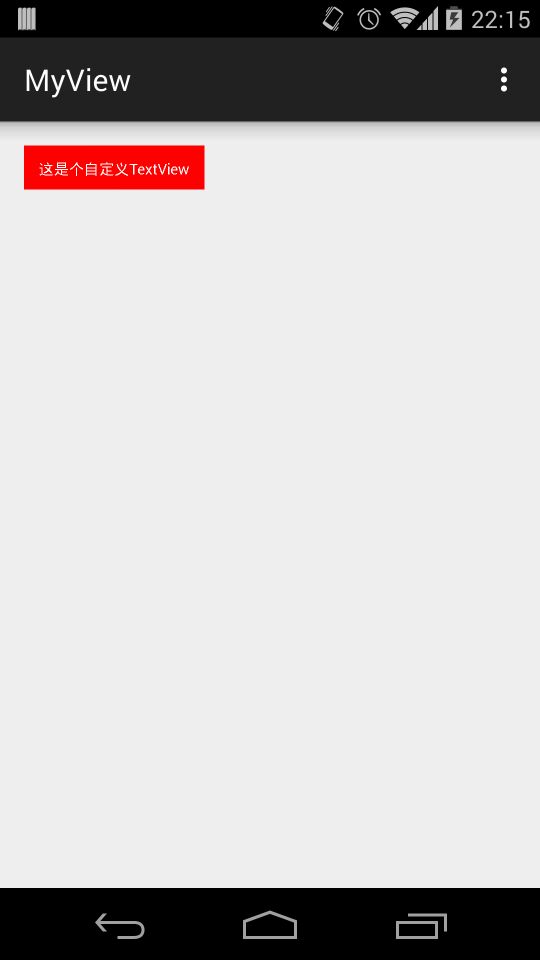
在功能上跟TextView很像,我们需要注意的是:
1.getMeasureHeight/getMeasureWidth是在onMeasure之后才能有效。
2.只有调用setMeasuredDimension(width, height)后才能真正把我们要的大小传入到view中。
在我们自定义一个view并重写onMeasure之后,在ViewGroup中会自动通过调用measureChildren来计算出对应的大小,其实ViewGroup中就是通过for循环遍历所有的view中的measureChildren方法来计算大小,这个系统的方法源码如下:
protected void measureChild(View child, int parentWidthMeasureSpec,
        int parentHeightMeasureSpec) {
    final LayoutParams lp = child.getLayoutParams();
    final int childWidthMeasureSpec = getChildMeasureSpec(parentWidthMeasureSpec,
            mPaddingLeft + mPaddingRight, lp.width);
    final int childHeightMeasureSpec = getChildMeasureSpec(parentHeightMeasureSpec,
            mPaddingTop + mPaddingBottom, lp.height);
    child.measure(childWidthMeasureSpec, childHeightMeasureSpec);
}
这样一个onMeasure()流程就完成了,我们就能根据这个流程具体知道系统View的工作流程,哪怕平时开发中没有用到,至少我们懂得了内部实现能很有效的应付平时需要实现的view了。
文章中自定义的view的源码:
https://github.com/Neacy/NeacyTextView


 314
314

 被折叠的 条评论
为什么被折叠?
被折叠的 条评论
为什么被折叠?
 到【灌水乐园】发言


