


概述
在开发过程中,经常会遇到系统中提供的控件无法满足产品的设计需求,这时可能就需要考虑使用自定义的View来实现产品的设计细节了。对于自定义View,可以分为两种,一种是自定义控件(继承View),另一种是自定义布局容器(继承ViewGroup),下面就针对自定义控件View的应用进行简单的总结。
自定义View
自定义View时,我们大部分只需要重写两个方法onMeasure(),onDraw()。onMeasure()负责对当前View尺寸进行测量,onDraw()负责把当前这个View绘制出来。另外在自定义View时,还需要写一个带AttributeSet参数的构造方法。
定义构造方法
    public CustView(Context context) {
        super(context);
    }

    public CustView(Context context, AttributeSet attrs) {
        super(context, attrs);
    }
上面两个不同的构造方法,表示了在创建该View时,可以有两种不同的方式。如果直接使用代码的形式创建CustView,调用的是第一种构造方法。如:
CustView custView = new CustView(this);如果通过XML布局文件创建这个View的对象时,那么系统自动调用第二个构造方法。该方法不能被省略,因为系统从这个方法中获得该View设置在XML布局文件中的属性。否则的话,系统将会抛出异常。有关这个方法,Google 文档这样描述:
public View(Context context, AttributeSet attrs)
Constructor that is called when inflating a view from XML. This is called when a view is being constructed from an XML file, supplying attributes that were specified in the XML file. This version uses a default style of 0, so the only attribute values applied are those in the Context’s Theme and the given AttributeSet.
这段话大概的意思就是,当从XML布局中填充一个View的时候,这个构造方法就会被调用。当View正在从XML布局中创建并提供在XML文件中指定的属性时会被调用。
所以说XML布局中设置该View的属性通过该方法传递进来。
重写onMeasure()方法
上面所说onMeasure()方法是用来测量View的宽高尺寸的。在XML布局文件中,我们可以对属性layout_width和layout_height可以不写具体的尺寸,而是用wrap_content或match_parent。这两个参数的意思就是“包裹住内容”和“匹配父布局给我们的所有空间”。默认情况下系统会针对上面的属性值进行处理。我们可以通过重写onMeasure(),来设置自己想要的尺寸。方法原型如下:
protected void onMeasure(int widthMeasureSpec, int heightMeasureSpec)
这个方法中包含了两个参数widthMeasureSpec和heightMeasureSpec。这两个参数代表了水平空间上父容器施加的要素和垂直空间上父容器施加的要素。说的通俗点,就是它们包含了宽高的尺寸大小和测量模式。
我们都知道设置宽高时可以有三个选择,一个具体的数值,match_parent,和 wrap_content。而测量模式同样也有三种:UNSPECIFIED,EXACTLY,AT_MOST。我们可以用MeasureSpec类取得上面参数对应的大小和测量模式。比如:
int widthSize = MeasureSpec.getSize(widthMeasureSpec);
int widthMode = MeasureSpec.getMode(widthMeasureSpec);
这三种测量模式分别代表的意义:
UNSPECIFIED:父容器没有对当前View强加任何限制,当前View可以显示任意尺寸大小。
EXACTLY:父容器确定了当前View的具体尺寸,View被限制在该尺寸中。当前的尺寸就是View应该设置的尺寸大小。
AT_MOST:当前尺寸是View能取得的最大尺寸。
上面三种测量模式与我们设置宽高属性的值对应的关系如下:
match_parent 对应的是 EXACTLY:因为match_parent 表示的匹配父控件的大小,而父View的大小是却定的,所以该View的尺寸同样确定,所以测量模式为EXACTLY。
wrap_content 对应的是 AT_MOST:wrap_content 表示的是大小为包裹View中的内容,以父View作为参考尺寸,不超过父View的大小就可以。
固定尺寸(100dp)对应的是EXACTLY:用户指定了尺寸大小,与match_parent 性质一致。
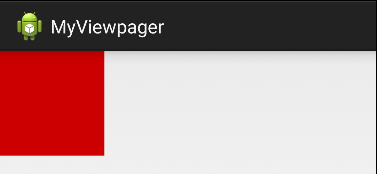
下面我们重写onMeasure方法实现View的宽高为正方形。默认宽高为100px,可以设置其他大小值(大于默认值)
    @Override
    protected void onMeasure(int widthMeasureSpec, int heightMeasureSpec) {
        super.onMeasure(widthMeasureSpec, heightMeasureSpec);

        int width = getSize(100, widthMeasureSpec);
        int height = getSize(100, heightMeasureSpec);

        if(width > height){
            width = height;
        }else{
            height = width;
        }
        setMeasuredDimension(width, height);  //将新计算的宽高测量值进行存储,否则不生效
    }

    private int getSize(int defaultSize, int measureSpec) {

        int mySize = defaultSize;
        int size = MeasureSpec.getSize(measureSpec);
        int mode = MeasureSpec.getMode(measureSpec);

        switch (mode) {
        case MeasureSpec.UNSPECIFIED: // 没有指定大小,设置默认大小.

            mySize = defaultSize;

            break;
        case MeasureSpec.EXACTLY:      // 如果布局中设置的值大于默认值,则使用布局中设置的值,对应match_parent和固定值

            if(size > defaultSize){
                mySize = size;
            }

            break;
        case MeasureSpec.AT_MOST:     // 如果测量模式中的值大于默认值,取默认值,对应wrap_content

            if(size > defaultSize){
                mySize = defaultSize;
            }
            break;
        }
        return mySize;
    }
布局文件设置:
<?xml version="1.0" encoding="utf-8"?>
<LinearLayout xmlns:android="http://schemas.android.com/apk/res/android"
    android:id="@+id/view_pager_box"
    android:layout_width="match_parent"
    android:layout_height="match_parent"
    android:orientation="horizontal" >

    <com.yuminfeng.myviewpager.CustView
        android:id="@+id/custView"
        android:layout_width="match_parent"
        android:layout_height="100dp"
        android:background="@android:color/holo_red_dark" />

</LinearLayout>
运行后效果图如下:
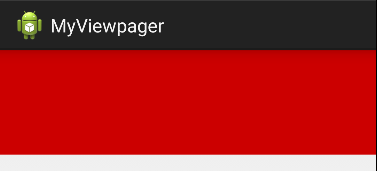
如果注销掉onMeasure方法时,效果图如下:
重写onDraw()
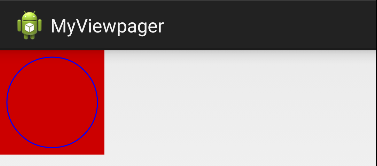
方法onDraw用来绘制用户想要的图形效果。下面我们实现了在View上绘制一个空心圆,如下:
    @Override
    protected void onDraw(Canvas canvas) {
        super.onDraw(canvas);

        int r = getMeasuredWidth()/2;    //使用getMeasuredWidth 可以获得在onMeasure方法中新计算的宽度

        int cx = getLeft() + r;            //getLeft 表示的是当前View的左边到屏幕左边框的位置距离。这里不建议使用,因为如果view在左边使用其他View时,会影响该值。

        canvas.drawCircle(r, r, r-20, mPaint); //该方法中的四个参数,前两个表示圆心的x,y的坐标。这两个值表示的是相对于该View中的位置,与其他view的位置无关。
    }
上面还涉及到了一个Paint类,该类只需要在构造方法中初始化即可,方法:
 private void initPaint() {
        mPaint = new Paint();
        mPaint.setAntiAlias(true); //设置抗锯齿的效果
        mPaint.setStyle(Paint.Style.STROKE); //设置画笔样式为描边
        mPaint.setStrokeWidth(3);  //设置笔刷的粗细度
        mPaint.setColor(Color.BLUE); //设置画笔的颜色
    }
上面代码的执行效果,如图:
添加自定义属性
我们为自定义View添加自定义属性,这样可以方便用户使用该View应对不同的场景。使得该自定义View的扩展性更好。
首先,我们需要在/res/values目录下新建一个名为attrs.xml的文件
<?xml version="1.0" encoding="utf-8"?>
<resources>

    <!-- name为属性的名称,可以随便取,但是建议使用view一样的名称 -->
    <declare-styleable name="CustView">
        <!--声明我们的属性,这里要注意format的值,不可乱用-->
        <attr name="paintColor" format="color" />
        <attr name="paintSize" format="dimension" />
    </declare-styleable>

</resources>
上面定义属性的文件中,每个属性的名称都有一个对应的format值,每个format值都代表这不同的含义,主要有一下几个值:
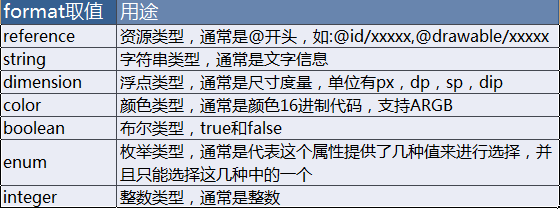
创建完attrs.xml文件后,然后我们将attrs.xml中属性应用到布局文件中
<?xml version="1.0" encoding="utf-8"?>
<LinearLayout xmlns:android="http://schemas.android.com/apk/res/android"
    xmlns:custView="http://schemas.android.com/apk/res/com.yuminfeng.myviewpager"
    android:layout_width="match_parent"
    android:layout_height="match_parent"
    android:orientation="horizontal" >

    <com.yuminfeng.myviewpager.CustView
        android:id="@+id/custView"
        android:layout_width="match_parent"
        android:layout_height="100dp"
        custView:paintColor="@android:color/holo_orange_dark"
        custView:paintSize="10dp" />

</LinearLayout>注意:布局文件中使用自定义的属性时,必须要设置命名空间。命名控件的名称可以随便取,如:custView。但是命名空间的值是由固定的前缀“http://schemas.android.com/apk/res/”+“包名”组成。完成命名空间的设置后,我们才可以在控件属性中添加自定义的属性了,如:custView:paintColor和custView:paintSize。
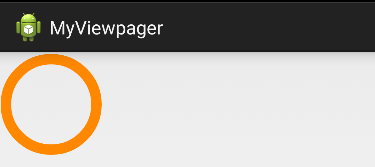
最后,我们在代码中调用自定义属性,如下:
  private void initAttrs(Context context,AttributeSet attrs) {
        //通过该方法,可以取出attrs中的CustView属性。CustView就是我们在attrs.xml文件中declare-styleable标签名称。
        TypedArray type = context.obtainStyledAttributes(attrs, R.styleable.CustView);

        //取出每个标签属性,命名方式为:R.styleable + 属性集合名称 + 下划线 + 属性名称,如果没有该值,则使用默认值
        paintColor = type.getColor(R.styleable.CustView_paintColor, Color.BLACK);
        paintSize = (int) type.getDimension(R.styleable.CustView_paintSize, 3);

        //最后需要将TypedArray对象回收
        type.recycle();
    }
完整的代码如下:
package com.yuminfeng.myviewpager;

import android.content.Context;
import android.content.res.TypedArray;
import android.graphics.Canvas;
import android.graphics.Color;
import android.graphics.Paint;
import android.util.AttributeSet;
import android.view.View;

public class CustView extends View {

    private Paint mPaint;
    private int paintColor;
    private int paintSize;

    public CustView(Context context) {
        super(context);

        initPaint(); //初始化画笔
    }

    public CustView(Context context, AttributeSet attrs) {
        super(context, attrs);

        initAttrs(context,attrs); //初始化属性值

        initPaint(); //初始化画笔

    }

    private void initAttrs(Context context,AttributeSet attrs) {
        //通过该方法,可以取出attrs中的CustView属性。CustView就是我们在attrs.xml文件中declare-styleable标签名称。
        TypedArray type = context.obtainStyledAttributes(attrs, R.styleable.CustView);

        //取出每个标签属性,命名方式为:R.styleable + 属性集合名称 + 下划线 + 属性名称,如果没有该值,则使用默认值
        paintColor = type.getColor(R.styleable.CustView_paintColor, Color.BLACK);
        paintSize = (int) type.getDimension(R.styleable.CustView_paintSize, 3);

        //最后需要将TypedArray对象回收
        type.recycle();
    }

    private void initPaint() {
        mPaint = new Paint();
        mPaint.setAntiAlias(true); //设置抗锯齿的效果
        mPaint.setStyle(Paint.Style.STROKE); //设置画笔样式为描边
        mPaint.setStrokeWidth(paintSize);  //设置笔刷的粗细度
        mPaint.setColor(paintColor); //设置画笔的颜色
    }


    @Override
    protected void onMeasure(int widthMeasureSpec, int heightMeasureSpec) {
        super.onMeasure(widthMeasureSpec, heightMeasureSpec);

        int width = getSize(100, widthMeasureSpec);
        int height = getSize(100, heightMeasureSpec);

        if(width > height){
            width = height;
        }else{
            height = width;
        }
        setMeasuredDimension(width, height);  //将新计算的宽高测量值进行存储,否则不生效
    }

    private int getSize(int defaultSize, int measureSpec) {

        int mySize = defaultSize;
        int size = MeasureSpec.getSize(measureSpec);
        int mode = MeasureSpec.getMode(measureSpec);

        switch (mode) {
        case MeasureSpec.UNSPECIFIED: // 没有指定大小,设置默认大小.

            mySize = defaultSize;

            break;
        case MeasureSpec.EXACTLY:      // 如果布局中设置的值大于默认值,则使用布局中设置的值,对应match_parent和固定值

            if(size > defaultSize){
                mySize = size;
            }

            break;
        case MeasureSpec.AT_MOST:     // 如果测量模式中的值大于默认值,取默认值,对应wrap_content

            if(size > defaultSize){
                mySize = defaultSize;
            }
            break;
        }
        return mySize;
    }

    @Override
    protected void onDraw(Canvas canvas) {
        super.onDraw(canvas);

        int r = getMeasuredWidth()/2;    //使用getMeasuredWidth 可以获得在onMeasure方法中新计算的宽度

        int cx = getLeft() + r;            //getLeft 表示的是当前View的左边到屏幕左边框的位置距离。这里不建议使用,因为如果view在左边使用其他View时,会影响该值。

        canvas.drawCircle(r, r, r-20, mPaint); //该方法中的四个参数,前两个表示圆心的x,y的坐标。这两个值表示的是相对于该View中的位置,与其他view的位置无关。
    }
}
上面代码的执行效果,如图:
到此,自定义View就结束了,下一篇我将继续讲述自定ViewGroup。


 8181
8181

 被折叠的 条评论
为什么被折叠?
被折叠的 条评论
为什么被折叠?
 到【灌水乐园】发言


