


转载请注明:http://blog.csdn.net/neo___
前言
Android系统上有很多方便实用的小功能,正是因为它们的存在才能让Android开发者们开发出众多让人们轻松上手的好的APP,但是作为一名小白,怎么才能在如此繁多的吸引人的功能中挑选出来那些极致的功能来进行学习呢,接下来你将学习到非常方便实用的功能——通知栏提醒
相信很多人都玩过QQ吧,当手机处于锁屏状态时是不是有一阵阵铃声来提醒你有消息来了?打开屏幕发现屏幕状态栏上方有一个小图标带着一行消息?没错,那就是通知栏提醒功能。有的朋友会问,这种功能要什么时候用呢,假设你做的项目是你的一位好朋友, 你们天天见面聊天还需要通知来提醒你吗,当然不用,只有你的朋友或者你很忙,你们没有机会见面的时候他才会发通知来提醒你想你了,所以,一般情况下,只有当程序进入后台的时候,我们才会用到这个功能。
1.创建一个通知栏
我们的软件可能会根据不同的需求向用户发出不同的通知,这些通知创建起来会很杂乱,所以我们需要NotificationManager来对通知进行管理而获取它的方法就是getSystemService(),这个方法需要接收一个字符串用于确定系统获取的哪个服务,所以获取NotificationManager的实例就可以写成:
NotificationManagermanager = (NotificationManager)getSystemService(Context.NOTIFICATION_SERVICE);额,直接上源码吧,首先先创建一个布局
<RelativeLayout xmlns:android="http://schemas.android.com/apk/res/android"
    xmlns:tools="http://schemas.android.com/tools"
    android:layout_width="match_parent"
    android:layout_height="match_parent"
    android:paddingBottom="@dimen/activity_vertical_margin"
    android:paddingLeft="@dimen/activity_horizontal_margin"
    android:paddingRight="@dimen/activity_horizontal_margin"
    android:paddingTop="@dimen/activity_vertical_margin"
    tools:context=".MainActivity" >

    <Button
        android:id="@+id/send_notice"
        android:layout_width="wrap_content"
        android:layout_height="wrap_content"
        android:layout_alignParentLeft="true"
        android:layout_alignParentTop="true"
        android:layout_marginLeft="82dp"
        android:layout_marginTop="152dp"
        android:text="Send notice" />

</RelativeLayout>
其实主布局里面就一个按钮,因为发出通知需要事件驱动。。。
import android.app.Activity;
import android.app.Notification;
import android.app.NotificationManager;
import android.app.PendingIntent;
import android.content.Intent;
import android.os.Bundle;
import android.view.Menu;
import android.view.View;
import android.view.View.OnClickListener;
import android.widget.Button;

public class MainActivity extends Activity implements OnClickListener {
    private Button sendNotice;

    @Override
    protected void onCreate(Bundle savedInstanceState) {
        super.onCreate(savedInstanceState);
        setContentView(R.layout.activity_main);
        sendNotice = (Button) findViewById(R.id.send_notice);
        sendNotice.setOnClickListener(this);
    }

    @Override
    public boolean onCreateOptionsMenu(Menu menu) {
        // Inflate the menu; this adds items to the action bar if it is present.
        getMenuInflater().inflate(R.menu.main, menu);
        return true;
    }

    @Override
    public void onClick(View v) {
        // TODO Auto-generated method stub
        switch(v.getId()){
        case R.id.send_notice:
            NotificationManager manager = (NotificationManager) getSystemService(NOTIFICATION_SERVICE);
            Notification notification = new Notification(R.drawable.ic_launcher, "This is ticker text", System.currentTimeMillis());
            notification.setLatestEventInfo(this, "这是通知标题", "内容:你有一条通知", null);
            manager.notify(1, notification);
            break;
            default:
                break;
        }

    }

}- Notification的有参构造函数接收三个参数,第一个参数用于指定通知的图标,第二个参数用于指定ticker内容,是一条瞬时信息,第三个参数用于指定通知被创建的时间。
- Notification的setLatestEventInfo()方法是给通知设定一个标准的布局,这个方法接收4个参数,第一个参数是context,第二个参数用于指定通知的标题的内容,第三个参数用于指定通知的正文的内容,第四个参数暂时用不到,所以填NULL就可以。
- 然后调用NotificationManager的notify()方法显示通知,notify()方法接收两个参数,第一个参数是ID,因为每个通知都是不一样的,所以它们的ID也不能一样,第二个参数是Notification对象,就是上述代码创建的对象。
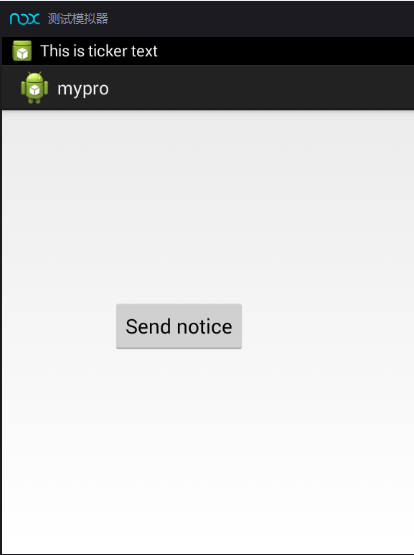
运行程序,如图所示
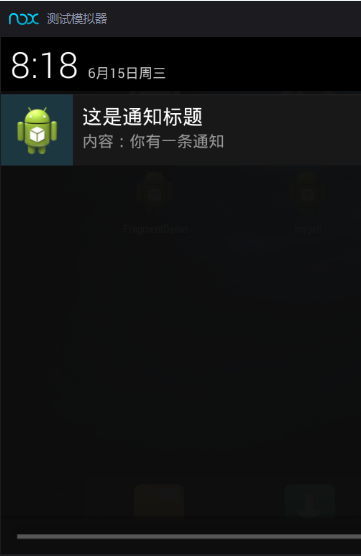
模拟器的状态栏上方有一条消息,而下拉状态栏则会看到通知栏显示的信息,如图所示
但是当你点击它的时候发现,它是没有任何反应的,但是QQ等软件的通知栏消息都是有反应的,所以接下来我们需要对通知栏进行一个优化
,首先创建另一个Activity由通知栏点击进入。
2.通知栏的转向意图
<?xml version="1.0" encoding="utf-8"?>
<RelativeLayout xmlns:android="http://schemas.android.com/apk/res/android"
    android:layout_width="match_parent"
    android:layout_height="match_parent" >

    <TextView
        android:id="@+id/textView1"
        android:layout_width="wrap_content"
        android:layout_height="wrap_content"
        android:layout_alignParentLeft="true"
        android:layout_alignParentTop="true"
        android:layout_marginLeft="50dp"
        android:layout_marginTop="112dp"
        android:text="欢迎来到notification" />

</RelativeLayout>
布局如上所示,为了简单说明,只显示一条信息就可以了,当然你可以在这个布局里面加入更多的东西。接下来创建一个NotificationActivity类并且从AndroidManifest中声明这个Activity。
import android.app.Activity;
import android.app.NotificationManager;
import android.os.Bundle;

public class NotificationActivity extends Activity {

    @Override
    protected void onCreate(Bundle savedInstanceState) {
        // TODO Auto-generated method stub
        super.onCreate(savedInstanceState);
        setContentView(R.layout.notification_layout);
            }
}

<?xml version="1.0" encoding="utf-8"?>
<manifest xmlns:android="http://schemas.android.com/apk/res/android"
    package="com.example.mypro"
    android:versionCode="1"
    android:versionName="1.0" >

    <uses-sdk
        android:minSdkVersion="14"
        android:targetSdkVersion="18" />

    <application
        android:allowBackup="true"
        android:icon="@drawable/ic_launcher"
        android:label="@string/app_name"
        android:theme="@style/AppTheme" >
        <activity
            android:name="com.example.mypro.MainActivity"
            android:label="@string/app_name" >
            <intent-filter>
                <action android:name="android.intent.action.MAIN" />

                <category android:name="android.intent.category.LAUNCHER" />
            </intent-filter>
        </activity>
        <activity android:name=".NotificationActivity"></activity>
    </application>

</manifest>
当这些都完成后就可以修改MainActivity的内容了,如下所示
import android.app.Activity;
import android.app.Notification;
import android.app.NotificationManager;
import android.app.PendingIntent;
import android.content.Intent;
import android.os.Bundle;
import android.view.Menu;
import android.view.View;
import android.view.View.OnClickListener;
import android.widget.Button;

public class MainActivity extends Activity implements OnClickListener {
    private Button sendNotice;

    @Override
    protected void onCreate(Bundle savedInstanceState) {
        super.onCreate(savedInstanceState);
        setContentView(R.layout.activity_main);
        sendNotice = (Button) findViewById(R.id.send_notice);
        sendNotice.setOnClickListener(this);
    }

    @Override
    public boolean onCreateOptionsMenu(Menu menu) {
        // Inflate the menu; this adds items to the action bar if it is present.
        getMenuInflater().inflate(R.menu.main, menu);
        return true;
    }

    @Override
    public void onClick(View v) {
        // TODO Auto-generated method stub
        switch(v.getId()){
        case R.id.send_notice:
            NotificationManager manager = (NotificationManager) getSystemService(NOTIFICATION_SERVICE);
            Notification notification = new Notification(R.drawable.ic_launcher, "This is ticker text", System.currentTimeMillis());
            Intent intent = new Intent(this,NotificationActivity.class);
            PendingIntent p = PendingIntent.getActivity(this,0,intent,PendingIntent.FLAG_CANCEL_CURRENT);
            notification.setLatestEventInfo(this, "这是通知标题", "内容:你有一条通知", p);
            manager.notify(1, notification);
            break;
            default:
                break;
        }

    }

}
- PendingIntent虽然看起来和Intent有些相似,并且它们都可以指明某一个意图,但是Intent更加倾向于立即去执行某个动作吗,而PendingIntent则更加倾向于在某个时刻或者某个时机去执行某个动作,所以也可以把PendingIntent简单地理解为延迟执行的Intent。
- 上述例子是用getActivity()这个方法来获取PendingIntent的实例的,但还有getBroadcast(),getService这两个方法来获取,这几个方法的参数都是相同的,第一个参数是context,第二个参数是0,一般用不到第二个参数,第三个参数是一个Intent对象,第四个参数用于确定PendingIntent的行为。
3.取消通知栏状态
最后运行程序却发现屏幕状态栏上方的消息并没有消失,那么调用NotificationManager的cancel()方法就可以了,代码如下所示:
import android.app.Activity;
import android.app.NotificationManager;
import android.os.Bundle;

public class NotificationActivity extends Activity {

    @Override
    protected void onCreate(Bundle savedInstanceState) {
        // TODO Auto-generated method stub
        super.onCreate(savedInstanceState);
        setContentView(R.layout.notification_layout);
        NotificationManager manager = (NotificationManager) getSystemService(NOTIFICATION_SERVICE);
        manager.cancel(1);

    }
}
我们在cancel()方法中传入了一个1,这个1就是在创建通知的时候给每条通知指定的那个ID。
好了,到这里通知栏提醒的基本功能就结束了,当然Android中还有很多有趣的功能等着我们去发掘,学习的脚步并没有停止,因为学习是没有结束的,以上博文如有不妥的地方欢迎众神指出。


 9976
9976

 被折叠的 条评论
为什么被折叠?
被折叠的 条评论
为什么被折叠?
 到【灌水乐园】发言


