


带自动补全与历史记录的自定义搜索框
车票列表以及车票详情页的实现请参照博客:Android学习 UI模仿练习之“巴士管家”选取车票
本篇博客就不再赘述
一、界面效果


二、设计实现
(一)需求分析
- 搜索界面 包括搜索框与历史记录的显示
- 搜索结果界面 一个搜索结果的列表
- 搜索内容可以自动补全
- 点击历史记录可直接获取搜索结果
- 以车票为例,可在三个维度(出发地,目的地,巴士类型)进行搜索,仅做简单的搜索展示
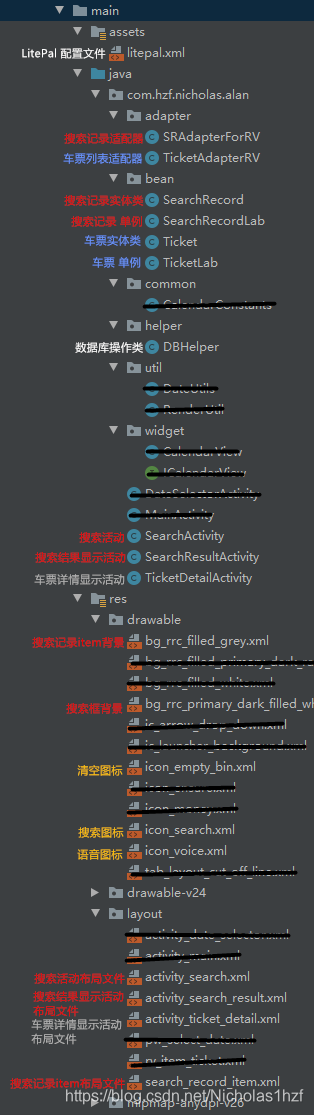
(二)文件列表
(三)完整代码获取
(四)关键代码讲解
1. 车票和搜索记录的单例实现以及数据库的相关操作
A.)单例介绍
单例模式(Singleton Pattern)是 Java 中最简单的设计模式之一。这种类型的设计模式属于创建型模式,它提供了一种创建对象的最佳方式。这种模式涉及到一个单一的类,该类负责创建自己的对象,同时确保只有单个对象被创建。这个类提供了一种访问其唯一的对象的方式,可以直接访问,不需要实例化该类的对象。
B.)车票单例实现
/**********TicketLab**********/
public class TicketLab {
	//车票单例
    private static TicketLab sTicketLab;
    //车票集合
    private List<Ticket> mTickets;
    //上下文
    private Context mContext;
	//提供一种访问其唯一的对象的方式,可以直接访问
    public static TicketLab getInstance(Context context){
    	//该类负责创建自己的对象,同时确保只有单个对象被创建。
    	//如果不存在则new一个,存在了直接返回
        if (sTicketLab == null){
            sTicketLab = new TicketLab(context);
        }
        return sTicketLab;
    }

    private TicketLab(Context context){
        mContext = context;
        initTickets();
    }

    ...

    //获取所有的车票的部分信息(出发地,目的地,巴士类型),用于自动补全
    public List<String> getTicketsInfo(){
        List<String> data = new ArrayList<>();
        for (Ticket ticket : mTickets) {
            if (!data.contains(ticket.getOriginStation())){
                data.add(ticket.getOriginStation());
            }
            if (!data.contains(ticket.getDestinationStation())){
                data.add(ticket.getDestinationStation());
            }
            if (!data.contains(ticket.getBusType())){
                data.add(ticket.getBusType());
            }
        }
        return data;
    }
	//是否为车票信息(全匹配才判定为是)
    public boolean isTicketsInfo(String content){
        for (Ticket ticket : mTickets) {
            if (ticket.getOriginStation().equals(content)||ticket.getDestinationStation().equals(content)||ticket.getBusType().equals(content)){
                return true;
            }
        }
        return false;
    }
C.)搜索记录单例介绍
/**********SearchRecordLab**********/
public class SearchRecordLab {

    private static SearchRecordLab sSearchRecordLab;
    private List<SearchRecord> mSearchRecords;

    public static SearchRecordLab get(Context context){
        if (sSearchRecordLab == null){
            sSearchRecordLab = new SearchRecordLab(context);
        }
        return sSearchRecordLab;
    }

    private SearchRecordLab(Context context){
        mSearchRecords = new ArrayList<>();
        mSearchRecords.addAll(DBHelper.getHistoryRecords());
    }

    public List<SearchRecord> getSearchRecords() {
        return mSearchRecords;
    }

	//添加搜索记录
    public void addSearchRecord(String content){
    	//判断是否存在该搜索记录
        boolean isExist = false;
        for (SearchRecord searchRecord : mSearchRecords) {
            if (searchRecord.getContent().equals(content)){
                isExist = true;
            }
        }
        //如果已经存在该搜索记录,则不添加,否则添加
        if (!isExist){
        	//将搜索记录添加到数据库
            DBHelper.insertHistoryRecord(content);
            SearchRecord sr = new SearchRecord();
            sr.setType(0);
            sr.setContent(content);
            mSearchRecords.add(sr);
        }
    }

	//清空所有的搜索记录,包括数据库
    public void clearSearchRecords(){
        DBHelper.deleteAllHistoryRecords();
        mSearchRecords.clear();
    }

	//获取历史记录的字符串集合
    public List<String> getHistoryToStringList(){
        List<String> strings = new ArrayList<>();
        for (SearchRecord searchRecord : mSearchRecords) {
            strings.add(searchRecord.getContent());
        }
        return strings;
    }
}
D.)数据库操作
/**********DBHelper**********/
private static SQLiteDatabase db = LitePal.getDatabase();

//获取所有的历史记录
public static List<SearchRecord> getHistoryRecords(){
	List<SearchRecord> records = LitePal.where("type == 0 ").find(SearchRecord.class);
    return records;
}
//保存一条历史记录
public static void insertHistoryRecord(String content){
	SearchRecord sr = new SearchRecord();
    sr.setContent(content);
    sr.setType(0);
    sr.save();
}
//删除所有的历史记录
public static void deleteAllHistoryRecords(){
	LitePal.deleteAll(SearchRecord.class, "type == 0");
}
2. 搜索界面,包括搜索框与历史记录的显示;搜索内容可以自动补全;点击历史记录可直接获取搜索结果

难点: 自动补全与历史记录的排列
思路介绍:
UI 思路: 自动补全采用 AutoCompleteTextView 实现,提示补全的下拉框为了美观,写了一个 invisibile的view,让下拉框在该 view 的下方出现;历史记录的排列为放得下就放,放不下就另外起一行,采用 Flexbox 与 RecyclerView 实现。
逻辑思路: 依据搜索框内容,点击搜索时,要完成以下四件事情:
- 1.)将搜索记录加入下方 RecyclerView 的适配器数据集合并刷新 RecyclerView;
- 2.)将搜索记录加入 AutoCompleteTextView 的适配器数据集合当中;
- 3.)把搜索记录保存到数据库;
- 4.)将搜索内容传入新活动中,完成搜索功能。点击历史记录进行搜索时,仅需要将搜索内容传入新活动中,完成搜索功能。点击清空图标时,需完成以下两件事情:(1)弹窗,提示用户是否清除历史记录;(2)若用户选择否,则 Toast 提示取消操作;若用户选择是则清空 RecyclerView 的适配器数据集合并刷新 RecyclerView,清空 AutoCompleteTextView 的适配器数据集合,Toast 提示完成操作。
- 值得注意的是重复搜索的数据需要做筛选,不做二次保存。
A.)布局实现
<?xml version="1.0" encoding="utf-8"?>
<!--**********activity_search**********-->
<LinearLayout xmlns:android="http://schemas.android.com/apk/res/android"
    xmlns:app="http://schemas.android.com/apk/res-auto"
    xmlns:tools="http://schemas.android.com/tools"
    android:layout_width="match_parent"
    android:layout_height="match_parent"
    android:orientation="vertical"
    tools:context=".SearchActivity">

    <LinearLayout
        android:id="@+id/widget_search_ll"
        android:layout_width="match_parent"
        android:layout_height="30dp"
        android:layout_marginLeft="14dp"
        android:layout_marginRight="14dp"
        android:layout_marginTop="14dp"
        android:layout_marginBottom="7dp"
        android:background="@drawable/bg_rrc_primary_dark_filled_white">

        <ImageView
            android:id="@+id/widget_search_left_icon_iv"
            android:layout_width="22dp"
            android:layout_height="22dp"
            android:layout_margin="4dp"
            app:srcCompat="@drawable/icon_search" />

        <AutoCompleteTextView
            android:id="@+id/widget_search_ac_tv"
            android:layout_width="0dp"
            android:layout_height="match_parent"
            android:layout_weight="1"
            android:dropDownAnchor="@id/widget_search_view"
            android:completionThreshold="2"
            android:background="@null"
            android:hint="@string/search_hint"
            android:textSize="14sp"
            android:textColor="@color/fc_light_grey"
            android:singleLine="true"
            android:imeOptions="actionSearch"/>

        <ImageView
            android:id="@+id/widget_search_right_icon_iv"
            android:layout_width="22dp"
            android:layout_height="22dp"
            android:layout_margin="4dp"
            app:srcCompat="@drawable/icon_voice"/>

    </LinearLayout>

    <View
        android:id="@+id/widget_search_view"
        android:layout_width="match_parent"
        android:layout_height="1dp"
        android:layout_marginLeft="36dp"
        android:layout_marginRight="36dp"
        android:visibility="invisible" />

    <RelativeLayout
        android:id="@+id/widget_search_rl"
        android:layout_width="match_parent"
        android:layout_height="wrap_content"
        android:layout_marginLeft="14dp"
        android:layout_marginRight="14dp">

        <TextView
            android:id="@+id/widget_search_history_tv"
            android:layout_width="wrap_content"
            android:layout_height="wrap_content"
            android:layout_marginTop="4dp"
            android:layout_marginBottom="4dp"
            android:layout_alignParentTop="true"
            android:text="@string/search_history"
            android:textSize="14sp"
            android:textStyle="bold"
            android:textColor="@color/fc_light_dark"/>

        <ImageView
            android:id="@+id/widget_search_empty_iv"
            android:layout_width="22dp"
            android:layout_height="22dp"
            android:layout_marginTop="4dp"
            android:layout_marginBottom="4dp"
            android:layout_alignParentRight="true"
            android:layout_alignParentTop="true"
            android:layout_toLeftOf="@id/widget_search_history_tv"
            app:srcCompat="@drawable/icon_empty_bin"/>

        <androidx.recyclerview.widget.RecyclerView
            android:id="@+id/widget_search_history_rv"
            android:layout_width="match_parent"
            android:layout_height="wrap_content"
            android:layout_below="@id/widget_search_empty_iv" />

    </RelativeLayout>

</LinearLayout>
B.)AutoCompleteTextView 自动补全文本框
| 属性名 | 属性值 | 效果 |
|---|---|---|
| dropDownAnchor | @id/widget_search_view | 下拉框锚点即补全下拉框在何处出现 |
| completionThreshold | 2 | 补全阈值即输入几个字符后开始补全 |
| imeOptions | actionSearch | 软键盘右下角返回按钮的动作指令,此处为搜索 |
C.)AutoCompleteTextView 绑定数据集合等相关操作
/**********SearchActivity**********/
//绑定控件
AutoCompleteTextView mAutoCompleteTextView = (AutoCompleteTextView)findViewById(R.id.widget_search_ac_tv);
//新建数组适配器用于 AutoCompleteTextView 控件 参数一:上下文 参数二:布局样式(此处采用android自带的简易布局) 参数三:数据集合,此处为历史搜索记录的字符串集合
ArrayAdapter mArrayAdapter = new ArrayAdapter(this,android.R.layout.simple_list_item_1,SearchRecordLab.get(this).getHistoryToStringList());
//添加车票相关信息的字符串集合到数组适配器中用于自动补全
mArrayAdapter.addAll(TicketLab.getInstance(this).getTicketsInfo());
//给自动补全文本框设置适配器
mAutoCompleteTextView.setAdapter(mArrayAdapter);
//AutoCompleteTextView 编辑活动监听
mAutoCompleteTextView.setOnEditorActionListener(new AutoCompleteTextView.OnEditorActionListener() {
	@Override
    public boolean onEditorAction(TextView v, int actionId, KeyEvent event) {
    	//若为搜索活动,则开始执行相关逻辑
    	if (actionId == EditorInfo.IME_ACTION_SEARCH) {
        	String content = v.getText().toString();
        	//搜索内容为空,则退出,不执行逻辑
            if ("".equals(content)){
            	return false;
            }
            //将搜索记录添加到搜索记录的单例当中,单例中关于重复值处理还有数据库处理的逻辑,见本篇博客的上方内容
            SearchRecordLab.get(SearchActivity.this).addSearchRecord(content);
            //历史记录RecyclerView 刷新数据集合
            mAdapter.notifyDataSetChanged();
            //将搜索框的文本清空
            v.setText("");
            //若为新的搜索内容(即非车票相关信息也不是已有的搜索记录),则添加到补全适配器中的数据集合
            if (!TicketLab.getInstance(SearchActivity.this).isTicketsInfo(content)){
            	mArrayAdapter.add(content);
            }
            //跳转到搜索结果界面,并将搜索内容传递过去
            Intent intent = new Intent(SearchActivity.this,SearchResultActivity.class);
            intent.putExtra(SEARCH_CONTENT,content);
            startActivity(intent);
            return true;
        }
        return false;
    }
});
D.)RecyclerView 绑定数据集合等相关操作
/**********SearchActivity**********/
//绑定控件
RecyclerView mHistoryRV = (RecyclerView)findViewById(R.id.widget_search_history_rv);
//设置适配器
SRAdapterForRV mAdapter = new SRAdapterForRV(SearchRecordLab.get(this).getSearchRecords());
FlexboxLayoutManager layoutManager = new FlexboxLayoutManager(this);
layoutManager.setFlexWrap(FlexWrap.WRAP); //设置是否换行
layoutManager.setAlignItems(AlignItems.STRETCH);
mHistoryRV.setLayoutManager(layoutManager);
mHistoryRV.setAdapter(mAdapter);
//历史记录点击事件
mAdapter.setOnItemClickListener(new SRAdapterForRV.OnItemClickListener() {
	@Override
    public void onClick(SearchRecord searchRecord) {
    	//跳转到搜索结果界面,并将搜索内容传递过去
    	String content = searchRecord.getContent();
        Intent intent = new Intent(SearchActivity.this,SearchResultActivity.class);
        intent.putExtra(SEARCH_CONTENT,content);
        startActivity(intent);
   }
});
E.)清空历史记录操作
/**********SearchActivity**********/
//绑定控件
ImageView mEmptyIV = (ImageView) findViewById(R.id.widget_search_empty_iv);
mEmptyIV.setOnClickListener(new View.OnClickListener() {
	@Override
    public void onClick(View v) {
    	//通过AlertDialog.Builder创建一个AlertDialog的实例
    	AlertDialog.Builder dialog = new AlertDialog.Builder(SearchActivity.this);
        //设置对话框的标题,内容,可否取消属性
        dialog.setTitle(getResources().getString(R.string.alert_dialog_title));
        dialog.setMessage(getResources().getString(R.string.alert_dialog_msg_for_search_activity));
        dialog.setCancelable(true);
        //调用setPositiveButton()方法为对话框设置确定按钮的点击事件
        dialog.setPositiveButton(getResources().getString(R.string.alert_dialog_ok), new DialogInterface.OnClickListener() {
            @Override
            public void onClick(DialogInterface dialogInterface, int i) {
            	//清空历史记录以及自动补全数据集合中的历史记录,并提示操作完成
                SearchRecordLab.get(SearchActivity.this).clearSearchRecords();
                mAdapter.notifyDataSetChanged();
                mArrayAdapter.clear();
                mArrayAdapter.addAll(TicketLab.getInstance(SearchActivity.this).getTicketsInfo());
                Toast.makeText(SearchActivity.this,getResources().getString(R.string.alert_dialog_ok_toast),Toast.LENGTH_SHORT).show();
            }
        });
        //调用setNegativeButton()方法为对话框设置取消按钮的点击事件
        dialog.setNegativeButton(getResources().getString(R.string.alert_dialog_cancel), new DialogInterface.OnClickListener() {
            @Override
            public void onClick(DialogInterface dialogInterface, int i) {
            	//提示操作取消
                Toast.makeText(SearchActivity.this,getResources().getString(R.string.alert_dialog_cancel_toast),Toast.LENGTH_SHORT).show();
            }
        });
        dialog.show();//将对话框显示出来
    }
});
3. 搜索功能的模拟实现
A.)获取上一个活动传递过来的数据
/**********SearchResultActivity**********/
String searchContent = getIntent().getStringExtra(SEARCH_CONTENT);
B.)依据搜索内容进行搜索并获得搜索结果
/**********TicketLab**********/
/**
*
* @param content 搜索内容
* @param type 搜索类型 0 按照出发地点搜索 1 按照目的地搜索 2 按照巴士类型搜索 3 0+1+2
* @return List<Ticket>
*/
public List<Ticket> searchResult(String content,int type){
	List<Ticket> tickets = new ArrayList<>();
	...
	//包含匹配即添加进搜索结果列表
    for (Ticket ticket : mTickets) {
    	if (ticket.getOriginStation().contains(content) || ticket.getDestinationStation().contains(content) || ticket.getBusType().contains(content)){
        	tickets.add(ticket);
        }
    }
	...
    if (tickets.size() > 0){
    	return tickets;
    }else {
        return mTickets;
    }
}
/**********SearchResultActivity**********/
mTickets.addAll(TicketLab.getInstance(this).searchResult(searchContent,3));
C.)搜索结果的展示
/**********SearchResultActivity**********/
//绑定控件
RecyclerView mRecyclerView = findViewById(R.id.recycler_view);
//将搜索结果的数据集合添加进适配器,并将适配器设置给相应的 RecyclerView
LinearLayoutManager layoutManagerMR = new LinearLayoutManager(this);
layoutManagerMR.setOrientation(LinearLayoutManager.VERTICAL);//设置布局的排列方向
mRecyclerView.setLayoutManager(layoutManagerMR);
TicketAdapterRV mAdapter = new TicketAdapterRV(mTickets,this);
mRecyclerView.setAdapter(mAdapter);
//添加分割线
mRecyclerView.addItemDecoration(new DividerItemDecoration(this,DividerItemDecoration.VERTICAL));
三、心得体会
多学习,多编码,多思考。实现后想想有没有更好的实现方法!与君共勉,一同进步!
持续学习Android中,如有错误请批评指正!


 565
565


 被折叠的 条评论
为什么被折叠?
被折叠的 条评论
为什么被折叠?
 到【灌水乐园】发言


