每一个iOS应用都一个UIWindow的实例,这个不过是一个UIView的子类,因此我们可以在UIWindow上的做动画,而这样的动画可以用来做View的转换。
下面的工程用Xcode4.2建立
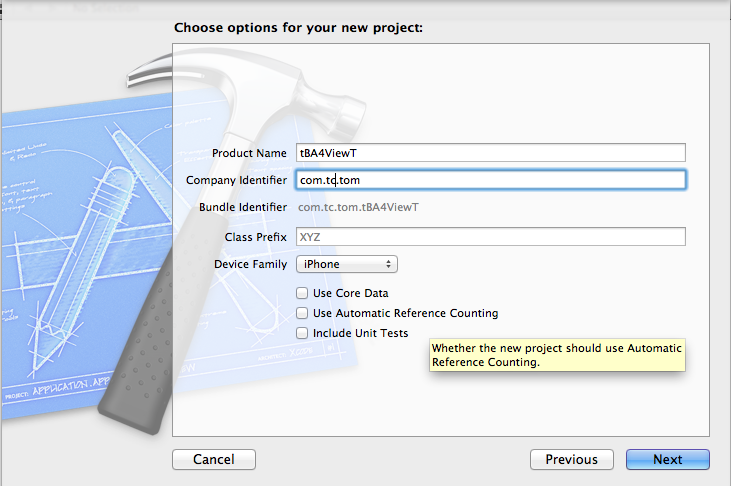
1.新建一个Empty Application,设置如下:

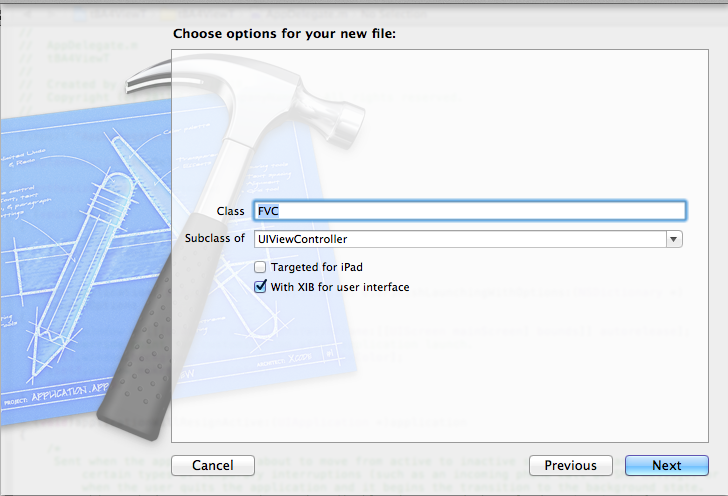
2.增加一个ViewController类,配置如下:

打开FVC.xib,加入一个button,命名为 goto two,为它的touch up inside事件加入一个响应函数。
3.使用上面同样的方法,加入一个SVC类,也加入一个button,命名为back,也为它的touch up inside事件加入一个响应函数。
4.修改AppDelegate.h文件如下:
@classFVC;
@classSVC;
@interface AppDelegate :UIResponder <UIApplicationDelegate> {
FVC *_fvc;
SVC *_svc;
}
@property (strong,nonatomic) UIWindow *window;
- (void)flipAction:(id)sender;
@end
5.在AppDelegate.m中实现函数flipAction:
#pragma mark -
#pragma mark === Flip action ===
#pragma mark -
- (void)flipAction:(id)sender {
[UIViewbeginAnimations:nilcontext:NULL];
[UIViewsetAnimationDuration:0.5];
[UIViewsetAnimationTransition:([_fvc.viewsuperview] ? UIViewAnimationTransitionFlipFromLeft :UIViewAnimationTransitionFlipFromRight) forView:self.windowcache:YES];
if ([_fvc.viewsuperview]) {
[_fvc.viewremoveFromSuperview];
[self.windowaddSubview:_svc.view];
} else {
[_svc.viewremoveFromSuperview];
[self.windowaddSubview:_fvc.view];
}
[UIViewcommitAnimations];
}
6.在AppDelegate.m中修改函数
- (BOOL)application:(UIApplication *)application didFinishLaunchingWithOptions:(NSDictionary *)launchOptions
{
_svc = [[SVCalloc] initWithNibName:@"SVC"bundle:nil];
_fvc = [[FVCalloc] initWithNibName:@"FVC"bundle:nil];
self.window = [[[UIWindowalloc] initWithFrame:[[UIScreenmainScreen] bounds]]autorelease];
// Override point for customization after application launch.
self.window.backgroundColor = [UIColorwhiteColor];
[self.windowaddSubview:_fvc.view];
[self.windowmakeKeyAndVisible];
return YES;
}
7.在AppDelegate.m中修改函数dealloc
- (void)dealloc
{
[_svcrelease];
[_fvcrelease];
[_windowrelease];
[superdealloc];
}
千万不要忘了忘记内存管理。
8.在FVC.m中实现button的响应事件代码:
#import"AppDelegate.h"
- (IBAction)gotoTwo:(id)sender {
AppDelegate *appD = (AppDelegate *)[UIApplicationsharedApplication].delegate;
[appD flipAction:nil];
}
9.在SVC.m中做同样的事情。
工程代码如下:
http://download.csdn.net/detail/NickTang/3692498


 2785
2785

 被折叠的 条评论
为什么被折叠?


