


简介
声明:本博客由狂神说Java视频整理而成
- GUI为Graphical User Interface(图形用户接口)的简称
- 主要涉及到两个包
- java.awt
- Abstract Window ToolKit (抽象窗口工具包),需要调用本地系统方法实现功能。属重量级控件
- javax.swing:
- 在AWT的基础上,建立的一套图形界面系统,其中提供了更多的组件,而且完全由Java实现。增强了移植性,属轻量级控件
- java.awt
- 不太流行的原因
- 界面不美观
- 需要jre环境,需要的空间大
AWT
AWT介绍
- 包含许多类与接口的一个包
- 包含很多元素:窗口、按钮、文本框…
- 位于java.awt包中
AWT体系结构
- 组件component
- 可以直接使用的组件(这些组件存放到组件中)
- 按钮button、文本域TextArea、标签Label…
- 容器Container
- 窗口Window
- Frame
- Dialog
- 面板Panel
- Applet
- 窗口Window
- 可以直接使用的组件(这些组件存放到组件中)
组件和容器
Frame
代码
package com.nightfall.Lesson_1;

import java.awt.*;

//GUI的第一个界面
public class TestFrame {
    public static void main(String[] args) {
        //Frame,初始化后还在内存中,需要设置可见性
        Frame frame = new Frame("我的第一个Java图形界面窗口");

        //设置可见性,窗口默认大小为0
        frame.setVisible(true);

        //需要设置窗口大小
        frame.setSize(400,400);

        //设置背景颜色,Color
        frame.setBackground(new Color(255, 200, 0));

        //弹出的初始位置
        frame.setLocation(200,200);

		//设置大小固定
		frame.setResizable(false);

    }
}
运行结果

到此时,程序便可以运行,但是弹出的窗口无法关闭,可以通过停止程序运行来关闭窗口
显示多个窗口
代码
package com.nightfall.Lesson_1;
import java.awt.*;
public class TestFrame2 {
public static void main(String[] args) {
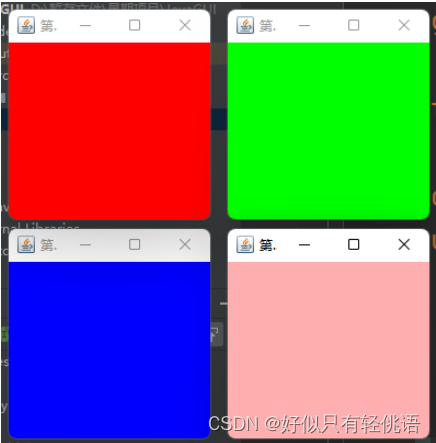
MyFrame myFrame1 = new MyFrame(100, 100, 200, 200, new Color(255, 0, 0));
MyFrame myFrame2 = new MyFrame(300, 100, 200, 200, new Color(0, 255, 0));
MyFrame myFrame3 = new MyFrame(100, 300, 200, 200, new Color(0, 0, 255));
MyFrame myFrame4 = new MyFrame(300, 300, 200, 200, new Color(255, 175, 175));
}
}
class MyFrame extends Frame{
static int id = 0;
MyFrame(int x,int y,int w,int h,Color color){
//初始化Frame的标题
super("第"+(id++)+"个Frame");
//设置背景颜色
setBackground(color);
//设置窗口范围,包括位置和大小
setBounds(x,y,w,h);
//设置窗口可见
setVisible(true);
}
}
运行结果
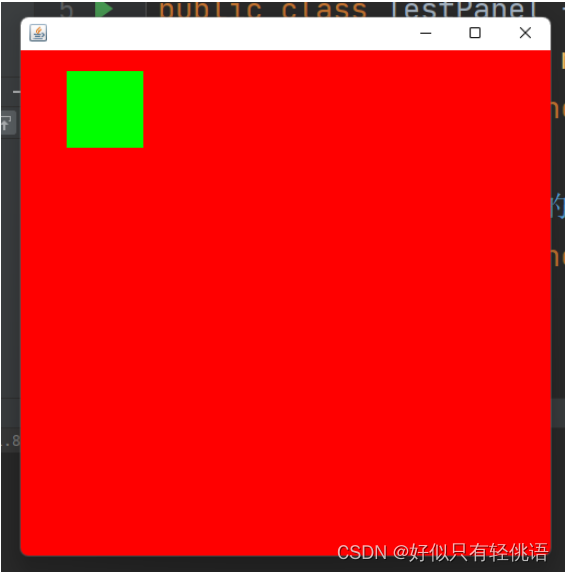
面板Panel
可以视作一个盒子,但是不能单独存在,需要放到Frame里去
代码
package com.nightfall.Lesson_1;

import java.awt.*;

public class TestPanel {
    public static void main(String[] args) {
        Frame frame = new Frame();

        //面板涉及到布局的概念
        Panel panel = new Panel();

        //暂时布局设置为null
        frame.setLayout(null);
        frame.setBounds(300,300,500,500);
        frame.setBackground(new Color(255,0,0));

        //panel设置,相对与包含它的frame
        panel.setBounds(50,50,70,70);
        panel.setBackground(new Color(0,255,0));

        //将panel添加到frame中去
        frame.add(panel);

        frame.setVisible(true);

    }
}
运行结果
目前,点击右上角按钮还是无法关闭窗口,解决这个问题需要用到监听事件
需要将这段代码添加到后面
//监听窗口关闭事件
//用到适配器模式,就不需要重写所有方法了
frame.addWindowListener(new WindowAdapter() {
    //窗口关闭的时候需要做的事情
    @Override
    public void windowClosing(WindowEvent e) {
        //结束程序
        System.exit(0);
    }
});
布局管理Layout
分为三种:流式布局、东南西北中布局、表格布局
流式布局
从左至右或者从右至左排列
package com.nightfall.Lesson_1;

import java.awt.*;
import java.awt.event.WindowAdapter;
import java.awt.event.WindowEvent;

public class TestFlowLayout {
    public static void main(String[] args) {
        Frame frame = new Frame();

        //组件-Button
        Button button1 = new Button("button1");
        Button button2 = new Button("button2");
        Button button3 = new Button("button3");

        //默认方式为元素居中
        //frame.setLayout(new FlowLayout());
        //设置元素靠左放置
        //frame.setLayout(new FlowLayout(FlowLayout.LEFT));
        //设置元素靠右放置
        frame.setLayout(new FlowLayout(FlowLayout.RIGHT));
        //frame.setLayout(new FlowLayout());

        frame.setBounds(200,200,500,500);

        //添加按钮
        frame.add(button1);
        frame.add(button2);
        frame.add(button3);
        frame.setVisible(true);

        //监听窗口关闭事件
        //用到适配器模式,就不需要重写所有方法了
        frame.addWindowListener(new WindowAdapter() {
            //窗口关闭的时候需要做的事情
            @Override
            public void windowClosing(WindowEvent e) {
                //结束程序
                System.exit(0);
            }
        });

    }
}
下图为靠右放置的效果
![![[Pasted image 20220510191125.png]]](https://img-blog.csdnimg.cn/0a356cbcdada4028ac5f19f9fa8dee9e.png)
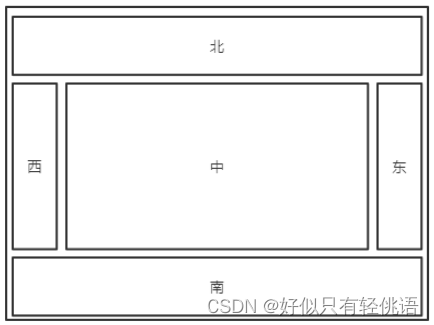
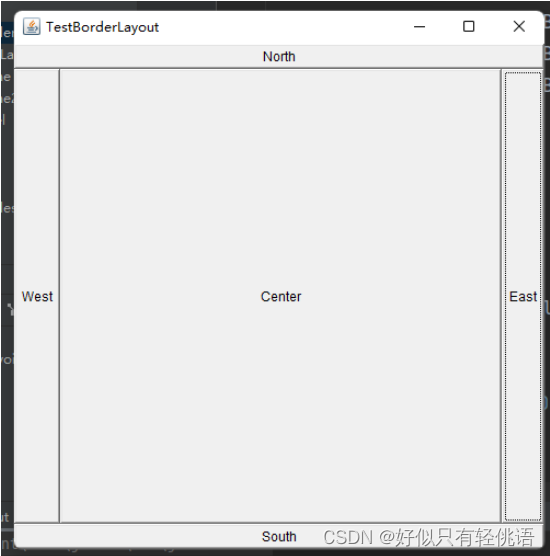
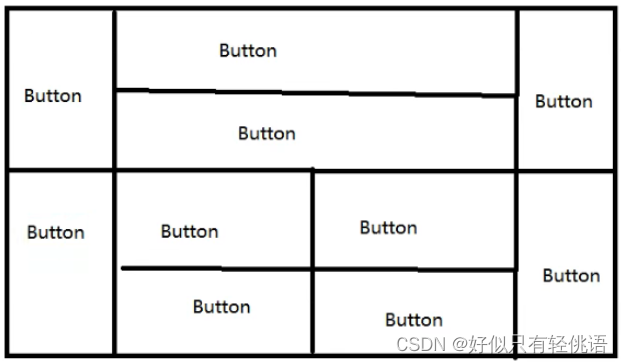
东南西北中
将frame分为一下五个区域,你可以将不同的组件分别放到这几个区域中
示意图
package com.nightfall.Lesson_1;

import java.awt.*;
import java.awt.event.WindowAdapter;
import java.awt.event.WindowEvent;

public class TestFlowLayout {
    public static void main(String[] args) {
        Frame frame = new Frame();

        //组件-Button
        Button button1 = new Button("button1");
        Button button2 = new Button("button2");
        Button button3 = new Button("button3");

        //默认方式为元素居中
        //frame.setLayout(new FlowLayout());
        //设置元素靠左放置
        //frame.setLayout(new FlowLayout(FlowLayout.LEFT));
        //设置元素靠右放置
        frame.setLayout(new FlowLayout(FlowLayout.RIGHT));
        //frame.setLayout(new FlowLayout());

        frame.setBounds(200,200,500,500);

        //添加按钮
        frame.add(button1);
        frame.add(button2);
        frame.add(button3);

        frame.setVisible(true);

        //监听窗口关闭事件
        //用到适配器模式,就不需要重写所有方法了
        frame.addWindowListener(new WindowAdapter() {
            //窗口关闭的时候需要做的事情
            @Override
            public void windowClosing(WindowEvent e) {
                //结束程序
                System.exit(0);
            }
        });

    }
}
运行结果
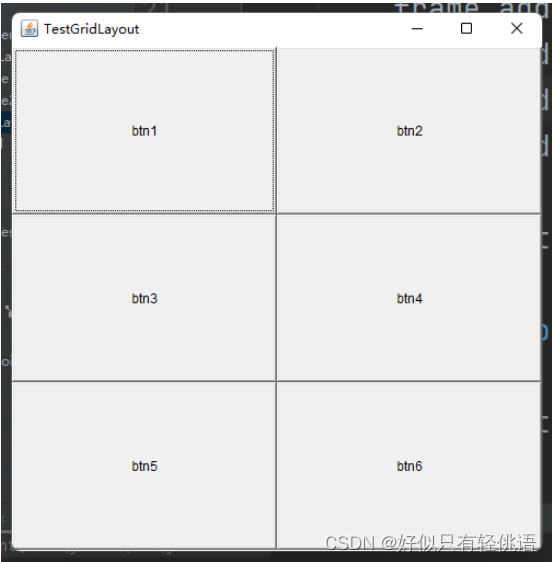
表格布局
package com.nightfall.Lesson_1;

import java.awt.*;

public class TestGridLayout {
    public static void main(String[] args) {
        Frame frame = new Frame("TestGridLayout");

        Button btn1 = new Button("btn1");
        Button btn2 = new Button("btn2");
        Button btn3 = new Button("btn3");
        Button btn4 = new Button("btn4");
        Button btn5 = new Button("btn5");
        Button btn6 = new Button("btn6");

        //设置为三行两列
        frame.setLayout(new GridLayout(3,2));

        frame.add(btn1);
        frame.add(btn2);
        frame.add(btn3);
        frame.add(btn4);
        frame.add(btn5);
        frame.add(btn6);

        frame.setVisible(true);

        //frame.pack();

        frame.setBounds(200,200,500,500);

    }
}
运行结果
课后小作业
实现如下界面
代码一
package com.nightfall.Lesson_1;

import java.awt.*;

public class TestHomeWork_1 {
    public static void main(String[] args) {
        Frame frame = new Frame("HomeWork");
        Panel TopCenter = new Panel();
        Panel BottomCenter = new Panel();
        Button btn1 = new Button("btn1");
        Button btn2 = new Button("btn2");
        Button btn3 = new Button("btn3");
        Button btn4 = new Button("btn4");
        Button btn5 = new Button("btn5");
        Button btn6 = new Button("btn6");
        Button btn7 = new Button("btn7");
        Button btn8 = new Button("btn8");
        Button btn9 = new Button("btn9");
        Button btn10 = new Button("btn10");

        frame.setLayout(new GridLayout(2,3));
        TopCenter.setLayout(new GridLayout(2,1));
        BottomCenter.setLayout(new GridLayout(2,2));

        frame.add(btn1);
        frame.add(TopCenter);
        TopCenter.add(btn2);
        TopCenter.add(btn3);
        frame.add(btn4);

        frame.add(btn5);
        frame.add(BottomCenter);
        BottomCenter.add(btn6);
        BottomCenter.add(btn7);
        BottomCenter.add(btn8);
        BottomCenter.add(btn9);
        frame.add(btn10);

        frame.setVisible(true);

        frame.setBounds(200,200,700,500);
    }
}
运行结果
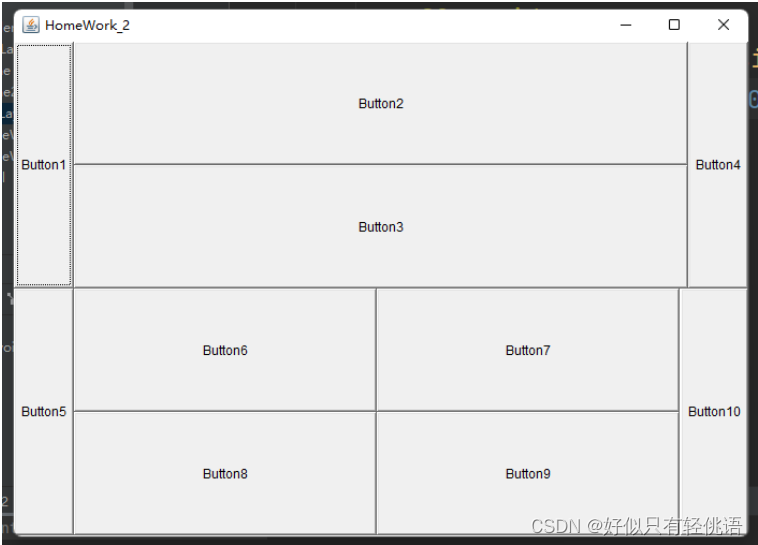
代码二
public class TestHomeWork_2 {
    public static void main(String[] args) {
        Frame frame = new Frame("HomeWork_2");
        frame.setLayout(new GridLayout(2,1));

        Panel top = new Panel(new BorderLayout());
        Panel bottom = new Panel(new BorderLayout());

        frame.add(top);
        frame.add(bottom);

        Button east_top = new Button("Button1");
        Button west_top = new Button("Button4");
        Button btn2 = new Button("Button2");
        Button btn3 = new Button("Button3");
        Panel center_top = new Panel();
        center_top.setLayout(new GridLayout(2,1));
        Button east_bottom = new Button("Button5");
        Button west_bottom = new Button("Button10");
        Button btn6 = new Button("Button6");
        Button btn7 = new Button("Button7");
        Button btn8 = new Button("Button8");
        Button btn9 = new Button("Button9");
        Panel center_bottom = new Panel();
        center_bottom.setLayout(new GridLayout(2,2));


        top.add(east_top,BorderLayout.WEST);
        top.add(west_top,BorderLayout.EAST);
        top.add(center_top,BorderLayout.CENTER);
        center_top.add(btn2);
        center_top.add(btn3);
        bottom.add(east_bottom,BorderLayout.WEST);
        bottom.add(west_bottom,BorderLayout.EAST);
        bottom.add(center_bottom,BorderLayout.CENTER);
        center_bottom.add(btn6);
        center_bottom.add(btn7);
        center_bottom.add(btn8);
        center_bottom.add(btn9);

        frame.setVisible(true);

        frame.setBounds(200,200,700,500);

        frame.addWindowListener(new WindowAdapter() {
            @Override
            public void windowClosing(WindowEvent e) {
                System.exit(0);
            }
        });
    }
}
运行结果
- Frame为最外层盒子,并且只能有一个
- Panel必须要加到Frame中去
- 他们之中都可以继续添加panel容器
事件监听
按钮事件监听
我们先来探究一下对于按钮的事件监听有何作用
public class TestActionEvent {
    public static void main(String[] args) {
        Frame frame = new Frame("按钮监听事件");
        Button button = new Button("Button");
        frame.add(button,BorderLayout.CENTER);
        frame.setBounds(400,400,300,300);

        //第一种实现方法,匿名内部类的方法,new接口并且实现方法
//        button.addActionListener(new ActionListener() {
//            @Override
//            public void actionPerformed(ActionEvent e) {
//                System.out.println("aaa");
//            }
//        });
        //另一种使用方法,创建一个新的类去实现ActionListener接口,重写方法,类定义在下方
        button.addActionListener(new MyActionListener());

        windowClose(frame);
        frame.setVisible(true);
    }
    private static void windowClose(Frame frame){
        frame.addWindowListener(new WindowAdapter() {
            @Override
            public void windowClosing(WindowEvent e) {
                System.exit(0);
            }
        });
    }
}

//另一种使用方法,创建一个新的类去实现ActionListener接口,重写方法
class MyActionListener implements ActionListener{

    @Override
    public void actionPerformed(ActionEvent e) {
        System.out.println("aaa");
    }
}
运行效果
点击按钮后,控制台输出aaa
![![[Pasted image 20220518111620.png]]](https://img-blog.csdnimg.cn/399b0b48c695418a8f1bdf90c141b333.png)
以上实现了一个按钮监听一个事件
接下来试试看两个按钮实现事件同一个监听
public class MyActionListener2 {
    public static void main(String[] args) {
        Frame frame = new Frame("测试两个按钮公用同一个监听器");

        Button start = new Button("start");
        Button stop = new Button("stop");

        //通过这种方式修改按钮的信息也可以
        //stop.setActionCommand("s-t-o-p");

        frame.add(start,BorderLayout.NORTH);
        frame.add(stop,BorderLayout.SOUTH);

        MyMonitor myMonitor = new MyMonitor();

        start.addActionListener(myMonitor);
        stop.addActionListener(myMonitor);

        windowClose(frame);
        frame.setBounds(400,400,400,400);
        frame.setVisible(true);
    }

    private static void windowClose(Frame frame){
        frame.addWindowListener(new WindowAdapter() {
            @Override
            public void windowClosing(WindowEvent e) {
                System.exit(0);
            }
        });
    }
}

class MyMonitor implements ActionListener{

    @Override
    public void actionPerformed(ActionEvent e) {
        //e.getActionCommand()获取按钮的信息
        System.out.println("获取的按钮信息,按钮的名字=> " + e.getActionCommand());
    }
}
运行结果
![![[Pasted image 20220519103356.png]]](https://img-blog.csdnimg.cn/b6d615964b854987b25b7ab18bfd3963.png)
输入框TextField
代码
public class TextFieldTest {
    public static void main(String[] args) {
        new MyFrame();
    }
}

class MyFrame extends Frame{
    public MyFrame(){
        TextField textField = new TextField();
        add(textField);

        //暗文密码
        textField.setEchoChar('*');
        //为输入框添加监听事件,键盘按下回车就会触发这个监听事件
        textField.addActionListener(new MyActionListenerTextField());
        setBounds(400,400,400,200);
        setVisible(true);
    }
}
class MyActionListenerTextField implements ActionListener {

    @Override
    public void actionPerformed(ActionEvent e) {
        TextField textField = (TextField)e.getSource();
        System.out.println(textField.getText());
        //每次按下回车触发事件后会清空输入框
        textField.setText("");
    }
}
运行结果
![![[Pasted image 20220519112927.png]]](https://img-blog.csdnimg.cn/5629bd9f784f45ddb6f6d5d117d81dc5.png)
实现超简易计算器
要求实现一个类似这样的计算器
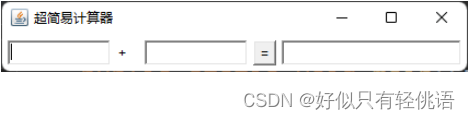
前两个文本框输入加数与被加数,点击等号,结果展示在最后一个文本框,并且清空前两个文本框
面向过程写法
public class CalcTest {
    public static void main(String[] args) {
        new MyCalc();
    }
}
class MyCalc extends Frame {
    public MyCalc(){
        setTitle("超简易计算器");
        //三个输入框
        TextField num1 = new TextField(10);
        TextField num2 = new TextField(10);
        TextField num3 = new TextField(20);
        //一个标签,承载'+'号
        Label label = new Label("+");
        //一个等号,是一个按钮
        Button button = new Button("=");
        button.addActionListener(new MyCalcActionListener(num1,num2,num3));
        setLayout(new FlowLayout());

        add(num1);
        add(label);
        add(num2);
        add(button);
        add(num3);

        setBounds(400,400,400,200);
        windowClose(this);
        pack();
        setVisible(true);
    }
    private static void windowClose(Frame frame){
        frame.addWindowListener(new WindowAdapter() {
            @Override
            public void windowClosing(WindowEvent e) {
                System.exit(0);
            }
        });
    }
}
class MyCalcActionListener implements ActionListener {

    //获取3个变量
    TextField num1;
    TextField num2;
    TextField num3;

    public MyCalcActionListener(TextField num1,TextField num2,TextField num3){
        this.num1 = num1;
        this.num2 = num2;
        this.num3 = num3;
    }

    @Override
    public void actionPerformed(ActionEvent e) {
        //进行计算,首先获得加数和被加数
        int i1 = Integer.parseInt(num1.getText());
        int i2 = Integer.parseInt(num2.getText());
        int i3 = i1 + i2;

        //运算结果放到第三个框里

        num3.setText(i3 + "");

        //清除前两个框中的内容

        num1.setText("");
        num2.setText("");

    }
}
面向对象写法
采用组合的方式
public class CalcTest {
    public static void main(String[] args) {
        new MyCalc().loadCal();
    }
}
class MyCalc extends Frame {

    TextField num1;
    TextField num2;
    TextField num3;

    public void loadCal(){
        setTitle("超简易计算器");
        num1 = new TextField(10);
        num2 = new TextField(10);
        num3 = new TextField(20);
        Label label = new Label("+");
        Button button = new Button("=");


        button.addActionListener(new MyCalcActionListener(this));


        setLayout(new FlowLayout());
        add(num1);
        add(label);
        add(num2);
        add(button);
        add(num3);
        setBounds(400,400,400,200);
        windowClose(this);
        pack();
        setVisible(true);
    }
    private static void windowClose(Frame frame){
        frame.addWindowListener(new WindowAdapter() {
            @Override
            public void windowClosing(WindowEvent e) {
                System.exit(0);
            }
        });
    }
}
class MyCalcActionListener implements ActionListener {

    //属性
    MyCalc myCalc;

    public MyCalcActionListener(MyCalc myCalc){
        this.myCalc = myCalc;
    }

    @Override
    public void actionPerformed(ActionEvent e) {
        //进行计算,首先获得加数和被加数
        //运算结果放到第三个框里
        //清除前两个框中的内容
        int i1 = Integer.parseInt(myCalc.num1.getText());
        int i2 = Integer.parseInt(myCalc.num2.getText());

        myCalc.num3.setText(""+(i1+i2));
        myCalc.num1.setText("");
        myCalc.num2.setText("");
    }
}
内部类
畅通无阻的使用外部类的资源
public class CalcTest {
    public static void main(String[] args) {
        new MyCalc().loadCal();
    }
}
class MyCalc extends Frame {

    TextField num1;
    TextField num2;
    TextField num3;

    public void loadCal(){
        setTitle("超简易计算器");
        num1 = new TextField(10);
        num2 = new TextField(10);
        num3 = new TextField(20);
        Label label = new Label("+");
        Button button = new Button("=");


        button.addActionListener(new MyCalcActionListener());


        setLayout(new FlowLayout());
        add(num1);
        add(label);
        add(num2);
        add(button);
        add(num3);
        setBounds(400,400,400,200);
        windowClose(this);
        pack();
        setVisible(true);
    }

    class MyCalcActionListener implements ActionListener {

        @Override
        public void actionPerformed(ActionEvent e) {
            //进行计算,首先获得加数和被加数
            //运算结果放到第三个框里
            //清除前两个框中的内容
            int i1 = Integer.parseInt(num1.getText());
            int i2 = Integer.parseInt(num2.getText());

            num3.setText(""+(i1+i2));
            num1.setText("");
            num2.setText("");
        }
    }

    private static void windowClose(Frame frame){
        frame.addWindowListener(new WindowAdapter() {
            @Override
            public void windowClosing(WindowEvent e) {
                System.exit(0);
            }
        });
    }
}
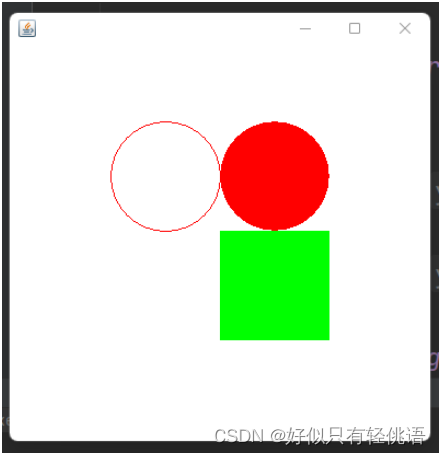
画笔Print
public class PrintTest {
    public static void main(String[] args) {
        new MyPrint().loadFrame();
    }
}

class MyPrint extends Frame{

    //用来设置画板
    public void loadFrame(){
        setVisible(true);
        setBounds(400,400,400,400);
    }

    //画笔
    @Override
    public void paint(Graphics g) {
        //画笔需要有颜色
        g.setColor(Color.red);
        //位置相对于窗口
        //画空心圆
        g.drawOval(100,100,100,100);
        //画实心圆
        g.fillOval(200,100,100,100);

        g.setColor(Color.green);
        //画实心矩形
        g.fillRect(200,200,100,100);

        //使用完画笔之后记得将画笔还原为原来的颜色,原来的颜色为黑色
    }
}
运行结果
鼠标监听事件
- 目的实现鼠标画画
//鼠标监听事件
public class MouseListener {
    public static void main(String[] args) {
        new MyFrame("画图-鼠标监听事件");
    }
}

class MyFrame extends Frame{

    ArrayList<Point> points;

    //画画需要画笔,需要监听鼠标当前的位置,需要集合来存储点
    public MyFrame(String title){
        super(title);
        setBounds(400,400,600,600);

        setVisible(true);

        points = new ArrayList<>();

        this.addMouseListener(new MyMouseListener());
        //鼠标监听器是针对窗口的
    }

    @Override
    public void paint(Graphics g) {
        Iterator<Point> iterator = points.iterator();
        while (iterator.hasNext()){
            Point next = iterator.next();
            g.setColor(Color.BLUE);
            g.fillOval(next.x,next.y,10,10);
        }
    }

	//向集合中添加点
    public void addPoints(Point point) {
        points.add(point);
    }

    private class MyMouseListener extends MouseAdapter {
        @Override
        public void mousePressed(MouseEvent e) {
            MyFrame frame = (MyFrame) e.getSource();
            frame.addPoints(new Point(e.getX()-5,e.getY()-5));
            frame.repaint();
        }
    }

}
运行结果
![![[Pasted image 20220520123642.png]]](https://img-blog.csdnimg.cn/3c27792a6c404c629fde9b566644ded5.png)
窗口监听事件
public class WindowListener {
    public static void main(String[] args) {
        new MyWindowFrame();
    }
}

class MyWindowFrame extends Frame{
    public MyWindowFrame(){
        setBackground(Color.BLUE);
        setBounds(400,400,400,400);
        setVisible(true);
        addWindowListener(new WindowAdapter() {

            //点击关闭按钮,会触发该事件
            @Override
            public void windowClosing(WindowEvent e) {
                System.out.println("窗口关闭");
            }


            //最小化之后,再次点击该窗口,会触发该事件
            @Override
            public void windowActivated(WindowEvent e) {
                System.out.println("窗口激活");
            }
        });
    }
}
键盘监听事件
public class KeyListener {
    public static void main(String[] args) {
        new MyKeyFrame();
    }
}

class MyKeyFrame extends Frame{
    public MyKeyFrame(){
        setBounds(400,400,400,400);
        setVisible(true);

        addKeyListener(new KeyAdapter() {
            @Override
            public void keyPressed(KeyEvent e) {
                //获得当前按下的键
                System.out.println(e.getKeyCode());
                int keyCode = e.getKeyCode();
                if (keyCode == KeyEvent.VK_UP)
                    System.out.println("你按下了上键");
            }
        });

    }
}


 1万+
1万+


 被折叠的 条评论
为什么被折叠?
被折叠的 条评论
为什么被折叠?
 到【灌水乐园】发言


