


PHP7的编译和安装
编译和安装
去官方网站下载最新版本的PHP源码。
下载完之后解压:
tar -zxvf php-7.4.7.tar.gz
可以通过下面的命令看看configure支持什么参数:
cd php-7.x.x
./configure -h   #按需选择配置
–prefix=PREFIX install architecture-independent files in PREFIX
[/usr/local]
–enable-fpm Enable building of the fpm SAPI executable
–enable-debug Compile with debugging symbols #方便后面调试使用
正式编译:
./configure --prefix=/home/codes --enable-fpm --enable-debug
make
make install
安装完之后去–prefix指定的目录即可看到安装后的文件。
添加环境变量:
 vi /etc/profile

 在文件最后加入:
 export PATH=$PATH:/home/codes/bin    #php的bin目录

 保存退出,执行:
 source /etc/profile
执行 php -v 即可看到:
PHP 7.2.31 (cli) (built: Mar 20 2020 10:45:01) ( NTS DEBUG )
Copyright (c) 1997-2018 The PHP Group
Zend Engine v3.2.0, Copyright (c) 1998-2018 Zend Technologies
PHP7.4.x的版本安装有个Bug
./configure --prefix=/usr/local/php --with-curl --with-freetype-dir --with-gd --with-gettext --with-iconv-dir --with-kerberos --with-libdir=lib64 --with-libxml-dir --with-mysqli --with-openssl --with-pcre-regex --with-pdo-mysql --with-pdo-sqlite --with-pear --with-png-dir --with-jpeg-dir --with-xmlrpc --with-xsl --with-zlib --with-bz2 --with-mhash --enable-fpm --enable-bcmath --enable-libxml --enable-inline-optimization --enable-mbregex --enable-mbstring --enable-opcache --enable-pcntl --enable-shmop --enable-soap --enable-sockets --enable-sysvsem --enable-sysvshm --enable-xml --enable-zip
新的Linux环境可能需要安装的东东:
yum -y install libxml2
yum -y install libxml2-devel
yum -y install openssl
yum -y install openssl-devel
yum -y install curl
yum -y install curl-devel
yum -y install libjpeg
yum -y install libjpeg-devel
yum -y install libpng
yum -y install libpng-devel
yum -y install freetype
yum -y install freetype-devel
yum -y install pcre
yum -y install pcre-devel
yum -y install libxslt
yum -y install libxslt-devel
yum -y install bzip2
yum -y install bzip2-devel
PHP5跟PHP7的性能对比
基准测试:

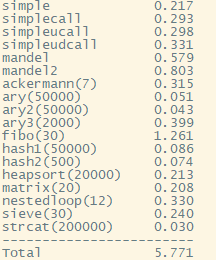
用PHP5.6运行 Zend/bench.php 压测文件:
用PHP7.2运行Zend/bench.php 压测文件:
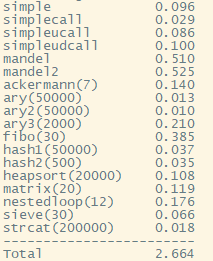
可以看到明显快了非常多。后续我们再来看看为什么PHP7快这么多。


 722
722


 被折叠的 条评论
为什么被折叠?
被折叠的 条评论
为什么被折叠?
 到【灌水乐园】发言


