


上一篇博客传送门:UIKit-TableView-简单的TableView细节扩展
这一篇我们来实现用代码自定义我们的cell单元格
- 先自定义一个cell子类
- 自定义我们需要的子控件
- 去到viewController当中使用我们的子类
并且使用我们的子控件
以下为自定义类代码:
import UIKit
//定义一个自己的cell类
class CityTableViewCell: UITableViewCell {


    //定义我们需要的UI控件
    var cityLabel: UILabel?
    var cityTextField: UITextField?
    var citySwitch: UISwitch?
    override init(style: UITableViewCellStyle, reuseIdentifier: String?){
        super.init(style: style, reuseIdentifier: reuseIdentifier)
        //初始化子视图:子控件 然后添加到当前视图
        cityLabel = UILabel(frame: CGRect(x: 5, y: 0, width: 40, height: 40))
        cityTextField = UITextField(frame: CGRect(x: 50, y: 0, width: 200, height: 40))
        citySwitch = UISwitch(frame: CGRect(x: 255, y: 0 , width: 40, height: 40))
        //然后将子控件添加到子视图
        self.addSubview(cityLabel!)
        self.addSubview(cityTextField!)
        self.addSubview(citySwitch!)
        //然后我们就可以使用我们自定义的这个子类了
    }
    //此为我们必须实现的父类构造函数
    required init?(coder aDecoder: NSCoder) {
        fatalError("init(coder:) has not been implemented")
    }

    override func awakeFromNib() {
        super.awakeFromNib()
        // Initialization code
    }

    override func setSelected(_ selected: Bool, animated: Bool) {
        super.setSelected(selected, animated: animated)

        // Configure the view for the selected state
    }

}
然后在viewController当中使用自定义子类:
import UIKit

class ViewController: UIViewController,UITableViewDataSource,UITableViewDelegate{

    @IBOutlet weak var myTableView1: UITableView!
    //定义一个城市数组
    var cities = ["北京","上海","广州","深圳"]
    override func viewDidLoad() {
        super.viewDidLoad()
        // Do any additional setup after loading the view, typically from a nib.
        myTableView1.dataSource = self
        myTableView1.delegate = self
    }

    //设置表格中有2个section
    func tableView(_ tableView: UITableView, numberOfRowsInSection section: Int) -> Int{
        return cities.count
    }


    @available(iOS 2.0, *)
    func tableView(_ tableView: UITableView, cellForRowAt indexPath: IndexPath) -> UITableViewCell{
        //先定义一个能够重复使用的cell标识符
        let cellid = "jycell"
        //dequeue为出列的意思,这里为让我们的可重复使用的cell出列
        var cell: CityTableViewCell? = tableView.dequeueReusableCell(withIdentifier: cellid) as? CityTableViewCell
        //判断cell是否为nil
        if cell == nil {
            //如果为nil则创建一个subtitle样式的cell
            cell = CityTableViewCell(style: UITableViewCellStyle.subtitle, reuseIdentifier: cellid)
        }
        //以下为设置我们UI控件的值
        cell?.cityLabel?.text = cities[indexPath.row]
        cell?.cityTextField?.text = "input number.."
        cell?.citySwitch?.isOn = true
        return cell!
    }


}
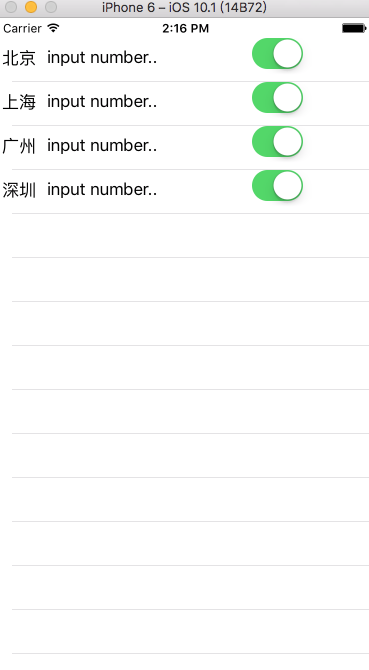
最后运行模拟器即可得到以下:
下一篇博客传送门:


 474
474


 被折叠的 条评论
为什么被折叠?
被折叠的 条评论
为什么被折叠?
 到【灌水乐园】发言


