一、SpringMVC的基本概念
(一)三层架构和MVC
1、三层架构概述
我们的开发架构一般都是基于两种形式,一种是 C/S 架构,也就是客户端/服务器,另一种是 B/S 架构,也就是浏览器服务器。在 JavaEE 开发中,几乎全都是基于 B/S 架构的开发。那么在 B/S 架构中,系统标准的三层架构
包括:表现层、业务层、持久层。三层架构在我们的实际开发中使用的非常多,所以我们课程中的案例也都是基于三层架构设计的。
三层架构中,每一层各司其职,接下来我们就说说每层都负责哪些方面:
(1)表现层:也就是我们常说的web层。它负责接收客户端请求,向客户端响应结果,通常客户端使用http协议请求web 层,web 需要接收 http 请求,完成 http 响应。
表现层包括展示层和控制层:控制层负责接收请求,展示层负责结果的展示。
(2)业务层:也就是我们常说的 service 层。它负责业务逻辑处理,和我们开发项目的需求息息相关。
(3)持久层:也就是我们是常说的 dao 层。负责数据持久化,和数据库做交互。
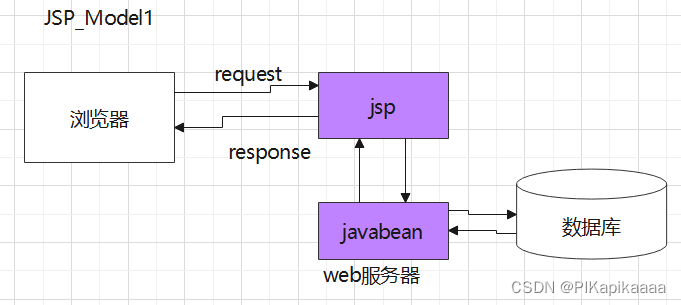
2、model1模式介绍
这种模式十分简单,页面显示,控制分发,业务逻辑,数据访问全部通过Jsp去实现
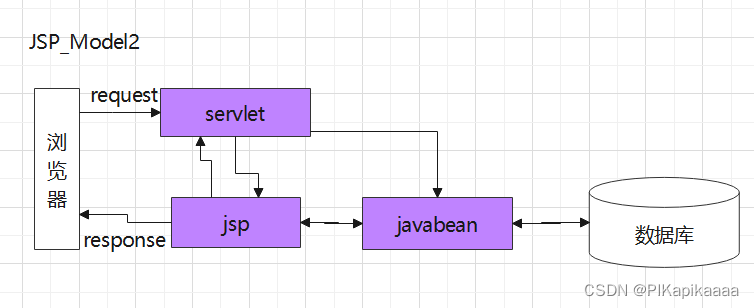
3、model2模式介绍
这种模式通过两部分去实现,即Jsp与Servlet。Jsp负责页面显示,Servlet负责控制分发,业务逻辑以及数据访问。
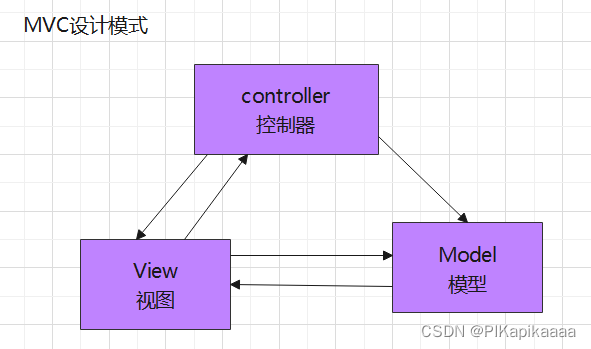
4、MVC模式介绍
MVC模式则分为三大块,即视图(View),控制器(Control),模型(Model).视图是Jsp负责的页面显示,控制器则是Servlet负责的控制分发,模型包括Service和Dao两个部分,分别负责业务逻辑和数据访问。
5、三种模型对比
Model1 模式的优缺点:
优点:架构简单,比较适合小型项目开发
缺点:JSP 职责不单一,职责过重,不便于维护
Model2 模式的优缺点:
优点:职责清晰,较适合于大型项目架构
缺点:不适合小型项目开发
MVC模式的优缺点:
优点:分工明确,各司其职,互不干涉。适用于大型项目架构,有利于组件的重构
缺点:增加了系统开发的复杂度
(二)SpringMVC 概述
1、springMVC是什么?
SpringMVC是一个基于Java的实现了MVC设计模式的请求驱动类型的轻量级Web框架,通过把Model,View,Controller分离,将web层进行职责解耦,把复杂的web应用分成逻辑清晰的几部分,简化开发,减少出错,方便组内开发人员之间的配合。它通过一套注解,让一个简单的 Java 类成为处理请求的控制器,而无须实现任何接口。同时它还支持RESTful编程风格的请求。
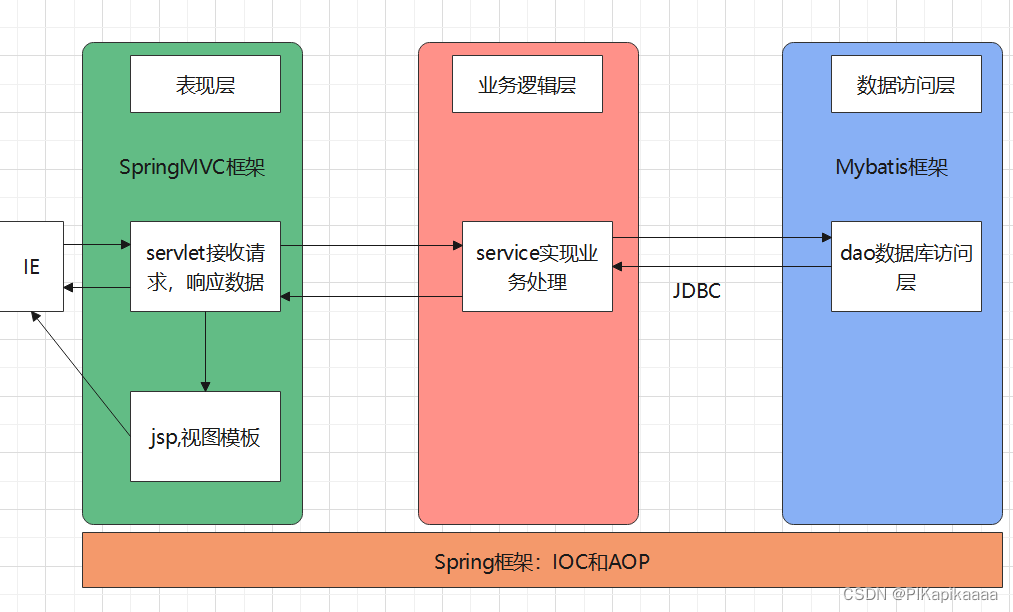
2、SpringMVC在三层架构中的位置?
springMVC位于三层架构中的表现层,作用是接收请求响应数据,响应的数据通过视图、模板展示给用户。
3、SpringMVC的优势?
(1)清晰的角色划分:
前端控制器(DispatcherServlet)
请求到处理器映射(HandlerMapping)
处理器适配器(HandlerAdapter)
视图解析器(ViewResolver)
处理器或页面控制器(Controller)
验证器(Validator)
命令对象(Command 请求参数绑定到的对象就叫命令对象)
表单对象(Form Object 提供给表单展示和提交到的对象就叫表单对象)。
(2)分工明确,而且扩展点相当灵活,可以很容易扩展,虽然几乎不需要。
(3)由于命令对象就是一个 POJO,无需继承框架特定 API,可以使用命令对象直接作为业务对象。
(4)和 Spring 其他框架无缝集成,是其它 Web 框架所不具备的。
(5)可适配,通过 HandlerAdapter 可以支持任意的类作为处理器。
(6)可定制性,HandlerMapping、ViewResolver 等能够非常简单的定制。
(7)功能强大的数据验证、格式化、绑定机制。
(8)利用 Spring 提供的 Mock 对象能够非常简单的进行 Web 层单元测试。
(9)本地化、主题的解析的支持,使我们更容易进行国际化和主题的切换。
(10)强大的 JSP 标签库,使 JSP 编写更容易。
………………还有比如RESTful风格的支持、简单的文件上传、约定大于配置的契约式编程支持、基于注解的零配
置支持等等。
二、SpringMVC入门
(一)SpringMVC 的入门案例
1、入门案例需求分析
构建页面index.jsp发起请求,在服务器端处理请求,控制台打印处理请求成功,跳转main.jsp成功页面;
2、构建maven项目并添加依赖
		<dependency>
            <groupId>org.springframework</groupId>
            <artifactId>spring-webmvc</artifactId>
            <version>5.1.7.RELEASE</version>
        </dependency>
        <dependency>
            <groupId>org.springframework</groupId>
            <artifactId>spring-web</artifactId>
            <version>5.1.7.RELEASE</version>
        </dependency>
        <dependency>
            <groupId>org.springframework</groupId>
            <artifactId>spring-context</artifactId>
            <version>5.1.7.RELEASE</version>
        </dependency>
3、web.xml中配置核心控制器DispatcherServlet
    <servlet>
        <servlet-name>springmvc01</servlet-name>
        <servlet-class>org.springframework.web.servlet.DispatcherServlet</servlet-class>
        <init-param>
            <param-name>contextConfigLocation</param-name>
            <param-value>classpath:springmvc.xml</param-value>
        </init-param>
    </servlet>
    <servlet-mapping>
        <servlet-name>springmvc01</servlet-name>
        <url-pattern>/</url-pattern>
    </servlet-mapping>
4、配置springMVC的配置文件springmvc.xml
 	<!--扫描注解包-->
    <context:component-scan base-package="com.offcn.controller"></context:component-scan>

	<!--处理器映射器:根据请求路径匹配映射路径找到对应的执行器-->
   <bean class="org.springframework.web.servlet.mvc.method.annotation.RequestMappingHandlerMapping"></bean>

    <!--处理器适配器:根据处理器映射器返回的执行器对象,去执行执行器对象-->
    <bean class="org.springframework.web.servlet.mvc.method.annotation.RequestMappingHandlerAdapter"></bean>

    <!--视图解析器:解析视图-->
    <bean class="org.springframework.web.servlet.view.InternalResourceViewResolver">
        <property name="prefix" value="/"></property>
        <property name="suffix" value=".jsp"></property>
    </bean>
5、构建页面发起请求
<a href="/hello/test1">hello</a>
6、编写控制器并使用注解配置
@Controller
@RequestMapping("hello")
public class HelloController {
    @RequestMapping("test1")
    public String test1(){
        System.out.println("正在处理请求");
        return "main";
    }
}
7、启动服务器测试
pom.xml文件中服务器插件配置:
 <build>
        <plugins>
            <plugin>
                <groupId>org.apache.tomcat.maven</groupId>
                <artifactId>tomcat7-maven-plugin</artifactId>
                <version>2.2</version>
                <configuration>
                    <!--指定编码格式-->
                    <uriEncoding>utf-8</uriEncoding>
                    <!--指定项目启动后的访问路径-->
                    <path>/</path>
                    <!--指定访问端口号-->
                    <port>8888</port>
                </configuration>
            </plugin>
        </plugins>
    </build>
(二)SpringMVC执行过程及原理分析
1、案例的执行过程
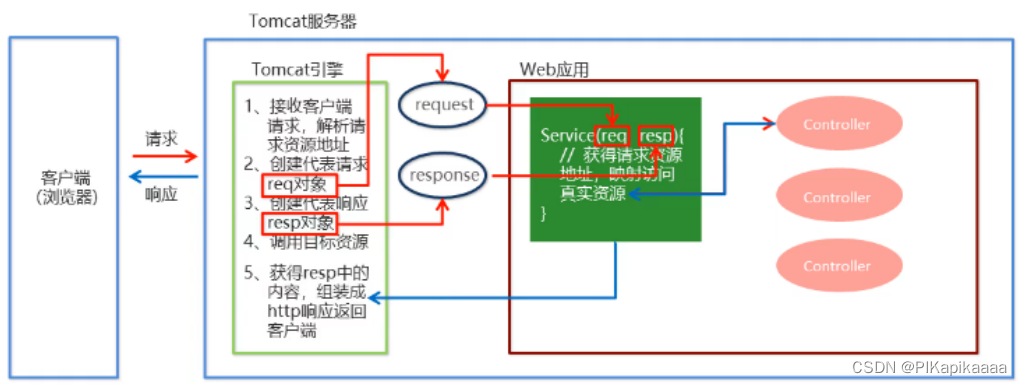
浏览器客户端发起请求,请求到达服务器tomcat,tomcat将请求相关信息参数封装到对象request和response中,再将request和response对象交给service方法处理,在service方法中会根据请求路径将请求交给对应的controller执行器处理。
2、SpringMVC的请求响应流程
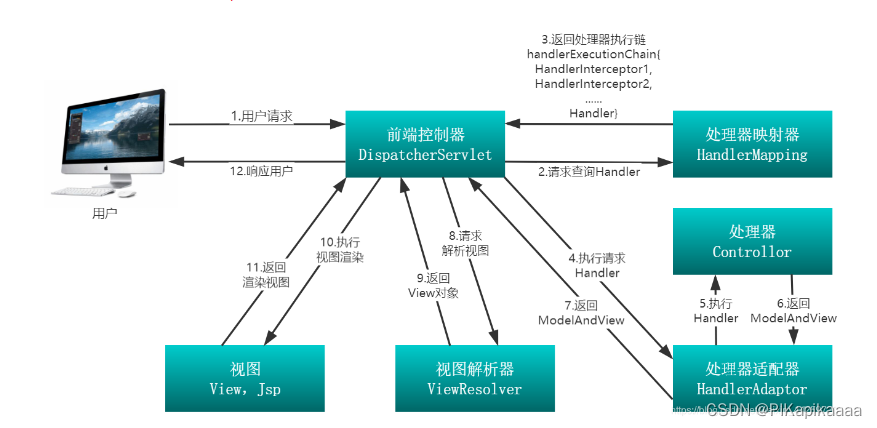
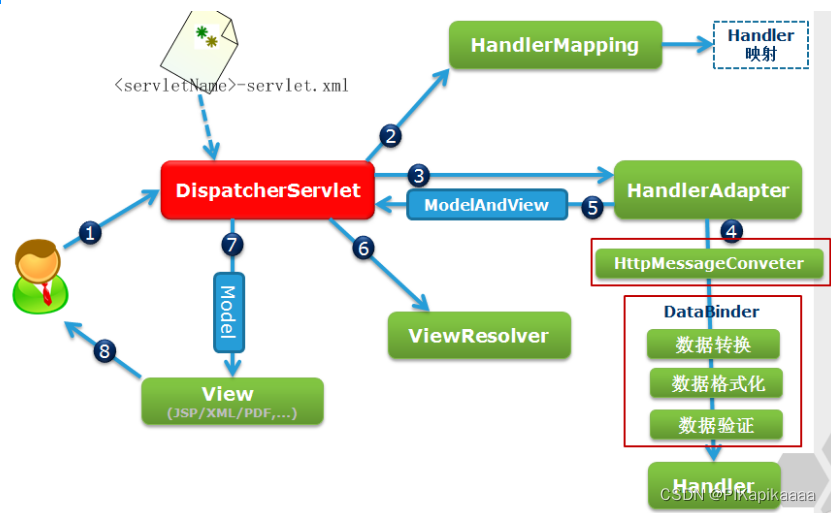
浏览器发送请求,被DispatcherServlet捕获,DispatcherServlet没有直接处理请求,而是将请求交给HandlerMapping处理器映射器,处理器映射器根据请求路径去controller控制层中匹配对应的执行器,并将匹配结果返回给DispatcherServlet,由DispacherServlet调用HandlerAdapter处理器适配器来执行控制层执行器方法;
执行器方法执行后的返回结果,由DispatcherServlet交给视图解析器ViewResolver来处理,找到对应的结果视图,渲染视图,并将结果响应给浏览器。
(三)SpringMVC常用组件介绍
1、DispatcherServlet:前端控制器
用户请求到达前端控制器,它就相当于 mvc 模式中的 c,dispatcherServlet 是整个流程控制的中心,由它调用其它组件处理用户的请求,dispatcherServlet 的存在降低了组件之间的耦合性。
2、HandlerMapping:处理器映射器
HandlerMapping 负责根据用户请求找到 Handler 即处理器,SpringMVC提供了不同的映射器实现不同的映射方式,例如:配置文件方式,实现接口方式,注解方式等。
3、Handler:处理器
它就是我们开发中要编写的具体业务控制器。由 DispatcherServlet 把用户请求转发到 Handler。由Handler 对具体的用户请求进行处理。
4、HandlAdapter:处理器适配器
通过 HandlerAdapter 对处理器进行执行,这是适配器模式的应用,通过扩展适配器可以对更多类型的处理器进行执行。
5、View Resolver:视图解析器
View Resolver 负责将处理结果生成 View 视图,View Resolver 首先根据逻辑视图名解析成物理视图名即具体的页面地址,再生成 View 视图对象,最后对 View 进行渲染将处理结果通过页面展示给用户。
6、View:视图
SpringMVC 框架提供了很多的 View 视图类型的支持,包括:jstlView、freemarkerView、pdfView等。我们最常用的视图就是 jsp。一般情况下需要通过页面标签或页面模版技术将模型数据通过页面展示给用户,需要由程序员根据业务需求开发具体的页面。
7、mvc:annotation-driven标签说明:
在 SpringMVC 的各个组件中,处理器映射器、处理器适配器、视图解析器称为 SpringMVC 的三大组件。使用 <mvc:annotation-driven> 自动加载 RequestMappingHandlerMapping(处理映射器)和RequestMappingHandlerAdapter ( 处 理 适 配 器 ),可 用 在 SpringMVC.xml 配 置 文 件 中 使 用<mvc:annotation-driven>替代处理映射器和适配器的配置(一般开发中都需要该标签)。注意:我们只需要编写处理具体业务的控制器以及视图。

<mvc:annotation-driven> 标签相当于以下配置:
<!-- HandlerMapping处理器映射器 -->
<bean class="org.springframework.web.servlet.mvc.method.annotation.RequestMappingHandlerM
apping"></bean>
<bean class="org.springframework.web.servlet.handler.BeanNameUrlHandlerMapping"></bean>

<!-- HandlerAdapter处理器适配器 -->
<bean class="org.springframework.web.servlet.mvc.method.annotation.RequestMappingHandlerA
dapter"></bean>
<bean class="org.springframework.web.servlet.mvc.HttpRequestHandlerAdapter"></bean>
<bean class="org.springframework.web.servlet.mvc.SimpleControllerHandlerAdapter"></bean>

<!-- HadnlerExceptionResolvers异常处理器 -->
<bean class="org.springframework.web.servlet.mvc.method.annotation.ExceptionHandlerExcept
ionResolver"></bean>
<bean class="org.springframework.web.servlet.mvc.annotation.ResponseStatusExceptionResolv
er"></bean>
<bean class="org.springframework.web.servlet.mvc.support.DefaultHandlerExceptionResolver"
></bean>
(四)RequestMapping 注解
用于定义映射路径,建立请求url和控制层方法之间的对应关系;
1、RequestMapping 注解源码解读
@Target({ElementType.METHOD, ElementType.TYPE})
@Retention(RetentionPolicy.RUNTIME)
@Documented
@Mapping
public @interface RequestMapping {
	String name() default "";
    @AliasFor("path")
	String[] value() default {};
    @AliasFor("value")
	String[] path() default {};
    RequestMethod[] method() default {};
    String[] params() default {};
    String[] headers() default {};
}
2、RequestMapping 注解的描述
(1)注解位置:
	a.类上:定义一级映射路径;
	b.方法上:定义二级映射路径;
(2)注解属性:
	value:用于指定映射路径url。它和 path 属性的作用是一样的。
	method:用于指定请求的方式。
	params:用于指定限制请求参数的条件。它支持简单的表达式。要求请求参数的 	key 和 value 必须和配置的一模一样。eg:params = {"username"},表示请求参数必须有 username;
	headers:用于指定限制请求消息头的条件。
	注意:多个属性之间是与的关系;
 /*
        @RequestMapping注解:
        用在类上     表示一级目录
        用在方法上   表示二级目录
          参数:
              value是一个String类型的数组,表示方法的访问路径,一个方法可以有多个访问路径。value = {"/register","/register1"}
              method 表示该方法的请求方式 ,如果没有设置method ,该方法 get 和 post 请求 都支持 method = RequestMethod.GET
              params 表示访问该方法所需要携带的参数,或者是不能携带的参数  params ={"name","age!=22","address=beijing"}
              headers 表示携带的请求头
headers = {"User-Agent: Mozilla/5.0 (Windows NT 10.0; Win64; x64) AppleWebKit/537.36 (KHTML, like Gecko) Chrome/102.0.5005.61 Safari/537.36"}
  * */
三、SpringMVC中的请求参数绑定
(一)绑定说明
1、绑定的机制
我们都知道,表单中请求参数都是基于 key=value 的。SpringMVC绑定请求参数的过程是通过把表单提交请求参数,作为控制器中方法参数进行绑定的。
2、支持的数据类型
基本类型参数:包括基本类型和 String 类型
POJO 类型参数:包括实体类,以及关联的实体类
数组和集合类型参数:包括 List 结构和 Map 结构的集合(包括数组)
3、使用要求:
如果是基本类型或者 String 类型:要求我们的参数名称必须和控制器中方法的形参名称保持一致。(严格区分大小写)
如果是 POJO 类型,或者它的关联对象:要求表单中参数名称和 POJO 类的属性名称保持一致。并且控制器方法的参数类型是 POJO 类型。
如果是集合类型,有两种方式:
(1)第一种:要求集合类型的请求参数必须在 POJO 中。在表单中请求参数名称要和 POJO 中集合属性名称相同。给 List 集合中的元素赋值,使用下标。给 Map 集合中的元素赋值,使用键值对。
(2)第二种:接收的请求参数是 json 格式数据。需要借助一个注解实现。
(二)参数绑定示例
1、基本类型和 String 类型作为参数
(1)页面定义请求:
<form action="/hello/test2" method="post">
    用户名:<input name="userName" type="text">
    年龄:<input name="age" type="text">
    <input type="submit" value="提交">
</form>
(2)执行器方法绑定参数:
 @RequestMapping("test2")
    public String test2(String userName,int age){
        System.out.println("用户名:"+userName);
        System.out.println("年龄:"+age);
        return "main";
    }
2、POJO 类型作为参数
(1)页面定义请求:
<form action="/hello/test3" >
    用户名:<input name="pname" type="text">
    年龄:<input name="age" type="text">
    车名称:<input name="car.cname" type="text">
    车价格:<input name="car.cprice" type="text">
    <input type="submit" value="提交">
</form>
(2)执行器方法绑定参数:
 @RequestMapping("test3")
    public String test3(Person person){
        System.out.println(person);
        return "main";
    }
3、POJO 类中包含集合类型参数
(1)页面定义请求:
<form action="/hello/test4" >
    用户名:<input name="pname" type="text">
    年龄:<input name="age" type="text">
    车名称:<input name="car.cname" type="text">
    车价格:<input name="car.cprice" type="text">
    list集合车1:车名称<input name="carList[0].cname" type="text">
    list集合车1:车价格<input name="carList[0].cprice" type="text">
    list集合车2:车名称<input name="carList[1].cname" type="text">
    list集合车2:车价格<input name="carList[1].cprice" type="text">
    set集合车1:车名称<input name="carSet[0].cname" type="text">
    set集合车1:车价格<input name="carSet[0].cprice" type="text">
    set集合车2:车名称<input name="carSet[1].cname" type="text">
    set集合车2:车价格<input name="carSet[1].cprice" type="text">
    map集合车1:车名称<input name="map['x'].cname" type="text">
    map集合车1:车价格<input name="map['x'].cprice" type="text">
    map集合车2:车名称<input name="map['y'].cname" type="text">
    map集合车2:车价格<input name="map['y'].cprice" type="text">
    <input type="submit" value="提交">
</form>
(2)执行器方法绑定参数:
  @RequestMapping("test4")
    public String test4(Person person){
        System.out.println(person);
        return "main";
    }
4、数组类型参数
(1)页面定义请求:
<form action="/hello/test5" >
    爱好1:<input name="hobbies" type="text">
    爱好2:<input name="hobbies" type="text">
    爱好3:<input name="hobbies" type="text">
    <input type="submit" value="提交">
</form>
(2)执行器方法绑定参数:
   @RequestMapping("test5")
    public String test5(String[] hobbies){
        for(String hobby:hobbies){
            System.out.println(hobby);
        }
        return "main";
    }
(二)参数绑定示例
5、使用 ServletAPI 对象作为方法参数
(1)引入servletAPI的依赖jar包:(注意jar包作用范围provided:不参与项目部署)
		<dependency>
            <groupId>javax.servlet</groupId>
            <artifactId>servlet-api</artifactId>
            <version>2.5</version>
            <scope>provided</scope>
        </dependency>
(2)执行器方法绑定参数:
    @RequestMapping("test6")
    public void test6(HttpServletRequest request, HttpServletResponse response) throws ServletException, IOException {
        System.out.println("我在请求转发");
        request.getRequestDispatcher("/hello/test1").forward(request,response);
    }
6、请求参数乱码问题
tomacat 对 GET 和 POST 请求处理方式是不同的:
(1)GET 请求的编码问题,要改 tomcat 的 server.xml配置文件:
	<Connector connectionTimeout="20000" port="8080"protocol="HTTP/1.1" redirectPort="8443" URIEncoding="UTF-8"/>
(2)POST 请求的编码问题,要在web.xml文件中配置编码过滤器:
    <filter>
        <filter-name>characterEncodingFilter</filter-name>
        <filter-class>org.springframework.web.filter.CharacterEncodingFilter</filter-class>
        <init-param>
            <param-name>encoding</param-name>
            <param-value>utf-8</param-value>
        </init-param>
    </filter>
    <filter-mapping>
        <filter-name>characterEncodingFilter</filter-name>
        <url-pattern>/*</url-pattern>
    </filter-mapping>
7、静态资源访问:
(1)将静态资源交给默认的DefaultServlet处理:在springMVC.xml配置文件中加如下配置:
	<mvc:default-servlet-handler></mvc:default-servlet-handler>
(2)指定静态资源的访问路径:在springMVC.xml配置文件中加如下配置:
	<mvc:resources location="/css/" mapping="/css/**"/>
	<mvc:resources location="/images/" mapping="/images/**"/>
	<mvc:resources location="/js/" mapping="/js/**"/>
<mvc:resources mapping="/images/**" location="/images/"/>  <!-- 一个一个文件夹释放 -->
<mvc:resources mapping="/static/**" location="/static/"/>  <!-- 把静态资源放进static文件夹一起释放 -->
<mvc:default-servlet-handler></mvc:default-servlet-handler>  <!-- 静态资源用 tomcat中默认的servlet处理 -->
(三)自定义参数处理
1、使用场景:
SpringMVC不能自动识别参数转换为我们需要的数据类型,浏览器报400错误,类型转换异常;
2、使用步骤:
(1)定义类型转换器;
public class MyDateConverter implements Converter<String, Date> {
    @Override
    public Date convert(String source) {
        SimpleDateFormat simpleDateFormat = new SimpleDateFormat("yyyy-MM-dd");
        Date date = null;
        try {
            date=simpleDateFormat.parse(source);
        } catch (ParseException e) {
            e.printStackTrace();
        }
        return date;
    }
}
(2)配置类型转换器;
 <bean id="formattingConversionService" class="org.springframework.format.support.FormattingConversionServiceFactoryBean">
        <property name="converters">
            <bean class="com.offcn.util.MyDateConverter"></bean>
        </property>
    </bean>
(3)引用类型转换器;
<form action="/hello/test7" >
    入职日期:<input name="hireDate" type="date">
    <input type="submit" value="提交">
</form>

 @RequestMapping("test7")
    public String test7(Date hireDate){
        System.out.println(hireDate);
        return "main";
    }
四、SpringMVC的注解详解
(一)RequestParam
1、RequestParam注解介绍
使用在方法入参位置,用于指定请求参数名称,将该请求参数绑定到注解参数位置。
属性:name:指定要绑定的请求参数名称;
     required:指定请求参数是否必传;
	 defaultValue:指定当没有传入请求参数时的默认取值;
2、RequestParam注解使用案例
 @RequestMapping("test1")
    public String test1(@RequestParam(name = "pname",required = true,defaultValue = "李四")String name){
        System.out.println(name);
        return "main";
    }
3、RequestParam注解测试结果
/*
        @RequestParam 注解:
            用在方法的形参上,表示取地址栏指定的key的值 赋给值的属性
            name属性:当url参数的key 和 方法所声明的参数不一致的时候,可以使用name属性来指定取地址栏参数的值 映射给指定的形参
            defaultValue属性:当url没有取到指定的参数值,就给形参赋一个默认值
            required属性: 如果设置该值为true,该形参必须接受来自url参数的值,如果url中没有该参数就会报错

    * */
    @RequestMapping("add")
    public String add(@RequestParam(name="username") String name,
                      @RequestParam(defaultValue = "0") int age,
                      @RequestParam(required = true) String address,
                      Model model) {
        System.out.println(name+"\t"+age+"\t"+address);
        model.addAttribute("msg","成功");
        return "registerSuccess";
    }
(二)RequestHeader
1、RequestHeader注解介绍
注解在方法入参位置,用于获取请求头信息。
2、RequestHeader注解使用案例
 @RequestMapping("test2")
    public String test2(@RequestHeader("Upgrade-Insecure-Requests")String data){
        System.out.println(data);
        return "main";
    }
3、RequestHeader注解测试结果
详见课堂案例结果
(三)ResponseBody
1、ResponseBody注解介绍
返回Jason格式
用于方法入参位置,获取请求体内容。直接使用得到是 key=value&key=value...结构的数据。get 请求方式不适用。通常用于将json格式字符串绑定到bean对象中;
2、在pom文件中导入 Jason依赖
  <!--    导入Jason 依赖   -->
        <dependency>
            <groupId>com.fasterxml.jackson.core</groupId>
            <artifactId>jackson-databind</artifactId>
            <version>2.9.8</version>
        </dependency>
3、ResponseBody使用案例1
//    @ResponseBody  返回Jason格式
    @RequestMapping("getJason")
    @ResponseBody
    public Person getJason(int id) {

        Person person1 = new Person();
        person1.setUsername("张三");
        person1.setPassword("123");
        person1.setGender("男");
        person1.setBirthday(new Date());

        Person person2 = new Person();
        person2.setUsername("李四");
        person2.setPassword("456");
        person2.setGender("女");
        person2.setBirthday(new Date());

        ArrayList<Person> personList = new ArrayList<>();
        personList.add(person1);
        personList.add(person2);
        return personList.get(id-1);
    }
页面显示效果
{"username":"李四","password":"456","gender":"女","birthday":1654017531678}
ResponseBody使用案例2
<html>
<head>
    <title>返回Json</title>
    <script src="js/jquery-3.4.1.js"></script>
    <script>
        function getJason(){
            $.ajax({
                url:"/person/addPerson",
                type:"POST",
                data:'{"id":100,"name":"张三","age":22}',
                contentType:"application/json",
                success:function(data){
                    alert("返回Json成功");
                }
            });
        }
    </script>
</head>
<body>
    <input type="button" value="返回Json格式" onclick="getJason();">
</body>
</html>
RequestBody注解测试结果
@RequestMapping("/addPerson")
@ResponseBody  //返回Json
// @RequestBody 用在形参上,表示接收Json对象 并映射到改类中
public String addPerson(@RequestBody Person person){
    System.out.println(person);
    return "success";
}
(四)CookieValue
1、CookieValue注解介绍
用于方法入参位置,把指定 cookie 名称的值传入控制器方法参数。
2、CookieValue注解使用案例
  @RequestMapping("test5")
  public String test5(@CookieValue("JSESSIONID") String data){
      System.out.println(data);
      return "main";
  }
3、CookieValue注解测试结果
详见课堂案例结果
(五)ModelAttribute
1、ModelAttribute注解介绍
该注解是SpringMVC4.3版本以后新加入的。它可以用于修饰方法和参数。
出现在方法上,表示当前方法会在控制器的方法执行之前,先执行。它可以修饰没有返回值的方法,也可以修饰有具体返回值的方法。
出现在参数上,获取指定的数据给参数赋值。
2、ModelAttribute注解使用案例
(1)注解在方法上:
  @ModelAttribute("shareParam")
  public String test6(){
      System.out.println("我是公共方法");
      return "公共参数";
  }
(2)注解在参数位置:
  @RequestMapping("test7")
  public String test7(@ModelAttribute("shareParam")String data){
      System.out.println(data);
      return "main";
  }
3、ModelAttribute注解测试结果
@RequestMapping("/method01")
    public String method01(@ModelAttribute("string") String data){
        System.out.println("key:"+data);
        System.out.println("执行了method01方法");
        return "message";
    }

    /*
    @ModelAttribute注解 用到方法上面,该方法表示一个公共方法,执行其他方法前先执行此方法
                        它以方法的返回值为value,以返回类型的简单名称为key 传到request域 【key:string  value:start()】
      如果在@ModelAttribute中设置name 属性,则以name的值为key,以方法的返回值为value 将键值对传到request域中
           @ModelAttribute 用在参数上 表示从request中取出指定key的值 赋给形参
    * */
    @ModelAttribute
    public String start(){
        System.out.println("执行start()");
        return "start()";
    }
(六)SessionAttributes
1、SessionAttributes注解介绍
注解在类上,作用将请求域中的参数存放到session域中,用于参数共享。
2、SessionAttributes注解使用案例
   //将参数存放到请求域
   @RequestMapping("test8")
   public ModelAndView test8(ModelAndView modelAndView){
        modelAndView.addObject("aa","aa1");
        modelAndView.addObject("bb","bb1");
        modelAndView.addObject("cc","cc1");
        modelAndView.setViewName("main");
        return modelAndView;
   }
   //将请求域参数存放到session域中
   @Controller
@RequestMapping("annotation")
@SessionAttributes(value = {"aa","bb"})
public class AnnotationController {
...
}
3、SessionAttributes注解测试结果
@Controller
@RequestMapping("/person")
// @SessionAttributes 用到类上,表示将符合条件的键值对放到session域中
@SessionAttributes(names ={"name","age"},types = {Date.class})
public class PersonController {

   public String method02(Model model, HttpSession session){
        model.addAttribute("name","李四");
        model.addAttribute("age",22);
        model.addAttribute("address","北京");
        model.addAttribute("birthday",new Date());
        session.setAttribute("gender","男");
        return "message";
    }
}
效果
<body>
${msg} ${requestScope.string}
<br>
request域:
<br> ${requestScope.name}
<br> ${requestScope.age}
<br> ${requestScope.address}
<br> ${requestScope.birthday}
<br>
session域:
<br> ${sessionScope.name}
<br> ${sessionScope.age}
<br> ${sessionScope.address}
<br> ${sessionScope.birthday}
<br> ${sessionScope.gender}
</body>
<!--============== 页 面 效 果 =============== -->
start()
request域:
李四
22
北京
Thu Jun 02 00:05:43 CST 2022
session域:
李四
22
Thu Jun 02 00:05:43 CST 2022
男
一、Rest风格编程
(一)Rest风格URL规范介绍
1、什么是restful?
RESTful架构,就是目前最流行的一种互联网软件架构风格。它结构清晰、符合标准、易于理解、扩展方便,所以正得到越来越多网站的采用。REST这个词,是Roy Thomas Fielding在他2000年的博士论文中提出的. Fielding将他对互联网软件的架构原则,定名为REST,即Representational State Transfer的缩写。即"表现层状态转化"。如果一个架构符合REST原则,就称它为RESTful架构。值得注意的是 REST 并没有一个明确的标准,而更像是一种设计的格。
它本身并没有什么实用性,其核心价值在于如何设计出符合 REST 风格的网络接口。
2、restful的优点:
它结构清晰、符合标准、易于理解、扩展方便,所以正得到越来越多网站的采用。
3、restful 的特性:
(1)资源(Resources):网络上的一个实体,或者说是网络上的一个具体信息。它可以是一段文本、一张图片、一首歌曲、一种服务,总之就是一个具体的存在。可以用一个 URI(统一资源定位符)指向它,每种资源对应一个特定的 URI 。要获取这个资源,访问它的 URI 就可以,因此 URI 即为每一个资源的独一无二的识别符。
(2)表现层(Representation):把资源具体呈现出来的形式,叫做它的表现层 (Representation)。比如,文本可以用 txt 格式表现,也可以用 HTML 格式、XML 格式、JSON 格式表现,甚至可以采用二进制格式。
(3)状态转化(State Transfer):每发出一个请求,就代表了客户端和服务器的一次交互过程。HTTP 协议,是一个无状态协议,即所有的状态都保存在服务器端。因此,如果客户端想要操作服务器,必须通过某种手段,让服务器端发生“状态转化”(State Transfer)。而这种转化是建立在表现层之上的,所以就是“表现层状态转化”。具体说,就是 HTTP 协议里面,四个表示操作方式的动词:GET 、POST 、PUT、DELETE。它们分别对应四种基本操作:GET 用来获取资源,POST 用来新建资源,PUT 用来更新资源,DELETE 用来删除资源。
(4)传统请求url:
新增:http://localhost:8888/annotation/addPerson      POST
修改:http://localhost:8888/annotation/updatePerson   POST
删除:http://localhost:8888/annotation/deletePerson?id=1   GET
查询:http://localhost:8888/annotation/findPerson?id=1     GET
(4)REST风格请求:
新增:http://localhost:8888/annotation/person      POST
修改:http://localhost:8888/annotation/person      PUT
删除:http://localhost:8888/annotation/person/1      DELETE
查询:http://localhost:8888/annotation/person/1      GET
(二)PathVariable注解详解
该注解用于绑定 url 中的占位符。例如:请求 url 中/annotation/test9/{id},这个{id}就是 url 占位符。url 支持占位符是 spring3.0 之后加入的。是springmvc 支持 rest 风格 URL 的一个重要标志。
属性:
	value:用于指定 url 中占位符名称。
	required:是否必须提供占位符。
(三)PathVariable案例
1、构建页面发起请求
REST风格编程:
<body>
    新增:<br>
    <form action="/person/person" method="post">
      <br>用户名:<input name="userName" type="text">
      <br>年龄:<input name="age" type="text">
      <br><input type="submit" value="新增">
    </form>
    <br><br>

    修改:<br>
    <form action="/person/person" method="post">
        <input type="hidden" name="_method" value="PUT">
        <br>用户名:<input name="userName" type="text">
        <br>年龄:<input name="age" type="text">
        <br><input type="submit" value="修改">
    </form>
    <br><br>

    删除:<br>
    <form action="/person/person/1/success" method="post">
        <input type="hidden" name="_method" value="DELETE">
        <br><input type="submit" value="删除">
    </form>
    <br><br>

    查询:<br>
    <form action="/person/person/1/file" method="get">
        <br><input type="submit" value="查询">
    </form>

    <br><br>

    超链接:<br>
    <a href="/person/person/20/success">查询id为20</a>

</body>
2、定义控制层执行器处理请求
@RequestMapping(value = "/person",method = RequestMethod.POST)
    public String add(String userName,Integer age){
        System.out.println("新增\tusername是"+userName+"\tage是"+age);
        return "success";
    }

    @RequestMapping(value = "/person",method = RequestMethod.PUT)
    public String edit(String userName,Integer age){
        System.out.println("修改\tusername是"+userName+"\tage是"+age);
        return "success";
    }

    // @PathVariable注解 用在形参上 根据占位符来取值,赋给指定的形参
    // {id} 是占位符 如果有占位符,怎前端url必须传值 否则报错
    @RequestMapping(value = "/person/{id}/{page}",method = RequestMethod.DELETE)
    public String delete(@PathVariable int id,@PathVariable String page){
        System.out.println("删除\tid为"+id+"的数据");
        return page;
    }

    @RequestMapping(value = "/person/{id}/{page}",method = RequestMethod.GET)
    public String query(@PathVariable int id,@PathVariable String page){
        System.out.println("查询\tid为"+id+"的数据");
        return page;
    }
3.引入请求方式转换过滤器
 <!-- 用来接收restful风格,支持put,delete请求的过滤器 -->
<filter>
        <filter-name>hiddenMethodFilter</filter-name>
        <filter-class>org.springframework.web.filter.HiddenHttpMethodFilter</filter-class>
    </filter>
    <filter-mapping>
        <filter-name>hiddenMethodFilter</filter-name>
        <url-pattern>/*</url-pattern>
    </filter-mapping>
二、响应数据和结果视图
(一)返回值分类
1、返回值为字符串
用于指定返回的逻辑视图名称;
控制器代码:
  @RequestMapping("test1")
    public String test1(String pname){
        System.out.println(pname);
        System.out.println("返回string类型测试");
        return "main";
    }

运行结果:详见课堂案例结果
2、void类型
通常使用原始servlet处理请求时,返回该类型;
控制器代码:
 @RequestMapping("test2")
    public void test2(HttpServletRequest request, HttpServletResponse response) throws ServletException, IOException {
        System.out.println("返回void类型测试");
        request.getRequestDispatcher("/response/test1").forward(request,response);
    }

运行结果:详见课堂案例结果
3、ModelAndView
用于绑定参数和指定返回视图名称;
控制器代码:
  @RequestMapping("test3")
    public ModelAndView test3(ModelAndView modelAndView){
        modelAndView.addObject("aa","aa1");
        modelAndView.setViewName("main");
        return modelAndView;
    }

运行结果:详见课堂案例结果
(二)转发和重定向
1、forward请求转发
控制器代码:
 @RequestMapping("test4")
    public String test4(){
        System.out.println("我是请求转发");
        return "forward:/response/test1";
    }
运行结果:详见课堂案例结果
2、redirect重定向
控制器代码:
  @RequestMapping("test5")
    public String test5(RedirectAttributes redirectAttributes,String pname){
        System.out.println("我是重定向");
       // redirectAttributes.addAttribute("pname",pname);
        redirectAttributes.addFlashAttribute("pname",pname);
        return "redirect:/response/test1";
    }
运行结果:详见课堂案例结果
//注意:重定向携带参数,需要使用对象RedirectAttributes,该对象提供两个方法封装参数addAttribute()和addFlashAttribute(),第一个方法参数会明文显示在浏览器地址栏,第二个方法参会会隐藏,使用第二种方法传参时,获取参数时需要加注解@ModelAttribute;
(三)转发和重定向案例
//   转发和重定向 ===================================================================================

    // 返回逻辑视图名称 --默认转发
    @RequestMapping("/jump01")
    public String jump01(){
        System.out.println("========== jump01 方法");
        return "request";
    }

    // 返回 ModelAndView --默认转发
    @RequestMapping("/jump02")
    public ModelAndView jump02(){
        System.out.println("========== jump02 方法");
        ModelAndView mv = new ModelAndView();
        mv.setViewName("request");
        return mv;
    }

    // 转发到其他方法
    @RequestMapping("/jump03")
    public String jump03(){
        System.out.println("========== jump03 方法");
        return "forward:jump01";
    }

    // 返回逻辑视图名称---重定向
    @RequestMapping("/jump04")
    public String jump04(){
        System.out.println("========== jump04 方法");
        return "redirect:/page/redirect.jsp";
    }

    // 返回 ModelAndView --重定向
    @RequestMapping("/jump05")
    public ModelAndView jump05(){
        System.out.println("========== jump05 方法");
        ModelAndView mv = new ModelAndView();
        mv.setViewName("redirect:/page/redirect.jsp");
        return mv;
    }

    // --重定向 到其他方法
    @RequestMapping("/jump06")
    public String jump06(){
        System.out.println("========== jump06 方法");
        return "redirect:jump04";
    }
三、Postman工具使用
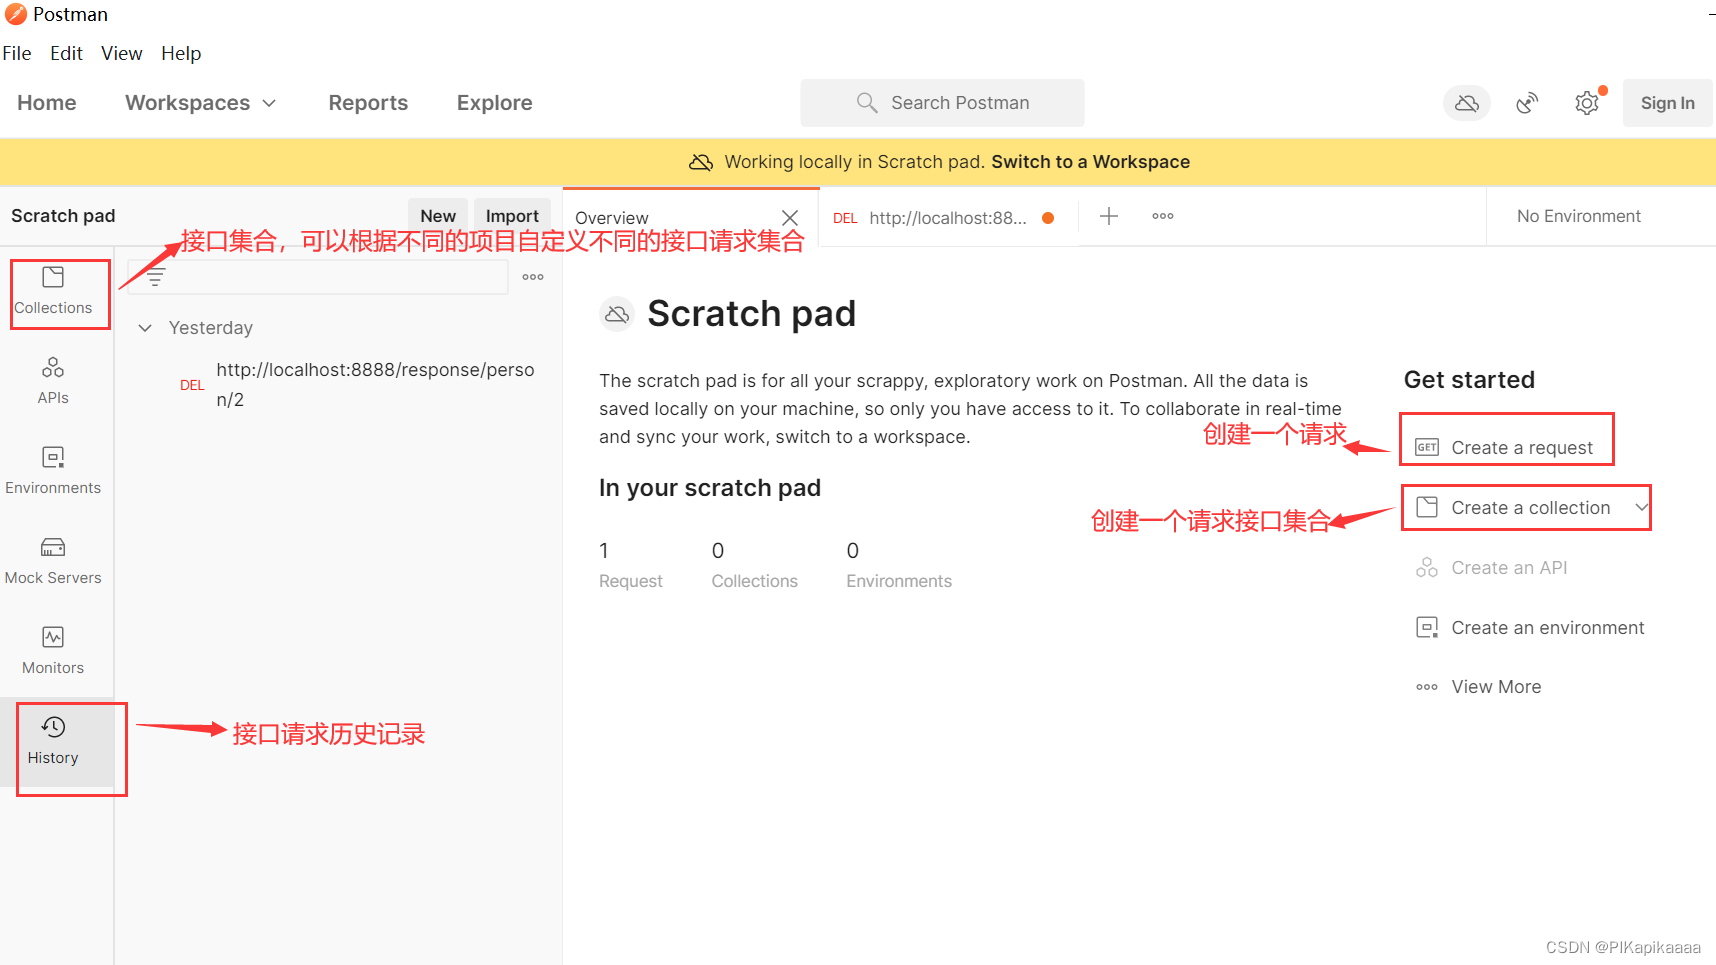
(一)Postman工具介绍
用户在开发或者调试网络程序或者是网页B/S模式的程序的时候是需要一些方法来跟踪网页请求的,用户可以使用一些网络的监视工具比如著名的Firebug等网页调试工具。今天给大家介绍的这款网页调试工具不仅可以调试简单的css、html、脚本等简单的网页基本信息,它还可以发送几乎所有类型的HTTP请求!Postman在发送网络HTTP请求方面可以说是Chrome插件类产品中的代表产品之一。
(二)Postman工具的下载安装
1、下载地址:https://www.postman.com/downloads/
2、安装步骤:
(1)下载安装文件
(2)运行安装程序
(3)重启电脑自动安装
(4)运行
(三)Postman工具的使用
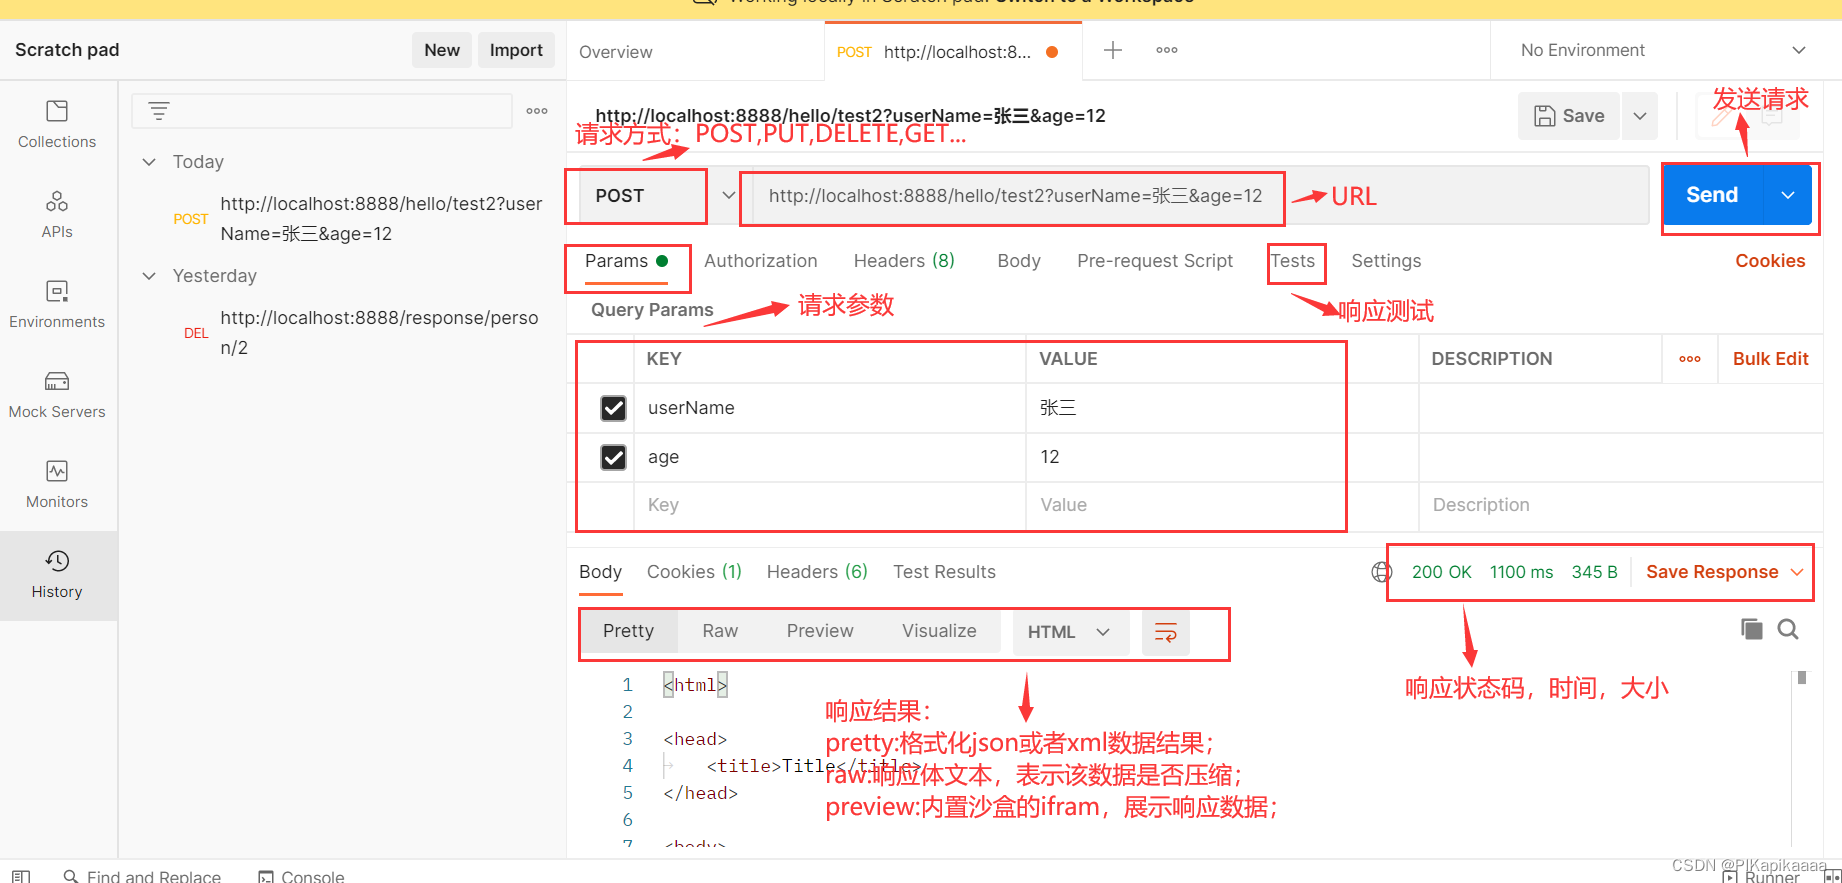
四、SpringMVC中的父子容器解析
(一)SpringMVC中的父子容器解析
Spring和SpringMVC的容器具有父子关系,Spring容器为父容器,SpringMVC为子容器,子容器可以引用父容器中的Bean,而父容器不可以引用子容器中的Bean。
配置spring的配置文件时,排出扫描控制层注解:
 <context:component-scan base-package="com.offcn">
        <context:exclude-filter type="annotation" expression="org.springframework.stereotype.Controller"/>
 </context:component-scan>
配置springMVC的配置文件时,扫描控制层注解:
 <context:component-scan base-package="com.offcn.controller">
        <context:include-filter type="annotation" expression="org.springframework.stereotype.Controller"/>
 </context:component-scan>
五、SpringMVC中的文件上传
(一)文件上传的必要前提:
1、form 表单的 enctype 取值必须是:multipart/form-data(默认值是:application/x-www-form-urlencoded)enctype:是表单请求正文的类型
2、 method 属性取值必须是 Post
3、提供一个文件选择域<input type=”file”/>
(二)文件上传原理分析
当 form 表单的 enctype 取值不是默认值后,request.getParameter()将失效。
enctype=”application/x-www-form-urlencoded”时,form 表单的正文内容是:key=value&key=value&key=value;
当 form 表单的 enctype 取值为 Mutilpart/form-data 时,请求正文内容就变成:每一部分都是 MIME 类型描述的正文;
(三)SpringMVC的文件上传
1、构建maven工程添加相关依赖
  <dependency>
            <groupId>commons-fileupload</groupId>
            <artifactId>commons-fileupload</artifactId>
            <version>1.3.1</version>
  </dependency>
2、编写 jsp 页面
- 上传表单必须指定 enctype=“multipart/form-data”
<form enctype="multipart/form-data" method="post" action="/file/fileUpload">
    <input type="file" name="file">
    <input type="submit" value="上传">
</form>
3、编写控制器
   @RequestMapping("fileUpload")
    public String fileUpload(MultipartFile file){
        File dest = new File("C:\\Users\\mwx\\Pictures\\"+file.getOriginalFilename());
        //文件上传
        try {
            file.transferTo(dest);
        } catch (IOException e) {
            e.printStackTrace();
        }
        return "main";
    }
4、配置xml文件解析器
 <!--  文件上传配置
      id必须为 multipartResolver
      defaultEncoding 表示上传文件编码格式
      maxUploadSize 表示上传文件最大字节限制
      -->
    <bean id="multipartResolver" class="org.springframework.web.multipart.commons.CommonsMultipartResolver">
        <property name="defaultEncoding" value="utf-8"></property>
        <property name="maxUploadSize" value="104857600"></property>
    </bean>
5、测试文件上传的运行结果
详见课堂案例结果
六、SpringMVC中的异常处理
(一)项目开发中异常处理的方式介绍
系统中异常包括两类:预期异常和运行时异常 RuntimeException,前者通过捕获异常从而获取异常信息,后者主要通过规范代码开发、测试等手段减少运行时异常的发生。
(二)异常处理的设计思路
系统的 dao、service、controller 出现都通过 throws Exception 向上抛出,最后由 springmvc 前端控制器交由异常处理器进行异常处理。
(三)异常处理的步骤
1、编写异常类和错误页面
// 自定义异常类
public class OAException extends RuntimeException{
    public String message;

    public OAException(String message){
        super(message);
        this.message=message;
    }

    @Override
    public String getMessage() {
        return message;
    }
}
<html>
<head>
    <title>异常</title>
</head>
<body>
    ${message}
</body>
</html>
2、自定义异常处理类
public class OAExceptionHandler implements HandlerExceptionResolver {
    @Override
    public ModelAndView resolveException(HttpServletRequest request, HttpServletResponse response, Object o, Exception e) {
        String message = "服务器异常,请联系管理员~";
        // 判断是不是自定义异常
        if (e instanceof OAException){
            message = e.getMessage();
        }
        ModelAndView mv = new ModelAndView();
        mv.addObject("message",message);
        mv.setViewName("error");
        return null;
    }
}
3、配置异常处理器
<bean class="com.offcn.util.MyExceptionHandler"></bean>
4、测试异常处理的运行结果
@Controller
public class PersonController {
    @RequestMapping("/getPersonById")
    public String getPersonById(int id){
        if (id<0){
            throw new OAException("id不能小于0");
        }
        System.out.println("id是"+id);
        return "uploadSuccess";
    }
}
public class OAException extends RuntimeException{
public String message;
public OAException(String message){
    super(message);
    this.message=message;
}

@Override
public String getMessage() {
    return message;
}
}
```html
<html>
<head>
    <title>异常</title>
</head>
<body>
    ${message}
</body>
</html>
2、自定义异常处理类
public class OAExceptionHandler implements HandlerExceptionResolver {
    @Override
    public ModelAndView resolveException(HttpServletRequest request, HttpServletResponse response, Object o, Exception e) {
        String message = "服务器异常,请联系管理员~";
        // 判断是不是自定义异常
        if (e instanceof OAException){
            message = e.getMessage();
        }
        ModelAndView mv = new ModelAndView();
        mv.addObject("message",message);
        mv.setViewName("error");
        return null;
    }
}
3、配置异常处理器
<bean class="com.offcn.util.MyExceptionHandler"></bean>
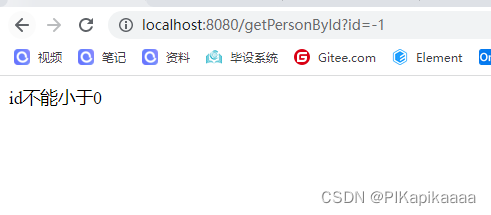
4、测试异常处理的运行结果
@Controller
public class PersonController {
    @RequestMapping("/getPersonById")
    public String getPersonById(int id){
        if (id<0){
            throw new OAException("id不能小于0");
        }
        System.out.println("id是"+id);
        return "uploadSuccess";
    }
}


 1万+
1万+


 被折叠的 条评论
为什么被折叠?


