


莫愁前路无知己,天下谁人不识君。 ——高适《别董大二首》
Fragment
碎片(Fragment)是一种可以嵌入在活动当中的UI片段,它能让程序更加合理和充分地利用大屏幕的空间,因而在平板上应用的非常广泛。
碎片是什么
这是《第一行代码》书中的介绍
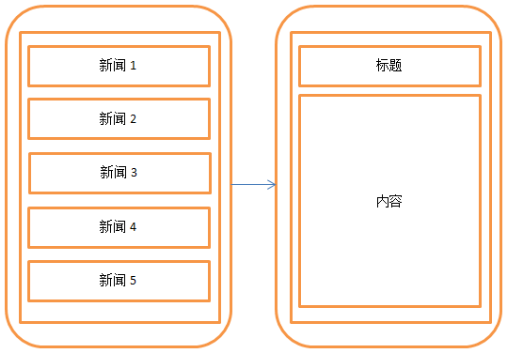
想象我们正在开发一个新闻应用,其中一个界面使用ListView展示了一组新闻的标题,当点击了其中一个标题,就打开另一个界面显示新闻的详细内容。如果是在手机中设计,我们可以将新闻标题列表放在一个活动中,将新闻的详细内容放在另一个活动中,如图所示。
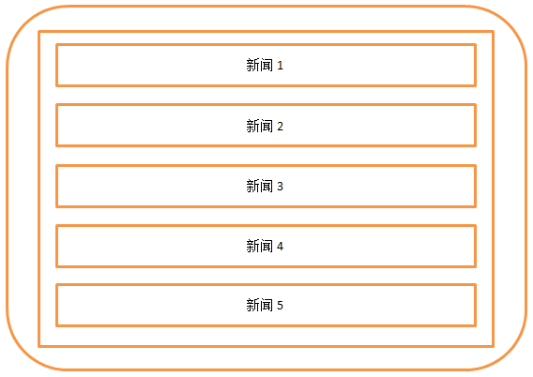
可是如果在平板上也这么设计,那么新闻标题列表将会被拉长至填充满整个平板的屏幕,而新闻的标题一般都不会太长,这样将会导致界面上有大量的空白区域,如图所示。
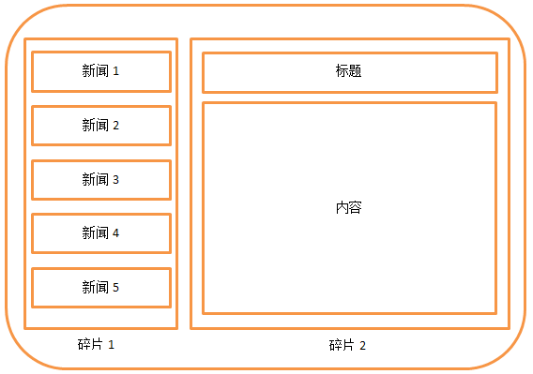
因此,更好的设计方案是将新闻标题列表界面和新闻详细内容界面分别放在两个碎片中,然后在同一个活动里引入这两个碎片,这样就可以将屏幕空间充分地利用起来了,如图所示。
Fragment的出现就是为了解决屏幕适配问题。你可以把Fragment当成Activity的一个界面的一个组成部分,甚至Activity的界面可以完全有不同的Fragment组成,而且Fragment拥有自己的生命周期和接收、处理用户的事件,这样就不必在Activity写一堆控件的事件处理的代码了。更为重要的是,你可以动态的添加、替换和移除某个Fragment。
Fragment的简单使用
Fragment必须依附Activity的存在,通过Activity来加载Fragment
定义一个类继承Fragment
import android.support.v4.app.Fragment;
....
public class Fragment3 extends Fragment {
    @Nullable
    //重写onCreateView方法
    @Override
    public View onCreateView(LayoutInflater inflater, @Nullable ViewGroup container, @Nullable Bundle savedInstanceState) {
    //通过打气筒加载Fragment的布局
        View view = inflater.inflate(R.layout.fragment3,null);
        return view;
    }
}
导入Fragment包的选择
support.v4.app.Fragment;
import android.support.v4.app.Fragment;android.app.Fragment3.0之后才有的,支持的版本太高
选择v4包,是为了可以兼容到1.6的版本的手机,但会影响到获取FragmentManager方式的不同
而且非常非常重要的是包含Fragment的Activity必须继承FragmentActivity
否则你就等着报错吧
android.app.Fragment;
import android.app.Fragment;导入这个包则不需修改Activity
Fragment3的布局文件
<?xml version="1.0" encoding="utf-8"?>
<LinearLayout xmlns:android="http://schemas.android.com/apk/res/android"
    android:layout_width="match_parent"
    android:layout_height="match_parent"
    android:background="#ffff00">

    <TextView
        android:layout_width="match_parent"
        android:layout_height="wrap_content"
        android:text="我是Fragment3里面的内容"
        android:textSize="30dp"
        android:textColor="#000000"/>
</LinearLayout>
activity的布局文件
<?xml version="1.0" encoding="utf-8"?>
<LinearLayout xmlns:android="http://schemas.android.com/apk/res/android"
    android:layout_width="match_parent"
    android:layout_height="match_parent">

    <TextView
        android:layout_width="match_parent"
        android:layout_height="wrap_content"
        android:text="我是主Activity里面的内容"
        android:textSize="30dp"
        android:textColor="#000000"/>
        <!--必须包含id -->
        <fragment
        android:id="@+id/fragment3"
        android:name="com.peng.fragmenttest.Fragment3"
        android:layout_width="match_parent"
        android:layout_height="match_parent">
        </fragment>
</LinearLayout>
MainActivity记得继承FragmentActivity
import android.support.v4.app.FragmentActivity;
...
public class MainActivity extends FragmentActivity {
@Override
protected void onCreate(Bundle savedInstanceState) {
super.onCreate(savedInstanceState);
setContentView(R.layout.activity_main);
}
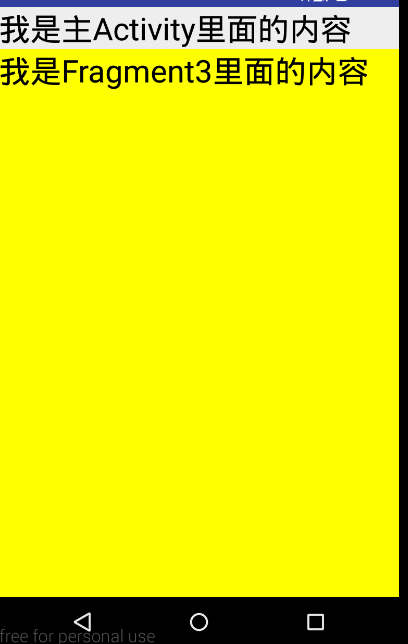
}结果
Fragment的动态使用1
首先给出程序运行成功的gif图
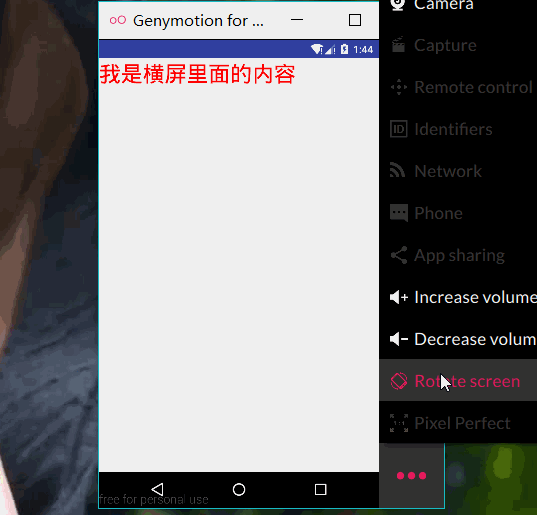
这是一个横竖屏切换时,切换Activity里的Fragment的效果
这里分别定义一个横屏的Fragment和一个竖屏的Fragment
- 横屏 Fragment1
import android.os.Bundle;
import android.support.annotation.Nullable;
import android.support.v4.app.Fragment;
import android.view.LayoutInflater;
import android.view.View;
import android.view.ViewGroup;

/**
 * Created by Peng on 2016/8/4.
 */
public class Fragment1 extends Fragment {
    @Nullable
    @Override
    public View onCreateView(LayoutInflater inflater, ViewGroup container, Bundle savedInstanceState) {
        View view = inflater.inflate(R.layout.fragment1, null);
        return view;
    }
}- 横屏 Fragment1 布局
<?xml version="1.0" encoding="utf-8"?>
<LinearLayout xmlns:android="http://schemas.android.com/apk/res/android"
    android:layout_width="match_parent"
    android:layout_height="match_parent"
    android:orientation="vertical">

    <TextView
        android:id="@+id/tv"
        android:layout_width="match_parent"
        android:layout_height="wrap_content"
        android:text="我是横屏里面的内容"
        android:textSize="30dp"
        android:textColor="#ff0000"/>
</LinearLayout>- 竖屏 Fragment2
public class Fragment2 extends Fragment {

    @Nullable
    @Override
    public View onCreateView(LayoutInflater inflater, ViewGroup container, Bundle savedInstanceState) {
        View view = inflater.inflate(R.layout.fragment2,null);

        return view;
    }
}- 竖屏 Fragment2布局
<?xml version="1.0" encoding="utf-8"?>
<LinearLayout xmlns:android="http://schemas.android.com/apk/res/android"
    android:layout_width="match_parent"
    android:layout_height="match_parent">

    <TextView
        android:layout_width="match_parent"
        android:layout_height="wrap_content"
        android:text="我是竖屏里面的内容"
        android:textSize="30dp"
        android:textColor="#000000"/>
</LinearLayout>
- MainActivity
import android.os.Bundle;
import android.support.v4.app.FragmentActivity;
import android.support.v4.app.FragmentManager;
import android.view.WindowManager;

public class MainActivity extends FragmentActivity {

    @Override
    protected void onCreate(Bundle savedInstanceState) {
        super.onCreate(savedInstanceState);
        setContentView(R.layout.activity_main);
        //获取手机的分辨率
        WindowManager wm = (WindowManager) getSystemService(WINDOW_SERVICE);
        int width = wm.getDefaultDisplay().getWidth();
        int height = wm.getDefaultDisplay().getHeight();

        /**
         * 如果使用的不是v4包的Fragment,就要用getFragmentManager()的到管理者
         * 而且FragmentManager也是用android.app.FragmentManager包
         *  FragmentManager fragmentManager = getFragmentManager();
         */

        //获取fragment的管理者 通过上下文获取
        FragmentManager fragmentManager = getSupportFragmentManager();
        //开启事物
        android.support.v4.app.FragmentTransaction beginTrasaction = fragmentManager.beginTransaction();

        //判断横竖
        if (height > width) {
            //竖屏 android.R.id.content 代表当前手机的窗体
            beginTrasaction.replace(android.R.id.content, new Fragment1());
        } else {
            //横屏
            beginTrasaction.replace(android.R.id.content, new Fragment2());

        }
        //最后一步
        beginTrasaction.commit();
    }
}
Activity的布局文件里并不需要设置,Fragment的布局会和activity共同显示在Activity上
你可以在Activity里写一些内容,内容会一直显示出来
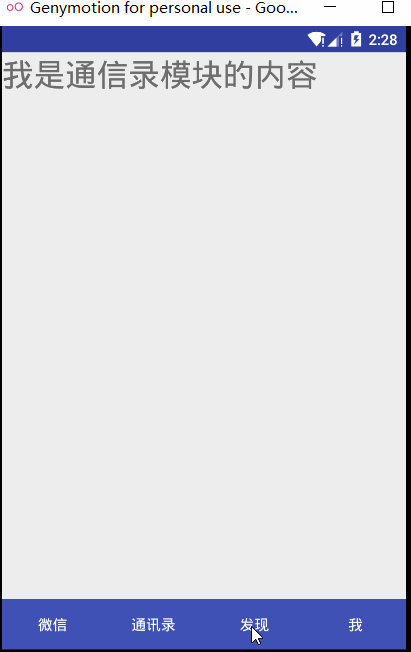
Fragment的动态使用2
首先程序运行的效果
Activity的布局 activity_main.xml
<?xml version="1.0" encoding="utf-8"?>
<LinearLayout xmlns:android="http://schemas.android.com/apk/res/android"
    xmlns:tools="http://schemas.android.com/tools"
    android:layout_width="match_parent"
    android:layout_height="match_parent"
    android:orientation="vertical"
    tools:context="com.peng.wei_xing.MainActivity">

    <LinearLayout
        android:layout_weight="1"
        android:id="@+id/ll_layout"
        android:layout_width="match_parent"
        android:layout_height="0dp"
        android:orientation="vertical">
    </LinearLayout>

    <!-- 引入底部按钮的布局-->
    <include layout="@layout/bottom"></include>

</LinearLayout>
bottom.xml
<?xml version="1.0" encoding="utf-8"?>
<LinearLayout xmlns:android="http://schemas.android.com/apk/res/android"
    android:layout_width="match_parent"
    android:layout_height="wrap_content"
    android:orientation="horizontal">

    <LinearLayout
        android:layout_width="match_parent"
        android:layout_height="wrap_content"
        android:background="@color/colorPrimary"
        android:layout_alignParentBottom="true"
        android:orientation="horizontal">

        <Button
            android:id="@+id/btn_wx"
            android:layout_width="wrap_content"
            android:layout_height="wrap_content"
            android:layout_weight="1"
            android:background="#00000000"
            android:textColor="#FFFEFEFE"
            android:text="微信" />

        <Button
            android:id="@+id/btn_contact"
            android:layout_width="wrap_content"
            android:layout_height="wrap_content"
            android:layout_weight="1"
            android:text="通讯录"
            android:background="#00000000"
            android:textColor="#FFFEFEFE"/>

        <Button
            android:id="@+id/btn_discover"
            android:layout_width="wrap_content"
            android:layout_height="wrap_content"
            android:layout_weight="1"
            android:text="发现"
            android:background="#00000000"
            android:textColor="#FFFEFEFE"/>

        <Button
            android:id="@+id/btn_me"
            android:layout_width="wrap_content"
            android:layout_height="wrap_content"
            android:layout_weight="1"
            android:text="我"
            android:background="#00000000"
            android:textColor="#FFFEFEFE"/>

    </LinearLayout>
</LinearLayout>
Fragment,这里用的是android.app.Fragment的包,没有用v4
的包,注意一下
import android.app.Fragment;
import android.os.Bundle;
import android.support.annotation.Nullable;
import android.view.LayoutInflater;
import android.view.View;
import android.view.ViewGroup;

/**
 * Created by Peng on 2016/8/4.
 */
public class ContactFragment extends Fragment {
    @Nullable
    @Override
    public View onCreateView(LayoutInflater inflater, ViewGroup container, Bundle savedInstanceState) {

        View view =inflater.inflate(R.layout.fragment_contact,null);
        return  view;
    }
}
四个Fragment的布局,这里只写一个,都是类似的
<?xml version="1.0" encoding="utf-8"?>
<LinearLayout xmlns:android="http://schemas.android.com/apk/res/android"
    android:layout_width="match_parent"
    android:layout_height="match_parent">
    <TextView
        android:layout_width="wrap_content"
        android:layout_height="wrap_content"
        android:text="我是通信录模块的内容"
        android:textSize="30dp"/>
</LinearLayout>
MainActivity
import android.app.FragmentManager;
import android.app.FragmentTransaction;
import android.os.Bundle;
import android.support.v7.app.AppCompatActivity;
import android.view.View;
import android.widget.Button;
import android.widget.LinearLayout;

public class MainActivity extends AppCompatActivity implements View.OnClickListener {
    private LinearLayout llLayout;
    private Button btnWx;
    private Button btnContact;
    private Button btnDiscover;
    private Button btnMe;


    @Override
    protected void onCreate(Bundle savedInstanceState) {
        super.onCreate(savedInstanceState);
        setContentView(R.layout.activity_main);

        llLayout = (LinearLayout) findViewById(R.id.ll_layout);

        //四个按钮 微信 通讯录 发现 我
        btnWx = (Button) findViewById(R.id.btn_wx);
        btnContact = (Button) findViewById(R.id.btn_contact);
        btnDiscover = (Button) findViewById(R.id.btn_discover);
        btnMe = (Button) findViewById(R.id.btn_me);

        //设置事件
        btnWx.setOnClickListener(this);
        btnContact.setOnClickListener(this);
        btnDiscover.setOnClickListener(this);
        btnMe.setOnClickListener(this);

    }

    @Override
    public void onClick(View view) {
        //获取fragment的管理者
        FragmentManager fragmentManager = getFragmentManager();
        //开启事物
        FragmentTransaction beginTrasaction = fragmentManager.beginTransaction();

        //具体判断点击那个按钮
        switch (view.getId()) {
            case R.id.btn_wx://点击的是微信
                beginTrasaction.replace(R.id.ll_layout, new WxFragment());

                break;
            case R.id.btn_contact://点击的是联系人
                beginTrasaction.replace(R.id.ll_layout, new ContactFragment());

                break;
            case R.id.btn_discover://点击的是发现
                beginTrasaction.replace(R.id.ll_layout, new DiscoverFragment());

                break;
            case R.id.btn_me://点击的是我
                beginTrasaction.replace(R.id.ll_layout, new MeFragment());

                break;
        }
        beginTrasaction.commit();

    }
}
用replace切换显示的Fragment,这种方法非常方便,但是这种方法不是最完美的, 下面-FragmentTransaction的方法-里关于它的介绍
在Fragment中模拟返回栈
当我们通过点击按钮添加了一个碎片之后,这时按下Back键程序就会直接退出。如果这里我们想模仿类似于返回栈的效果,按下Back键可以回到上一个碎片,该如何实现呢?
其实很简单,FragmentTransaction中提供了一个addToBackStack()方法,可以用于将一个事务添加到返回栈中,修改MainActivity中的代码,
public class MainActivity extends Activity implements OnClickListener {
    ……
    @Override
    public void onClick(View v) {
        switch (v.getId()) {
        case R.id.button:
            AnotherRightFragment fragment = new AnotherRightFragment();
            FragmentManager fragmentManager = getFragmentManager();
            FragmentTransaction transaction = fragmentManager. beginTransaction();
            transaction.replace(R.id.right_layout, fragment);
            //加上这句
            transaction.addToBackStack(null);
            transaction.commit();
            break;
        default:
            break;
        }
    }
}
FragmentTransaction的方法
transaction.add() 往Activity中添加一个Fragment
transaction.remove() 从Activity中移除一个Fragment,如果被移除的Fragment没有添加到回退栈,这个Fragment实例将会被销毁。
transaction.replace() 使用另一个Fragment替换当前的,实际上就是remove()然后add()
transaction.hide() 隐藏当前的Fragment,仅仅是设为不可见,并不会销毁
transaction.show() 显示之前隐藏的Fragment
detach() 会将view从UI中移除,和remove()不同,此时fragment的状态依然由FragmentManager维护。
attach() 重建view视图,附加到UI上并显示。
transatcion.commit() 提交一个事务
Fragment进阶使用
先上程序运行效果
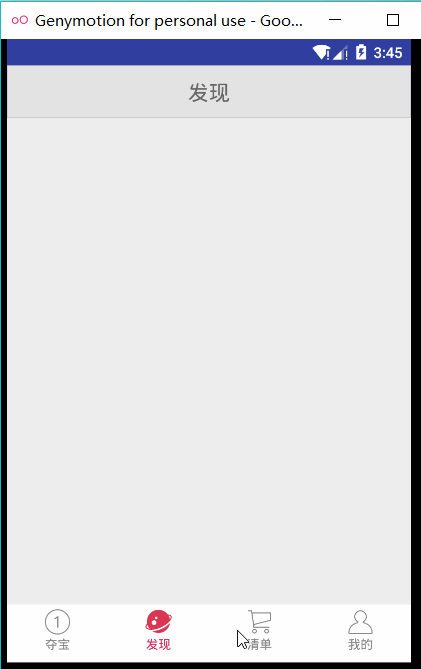
程序里用到了RadioGroup作为底部栏 ,selector背景选择器用于点击时更换背景,FragmentTransaction切换四个Fragment.
FrameLayout作为载体,显示四个Fragment
先把几个重要的文件贴上,这个程序比较复杂,建议下载后学习
页面下方有源码下载
四个Fragment都是类似,这里给出一个
public class Me_Fragment extends Fragment {
    @Nullable
    @Override
    public View onCreateView(LayoutInflater inflater, ViewGroup container, Bundle savedInstanceState) {

        View view =inflater.inflate(R.layout.fragment_me,null);
        return  view;
    }
}
Fragment布局,这里给出夺宝这个
<?xml version="1.0" encoding="utf-8"?>
<LinearLayout xmlns:android="http://schemas.android.com/apk/res/android"
    android:layout_width="match_parent"
    android:layout_height="match_parent"
    android:orientation="vertical"
    >
<LinearLayout
    android:gravity="center"
    android:layout_width="match_parent"
    android:layout_height="50dp"
    android:background="#d02e5c">
    <ImageView
        android:layout_width="wrap_content"
        android:layout_height="wrap_content"
        android:src="@drawable/ic_logo_white"/>
</LinearLayout>
    <LinearLayout
        android:layout_weight="1"
        android:layout_width="match_parent"
        android:layout_height="0dp">
        <TextView
            android:layout_width="wrap_content"
            android:layout_height="wrap_content"
            android:text="我是夺宝模块的内容"/>
    </LinearLayout>

</LinearLayout>

activity_main.xml
<?xml version="1.0" encoding="utf-8"?>
<LinearLayout xmlns:android="http://schemas.android.com/apk/res/android"
    xmlns:tools="http://schemas.android.com/tools"
    android:layout_width="match_parent"
    android:layout_height="match_parent"
    android:orientation="vertical"
    tools:context="com.peng.fragement_826.MainActivity">

    <FrameLayout
        android:id="@+id/main_fragment"
        android:layout_width="match_parent"
        android:layout_height="0dp"
        android:layout_weight="1"></FrameLayout>

<include layout="@layout/bottom"></include>
</LinearLayout>
底部栏bottom.xml
<?xml version="1.0" encoding="utf-8"?>
<LinearLayout xmlns:android="http://schemas.android.com/apk/res/android"
    android:layout_width="match_parent"
    android:layout_height="55dp"
    android:orientation="vertical">

    <RadioGroup
        android:id="@+id/main_rg"
        android:layout_width="match_parent"
        android:layout_height="55dp"
        android:background="#ffffff"
        android:orientation="horizontal"
        android:paddingBottom="5dp"
        android:paddingTop="4dp">

        <!--android:checked="true"-->

        <RadioButton
            android:id="@+id/main_db"
            android:layout_width="0dp"
            android:layout_height="wrap_content"
            android:layout_weight="1"
            android:button="@null"
            android:checked="true"
            android:drawableTop="@drawable/selected_ic_home"
            android:gravity="center_horizontal|bottom"
            android:text="夺宝"
            android:textColor="@drawable/selected_rg_rb_text"
            android:textSize="12sp" />

        <RadioButton
            android:id="@+id/main_fx"
            android:layout_width="0dp"
            android:layout_height="wrap_content"
            android:layout_weight="1"
            android:button="@null"
            android:checked="false"
            android:drawableTop="@drawable/selected_ic_find"
            android:gravity="center_horizontal|bottom"
            android:text="发现"
            android:textColor="@drawable/selected_rg_rb_text"
            android:textSize="12sp" />

        <RadioButton
            android:id="@+id/main_qd"
            android:layout_width="0dp"
            android:layout_height="wrap_content"
            android:layout_weight="1"
            android:button="@null"
            android:checked="false"
            android:drawableTop="@drawable/selected_ic_listing"
            android:gravity="center_horizontal|bottom"
            android:text="清单"
            android:textColor="@drawable/selected_rg_rb_text"
            android:textSize="12sp" />

        <RadioButton
            android:id="@+id/main_me"
            android:layout_width="0dp"
            android:layout_height="wrap_content"
            android:layout_weight="1"
            android:button="@null"
            android:checked="false"
            android:drawableTop="@drawable/selected_ic_user"
            android:gravity="center_horizontal|bottom"
            android:text="我的"
            android:textColor="@drawable/selected_rg_rb_text"
            android:textSize="12sp" />
    </RadioGroup>
</LinearLayout>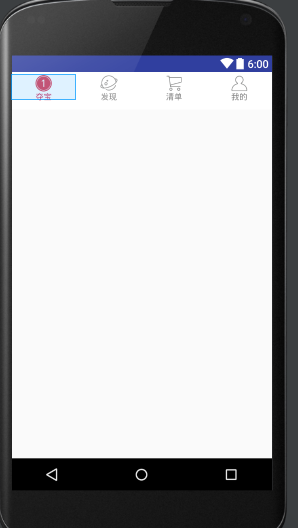
选择器selected_ic_home.xml
选择器的相关知识看我另一篇博文点这里
<?xml version="1.0" encoding="utf-8"?>
<selector xmlns:android="http://schemas.android.com/apk/res/android">
    <item android:drawable="@drawable/ic_home_selected" android:state_checked="true"/>
    <item android:drawable="@drawable/ic_home" android:state_checked="false" />
</selector>
MainActivity
package com.peng.fragement_826;

import android.os.Bundle;
import android.support.v7.app.AppCompatActivity;
import android.util.Log;
import android.widget.FrameLayout;
import android.widget.RadioButton;
import android.widget.RadioGroup;

import com.peng.fragement_826.fragment.Discover_Fragment;
import com.peng.fragement_826.fragment.Doubao_Fragment;
import com.peng.fragement_826.fragment.List_Fragment;
import com.peng.fragement_826.fragment.Me_Fragment;

public class MainActivity extends AppCompatActivity {
    private FrameLayout mainFragment;
    private RadioGroup mainRg;
    private RadioButton mainDb;
    private RadioButton mainFx;
    private RadioButton mainQd;
    private RadioButton mainMe;

    //四个fragment页面
    private Doubao_Fragment duobaofragment;
    private Discover_Fragment discoverFragment;
    private List_Fragment listFragment;
    private Me_Fragment meFragment;


    @Override
    protected void onCreate(Bundle savedInstanceState) {
        super.onCreate(savedInstanceState);
        setContentView(R.layout.activity_main);

        mainFragment = (FrameLayout) findViewById(R.id.main_fragment);

        inintView();


    }
     //页面底部四个按钮的点击 显示不同的fragment
    private void inintView() {
        //底部四个按钮 夺宝 发现 清单 我的
        mainDb = (RadioButton) findViewById(R.id.main_db);
        mainFx = (RadioButton) findViewById(R.id.main_fx);
        mainQd = (RadioButton) findViewById(R.id.main_qd);
        mainMe = (RadioButton) findViewById(R.id.main_me);

        duobaofragment = new Doubao_Fragment();
        getFragmentManager().beginTransaction().replace(R.id.main_fragment, duobaofragment).commit();

        //RadioGroup的点击事件 分别打开不同的fragment
        mainRg = (RadioGroup) findViewById(R.id.main_rg);
        mainRg.setOnCheckedChangeListener(new RadioGroup.OnCheckedChangeListener() {
            @Override
            public void onCheckedChanged(RadioGroup radioGroup, int checkedId) {
                //获取fragment的管理者
                android.app.FragmentManager fragmentManager = getFragmentManager();
                //开启事物
                android.app.FragmentTransaction beginTrasaction = fragmentManager.beginTransaction();

                switch (checkedId) {
                    case R.id.main_db:
                        if (duobaofragment == null) {
                            duobaofragment = new Doubao_Fragment();
                            beginTrasaction.add(R.id.main_fragment, duobaofragment);
                            Log.d("peng","--->>>add-one");
                        }
                        if (discoverFragment != null){
                            beginTrasaction.hide(discoverFragment);
                        Log.d("peng","--->>>hide-two");}
                        if (listFragment != null){
                            beginTrasaction.hide(listFragment);
                        Log.d("peng","--->>>hide-three");}
                        if (meFragment != null) {
                            beginTrasaction.hide(meFragment);
                            Log.d("peng","--->>>hide-four");
                        }
                        beginTrasaction.show(duobaofragment);
                        Log.d("peng","--->>>show-one");
                        beginTrasaction.commit();

                        break;
                    case R.id.main_fx:
                        if (discoverFragment == null) {
                            discoverFragment = new Discover_Fragment();
                            beginTrasaction.add(R.id.main_fragment, discoverFragment);
                            Log.d("peng","--->>>add-two");
                        }
                        if (duobaofragment != null){
                            beginTrasaction.hide(duobaofragment);
                        Log.d("peng","--->>>hide-one");}
                        if (listFragment != null){
                            beginTrasaction.hide(listFragment);
                        Log.d("peng","--->>>hide-three");
                        }
                        if (meFragment != null){
                            beginTrasaction.hide(meFragment);
                            Log.d("peng","--->>>hide-four");
                        }
                        beginTrasaction.show(discoverFragment);
                        Log.d("peng","--->>>show-two");
                        beginTrasaction.commit();

                        break;
                    case R.id.main_qd:
                        if (listFragment == null) {
                            listFragment = new List_Fragment();
                            beginTrasaction.add(R.id.main_fragment, listFragment);
                        }
                        if (duobaofragment != null)
                            beginTrasaction.hide(duobaofragment);
                        if (discoverFragment != null)
                            beginTrasaction.hide(discoverFragment);
                        if (meFragment != null)
                            beginTrasaction.hide(meFragment);
                        beginTrasaction.show(listFragment);
                        beginTrasaction.commit();
                        break;

                    case R.id.main_me:

                        if (meFragment == null) {
                            meFragment = new Me_Fragment();
                            beginTrasaction.add(R.id.main_fragment, meFragment);
                        }
                        if (duobaofragment != null)
                            beginTrasaction.hide(duobaofragment);
                        if (listFragment != null)
                            beginTrasaction.hide(listFragment);
                        if (discoverFragment != null)
                            beginTrasaction.hide(discoverFragment);
                        beginTrasaction.show(meFragment);
                        beginTrasaction.commit();
                        break;
                    default:
                        break;
                }
            }
        });
    }

}
源码
dynamic-fragment动态加载fragment
Fragment进阶使用
参考
Android Fragment 真正的完全解析(上)
Android Fragment 真正的完全解析(下)
Android Fragment 你应该知道的一切


 683
683

 被折叠的 条评论
为什么被折叠?
被折叠的 条评论
为什么被折叠?
 到【灌水乐园】发言


