


 本文详细介绍了如何在Linux虚拟机中使用LVS(LinuxVirtualServer)实现四层负载均衡,包括配置NAT模式、添加公网IP、调度算法以及监控和调整服务器负载的过程。
负载均衡集群
1,集群是什么?
利用多台计算机组合,可以进行海量请求处理。
2,负载均衡是啥?
负载均衡器通过调度算法,合理的将请求分配给计算机服务集群。
3,lvs-NAT模式:实现四层负载均衡项目实战
-
首先准备三台干净的虚拟机:lvs,real_1,real_2。
-
都关闭防火墙,selinux。
[root@lvs ~]# systemctl disable firewalld --now    #永久关闭防火墙
[root@lvs ~]# sed -i 's/^SELINUX=.*/SELINUX=disabled/' /etc/sysconfig/selinux    #永久关闭selinux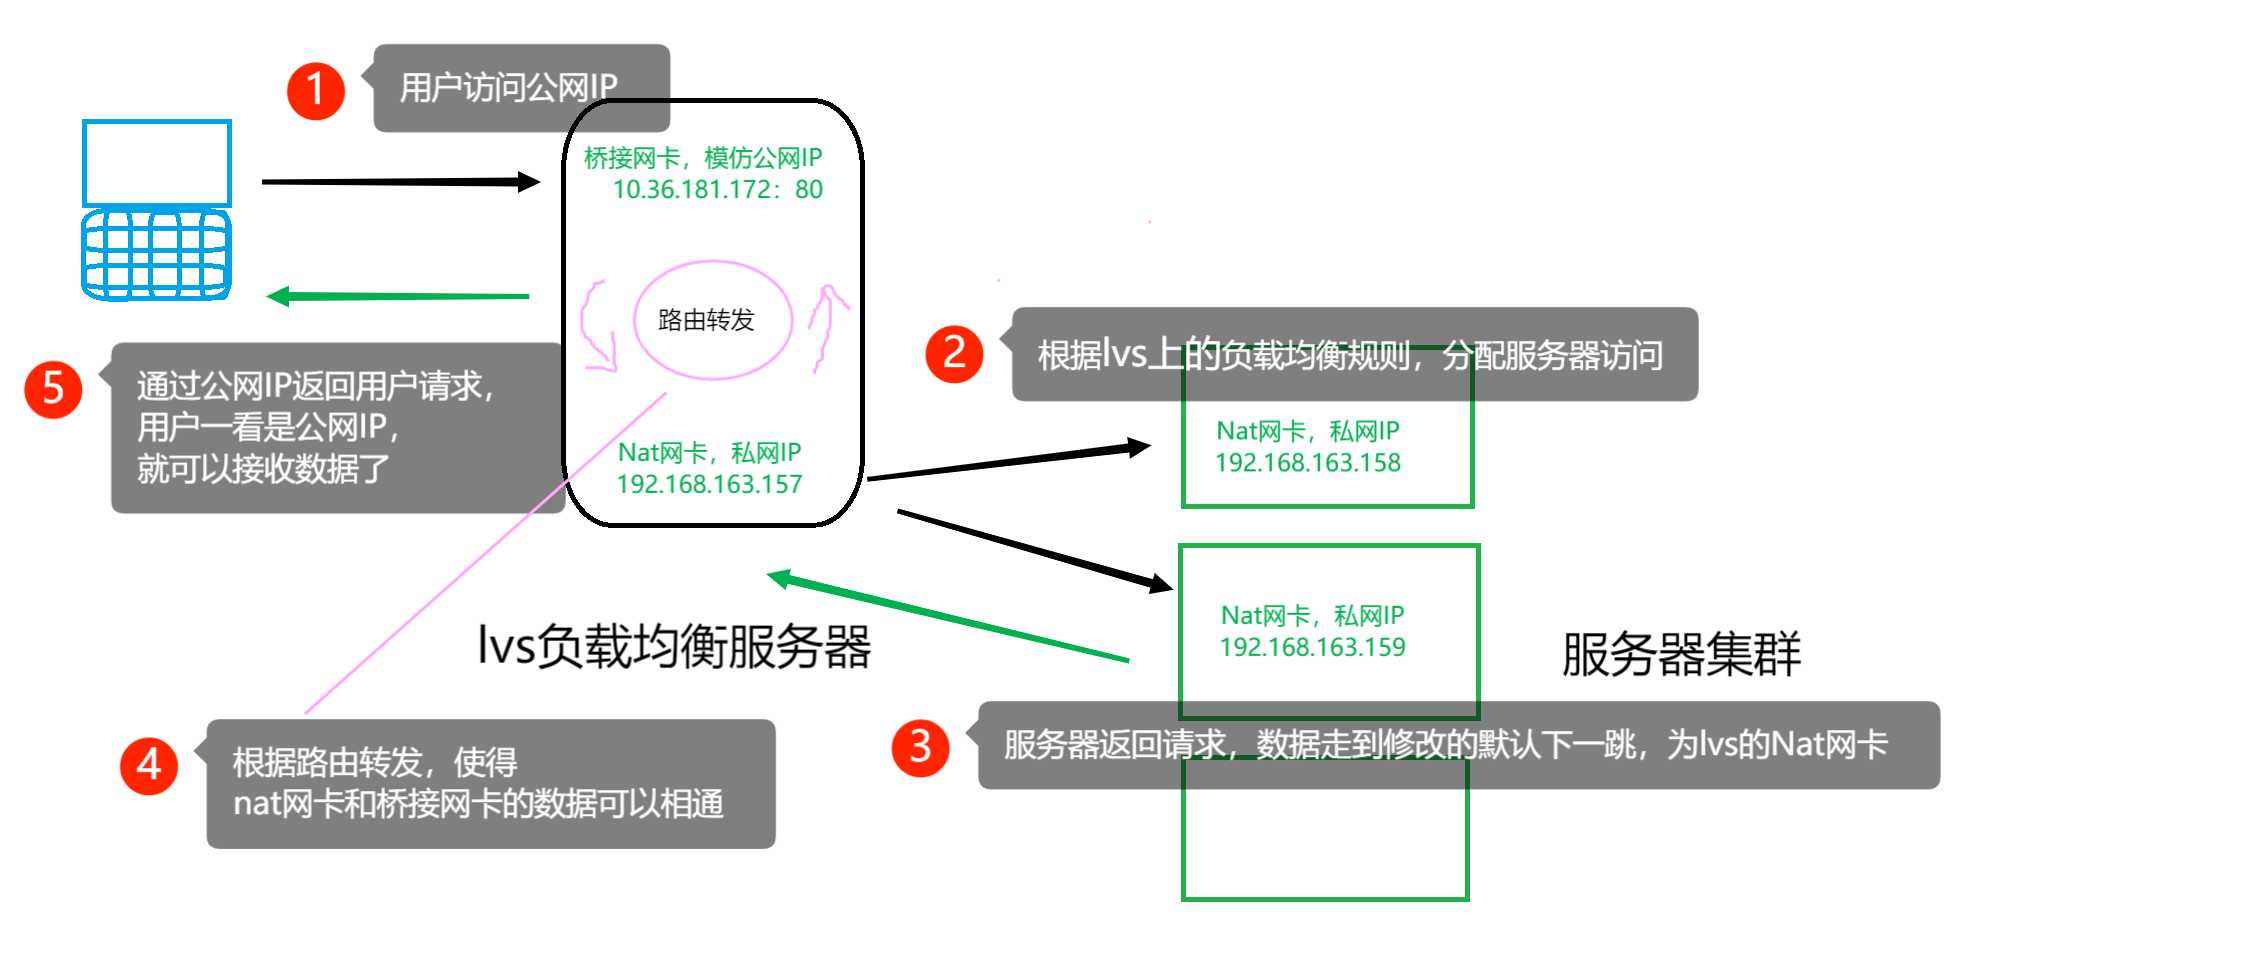
-
在lvs上添加负载均衡方案,并且开启路由转发,使得nat网卡和桥接网卡的数据可以相通。
[root@localhost ~]# yum install -y ipvsadm #安装lvs管理工具 [root@localhost ~]# vim /etc/sysctl.conf net.ipv4.ip_forward = 1 #添加这行内容,打开路由转发功能 [root@localhost ~]# sysctl -p #确认打开 net.ipv4.ip_forward = 1 #添加负载均衡方案 [root@localhost ~]# ipvsadm -A -t 10.36.181.172:80 -s wrr #在lvs上添加外部可以访问的公网IP,-A添加公网IP,-t:TCP协议,-s:调度算法 [root@localhost ~]# ipvsadm -a -t 10.36.181.172:80 -r 192.168.163.158:80 -m -w 2 #在公网IP下,添加可以访问的真实的请求响应服务器,-a:添加真实的请求处理服务器,-r:请求服务器的私网IP,-m:NAT模式,-w:权值 [root@localhost ~]# ipvsadm -a -t 10.36.181.172:80 -r 192.168.163.159:80 -m -w 1 #添加第二个请求服务器的内网地址 [root@localhost ~]# ipvsadm -L -n #查看lvs任务 IP Virtual Server version 1.2.1 (size=4096) Prot LocalAddress:Port Scheduler Flags -> RemoteAddress:Port Forward Weight ActiveConn InActConn TCP 10.36.181.172:80 wrr #公网IP:端口 调度算法 -> 192.168.163.158:80 Masq 2 0 0 #私网IP -> 192.168.163.159:80 Masq 1 0 0 #拓展:删除规则 [root@localhost ~]# ipvsadm -d -t 10.36.181.172:80 -r 192.168.163.159:80 #删除私网IP [root@localhost ~]# ipvsadm -L -n IP Virtual Server version 1.2.1 (size=4096) Prot LocalAddress:Port Scheduler Flags -> RemoteAddress:Port Forward Weight ActiveConn InActConn TCP 10.36.181.172:80 wrr -> 192.168.163.158:80 Masq 2 0 0 [root@localhost ~]# ipvsadm -D -t 10.36.181.172:80 #删除公网IP [root@localhost ~]# ipvsadm -Ln IP Virtual Server version 1.2.1 (size=4096) Prot LocalAddress:Port Scheduler Flags -> RemoteAddress:Port Forward Weight ActiveConn InActConn -
在real_1上启动nginx,并且临时添加默认下一跳为lvs的nat网卡
[root@localhost ~]# yum install -y nginx #安装nginx [root@localhost ~]# nginx #启动nginx [root@localhost ~]# cd /usr/share/nginx/html/ #找nginx前端页面 [root@localhost html]# ls 404.html en-US img nginx-logo.png 50x.html icons index.html poweredby.png [root@localhost html]# echo "<center><h1>real_1</h1></center>" > index.html #修改前端页面 [root@localhost html]# ip r add default via 10.36.181.172 #公网IP,通不了 RTNETLINK answers: Network is unreachable [root@localhost html]# ip r add default via 192.168.163.157 #修改下一条默认网关,私网IP能通,这样就能实现路由转发 -
在real_2上,和real_1一样
-
上网检测:网址搜索公网IP:http://10.36.181.172/,查看服务器的页面。
(1)可以在real_1,real_2上,修改等待空闲时间。
[root@localhost etc]# vim /etc/nginx/nginx.conf keepalive_timeout 0; [root@localhost ~]# nginx -s reload #记得刷新一下 -
再在lvs上查看记录:
[root@localhost ~]# ipvsadm -L -n -c #可以查看是谁在访问公网IP [root@localhost ~]# ipvsadm -L -n --stats #查看私网请求服务器的访问次数 -
在lvs上,保存lvs负载均衡设计方案
[root@localhost ~]# ipvsadm-save -n  #查看方案
-A -t 10.36.181.172:80 -s wrr
-a -t 10.36.181.172:80 -r 192.168.163.158:80 -m -w 2
-a -t 10.36.181.172:80 -r 192.168.163.159:80 -m -w 1
[root@localhost ~]# ipvsadm-save -n > /etc/sysconfig/ipvsadm   #保存方案到配置文件,下一次开机自动加载规则


 983
983

 被折叠的 条评论
为什么被折叠?
被折叠的 条评论
为什么被折叠?
 到【灌水乐园】发言


