


1、什么是线程中断(不是停止)机制?
一个线程不应该由其他线程来强制中断或停止,而是应该由线程自己自行停止,自己来决定自己是否停止。
在Java中没有办法立即停止一条线程,然而停止线程却显得尤为重要,如取消一个耗时操作。因此,Java提供了一种用于停止线程的协商机制——中断,即中断标识协商机制。也仅仅是将线程对象中的中断标识设成true。
生活例子:
顾客在餐厅中吸烟,服务员只能提醒他别吸烟了;而不是强制停止顾客吸烟。具体停止吸烟行为还是需要顾客自己做出操作(顾客可以停止吸烟,也可以不停止吸烟)。
——体现了协商机制
在Thread.java类中有中断相关API方法的说明
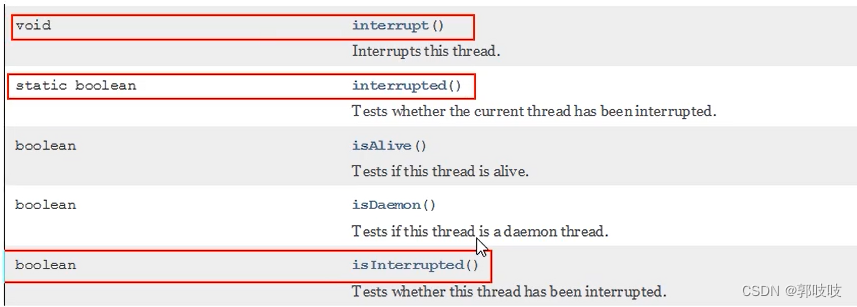
| public void interrupt() | 实例方法,实例方法interrupt()仅仅是设置线程的中断状态为true,发起一个协商而不会立刻停止线程 |
| public static boolean interrupted() | 静态方法,Thread.interrupted()判断线程是否被中断,并清除当前中断状态这个方法做了两件事: 1 返回当前线程的中断状态 2 将当前线程的中断状态设为false(这个方法有点不好理解,因为连续调用两次的结果可能不一样。) |
| public boolean isInterrupted() | 实例方法,判断当前线程是否被中断(通过检查中断标志位) |
2、面试:如何使用中断标识停止线程?
2.1 如何停止中断运行的线程
2.1.1 通过一个被volatile修饰的变量实现
volatile保证了可见性,t2修改了标志后,t1能立马感知到。(原理后续会详细解说)
static volatile boolean isStop = false;
public static void main(String[] args) {
    new Thread(()->{
        while(true){
            if(isStop){
                // 如果这个标志位被其他线程改为true了
                System.out.println(Thread.currentThread().getName()+"\t isStop被修改为true,程序终止");
                break;
            }
            System.out.println("t1 ------hello volatile");//----------------------如果没停止,那就一直打印
        }
    },"t1").start();

    try {TimeUnit.MILLISECONDS.sleep(20);} catch (InterruptedException e) {e.printStackTrace();}

    new Thread(()->{
        isStop = true;
        System.out.println("t2 ------修改isStop = true");
    },"t2").start();
}


//t1 ------hello volatile
//...
//t1 ------hello volatile
//t2 ------修改isStop = true
//t1	 isStop被修改为true,程序终止
2.1.2 通过AtomicBoolean(原子布尔型)——底层volatile实现的
static AtomicBoolean atomicBoolean = new AtomicBoolean(false);
public static void main(String[] args){
    new Thread(()->{
        while(true){
            if(atomicBoolean.get()){//如果这个标志位被其他线程改为true了
                System.out.println(Thread.currentThread().getName()+"\t isStop被修改为true,程序终止");
                break;
            }
            System.out.println("t1 ------hello volatile");//----------------------如果没停止,那就一直打印
        }
    },"t1").start();

    try {TimeUnit.MILLISECONDS.sleep(20);} catch (InterruptedException e) {e.printStackTrace();}

    new Thread(()->{
        atomicBoolean.set(true);
        System.out.println("t2 ------修改atomicBoolean.set(true)");
    },"t2").start();
}

//t1 ------hello volatile
//...
//t1 ------hello volatile
//t2 ------修改atomicBoolean.set(true)
//t1	 isStop被修改为true,程序终止
2.1.3 通过Thread类自带的中断api方法实现
public static void main(String[] args) {
    Thread t1 = new Thread(() -> {
        while (true) {
            if (Thread.currentThread().isInterrupted()) {//一旦发现中断标志位被修改
                System.out.println(Thread.currentThread().getName() + "\t isInterrupted()被修改为true,程序终止");
                break;
            }
            System.out.println("t1 ------hello interrupt ");//----------------------如果没停止,那就一直打印
        }
    }, "t1");
    t1.start();

    try {TimeUnit.MILLISECONDS.sleep(20);} catch (InterruptedException e) {e.printStackTrace();}

    new Thread(()->{
        t1.interrupt();//把t1中断
        System.out.println("t2 ------interrupt()");
    },"t2").start();
}

//t1 ------hello interrupt
//...
//t1 ------hello interrupt
//t2 ------interrupt()
//t1	 isInterrupted()被修改为true,程序终止
2.2 API分析说明
实例方法interrupt(),没有返回值
//Thread.java
public void interrupt() {
        if (this != Thread.currentThread())
            checkAccess();

        synchronized (blockerLock) {
            Interruptible b = blocker;
            if (b != null) {
                interrupt0();           // Just to set the interrupt flag----调用了interrupt0()方法
                b.interrupt(this);
                return;
            }
        }
        interrupt0();
    }


//Thread.java
    /* Some private helper methods */
    private native void setPriority0(int newPriority);
    private native void stop0(Object o);
    private native void suspend0();
    private native void resume0();
    private native void interrupt0();  //---------------------------调用了c底层
    private native void setNativeName(String name);
实例方法isInterrupted,返回布尔值
    //Thread.java
    public boolean isInterrupted() {
        return isInterrupted(false);
    }


    //Thread.java
    private native boolean isInterrupted(boolean ClearInterrupted);//也调用了c底层
说明:
- 具体来说,当对一个线程,调用 interrupt() 时:
- 如果线程处于正常活动状态,那么会将该线程的中断标志设置为 true,仅此而已。被设置中断标志的线程将继续正常运行,不受影响。所以, interrupt() 并不能真正的中断线程,需要被调用的线程自己进行配合才行。
- 如果线程处于被阻塞状态(例如处于sleep, wait, join 等状态),在别的线程中调用当前线程对象的interrupt方法,那么线程将立即退出被阻塞状态(中断状态将被清除),并抛出一个InterruptedException异常。
- 中断不活动的线程不会产生任何影响
2.3 当前线程中断标识为true,线程会立刻停止吗?
不会,仅仅设置了一个中断状态。
public static void main(String[] args) {
    Thread t1 = new Thread(()->{
        for(int i = 0;i < 300;i ++){
            System.out.println("---------" + i);
        }
        System.out.println("after t1.interrupt()---第2次----"+Thread.currentThread().isInterrupted());
    },"t1");
    t1.start();

    System.out.println("before t1.interrupt()----"+t1.isInterrupted());
    t1.interrupt();
    try {TimeUnit.MILLISECONDS.sleep(3);} catch (InterruptedException e) {e.printStackTrace();}
    System.out.println("after t1.interrupt()---第1次---"+t1.isInterrupted());
    try {TimeUnit.MILLISECONDS.sleep(20);} catch (InterruptedException e) {e.printStackTrace();}
    System.out.println("after t1.interrupt()---第3次---"+t1.isInterrupted());
}

//before t1.interrupt()----false
//---------0
//---------1
//---------2
//---------3
//....
//---------136
//after t1.interrupt()---第1次---true    ------此处中断标志位设置为了true,但是t1仍然在运行
//---------137
//---------298
//---------299
//after t1.interrupt()---第2次----true
//after t1.interrupt()---第3次---false//中断不活动的线程不会产生任何影响,线程结束后应该是自动变为了false
2.4 标识睡眠、停止的线程
public class InterruptDemo03 {
    public static void main(String[] args) {
        Thread t1 =  new Thread(()->{
            while(true){
                if(Thread.currentThread().isInterrupted()){
                    System.out.println(Thread.currentThread().getName()+"\t"+
                            "中断标志位:"+Thread.currentThread().isInterrupted()+"程序终止");
                    break;
                }
                try {
                    Thread.sleep(200);
                } catch (InterruptedException e) {
                    e.printStackTrace();
                    // Thread.currentThread().interrupt();  假如加了这个,程序可以终止,只会爆异常
                }
                System.out.println("-----hello InterruptDemo03");
            }
        },"t1");
        t1.start();
        try {TimeUnit.MILLISECONDS.sleep(1);} catch (InterruptedException e) {e.printStackTrace();}
        new Thread(() -> t1.interrupt()).start();
    }
}
//爆异常了,并且程序一直在跑
//java.lang.InterruptedException: sleep interrupted
//  at java.lang.Thread.sleep(Native Method)
//-----hello InterruptDemo03
//-----hello InterruptDemo03
//-----hello InterruptDemo03
//......
//----------------------------
//---------加了Thread.currentThread().interrupt();
//java.lang.InterruptedException: sleep interrupted
// at java.lang.Thread.sleep(Native Method)
//  at com.zhang.admin.controller.InterruptDemo03.lambda$main$0(InterruptDemo03.java:15)
//  at java.lang.Thread.run(Thread.java:748)
//-----hello InterruptDemo03
//t1  中断标志位:true程序终止
如果线程处于被阻塞状态(例如处于sleep, wait, join 等状态),在别的线程中调用当前线程对象的 interrupt 方法,那么线程将立即退出被阻塞状态(中断状态将被清除),并抛出一个InterruptedException异常。
1、中断标志位 默认是false
2、t2 ----->t1发出了中断协商,t2调用t1.interrupt(),中断标志位true
3、中断标志位true,正常情况下,程序停止,^-^
4、中断标志位true,异常情况下,InterruptedException,将会把中断状态清除,并且将收到InterruptedException。中断标志位false导致无限循环。
5、在catch块中,需要再次给中断标志位设置为true,2次调用停止
sleep方法抛出InterruptedException后,中断标识也被清空置为false,我们在catch没有通过th.interrupt()方法再次将中断标志设置为true,这就导致无限循环了
2.5 interrupted()与 isInterrupted() 区别
isInterrupted() 是实例方法,只返回当前线程的中断状态
interrupted()是静态方法,不光返回线程的中断状态,而且会将当前线程的中断状态设置为false
public boolean isInterrupted() {
        return isInterrupted(false);
    }

private native boolean isInterrupted(boolean ClearInterrupted);
public static boolean interrupted() {
return currentThread().isInterrupted(true);
}
private native boolean isInterrupted(boolean ClearInterrupted);他们在底层都调用了native方法isInterrupted。
只不过传入参数ClearInterrupted一个传参传了true,一个传了false。
- 静态方法interrupted() 中true表示清空当前中断状态。
- 实例方法isInterrupted 则不会。
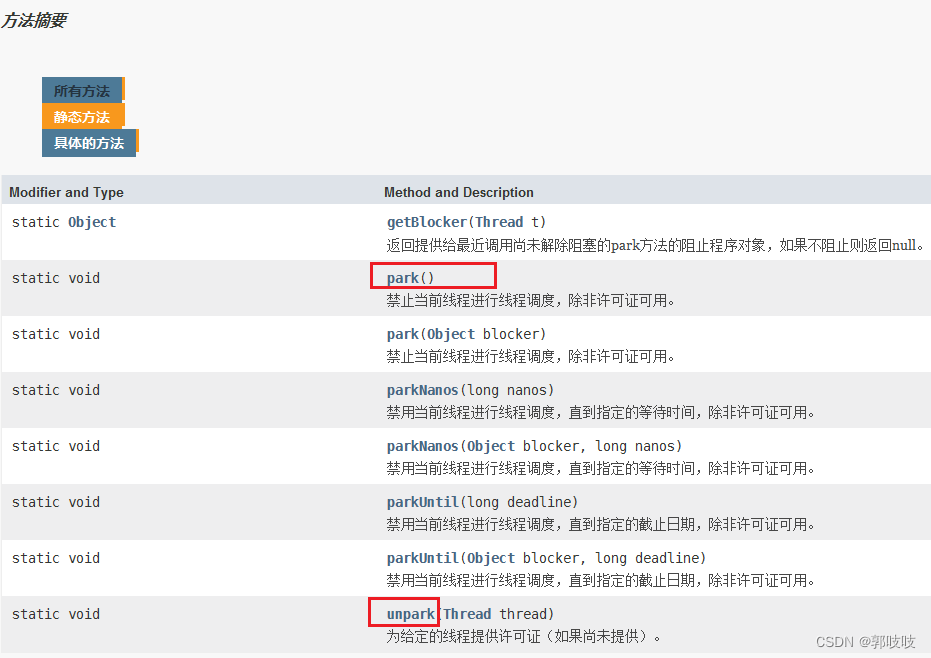
3、LockSupport是什么
官方解释:用于创建锁和其他同步类的基本线程阻塞原语。
核心方法 park() 和 unpark()方法
- park() 方法阻塞线程
- unpark()方法是解除阻塞线程
3.1 线程唤醒等待(阻塞)机制
- 使用Object中的 wait() 方法让线程等待,使用Object中的 notify() 方法唤醒线程
- 使用JUC包中 Condition 的 await()方法让线程等待,使用 signal() 方法唤醒线程
- LockSupport 类可以阻塞当前线程以及唤醒指定被阻塞的线程
3.1.1 Object类中的wait和notify方法实现线程等待和唤醒
public static void main(String[] args) {
    Object objectLock = new Object();
    new Thread(() -> {
        synchronized (objectLock){
            System.out.println(Thread.currentThread().getName()+"\t ---- come in");
            try {
                objectLock.wait();//----------------------这里先让他等待
            } catch (InterruptedException e) {
                e.printStackTrace();
            }
        }
        System.out.println(Thread.currentThread().getName()+"\t"+"---被唤醒了");
    },"t1").start();
    //暂停几秒钟线程
    try { TimeUnit.SECONDS.sleep(3L); } catch (InterruptedException e) { e.printStackTrace(); }
    new Thread(() -> {
        synchronized (objectLock){
            objectLock.notify();
            System.out.println(Thread.currentThread().getName()+"\t ---发出通知");
        }
    },"t2").start();
}

//t1   ---- come in
//t2   ---发出通知
//t1 ---被唤醒了异常1——去掉synchronized
public class LockSupportDemo
{
    public static void main(String[] args){
        Object objectLock = new Object();

        new Thread(() -> {
        //    synchronized (objectLock) {
                System.out.println(Thread.currentThread().getName()+"\t ---- come in");
                try {
                    objectLock.wait();
                } catch (InterruptedException e) {
                    e.printStackTrace();
                }
      //      }
            System.out.println(Thread.currentThread().getName()+"\t"+"---被唤醒了");
        },"t1").start();

        //暂停几秒钟线程
        try { TimeUnit.SECONDS.sleep(3L); } catch (InterruptedException e) { e.printStackTrace(); }

        new Thread(() -> {
       //     synchronized (objectLock) {
                objectLock.notify();
                System.out.println(Thread.currentThread().getName()+"\t ---发出通知");
       //     }
        },"t2").start();
    }
}
//t1   ---- come in
//Exception in thread "t1" java.lang.IllegalMonitorStateException
//  at java.lang.Object.wait(Native Method)
//  at java.lang.Object.wait(Object.java:502)
//  at com.zhang.admin.controller.LockSupportDemo.lambda$main$0(LockSupportDemo.java:15)
//  at java.lang.Thread.run(Thread.java:748)
异常2——将notify和wait的执行顺序兑换
public static void main(String[] args) {
        Object objectLock = new Object();
        new Thread(() -> {
            try { TimeUnit.SECONDS.sleep(3L); } catch (InterruptedException e) { e.printStackTrace(); }
            synchronized (objectLock){
                System.out.println(Thread.currentThread().getName()+"\t ---- come in");
                try {
                    objectLock.wait();//----------------------这里先让他等待
                } catch (InterruptedException e) {
                    e.printStackTrace();
                }
            }
            System.out.println(Thread.currentThread().getName()+"\t"+"---被唤醒了");
        },"t1").start();
//        //暂停几秒钟线程
//        try { TimeUnit.SECONDS.sleep(3L); } catch (InterruptedException e) { e.printStackTrace(); }
        new Thread(() -> {
            synchronized (objectLock){
                objectLock.notify();
                System.out.println(Thread.currentThread().getName()+"\t ---发出通知");
            }
        },"t2").start();
    }

// t2	 ---发出通知
// t1	 ---- come in
// 未退出程序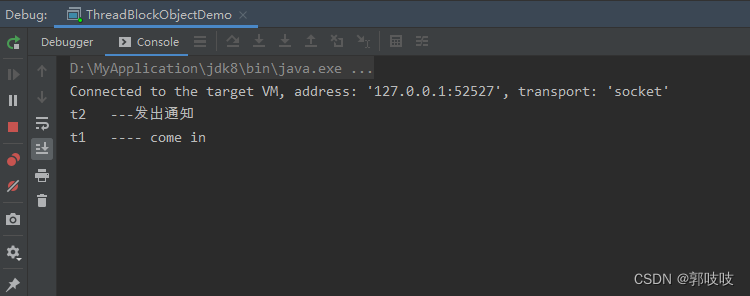
1、wait和notify方法必须要在同步块或者同步方法里面,且成对出现使用
2、先wait后notify才OK,顺序
3.1.2 Condition接口中的await后signal方法实现线程的等待和唤醒
public class ThreadBlockConditionDemo {
    public static void main(String[] args) {
        Lock lock = new ReentrantLock();
        Condition condition = lock.newCondition();
        new Thread(() -> {
            lock.lock();
            try {
                System.out.println(Thread.currentThread().getName()+"\t-----come in");
                condition.await();
                System.out.println(Thread.currentThread().getName()+"\t -----被唤醒");
            } catch (InterruptedException e) {
                e.printStackTrace();
            } finally {
                lock.unlock();
            }
        },"t1").start();

        //暂停几秒钟线程
        try { TimeUnit.SECONDS.sleep(1); } catch (InterruptedException e) { e.printStackTrace(); }

        new Thread(() -> {
            lock.lock();
            try {
                condition.signal();
            } finally {
                lock.unlock();
            }
            System.out.println(Thread.currentThread().getName()+"\t"+"我要进行唤醒");
        },"t2").start();
    }
}

//t1	-----come in
//t2	我要进行唤醒
//t1	 -----被唤醒
与第一种出现的情况一样,依然会出现上述异常和程序循环
- Condition中的线程等待和唤醒方法,需要先获取锁
- 一定要先await后signal,不可以反过来
Object和Condition使用条件限制
- 必选先要获得并持有锁,必须再锁块(synchronized或lock)中
- 必须先等待后唤醒,线程才能够被唤醒
3.1.3 LockSupport类中的park等待和unpark唤醒
通过park()和unpark(thread)方法来实现阻塞和唤醒线程的操作
- LockSupport是用来创建锁和其他同步类的基本线程阻塞原语。
- LockSupport类使用了一种名为Permit(许可) 的概念来做到阻塞和唤醒线程的功能, 每个线程都有一个许可(permit),
- permit(许可)只有两个值1和0,默认是0。0 是阻塞,1是唤醒
- 可以把许可看成是一种(0,1)信号量(Semaphore),但与 Semaphore 不同的是,许可的累加上限是1。
阻塞
调用LockSupport.park()时,发现它调用了unsafe类,并且默认传了一个0
public static void park() {
    UNSAFE.park(false, 0L);
}
permit默认是0
所以一开始调用park()方法,当前线程就会阻塞
直到别的线程将当前线程的permit设置为1时,park方法会被唤醒,然后会将permit再次设置为0并返回。
唤醒
public static void unpark(Thread thread) {
    if (thread != null)
        UNSAFE.unpark(thread);
}
调用unpark(thread)方法后
就会将thread线程的许可permit设置成1(注意多次调用unpark方法,不会累加,permit值还是1)会自动唤醒thread线程,即之前阻塞中的LockSupport.park()方法会立即返回。
正常+无锁块要求
public class LockSupportDemo {
    public static void main(String[] args) {
        Thread t1 = new Thread(() -> {
            System.out.println(Thread.currentThread().getName() + "\t-----come in");
            LockSupport.park();
            System.out.println(Thread.currentThread().getName() + "\t -----被唤醒");
        }, "t1");
        t1.start();

        new Thread(() -> {
            LockSupport.unpark(t1);
            System.out.println(Thread.currentThread().getName() + "\t -----唤醒t1线程");
        },"t2").start();
    }
}

t1	-----come in
t2	 -----唤醒t1线程
t1	 -----被唤醒
唤醒阻塞顺序不同,依旧支持
public class LockSupportDemo {
    public static void main(String[] args) {
        Thread t1 = new Thread(() -> {
            try {TimeUnit.SECONDS.sleep(3);} catch (InterruptedException e) {e.printStackTrace();}
            System.out.println(Thread.currentThread().getName() + "\t-----come in");
            LockSupport.park();
            System.out.println(Thread.currentThread().getName() + "\t -----被唤醒");
        }, "t1");
        t1.start();

        new Thread(() -> {
            LockSupport.unpark(t1);
            System.out.println(Thread.currentThread().getName() + "\t -----唤醒t1线程");
        },"t2").start();
    }
}
sleep方法3秒后醒来,执行park无效,没有阻塞效果,解释如下
先执行了unpark(t1)导致上面的park方法形同虚设无效,时间是一样的
- 类似于高速公路的ETC,提前买好了通行证unpark,到闸机处直接抬起栏杆放行了,没有park拦截了。
许可证只有一个
public class LockSupportDemo
{
    public static void main(String[] args) {
        Thread t1 = new Thread(()->{
            try {TimeUnit.SECONDS.sleep(3);} catch (InterruptedException e) {e.printStackTrace();}
            System.out.println(Thread.currentThread().getName()+"\t----------come in"+"\t"+System.currentTimeMillis());
            LockSupport.park();
            LockSupport.park();
            System.out.println(Thread.currentThread().getName()+"\t----------被唤醒了"+"\t"+System.currentTimeMillis());
        },"t1");
        t1.start();

        new Thread(()->{
            LockSupport.unpark(t1);
            LockSupport.unpark(t1);
            System.out.println(Thread.currentThread().getName()+"\t-----发出通知,去唤醒t1");
        },"t2").start();
    }
}
//t2  -----发出通知,去唤醒t1
//t1  ----------come in  1654750970677--------------------卡在这里了
4、面试题
4.1 LockSupport为什么可以突破wait/notify的原有调用顺序?
因为看是否阻塞是查看是否有凭证,可以先发放凭证后续可以直接通行。
4.2 为什么唤醒两次后阻塞两次,但最终线程还会阻塞?
因为凭证的数量最多为1, 连续调用两次unpark和调用一次unpark效果一样, 只会增加一个凭证;
而调用两次park却需要消费两个凭证,凭证不够,不能放行。


 141
141


 被折叠的 条评论
为什么被折叠?
被折叠的 条评论
为什么被折叠?
 到【灌水乐园】发言


