


 本文探讨了PSP(个人软件过程)、TSP(团队软件过程)与CMM(能力成熟度模型)之间的关系,解释了如何通过这些方法提高软件工程师的工作质量和团队协作效率。同时介绍了面向对象编程的基础概念和技术,包括类、对象、封装等。
题外话:
- PSP(Personal Software Process 个人开发能力)
- TSP(Team Software Process 团队开发能力)
- CMM(Capability Maturity Model for Software 能力成熟度模型)之间的关系
·PSP能够指导软件工程师如何保证自己的工作质量,估计和规划自身的工作,度量和追踪个人的表现,管理自身的软件过程和产品质量。经过PSP学习和实践的正规训练,软件工程师们能够在他们参与的项目工作之中充分运用PSP,从而有助于CMM目标的实现。
·TSP结合了CMM的管理方法和PSP的工程技能,通过告诉软件工程师如何将个体过程结合进小组软件过程,并将后者与组织进而整个管理系统相联系;通过告诉管理层如何支持和授权项目小组,坚持高质量的工作,并且依据数据进行项目的管理,向组织展示如何应用CMM的原则和PSP的技能去生产高质量的产品。
·CMM是过程改善的第一步,它提供了评价组织的能力、识别优先改善需求和追踪改善进展的管理方式。企业只有开始CMM改善后,才能接受需要规划的事实,认识到质量的重要性,才能注重对员工经常进行培训,合理分配项目人员,并且建立起有效的项目小组。然而,它实现的成功与否与组织内部有关人员的积极参加和创造性活动密不可分。
抽象
- 函数—— 一种算法,一旦写成即可用于多种情况
- 对象—— 将一组相关的属性和行为组成一个类(两个级别 对象中包含对象的对象叫做集合对象)
- 框架和API—— 支持复杂行为的大型对象组
类
类是对象的蓝图。
Java技术编程语言支持三个OOP的关键特性:封装、继承和多态。
格式如下:
<修饰符> class <类名>{
[<属性声明>]
[<构造器声明>]
[<方法声明>]
}
属性
属性名一般为名词命名
格式如下
<修饰符><类型><名称>;
方法
格式如下
<修饰符><返回类型><名称>([参数列表]){
<语句>
}
返回类型必须写,如果没有必须写void,如果有则必须在结尾处写return语句,return语句后任何代码都不被程序读取
信息隐藏
尽量使用private来修饰。保护数据
封装
- 封装的意义
- 隐蔽类的实现细节
- 强迫用户使用接口访问数据
- 使代码更易维护
构造器(俗称“构造方法”)
强调:构造器不是方法!因为它没有任何返回,甚至连void都没有,因为它并不包含返回选项。另外它不可以被继承
格式如下:
<修饰符><类名>([<参数表>]){
[<语句>]
}
默认构造器
- 每个类至少有一个构造器
- 如果不便携构造器,则自动添加默认构造器:
- 默认构造器不带参数
- 默认构造器为空
- 不必编写构造器就能使用new xxx()创建对象实例。
可以通过默认构造器使用new xxx()创建实例,否则,将要求为每个类提供一个构造器。
源文件布局
格式如下
[<包声明>]
[<导入声明>]
<类声明>+
(+号代表一个或多个)
Ps:包的命名规则:编程者所在组织的域名倒写加其他规范,如com.sun.java.ProKun
包必须写在import之前,一般写在源文件最顶部
包不可以使用诸如package com.*之类的带*的名称
包名小写,无数字
每个源文件只有一个包声明
import java.net.*;此句话只引入当前包下所有文件,并不包含它们的子包。即访问不到java.net.URL.*;
import用.*和.具体包名运行速度完全相同,无任何差异,对程序性能没有影响这点和C/C++的#include语句完全不同,初学者最好使用后者方法,可帮助记忆
术语摘要:
- 类 —— Java编程语言中定义新的对象类型的一种方法,类可以被视为一张蓝图——它是您要描述的对象的模型。
- 对象 —— 类的实例。对象就是每次使用new 来实例化一个类得到的东西。对象也被称为实例。
- 属性 —— 对象的数据元素。属性存储一个对象的信息。属性也被称为数据成员、实例变量或数据字段。
- 方法 —— 一个对象的功能元素。方法也被称作函数或过程。
- 构造器 —— 用于初始化(或建立)一个新对象的“类似方法”的构造。构造器名与类名相同。
- 程序包 —— 是类、子程序包或者两者的集合。
Java API文档
- 一套超文本标记语言(HTML)文件,是描述提供的API的文档
- 一个包含了到多有类信息超链接的包
- 一个类的文档。包括了类的层次结构、对象的描述、成员变量列表、构造器列表,等等。
另外,为什么写程序要写成:
public static void main(String[] args){
}
而不是
public static void main(String[] args)
{
}
前者会让编程人员在屏幕上看到更多行的代码,提高编程效率。
====================================================================
本章练习题:
SL275: Module1: Getting Started
Exercise #1: Explore Java Errors
(Level 1)
Objective
In this exercise you will solve compilation and runtime errors by fixing an example Java technology program.
Directions
- Compile the Test1.java file.
Why did it fail?
Fix it and recompile and run this program. - Compile the Test2.java file.
Why did it fail?
How would you fix this situation? - Compile and run the Test3 class.
Why did it fail?
Fix it and recompile and run this program. - Compile and run the Test4 class.
Why did it fail?
Fix it and recompile and run this program.
文件名:Test1.java
内容:
==================================================
public class Test1 {
public static void main(String[] args) {
System.out.println("What's wrong with this program?");
}
}
public class TestAnother1 {
public static void main(String[] args) {
System.out.println("What's wrong with this program?");
}
}
==================================================
文件名:Test2.java
内容:
==================================================
public class Testing2 {
public static void main(String[] args) {
System.out.println("What's wrong with this program?");
}
}
==================================================
文件名:Test3.java
内容:
==================================================
public class Test3 {
public static void main(String args) {
System.out.println("What's wrong with this program?");
}
}
==================================================
文件名:Test4.java
内容:
==================================================
public class Test4 {
public void main(String[] args) {
System.out.println("What's wrong with this program?");
}
}
==================================================
我的解答:
Test1:一个类文件只能有一个public的class,并且一个程序只有一个main方法。所以显然是错误在这里,应改成
public class Test1 {
public static void main(String[] args) {
System.out.println("This is Right!");
}
}
Test2:类名和文件名不同。应改成
public class Test2 {
public static void main(String[] args) {
System.out.println("This is Right!");
}
}
Test3:字符数组没写。应改成
public class Test3 {
public static void main(String[] args) {
System.out.println("This is Right!");
}
}
Test4:main方法不是静态的。应改成
public class Test4 {
public static void main(String[] args) {
System.out.println("This is Right!");
}
}
练习2
SL275: Module2: Object-Oriented Programming
Exercise #2: Explore Encapsulation
(Level 2)
Objective
In this exercise you will explore the purpose of proper object encapsulation. You will create a class in three steps demonstrating the use of information hiding.
Directions
Version 1: No Information Hiding
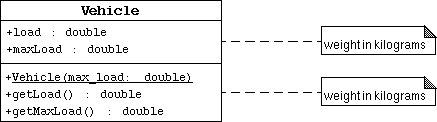
In this version of the Vehicle class, you will leave the attributes public so that the test program TestVehicle1 will have direct access to them.
- Change your working directory to mod02/exercise2/version1.
- Create a class Vehicle that implements the above UML diagram.
- Include two public attributes: load "the current weight of the vehicle's cargo" and maxLoad "the vehicle's maximum cargo weight limit".
- Include one public constructor to set the maxLoad attribute.
- Include two public access methods: getLoad to retrieve the load attribute and getMaxLoad to retrieve the maxLoad attribute.
Note that all of the data are assumed to be in kilograms.
- Read the TestVehicle.java code. Notice that the program gets into trouble when the last box is added to the vehicle's load because the code does not check if adding this box will exceed the maxLoad.
- Compile the Vehicle and TestVehicle classes.
- Run the TestVehicle class. The output generated should be:
Creating a vehicle with a 10,000kg maximum load.
Add box #1 (500kg)
Add box #2 (250kg)
Add box #3 (5000kg)
Add box #4 (4000kg)
Add box #5 (300kg)
Vehicle load is 10050.0 kg
Version 2: Basic Information Hiding
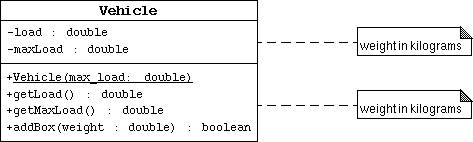
To solve the problem from the first version, you will hide the internal class data (load and maxLoad) and provide a method, addBox, to perform the proper checking that the vehicle is not being overloaded.
- Change your working directory to mod02/exercise2/version2.
- Create a class Vehicle that implements the above UML diagram.
You may wish to copy the Vehicle.java file you created in version #1.
- Modify the load and maxLoad attributes to be private.
- Add the addBox method. This method takes a single argument, which is the weight of the box in kilograms. The method must verify that adding the box will not violate the maximum load. If a violation occurs the box is rejected by returning the value of false; otherwise the weight of the box is added to the vehicle load and the method returns true.
Hint: you will need to use an "if" statement. Here is the basic form of the conditional form:
if ( <boolean_expression> ) {
  <statement>*
} else {
  <statement>*
}
Note that all of the data are assumed to be in kilograms.
- Read the TestVehicle.java code. Notice that the code can not modify the load attribute directly, but now must use the addBox method. This method returns a true or false value which is printed to the screen.
- Compile the Vehicle and TestVehicle classes.
- Run the TestVehicle class. The output generated should be:
Creating a vehicle with a 10,000kg maximum load.
Add box #1 (500kg) : true
Add box #2 (250kg) : true
Add box #3 (5000kg) : true
Add box #4 (4000kg) : true
Add box #5 (300kg) : false
Vehicle load is 9750.0 kg
Version 3: Change Internal Representation of Weight to Newtons
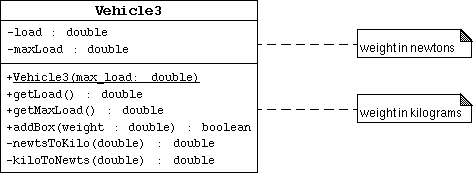
Now suppose that you were going to write some calculations that determine the wear on the vehicle's engine and frame. These calculations are easier if the weight of the load is measured in newtons.
- Change your working directory to mod02/exercise2/version3.
- Create a class Vehicle that implements the above UML diagram.
You may wish to copy the Vehicle.java file you created in version #2.
- Modify the constructor, getLoad, getMaxLoad, and addBox methods to use a conversion from kilograms (the parameter weight measurement) to newtons (the instance variable measurement). You might want to use the following private methods:
  private double kiloToNewts(double weight) {
    return (weight * 9.8);
  }
  private double newtsToKilo(double weight) {
    return (weight / 9.8);
  }
Note that now the internal data of the vehicle objects is in newtons and the external data (passed between methods) is still in kilograms.
- Modify the constructor, getLoad, getMaxLoad, and addBox methods to use a conversion from kilograms (the parameter weight measurement) to newtons (the instance variable measurement). You might want to use the following private methods:
- Read the TestVehicle.java code. Notice that it is identical to the test code in version #2.
- Compile the Vehicle and TestVehicle classes.
- Run the TestVehicle class. The output generated should be:
Creating a vehicle with a 10,000kg maximum load.
Add box #1 (500kg) : true
Add box #2 (250kg) : true
Add box #3 (5000kg) : true
Add box #4 (4000kg) : true
Add box #5 (300kg) : false
Vehicle load is 9750.0 kg
You should see no change in the output of the program. This demonstrates that the (private) internal changes to the version #3 Vehicle class did not change the code of the client class TestVehicle.
我的解答
第一题:
public class Vehicle{
public double load;
public double maxLoad;
public Vehicle(double max_load){
maxLoad=10000.0;
}
public double getLoad(){
return load;
}
public double getMaxLoad(){
return maxLoad;
}
}
第二题
public class Vehicle{
private double load;
private double maxLoad;
public Vehicle(double max_load){
maxLoad=10000.0;
}
public double getLoad(){
return load;
}
public double getMaxLoad(){
return maxLoad;
}
public boolean addBox(double weight){
load+=weight;
if(load<=maxLoad){
return true;
}
else{
load-=-weight;
return false;
}
}
}
第三题
public class Vehicle{
private double load;
private double maxLoad;
public Vehicle(double max_Load){
maxLoad=10000.0;
}
public double getLoad(){
return load;
}
public double getMaxLoad(){
return maxLoad;
}
public boolean addBox(double weight){
load+=weight;
if(load<=maxLoad){
return true;
}
else{
load-=weight;
return false;
}
}
private double newtsToKio(double weight){
return (weight*9.8);
}
private double kiloToNewts(double weight){
return (weight/9.8);
}
}


 1942
1942

 被折叠的 条评论
为什么被折叠?
被折叠的 条评论
为什么被折叠?
 到【灌水乐园】发言


