


1.c++的第一个程序
// 方法一
#include<iostream>

// namespace为命名空间的关键字,std为空间名; C++标准库的东西放进std命名空间
using namespace std;

int main()
{
	cout << "hello world" << endl;

	return 0;
}
// 方法二
#include<iostream>

int main()
{
    // 流插入( << ); cout--> console out; endl--> endline
    // :: 为域作用限定符
	// 自动识别类型
	std::cout << "hello world" << std::endl;

    int i = 10;
	double j = 10.11;
	std::cout << i <<" "<< j << " "<< &i <<std::endl;

	return 0;
}
// 可以自己输出打印结果
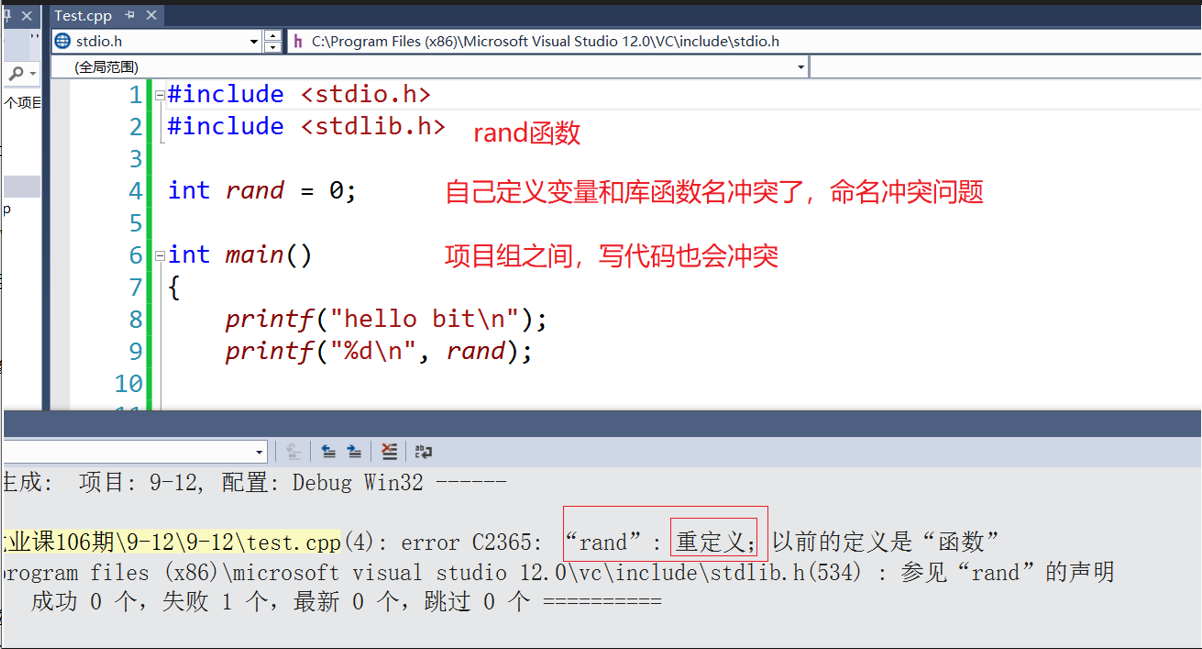
为什么要存在命名空间
// 错误演示
#include <stdio.h>
#include <stdlib.h>

int rand = 0;

int main()
{
	printf("hello bit\n");
	printf("%d\n", rand);  //rand 是函数名,打印的是函数的地址


	return 0;
}
// 加上命名空间修正之后
#include <stdio.h>
#include <stdlib.h>

namespace qwy
{
	int rand = 0;
}

int main()
{
	printf("hello bit\n");
	printf("%p\n", rand);       // 打印为0
	printf("%p\n", qwy::rand);  // 打印为rand()函数的地址

	return 0;
}
实例2:
#include<stdio.h>
int a = 0;

int main()
{
	int a = 1;

    // 根据局部优先原则,打印值为1
	printf("%d\n", a);

	// ::域作用限定符
    // ::(限定符左侧为空白,代表是全局域);打印结果为0
	printf("%d\n", ::a);

	return 0;
}
2. 命名空间
在C/C++中,变量、函数和类都是大量存在的,这些变量、函数和类的名称将都存在于全局作用域中,可能会导致很多冲突。使用命名空间的目的是对标识符的名称进行本地化, 以避免命名冲突或名字污染,namespace关键字的出现就是针对这种问题的。
#include <stdio.h>
#include <stdlib.h>  // 预处理时,会展开,所以编译器查找的范围只有全局变量,和局部变量,局部变量优先

// 命名空间:不影响变量生命周期,只是限定域,影响编译查找规则
// 默认查找规则,先在局部找,再全局找
namespace qwy
{
	int rand = 10;
	int x = 1;
}

void func()
{
	printf("%p\n", rand);  // 为<stdlib.h> 中的函数,打印值为函数的地址
	printf("%d\n", qwy::x);  // 打印为 1
	printf("%d\n", qwy::rand);  // 打印为 10
}

int main()
{
	func();
	// printf("%p\n", rand);

	return 0;
}
2.1 命名空间定义
定义命名空间,需要使用到namespace关键字**,后面跟命名空间的名字,然后接一对{}**即可,{}中即为命名空间的成员。
// 1. 正常的命名空间定义
#include <stdio.h>
#include <stdlib.h>

// 避免命名冲突
namespace qwy
{
	int rand = 10;
	int x = 1;

	int Add(int left, int right)
	{
		return left + right;
	}

	struct Node
	{
		struct Node* next;
		int val;
	};
}

namespace _qwy
{
	int Add(int left, int right)
	{
		return left*10 + right*10 ;
	}

	struct Node
	{
		struct Node* next;
		struct Node* prev;
		int val;
	};
}

int main()
{
	printf("%d\n", qwy::Add(1, 2));
    // 注意结构体,域作用限定符的位置;  命名空间避免了命名冲突
	struct qwy::Node node;

	struct _qwy::Node dnode;

	return 0;
}
// 2. 命名空间可以嵌套
namespace N1
{
	int a;
	int b;
	int Add(int left, int right)
	{
		return left + right;
	}

	namespace N2
	{
		int c;
		int d;
		int Sub(int left, int right)
		{
			return left - right;
		}
	}
}

int main()
{
	N1::a = 1;
	N1::N2::c = 2;  // 在N1中找N2,再到N2中找c

	return 0;
}
// std C++官方库内容定义的命名空间
// 3. 同一个工程中允许存在多个相同名称的命名空间,编译器最后会合成到同一个命名空间中。
// ps:一个工程中的Stack.h和上面Queue.h中两个qwy(相同的命名空间)会被合并成一个

// stack.h
namespace qwy  // 空间名都为qwy
{
	struct Stack
	{
		int* a;
		//.....
	};

	void StackPush(struct Queue* ps, int x)
	{}
}

// Queue.h
namespace qwy
{
	struct Queue
	{
		//.....
	};

	void QueuePush(struct Queue* ps, int x)
	{}
}

// test.cpp
int main()
{
	qwy::StackPush(NULL, 1);
	qwy::QueuePush(NULL, 1);

	return 0;
}
2.2 命名空间使用
命名空间中成员该如何使用呢?
命名空间的使用有三种方式:
// 1.加命名空间名称及作用域限定符
#include <iostream>

int main()
{
	std::cout << "hello world" << std::endl;
	return 0;
}
// 2.使用using namespace std(也就是将std标准库展开,这样编译器编译时,就可以找到)
// 用起来就方便了,命名的隔离墙拆了
// 日常练习,小程序,这么用可以,项目最好不要这么用
// 写项目时,我们自己定义的变量名,可能会和std标准库中的名字相冲突

#include <iostream>
using namespace std;

// int cout = 0;  // 这样使用就会导致命名冲突

int main()
{
	cout << "hello world" << endl;
	cout << "hello world" << endl;
	std::cout << "hello world" << std::endl;

	return 0;
}
// 3.使用using将命名空间中某个成员引入

#include <iostream>
// 指定展开 -- 常用展开,自己定义的时候避免跟常用重名即可
using std::cout;

int main()
{
	cout << "hello world" << std::endl;
	cout << "hello world" << std::endl;
	std::cout << "hello world" << std::endl;

	return 0;
}
3. C++输入&输出
#include <iostream>
using namespace std;

int main()
{
	// 可以自动识别变量的类型,相比c的优势printf / scanf
	// 哪个方便就用哪个

	// << 流插入运算符
	cout << "Hello world!!!" << endl; //可以将endl看做是换行
	cout << "Hello world!!!" << '\n';

	int a;
	double b;
	char c;

	// >> 流提取运算符
	cin >> a;       // 输入数据到a,然后被提取,相当于scanf
	cin >> b >> c;
	cout << a << endl;
	cout << b <<" "<< c <<endl;   // 如果需要打印ASCII值,可以强转类型,打印

	printf("%.1f\n", b);
	cout <<"int:"<<a <<" "<<" double:"<< b <<" char:" << c << endl;
    //这块相比而言,用printf就更加方便
	printf("int:%d double:%f char:%c", a, b, c);

	return 0;
}
4. 缺省参数
4.1 缺省参数概念
缺省参数是声明或定义函数时为函数的参数指定一个缺省值(可以理解为是默认值)。在调用该函数时,如果没有指定实参则采用该形参的缺省值,否则使用指定的实参。
#include <iostream>
using namespace std;

void Func(int a = 0)
{
	cout << a << endl;
}

int main()
{
	Func();    // 打印值为0
	Func(10);  // 打印值为10

	return 0;
}
4.2 缺省参数分类
全缺省参数
// 全缺省
#include <iostream>
using namespace std;

void Func(int a = 10, int b = 20, int c = 30)
{
	cout << "a = " << a << endl;
	cout << "b = " << b << endl;
	cout << "c = " << c << endl;
}

int main()
{
    // 传值:从左向右依次传值,不能间隔着给
	Func();
	Func(1);          // 打印结果为 a = 1, b = 20, c = 30
	Func(1, 2);       // 打印结果为 a = 1, b = 2,  c = 30

    // Func(1, ,2); 不支持
	Func(1, 2, 3);    // 打印结果为 a = 1, b = 2,  c = 3
    return 0;
}
半缺省参数(部分缺省)
// 半缺省/部分缺省 -- 只能从右往左连续缺省
// 半缺省,因为有些变量,没有缺省值,因此我们必须要传值
// 半缺省参数必须从右往左依次来给出,不能间隔着给
void Func(int a, int b = 10, int c = 20)    // 给缺省值,必须按从右向左的顺序
{
	cout << "a = " << a << endl;
	cout << "b = " << b << endl;
	cout << "c = " << c << endl;
}

int main()
{
    // a没有缺省值,因此a必须要传参
	Func(1);
	Func(1, 2);
	Func(1, 2, 3);

	return 0;
}
缺省参数的应用
- 缺省参数不能在函数声明和定义中同时出现
// stack.h
namespace qwy
{
	typedef struct Stack
	{
		int* a;
		int top;
		int capaicty;
		//....
	}ST;

	// 缺省参数不能在函数声明和定义中同时出现,只能在声明中给缺省值,定义中不需要给(这是c++语法规定的)
    // 这么做的目的是为了避免声明和定义的缺省值不一致,导致冲突
	void StackInit(ST* ps, int defaultCP = 4);
	void StackPush(ST* ps, int x);
}


// stack.cpp
#include "Stack.h"

namespace qwy
{
    // 上面的声明已经给出了缺省值,定义中不需要出现缺省值了
	// 缺省参数不能在函数声明和定义中同时出现,避免声明和定义中给的值不一致
	void StackInit(ST* ps, int defaultCP)
	{
		ps->a = (int*)malloc(sizeof(int)*defaultCP);
		assert(ps->a);
		ps->top = 0;
		ps->capaicty = defaultCP;
	}

	void StackPush(ST* ps, int x)
	{}
}

// test.cpp
int main()
{
	// 不知道要插入多少数据
	qwy::ST st1;
	qwy::StackInit(&st1);

	// 知道要插入100个数据
	qwy::ST st2;
	qwy::StackInit(&st2, 100); // 使用缺省值,避免了频繁malloc,提高了运行效率

	return 0;
}
综上得出的结论:
-
半缺省参数必须从右往左依次来给出,不能间隔着给(注:这里的从右往左是指函数参数)
-
缺省参数不能在函数声明和定义中同时出现
-
缺省值必须是常量或者全局变量
-
C语言不支持(编译器不支持)
5. 函数重载
-
自然语言中,一个词可以有多重含义,人们可以通过上下文来判断该词真实的含义,即该词被重载了。
-
比如:以前有一个笑话,国有两个体育项目大家根本不用看,也不用担心。一个是乒乓球,一个是男足。前者是“谁也赢不了!”,后者是“谁也赢不了!”。
5.1 函数重载概念
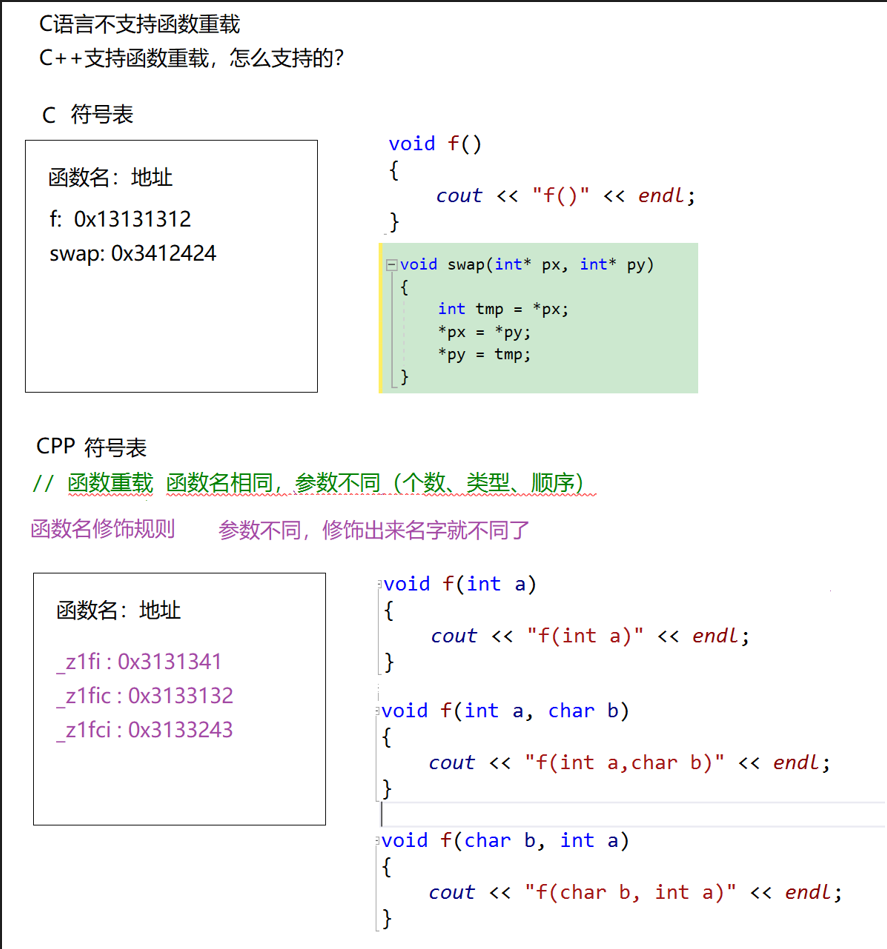
函数重载:是函数的一种特殊情况,C++允许在同一作用域中声明几个功能类似的同名函数,这些同名函数的形参列表(参数个数 或 类型 或 类型顺序)不同,常用来处理实现功能类似数据类型不同的问题。
// 函数重载 函数名相同,参数不同(个数、类型、顺序)

#include<iostream>
using namespace std;

// 1.参数类型不同
int add(int x, int y)
{
	return x + y;
}

double add(double x, double y)
{
	return x + y;
}

void swap(int* px, int* py)
{
	int tmp = *px;
	*px = *py;
	*py = tmp;
}

void swap(double* px, double* py)
{
	double tmp = *px;
	*px = *py;
	*py = tmp;
}

int main()
{
    // 调用int add(int x, int y)
	cout << add(1, 2) << endl;
    // 调用double add(double x, double y)
	cout << add(1.1, 2.2) << endl;

	int a = 0, b = 1;
	swap(&a, &b);

	double c = 1.1, d = 2.2;
	swap(&c, &d);

	return 0;
}
// 2、参数个数不同
void f()
{
	cout << "f()" << endl;
}

void f(int a)
{
	cout << "f(int a)" << endl;
}

int main()
{
	f();        // 打印结果为 f()
	f(1);       // 打印结果为 f(int a)

	return 0;
}
// 3.顺序不同是形参类型顺序不同(指的是参数的类型,而不是参数本身)
void f(int a, char b)
{
	cout << "f(int a,char b)" << endl;
}

void f(char b, int a)
{
	cout << "f(char b, int a)" << endl;
}

/*
// 错误示范;顺序不同,指的是参数的类型(如char,int的顺序不同)
void f(int a, int b)
{
    cout << "f(int a,int b)" << endl;
}

void f(int b, int a)
{
   cout << "f(int a,int b)" << endl;
}
*/

int main()
{
	f(0, 'A');  // 打印结果为 f(int a,char b)
	f('A', 1);  // 打印结果为 f(char b, int a)

	return 0;
}
// 在语法上构成函数重载 -- 但是f()调用会报错,存在歧义
void f()
{
	cout << "f()" << endl;
}

void f(int a = 0, char b = 1)
{
	cout << "f(int a,char b)" << endl;
}

int main()
{
	f(10);     // 打印结果f(int a,char b)
	f(10, 20); // 打印结果f(int a,char b)

	f(); // 歧义  二义性;按照语法,两个都可以调用

	return 0;
}
5.2 C++支持函数重载的原理–名字修饰(name Mangling)
为什么C++支持函数重载,而C语言不支持函数重载呢?
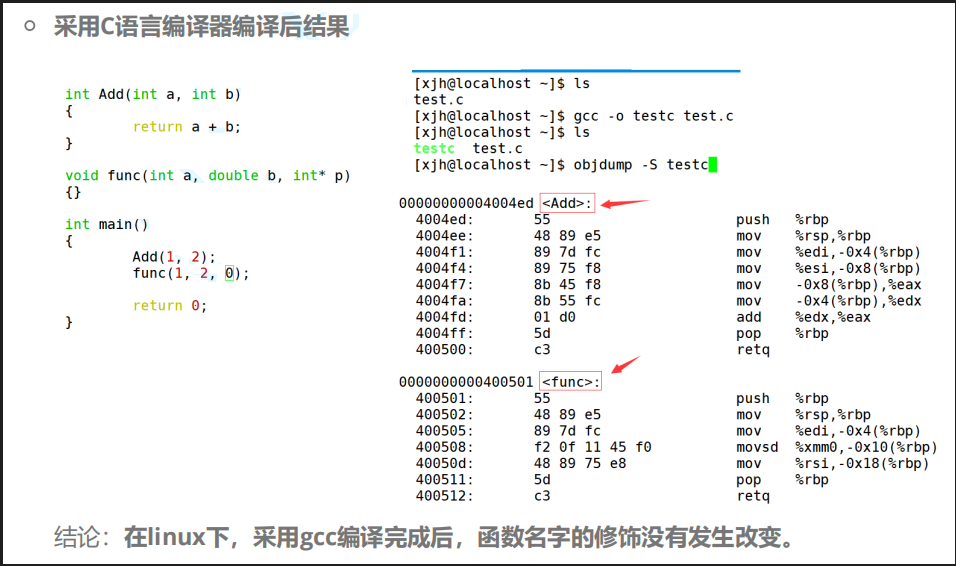
- 采用C++编译器编译后结果

结论:在linux下,采用g++编译完成后,函数名字的修饰发生改变,编译器将函数参数类型信息添加到修改后的名字中。
参数相同,返回值不同是否可以构成重载
// _z1ifii-->将返回值加入之后的函数名
int f(int a, int b)
{
	cout << "f(int a,char b)" << endl;
	return 0;
}

// _z1cfii
char f(int b, int a)
{
	cout << "f(int a,char b)" << endl;
	return 'A';
}

// 验证之后得出:返回值不同,不构成重载
// 返回值不同,不构成重载原因,并不是函数名修饰规则
// 真正原因是调用时的二义性,无法区分,调用时不指定返回值类型
int main()
{
	f(1, 1);
	f(2, 2);

	return 0;
}
6. 引用
6.1 引用概念
引用不是新定义一个变量,而是给已存在变量取了一个别名,编译器不会为引用变量开辟内存空间,它和它引用的变量共用同一块内存空间。
// 情况1:
int main()
{
	int a = 10;
	int& ra = a; // 引用
	int& x = a;
	int& y = x;

	x++;
	y++;
	a++;
    printf("%d %d %d", x,y,a); // 打印结果为, 11 12 13
	return 0;
}
// 情况2:
void swap(int& m, int& n)
{
	int tmp = m;
	m = n;
	n = tmp;
}

int main()
{
    int cc = 1, dd = 2;
	swap(cc, dd);
    printf("%d %d", cc, dd); //打印结果为 2 1
}
// 情况3:
// case1:
struct ListNode
{
	struct ListNode* next;
	int val;
};

// c语言的玩法
void SlistPushBack(struct ListNode** pphead, int x)
{}

// c++的玩法
// 也就是给struct ListNode*类型的数据取别名
void SlistPushBack(struct ListNode*& phead, int x)
{}


// case2:
typedef struct ListNode
{
	struct ListNode* next;
	int val;
}LTNode, *PLTNode;
// 将struct ListNode 定义为LTNode
// 将struct ListNode* 定义为PLTNode

// c语言的玩法
void SlistPushBack(struct ListNode** pphead, int x)
{}

// c++的玩法(两种都可以)
void SlistPushBack(struct ListNode*& phead, int x)
{}
void SlistPushBack(PLTNode& phead, int x)
{}


int main()
{
	struct ListNode* plist = NULL;
	SlistPushBack(plist, 1);
	SlistPushBack(plist, 2);

	return 0;
}
// 情况4:
#include<iostream>
using namespace std;

void TestRef()
{
	int a = 10;
	int& ra = a;// <====定义引用类型

	printf("%p\n", &a);  // ra是a的别名,因此ra和a的地址相同
	printf("%p\n", &ra);
}

int main()
{
	TestRef();

	return 0;
}
注:
-
类型& 引用变量名(对象名) = 引用实体;
-
引用类型必须和引用实体是同种类型的
6.2 引用特性
-
引用在定义时必须初始化
-
一个变量可以有多个引用
-
引用一旦引用一个实体,再不能引用其他实体。
void TestRef()
{
   int a = 10;
   // int& ra;   // 该条语句编译时会出错;引用在定义时,必须初始化

   int& ra = a;
   int& rra = a;

   int b = 10;
   ra = b;  // 给ra赋值,并不是给b取别名
   printf("%p %p %p\n", &a, &ra, &rra);
}
6.3 常引用
// 减少拷贝,提高效率、
// 一般用引用做参数都是用const 引用
#include<iostream>

void Func(const int& x)
{}

int main()
{
	int a = 0;
	// 权限平移(ra 在申请的a空间可读可写)
	int& ra = a;

	// 指针和引用赋值中,权限可以缩小,但是不能放大
	const int b = 1;

	// 我引用你,权限放大 不行(范围从const int 扩大到 int)
	// int& rb = b;
    // 正确做法是:const int&rb = b;

	// 我引用你,我的权限的缩小 是可以(范围从int 扩大到 const int)
	const int& rra = a;
	//rra++; (rra被const修饰,是不可以修改的)
	a++;   // a可以被修改,a的值被改变,则rra的值也将改变

	// 权限平移
	const int& rb = b;

	Func(a);  // 权限缩小
	Func(b);  // 权限平移
	Func(rra);  // 权限平移
    Func(10); // 常量是不能够被修改的, 所以常量被引用,需要用const来修饰,如:const int& a = 10

	return 0;
}
// 情况2:
void func(const int& N = 10)
{}
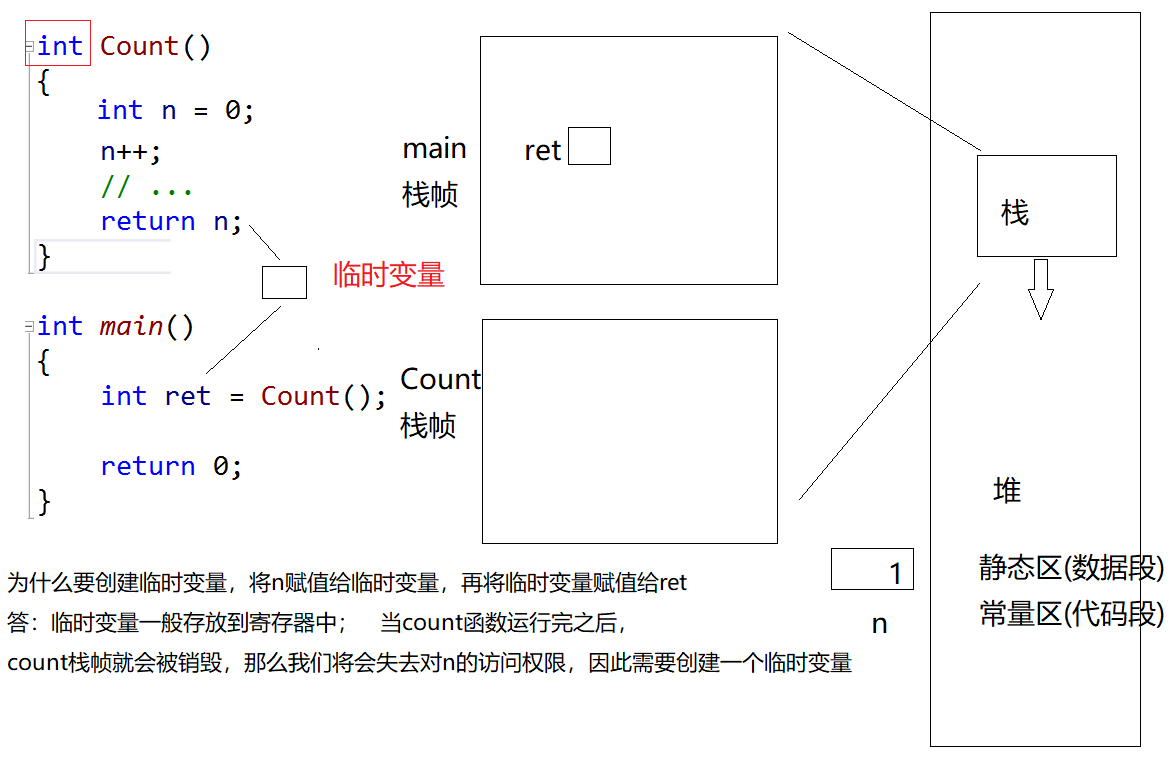
int Count()
{
int n = 0;
n++;
// ...
return n;
}
int main()
{
// 常量被引用,要用const修饰
const int& b = 10;
double d = 12.34;
// d的值是不变的,实际打印的是临时变量的值
cout << (int)d << endl;
// 强转d的类型,需要创建一个临时变量,将d取出,放入临时变量,实际上打印的是临时变量的值
// 注意:创建的临时变量具有常性,因此引用时需要用const修饰
const int& ri = d; // 可以;引用的其实是临时变量,临时变量具有常性,因此需要用const来修饰
int i = d; // 可以
int i = (int)d; // 可以
cout << ri << endl;
// int& ret = Count(); // 错误演示
// 由于栈帧被销毁,因此不可以通过ret来修改n;需要用const修饰,只读不写
const int& ret = Count();
return 0;
}
6.4使用场景
- 引用做参数
void Swap(int& left, int& right) // 输出型参数
{
   int temp = left;
   left = right;
   right = temp;
}
- 引用做返回值
// case1:普通的传值返回
int Count()
{
    int n = 0;
	n++;
	// ...
	return n;
}

int main()
{
	int ret = Count();
	cout << ret << endl;

    return 0;
}
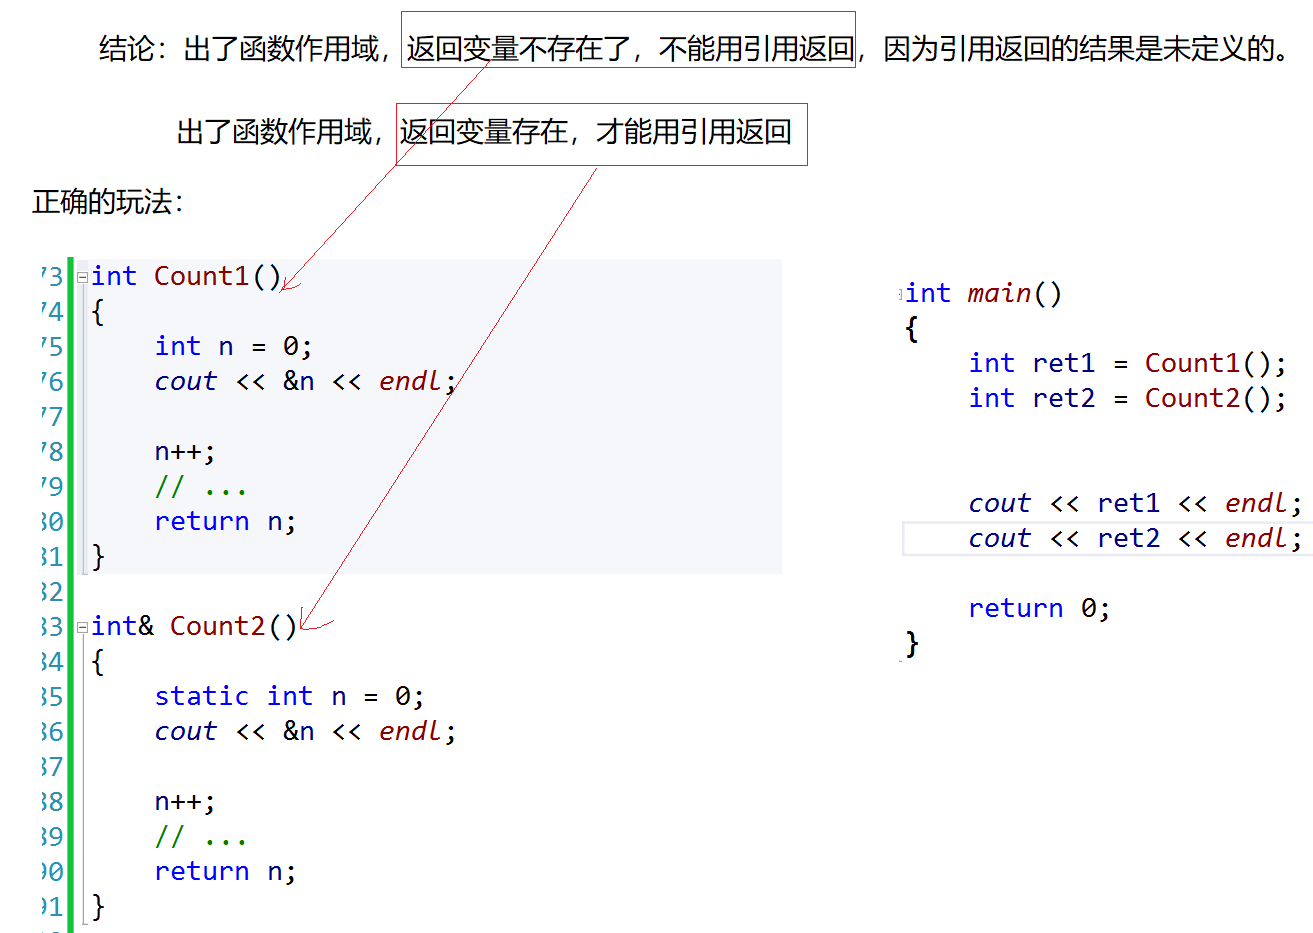
// case2:普通的传值返回
int Count()
{
    //此时的n在静态区存放,就算count栈帧销毁,依旧可以访问n
    static int n = 0;
	n++;
	// ...
	return n;
}

int main()
{
	int ret = Count();
	cout << ret << endl;

	return 0;
}
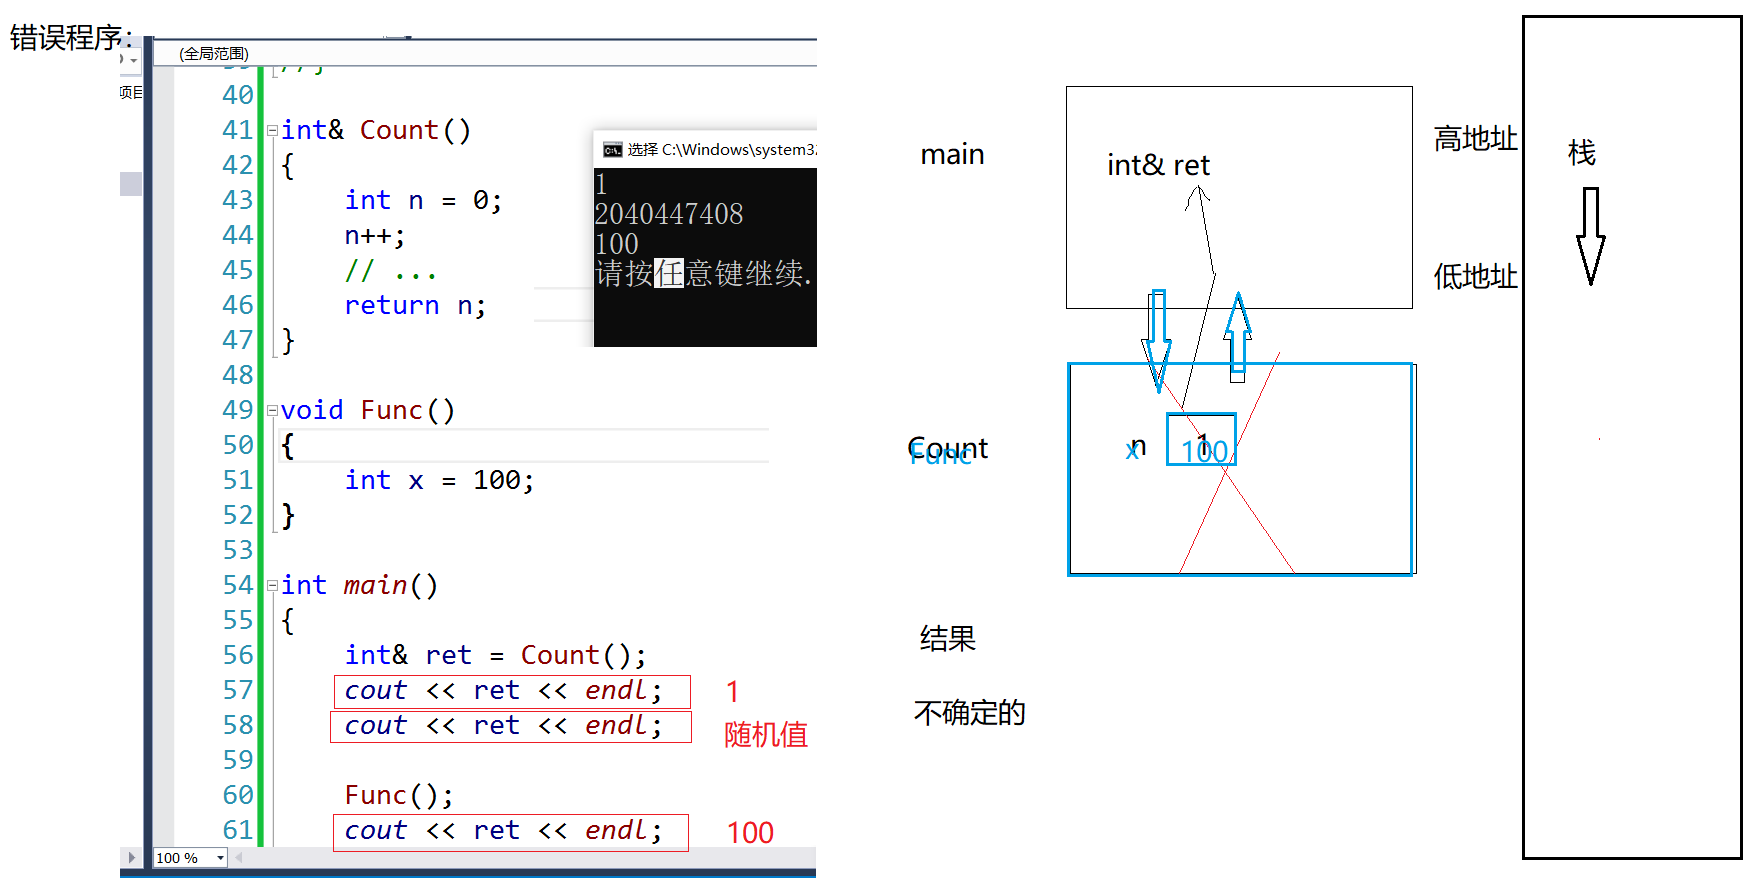
// case3:引用做返回值
int& Count()
{
    int n = 0;
	n++;
	// ...
	return n;
}

int main()
{
	int ret = Count();
    // 当count栈帧销毁,则我们就没有对n的访问权限,n空间的访问权限可能已经被重新分配了;
    // 所以:出了函数作用域,返回变量不存在了,不能用引用返回,因为引用返回的结果是未定义的
    // 因此,这种方法是不可取的

	cout << ret << endl; // 打印结果为1

    return 0;
}
// 验证:
int& Count()
{
    int n = 0;
	n++;
	// ...
	return n;
}

void Func()
{
    int x = 100;
}

int main()
{
	int& ret = Count();
	cout << ret << endl; // 打印结果为1
    cout << ret << endl; // 打印结果为随机值

    Func();
    cout << ret << endl; // 打印结果为100

    return 0;
}
// case:4:
int& Count()
{
    static int n = 0;
	n++;
	// ...
	return n;
}

int main()
{
	int ret = Count();
    // 由于n在静态区,因此就算count栈帧销毁,也不会有什么影响,所以这种用法是正确的

	cout << ret << endl;

    return 0;
}
引用做返回值的正确使用方法:
**注:**内存空间销毁意味着什么?
- 空间还在吗?
答:在的;只是使用权限不是我们的了,我们存的数据不被保护
2.我们还可以访问吗?
答:可以;只是我们读写的数据都是不确定的
例子:
int& Add(int a, int b)
{
    int c = a + b;
    return c;
}

int main()
{
    int& ret = Add(1, 2);    // ret是c的别名
    Add(3, 4);
    cout << "Add(1, 2) is :"<< ret <<endl;
    return 0;
}

// 打印结果为随机值  Add(1, 2) is :7
结论:
-
出了函数作用域,返回变量不存在了,不能用引用返回,因为引用返回的结果是未定义的
-
出了函数作用域,返回变量存在,才能用引用返回。
6.5 传值、传引用效率比较
引用做返回值
1.减少拷贝,提高效率。
2.修改返回值。
#include <time.h>
struct A
{
    int a[10000];
};

A a;  // 全局变量

// 值返回
A TestFunc1()
{
    return a;
}

// 引用返回
A& TestFunc2()
{
    return a;
}

void TestReturnByRefOrValue()
{
    // 以值作为函数的返回值类型
    size_t begin1 = clock();

    for (size_t i = 0; i < 100000; ++i)
      TestFunc1();

    size_t end1 = clock();

    // 以引用作为函数的返回值类型
    size_t begin2 = clock();

    for (size_t i = 0; i < 100000; ++i)
      TestFunc2();

    size_t end2 = clock();

    // 计算两个函数运算完成之后的时间
    cout << "TestFunc1 time:" << end1 - begin1 << endl;   // 打印结果为143
    cout << "TestFunc2 time:" << end2 - begin2 << endl;   // 打印结果为1
}

int main()
{
	TestReturnByRefOrValue();

	return 0;
}
通过上述代码的比较,发现传值和指针在作为传参以及返回值类型上效率相差很大。
传值返回:每传值一次,都需要进行一次拷贝,因此,效率会相对较低
引用做参数
1.减少拷贝,提高效率。
2.输出型参数,函数中修改形参,实参也会发生改变。
#include <time.h>
struct A
{
    int a[10000];
};

// 传值调用
void TestFunc1(A a)
{}

// 传址调用
void TestFunc2(A& a)
{}

void TestRefAndValue()
{
    A a;
    // 以值作为函数参数
    size_t begin1 = clock();

    for (size_t i = 0; i < 10000; ++i)
      TestFunc1(a);

    size_t end1 = clock();

    // 以引用作为函数参数
    size_t begin2 = clock();

    for (size_t i = 0; i < 10000; ++i)
    TestFunc2(a);

    size_t end2 = clock();

    // 分别计算两个函数运行结束后的时间
    cout << "TestFunc1(A)-time:" << end1 - begin1 << endl;  // 打印结果为 143毫秒
    cout << "TestFunc2(A&)-time:" << end2 - begin2 << endl; // 打印结果为 1毫秒
}

int main()
{
    void TestRefAndValue();
}
#include<iostream>

void Swap1(int& left, int& right)
{
	int temp = left;
	left = right;
	right = temp;
}

void Swap2(int left, int right)
{
	int temp = left;
	left = right;
	right = temp;
}

int main()
{
	int a = 1, b = 2;
	Swap1(a, b);
	Swap2(a, b);

	return 0;
}

6.6 引用和指针的区别
在语法概念上引用就是一个别名,没有独立空间,和其引用实体共用同一块空间。
#include<iostream>
using namespace std;

int main()
{
   int a = 10;
   int& ra = a;

   cout<< "&a = " << &a <<endl;
   cout<< "&ra = " << &ra <<endl;  //打印结果是一致的

   return 0;
}
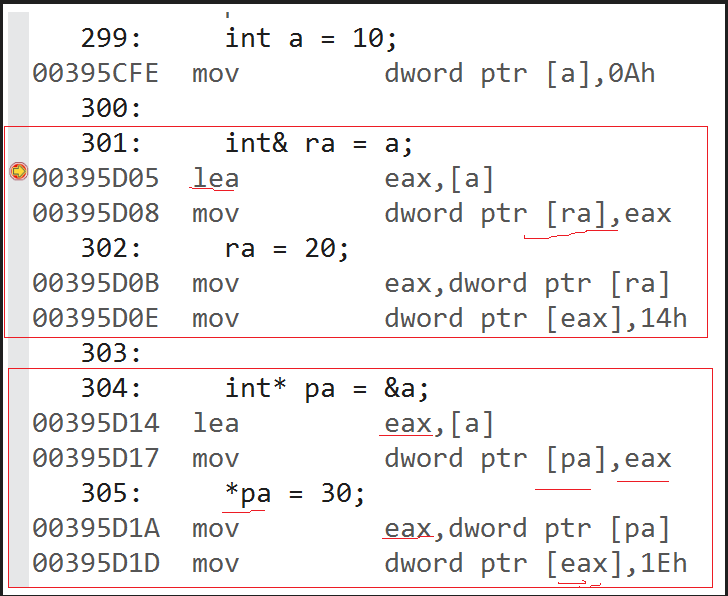
在底层实现上实际是有空间的,因为引用是按照指针方式来实现的。
#include<iostream>
using namespace std;

 // 语法上面,ra是a的别名,不开空间
 // 底层实现,引用是使用指针实现的
int main()
{
	int a = 10;

	int& ra = a;  //引用
	ra = 20;

	int* pa = &a;  //指针
	*pa = 30;

	return 0;
}
- 我们来看一下引用和指针汇编代码的对比
引用和指针的不同点:
-
引用概念上定义一个变量的别名,指针存储一个变量地址。
-
引用在定义时必须初始化,指针没有要求
-
引用在初始化时引用一个实体后,就不能再引用其他实体,而指针可以在任何时候指向任何一个同类型实体
-
没有NULL引用,但有NULL指针
-
在sizeof中含义不同:引用结果为引用类型的大小,但指针始终是地址空间所占字节个数(32位平台下占4个字节)
-
引用自加,即引用的实体增加1,指针自加即指针向后偏移一个类型的大小
浅尝语法糖
// C++11 小语法 -- 语法糖
int main()
{
    // 1.语法糖auto
	int a = 10;
	// 根据a的类型推导b的类型
	auto b = a;

	std::map<std::string, std::string> m{ { "apple", "苹果" }, { "orange", "橙子" },{ "pear", "梨" } };

	// auto是方便 下面需要类型的地方
	// std::map<std::string, std::string>::iterator it = m.begin();
	auto it = m.begin();


    // 2.语法糖for遍历
	int array[] = { 1, 2, 3, 4, 5 };

    // 普通用法
	for (int i = 0; i < sizeof(array) / sizeof(array[0]); ++i)
		cout << array[i] << " ";

	cout << endl;

    // 语法糖
	// 范围for遍历
	// 依次取array中数据赋值给e 自动判断结束,自动迭代
	for (auto e : array)
	{
		cout << e << " ";
	}
	cout << endl;

	return 0;
}
7. 内联函数
7.1 概念
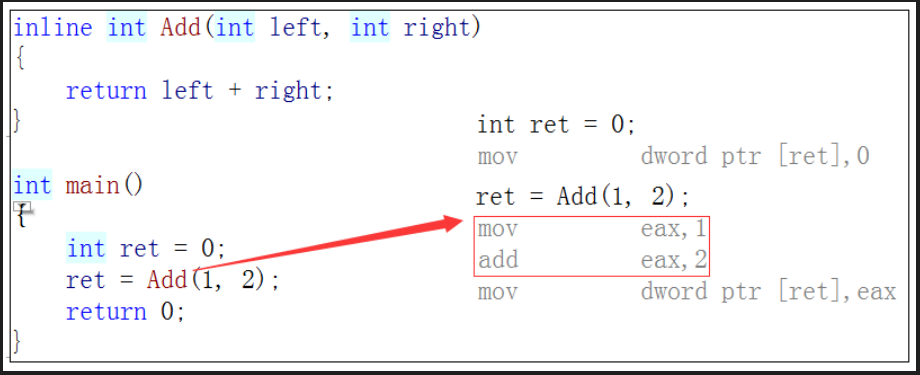
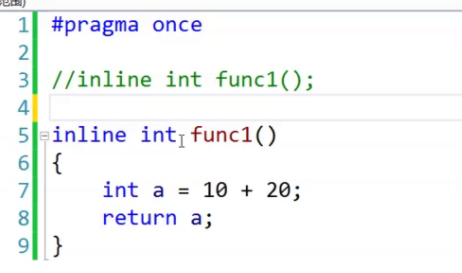
以inline修饰的函数叫做内联函数,编译时C++编译器会在调用内联函数的地方展开,没有函数调用建立栈帧的开销,内联函数提升程序运行的效率。
如果在上述函数前增加inline关键字将其改成内联函数,在编译期间编译器会用函数体替换函数的调用。
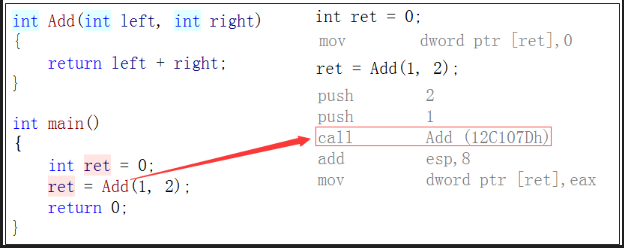
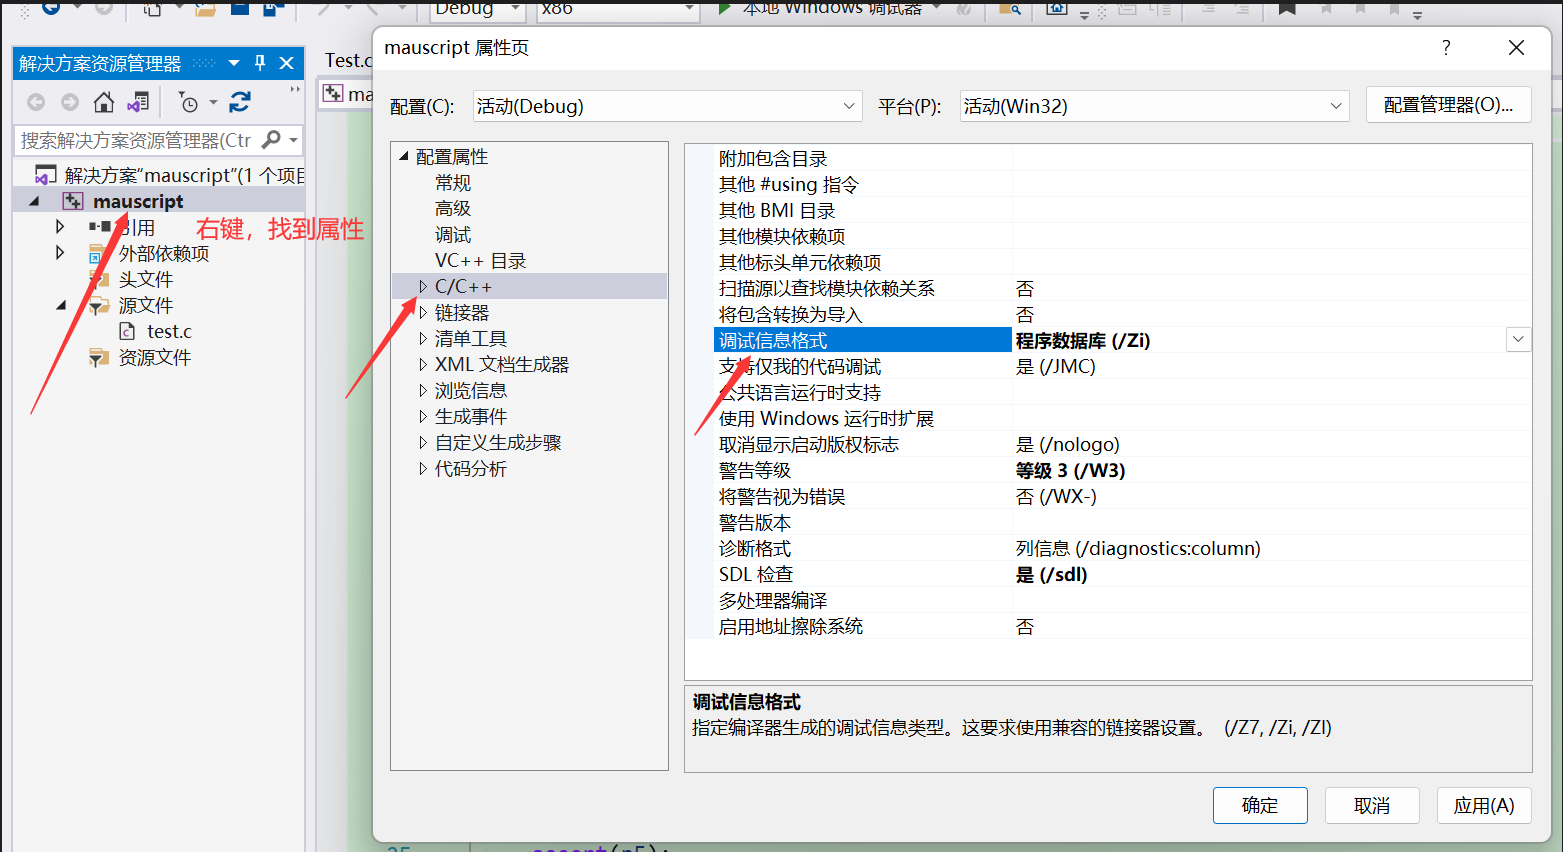
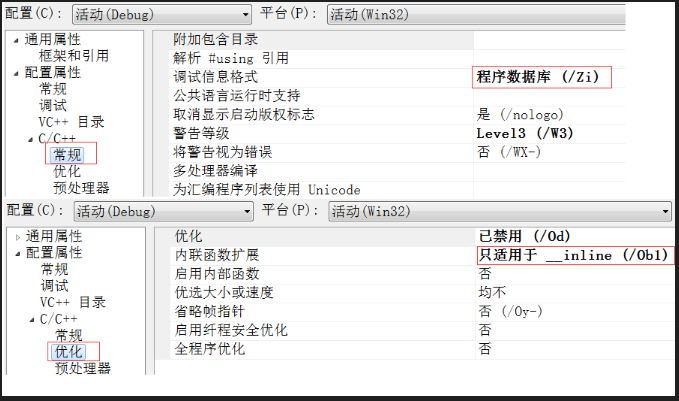
查看方式:
-
在release模式下,查看编译器生成的汇编代码中是否存在call Add
-
在debug模式下,需要对编译器进行设置,否则不会展开(因为debug模式下,编译器默认不会对代码进行优化,以下给出vs2013的设置方式)
经过测试,我们发现,并不会去调用Add函数
7.2 特性
// 宏也不需要建立栈帧,在预处理时,就会将宏定义的东西替换到函数中
/*
宏的缺点:1.不能调试
         2.没有类型安全检查
         3.容易写错
*/

#define ADD(x, y) ((x) + (y))

int main()
{
	// 不能加分号,在ADD(1,2)后面
	if (ADD(1,2))
	{}

	// 外层括号; *的优先级更高,可能会变成(1+2*3)
	ADD(1, 2) * 3;

	// 里面括号;+的优先级会更高,可能会变成a|(b+a)&b
	int a = 1, b = 2;
	ADD(a|b, a&b);

	return 0;
}

// 内联函数解决了宏的缺点
-
inline是一种以空间换时间的做法,如果编译器将函数当成内联函数处理,在编译阶段,会用函数体替换函数调用,缺陷:可能会使目标文件变大,优势:少了调用开销,提高程序运行效率。
-
inline对于编译器而言只是一个建议,不同编译器关于inline实现机制可能不同,一般建议:将函数规模较小(即函数不是很长,具体没有准确的说法,取决于编译器内部实现)、不是递归、且频繁调用的函数采用inline修饰,否则编译器会忽略inline特性。
-
**内联只是向编译器发出的一个请求,编译器可以选择忽略这个请求。**为《C++prime》第五版关于inline的建议
-
一般来说,内联机制用于优化规模较小,流程直接,频繁调用的函数。很多编译器都不支持内联递归函数,而一个75行的函数也不大可能在调用点内联展开。
3.inline不建议声明和定义分离,分离会导致链接错误。因为inline被展开,就没有函数地址了,链接就会找不到。
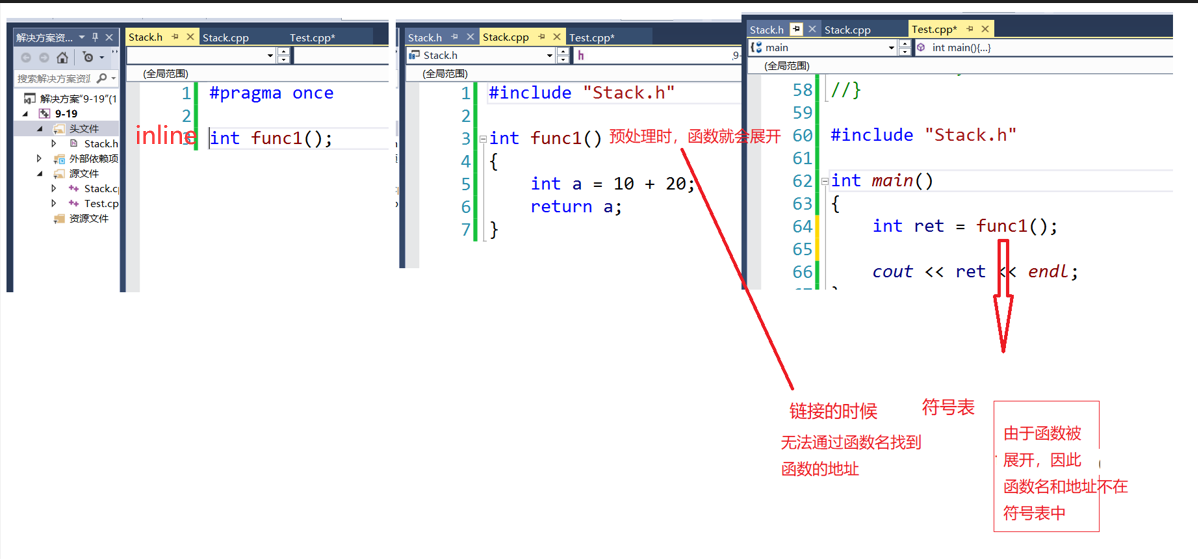
- 因此正确的做法就是内联不分离声明和定义(也就是直接在头文件中写定义,不要再写声明了)
8. auto关键字(C++11)
8.1 类型别名思考
随着程序越来越复杂,程序中用到的类型也越来越复杂,经常体现在:
-
类型难于拼写
-
含义不明确导致容易出错
#include <string>
#include <map>
int main()
{
    std::map<std::string, std::string> m{ { "apple", "苹果" }, { "orange", "橙子" }, {"pear","梨"} };

	//std::map<std::string, std::string>::iterator it = m.begin();
	auto it = m.begin();

    while (it != m.end())
    {
      //....
    }
    return 0;
}
8.2 auto简介
-
在早期C/C++中auto的含义是:使用auto修饰的变量,是具有自动存储器的局部变量,但遗憾的是一直没有人去使用它,大家可思考下为什么?
-
C++11中,标准委员会赋予了auto全新的含义即:auto不再是一个存储类型指示符,而是作为一个新的类型指示符来指示编译器,auto声明的变量必须由编译器在编译时期推导而得。
int TestAuto()
{
    return 10;
}
int main()
{
    int a = 10;
    auto b = a;
    auto c = 'a';
    auto d = TestAuto();

    cout << typeid(b).name() << endl;   // typeid(b).name() 就是打印b的类型
    cout << typeid(c).name() << endl;
    cout << typeid(d).name() << endl;

    // auto e; 无法通过编译,使用auto定义变量时必须对其进行初始化
    return 0;
}
【注意】
使用auto定义变量时必须对其进行初始化,在编译阶段编译器需要根据初始化表达式来推导auto的实际类型。因此auto并非是一种“类型”的声明,而是一个类型声明时的“占位符”,编译器在编译期会将auto替换为变量实际的类型。
8.3 auto的使用细则
- auto与指针和引用结合起来使用,用auto声明指针类型时,用auto和auto*没有任何区别,但用auto声明引用类型时则必须加&。
int main()
{
	int x = 10;
	auto a = &x;
	auto* b = &x;
	auto& c = x; // 相当于int& c = x;

    cout << typeid(a).name() << endl; // a的类型为int*
    cout << typeid(b).name() << endl; // b的类型为int*
    cout << typeid(c).name() << endl; // c的类型为int

	return 0;
}
- 在同一行定义多个变量
- 当在同一行声明多个变量时,这些变量必须是相同的类型,否则编译器将会报错,因为编译器实际只对第一个类型进行推导,然后用推导出来的类型定义其他变量。
void TestAuto()
{
    auto a = 1, b = 2;
    auto c = 3, d = 4.0;  // 该行代码会编译失败,因为c和d的初始化表达式类型不同
}
8.3 auto不能推导的场景
1.auto不能作为函数的参数
// 此处代码编译失败,auto不能作为形参类型,因为编译器无法对a的实际类型进行推导
void TestAuto(auto a)
{}
2.auto不能直接用来声明数组
// 错误演示
void TestAuto()
{
    int a[] = {1,2,3};
    auto b[] = {4,5,6};
}
9. 基于范围的for循环(C++11)
9.1 范围for的语法
在C++98中如果要遍历一个数组,可以按照以下方式进行:
void TestFor()
{
    int array[] = { 1, 2, 3, 4, 5 };
    for (int i = 0; i < sizeof(array) / sizeof(array[0]); ++i)
         array[i] *= 2;

    for (int* p = array; p < array + sizeof(array)/ sizeof(array[0]); ++p)
         cout << *p << endl;
}
- 对于一个有范围的集合而言,由程序员来说明循环的范围是多余的,有时候还会容易犯错误。因此C++11中引入了基于范围的for循环。fo循环后的括号由冒号“ :”分为两部分:第一部分是范围内用于迭代的变量,第二部分则表示被迭代的范围。
void TestFor()
{
    int array[] = { 1, 2, 3, 4, 5 };

    // 范围for遍历
	// 依次取array中数据赋值给e 自动判断结束,自动迭代
    for(auto& e : array)
         e *= 2;

    for(auto e : array)
         cout << e << " ";
    return 0;
}
注意:与普通循环类似,可以用continue来结束本次循环,也可以用break来跳出整个循环。
9.2 范围for的使用条件
- for循环迭代的范围必须是确定的
对于数组而言,就是数组中第一个元素和最后一个元素的范围;对于类而言,应该提供begin和end的方法,begin和end就是for循环迭代的范围。
注意:以下代码就有问题,因为for的范围不确定
// 数组传参之后就会变为指针,也就是首元素的地址,因此不可以使用范围for
void TestFor(int array[])
{
    for(auto& e : array)
        cout<< e <<endl;
}
10.指针空值nullptr(C++11)
- 在良好的C/C++编程习惯中,声明一个变量时最好给该变量一个合适的初始值,否则可能会出现不可预料的错误,比如未初始化的指针。如果一个指针没有合法的指向,我们基本都是按照如下方式对其进行初始化:
void TestPtr()
{
    int* p1 = NULL;
    int* p2 = 0;
    // ……
}
- NULL实际是一个宏,在传统的C头文件(stddef.h)中,可以看到如下代码:
#ifndef NULL
#ifdef __cplusplus
#define NULL   0              // NULL被定义为字面常量0
#else
#define NULL   ((void *)0)    // 被定义为无类型指针(void*)的常量
#endif
#endif
- 可以看到,NULL可能被定义为字面常量0,或者被定义为无类型指针(void)的常量。不论采取何种定义,在使用空值的指针时,都不可避免的会遇到一些麻烦,比如:*
void f(int)
{
   cout<<"f(int)"<<endl;
}

void f(int*)
{
   cout<<"f(int*)"<<endl;
}

int main()
{
   f(0);             // 打印结果为 f(int)
   f(NULL);          // 打印结果为 f(int)
   f((int*)NULL);    // 打印结果为 f(int*)
   f(nullptr);       // 打印结果为 f(int*)
   return 0;
}
-
程序本意是想通过f(NULL)调用指针版本的f(int)函数,但是由于NULL被定义成0,因此与程序的初衷相悖。*
-
在C++98中,字面常量0既可以是一个整形数字,也可以是无类型的指针(void)常量,但是编译器默认情况下将其看成是一个整形常量,如果要将其按照指针方式来使用,必须对其进行强转(void)0。**
注意:
1. 在使用nullptr表示指针空值时,不需要包含头文件,因为nullptr是C++11作为新关键字引入的。
2. 在C++11中,sizeof(nullptr)与sizeof((void*)0)所占的字节数相同。
3. 为了提高代码的健壮性,在后续表示指针空值时建议最好使用nullptr。


 780
780


 被折叠的 条评论
为什么被折叠?
被折叠的 条评论
为什么被折叠?
 到【灌水乐园】发言


