


实现效果
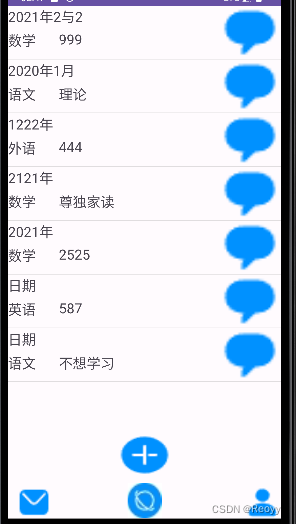
frag的界面设计
底部有3个按钮的界面
frag.xml
<androidx.constraintlayout.widget.ConstraintLayout xmlns:android="http://schemas.android.com/apk/res/android"
    xmlns:app="http://schemas.android.com/apk/res-auto"
    android:id="@+id/linearLayout5"
    android:layout_width="match_parent"
    android:layout_height="wrap_content"
    android:layout_gravity="bottom"
    android:gravity="bottom">

    <ImageButton
        android:id="@+id/imageButton_note"
        android:layout_width="45dp"
        android:layout_height="48dp"
        android:layout_marginTop="688dp"
        android:background="@mipmap/note"
        app:layout_constraintEnd_toEndOf="parent"
        app:layout_constraintHorizontal_bias="0.043"
        app:layout_constraintStart_toStartOf="parent"
        app:layout_constraintTop_toTopOf="parent" />

    <ImageButton
        android:id="@+id/imageButton_tongji"
        android:layout_width="49dp"
        android:layout_height="51dp"
        android:layout_marginTop="684dp"
        android:background="@mipmap/tongji"
        app:layout_constraintEnd_toEndOf="parent"
        app:layout_constraintStart_toStartOf="parent"
        app:layout_constraintTop_toTopOf="parent" />

    <ImageButton
        android:id="@+id/imageButton_mine"
        android:layout_width="51dp"
        android:layout_height="47dp"
        android:background="@mipmap/ic_public_contacts_filled"
        app:layout_constraintBottom_toBottomOf="parent"
        app:layout_constraintEnd_toEndOf="parent"
        app:layout_constraintHorizontal_bias="0.997"
        app:layout_constraintStart_toStartOf="parent"
        app:layout_constraintTop_toTopOf="parent"
        app:layout_constraintVertical_bias="1.0" />


</androidx.constraintlayout.widget.ConstraintLayout>
第一个界面
思路:MainActivity加入FirstFrag类(实现按钮的跳转活动),加入Framelayout_first(实现底部三个按钮的显示)
MainActivity.java
public class MainActivity extends AppCompatActivity {
	protected void onCreate(Bundle savedInstanceState) {
		FirstFrag firstFrag=new FirstFrag();
		super.onCreate(savedInstanceState);
       	setContentView(R.layout.activity_main);	//加入界面
   		getSupportFragmentManager().			//加入frag
		beginTransaction().
		add(R.id.Framelayout_first,firstFrag).commitAllowingStateLoss();
	}
}
FirstFrag.java
public class FirstFrag extends Fragment {
    @Nullable
    @Override
    public View onCreateView(@NonNull LayoutInflater inflater, @Nullable ViewGroup container, @Nullable Bundle savedInstanceState) {
        View view = inflater.inflate(R.layout.frag, container, false);

        // 获取按钮实例
        @SuppressLint({"MissingInflatedId", "LocalSuppress"}) ImageButton noteButtonButton = view.findViewById(R.id.imageButton_note);
        @SuppressLint({"MissingInflatedId", "LocalSuppress"}) ImageButton tongjiButton = view.findViewById(R.id.imageButton_tongji);
        ImageButton mineButton=view.findViewById(R.id.imageButton_mine);
        // 设置按钮点击事件
        noteButtonButton.setOnClickListener(new View.OnClickListener() {
            @Override
            public void onClick(View v) {
                // 启动 MyActivity
                Intent intent = new Intent(getActivity(), MainActivity.class);
                startActivity(intent);
            }
        });

        tongjiButton.setOnClickListener(new View.OnClickListener() {
            @Override
            public void onClick(View v) {
                // 启动 InfoActivity
                Intent intent = new Intent(getActivity(), TongjiActivity.class);
                startActivity(intent);
            }
        });

        mineButton.setOnClickListener(new View.OnClickListener() {
            @Override
            public void onClick(View view) {
                Intent intent=new Intent(getActivity(), MineActivity.class);
                startActivity(intent);
            }
        });
        return view;
    }
}
activity_main.xml
<?xml version="1.0" encoding="utf-8"?>
<androidx.constraintlayout.widget.ConstraintLayout xmlns:android="http://schemas.android.com/apk/res/android"
    xmlns:app="http://schemas.android.com/apk/res-auto"
    xmlns:tools="http://schemas.android.com/tools"
    android:layout_width="match_parent"
    android:layout_height="match_parent"
    tools:context=".MainActivity">


    <FrameLayout
        android:id="@+id/Framelayout_first"
        android:layout_width="match_parent"
        android:layout_height="match_parent"
        tools:layout_editor_absoluteX="0dp"
        tools:layout_editor_absoluteY="0dp">
    </FrameLayout>

</androidx.constraintlayout.widget.ConstraintLayout>
第二个界面
解答同上
TongjiActivity.java
public class TongjiActivity extends AppCompatActivity {
	protected void onCreate(@Nullable Bundle savedInstanceState) {
        super.onCreate(savedInstanceState);
        setContentView(R.layout.tongji);			//加入界面
        SecondFrag secondFrag=new SecondFrag();		//加入frag
        getSupportFragmentManager().beginTransaction().
	add(R.id.Framelayout_second,secondFrag).commitAllowingStateLoss();
	}
}
SecondFrag.java
public class SecondFrag extends Fragment {
    @Nullable
    @Override
    public View onCreateView(@NonNull LayoutInflater inflater, @Nullable ViewGroup container, @Nullable Bundle savedInstanceState) {
        View view = inflater.inflate(R.layout.frag, container, false);

        // 获取按钮实例
        @SuppressLint({"MissingInflatedId", "LocalSuppress"}) ImageButton noteButtonButton = view.findViewById(R.id.imageButton_note);
        @SuppressLint({"MissingInflatedId", "LocalSuppress"}) ImageButton tongjiButton = view.findViewById(R.id.imageButton_tongji);
        ImageButton mineButton=view.findViewById(R.id.imageButton_mine);
        // 设置按钮点击事件
        noteButtonButton.setOnClickListener(new View.OnClickListener() {
            @Override
            public void onClick(View v) {
                // 启动 MyActivity
                Intent intent = new Intent(getActivity(), MainActivity.class);
                startActivity(intent);
            }
        });

        tongjiButton.setOnClickListener(new View.OnClickListener() {
            @Override
            public void onClick(View v) {
                // 启动 InfoActivity
                Intent intent = new Intent(getActivity(), TongjiActivity.class);
                startActivity(intent);
            }
        });

        mineButton.setOnClickListener(new View.OnClickListener() {
            @Override
            public void onClick(View view) {
                Intent intent=new Intent(getActivity(),MineActivity.class);
                startActivity(intent);
            }
        });
        return view;
    }
}
tongji.xml

<?xml version="1.0" encoding="utf-8"?>
<androidx.constraintlayout.widget.ConstraintLayout xmlns:android="http://schemas.android.com/apk/res/android"
    xmlns:app="http://schemas.android.com/apk/res-auto"
    android:layout_width="match_parent"
    android:layout_height="match_parent">

    <FrameLayout
        android:layout_width="match_parent"
        android:layout_height="match_parent"
        android:id="@+id/Framelayout_second">

    </FrameLayout>

</androidx.constraintlayout.widget.ConstraintLayout>
第三个界面
解答同上
MineActivity.java
public class MineActivity extends AppCompatActivity {
    @Override
    protected void onCreate(@Nullable Bundle savedInstanceState) {
        super.onCreate(savedInstanceState);
        setContentView(R.layout.mine);			//加入界面
        ThirdFrag thirdFrag=new ThirdFrag();	//加入frag
        getSupportFragmentManager().beginTransaction().
	add(R.id.Framelayout_third,thirdFrag).commitAllowingStateLoss();
    }
}
ThirdFrag.java
public class ThirdFrag extends Fragment {
    @Nullable
    @Override
    public View onCreateView(@NonNull LayoutInflater inflater, @Nullable ViewGroup container, @Nullable Bundle savedInstanceState) {
        View view = inflater.inflate(R.layout.frag, container, false);

        // 获取按钮实例
        @SuppressLint({"MissingInflatedId", "LocalSuppress"}) ImageButton noteButtonButton = view.findViewById(R.id.imageButton_note);
        @SuppressLint({"MissingInflatedId", "LocalSuppress"}) ImageButton tongjiButton = view.findViewById(R.id.imageButton_tongji);
        ImageButton mineButton=view.findViewById(R.id.imageButton_mine);
        // 设置按钮点击事件
        noteButtonButton.setOnClickListener(new View.OnClickListener() {
            @Override
            public void onClick(View v) {
                // 启动 MyActivity
                Intent intent = new Intent(getActivity(), MainActivity.class);
                startActivity(intent);
            }
        });

        tongjiButton.setOnClickListener(new View.OnClickListener() {
            @Override
            public void onClick(View v) {
                // 启动 InfoActivity
                Intent intent = new Intent(getActivity(), TongjiActivity.class);
                startActivity(intent);
            }
        });

        mineButton.setOnClickListener(new View.OnClickListener() {
            @Override
            public void onClick(View view) {
                Intent intent=new Intent(getActivity(),MineActivity.class);
                startActivity(intent);
            }
        });
        return view;
    }
}
mine.xml

<?xml version="1.0" encoding="utf-8"?>
<androidx.constraintlayout.widget.ConstraintLayout xmlns:android="http://schemas.android.com/apk/res/android"
    xmlns:app="http://schemas.android.com/apk/res-auto"
    xmlns:tools="http://schemas.android.com/tools"
    android:layout_width="match_parent"
    android:layout_height="match_parent">
	<FrameLayout
        android:layout_width="match_parent"
        android:layout_height="match_parent"
        android:id="@+id/Framelayout_third">

    	</FrameLayout>

</androidx.constraintlayout.widget.ConstraintLayout>


 2479
2479


 被折叠的 条评论
为什么被折叠?
被折叠的 条评论
为什么被折叠?
 到【灌水乐园】发言


