


HTTP服务
WEB服务简介
WEB服务器也称为WWW(WORLD WIDE WEB)服务器,主要功能是提供网上信息浏览服务。 Web服务器是在运行在物理服务器上的一个程序,它永久地等待客户端(主要是浏览器,比如Chrome,Firefox等)发送请求。当收到请求之后,它会生成相应的响应并将其返回至客户端。Web服务器通过HTTP协议与客户端通信,因此也被称为HTTP服务器。
WEB服务原理

Web服务器的工作原理并不复杂,一般可分成如下4个步骤:
- 建立连接:客户机通过TCP/IP协议建立到服务器的TCP连接
- 请求过程:客户端向服务器发送HTTP协议请求包,请求服务器里的资源文档
- 应答过程:服务器向客户机发送HTTP协议应答包,如果请求的资源包含有动态语言的内容,那么服务器会调用动态语言的解释引擎负责处理“动态内容”,并将处理得到的数据返回给客户端。由客户端解释HTML文档,在客户端屏幕上渲染图形结果
- 关闭连接:客户机与服务器断开
常见的WEB应用服务: - Apache(Apache HTTP Server)Apache软件基金会,本身只支持html即静态网页
- IIS(Internet Information Services)微软
- Tomcat Apache软件基金会,Tomcat是应用(java)服务器,它只是一个servlet容器,是Apache的扩展
- Nginx (engine x) 是一个高性能的HTTP和反向代理服务器,也是一个IMAP/POP3/SMTP服务器
HTTP服务的配置
1.apache的安装
[root@linux ~]# yum remove httpd -y
Loaded plugins: fastestmirror
Resolving Dependencies
--> Running transaction check
---> Package httpd.x86_64 0:2.4.6-67.el7.centos will be erased
--> Finished Dependency Resolution

Dependencies Resolved

==================================================================================
 Package        Arch            Version                        Repository    Size
==================================================================================
Removing:
 httpd          x86_64          2.4.6-67.el7.centos            @c7          9.4 M

Transaction Summary
==================================================================================
Remove  1 Package

Installed size: 9.4 M
Downloading packages:
Running transaction check
Running transaction test
Transaction test succeeded
Running transaction
  Erasing    : httpd-2.4.6-67.el7.centos.x86_64                               1/1
  Verifying  : httpd-2.4.6-67.el7.centos.x86_64                               1/1

Removed:
  httpd.x86_64 0:2.4.6-67.el7.centos

Complete!
2.apache的配置、启动
[root@linux ~]# vi /etc/httpd/conf/httpd.conf
[root@linux ~]# echo 'hello world' >> /var/www/html/index.html
[root@linux ~]# systemctl start httpd
[root@linux ~]# systemctl enable httpd
Created symlink from /etc/systemd/system/multi-user.target.wants/httpd.service to /usr/lib/systemd/system/httpd.service.
3.apache虚拟主机的配置
Apache 配置虚拟主机支持3种方式:基于IP的虚拟主机配置,基于端口的虚拟主机配置,基于域名的虚拟主机配置
3.1 apache的下载安装
[root@linux ~]# wget http://mirrors.hust.edu.cn/apache//httpd/httpd-2.4.37.tar.gz
--2018-12-05 14:41:25--  http://mirrors.hust.edu.cn/apache//httpd/httpd-2.4.37.tar.gz
Resolving mirrors.hust.edu.cn (mirrors.hust.edu.cn)... 202.114.18.160
Connecting to mirrors.hust.edu.cn (mirrors.hust.edu.cn)|202.114.18.160|:80... connected.
HTTP request sent, awaiting response... 200 OK
Length: 9177278 (8.8M) [application/octet-stream]
Saving to: ‘httpd-2.4.37.tar.gz.1’

100%[========================================>] 9,177,278   4.14MB/s   in 2.1s

2018-12-05 14:41:27 (4.14 MB/s) - ‘httpd-2.4.37.tar.gz.1’ saved [9177278/9177278]
[root@linux ~]# yum install apr* -y
Loaded plugins: fastestmirror
Loading mirror speeds from cached hostfile
Resolving Dependencies
--> Running transaction check
---> Package apr.x86_64 0:1.4.8-3.el7 will be installed
---> Package apr-devel.x86_64 0:1.4.8-3.el7 will be installed
---> Package apr-util.x86_64 0:1.5.2-6.el7 will be installed
---> Package apr-util-devel.x86_64 0:1.5.2-6.el7 will be installed
--> Processing Dependency: openldap-devel(x86-64) for package: apr-util-devel-1.5.2-6.el7.x86_64
--> Processing Dependency: libdb-devel(x86-64) for package: apr-util-devel-1.5.2-6.el7.x86_64
--> Processing Dependency: expat-devel(x86-64) for package: apr-util-devel-1.5.2-6.el7.x86_64
--> Running transaction check
---> Package expat-devel.x86_64 0:2.1.0-10.el7_3 will be installed
---> Package libdb-devel.x86_64 0:5.3.21-20.el7 will be installed
---> Package openldap-devel.x86_64 0:2.4.44-5.el7 will be installed
--> Processing Dependency: cyrus-sasl-devel(x86-64) for package: openldap-devel-2.4.44-5.el7.x86_64
--> Running transaction check
---> Package cyrus-sasl-devel.x86_64 0:2.1.26-21.el7 will be installed
--> Processing Dependency: cyrus-sasl(x86-64) = 2.1.26-21.el7 for package: cyrus-sasl-devel-2.1.26-21.el7.x86_64
--> Running transaction check
---> Package cyrus-sasl.x86_64 0:2.1.26-21.el7 will be installed
--> Finished Dependency Resolution

Dependencies Resolved

==================================================================================
 Package                  Arch           Version                 Repository  Size
==================================================================================
Installing:
 apr                      x86_64         1.4.8-3.el7             c7         103 k
 apr-devel                x86_64         1.4.8-3.el7             c7         188 k
 apr-util                 x86_64         1.5.2-6.el7             c7          92 k
 apr-util-devel           x86_64         1.5.2-6.el7             c7          76 k
Installing for dependencies:
 cyrus-sasl               x86_64         2.1.26-21.el7           c7          88 k
 cyrus-sasl-devel         x86_64         2.1.26-21.el7           c7         310 k
 expat-devel              x86_64         2.1.0-10.el7_3          c7          57 k
 libdb-devel              x86_64         5.3.21-20.el7           c7          38 k
 openldap-devel           x86_64         2.4.44-5.el7            c7         801 k

Transaction Summary
==================================================================================
Install  4 Packages (+5 Dependent packages)

Total download size: 1.7 M
Installed size: 6.5 M
Downloading packages:
----------------------------------------------------------------------------------
Total                                                9.2 MB/s | 1.7 MB  00:00
Running transaction check
Running transaction test
Transaction test succeeded
Running transaction
  Installing : apr-1.4.8-3.el7.x86_64                                         1/9
  Installing : apr-devel-1.4.8-3.el7.x86_64                                   2/9
  Installing : apr-util-1.5.2-6.el7.x86_64                                    3/9
  Installing : cyrus-sasl-2.1.26-21.el7.x86_64                                4/9
  Installing : cyrus-sasl-devel-2.1.26-21.el7.x86_64                          5/9
  Installing : openldap-devel-2.4.44-5.el7.x86_64                             6/9
  Installing : expat-devel-2.1.0-10.el7_3.x86_64                              7/9
  Installing : libdb-devel-5.3.21-20.el7.x86_64                               8/9
  Installing : apr-util-devel-1.5.2-6.el7.x86_64                              9/9
  Verifying  : apr-1.4.8-3.el7.x86_64                                         1/9
  Verifying  : apr-util-devel-1.5.2-6.el7.x86_64                              2/9
  Verifying  : apr-devel-1.4.8-3.el7.x86_64                                   3/9
  Verifying  : apr-util-1.5.2-6.el7.x86_64                                    4/9
  Verifying  : cyrus-sasl-devel-2.1.26-21.el7.x86_64                          5/9
  Verifying  : libdb-devel-5.3.21-20.el7.x86_64                               6/9
  Verifying  : openldap-devel-2.4.44-5.el7.x86_64                             7/9
  Verifying  : expat-devel-2.1.0-10.el7_3.x86_64                              8/9
  Verifying  : cyrus-sasl-2.1.26-21.el7.x86_64                                9/9

Installed:
  apr.x86_64 0:1.4.8-3.el7             apr-devel.x86_64 0:1.4.8-3.el7
  apr-util.x86_64 0:1.5.2-6.el7        apr-util-devel.x86_64 0:1.5.2-6.el7

Dependency Installed:
  cyrus-sasl.x86_64 0:2.1.26-21.el7      cyrus-sasl-devel.x86_64 0:2.1.26-21.el7
  expat-devel.x86_64 0:2.1.0-10.el7_3    libdb-devel.x86_64 0:5.3.21-20.el7
  openldap-devel.x86_64 0:2.4.44-5.el7

Complete!
[root@linux ~]# tar xzvf httpd-2.4.37.tar.gz
......
[root@linux ~]# mkdir /opt/apache/
[root@linux ~]# httpd-2.4.37/configure --prefix=/opt/apache
......
configure: summary of build options:

    Server Version: 2.4.37
    Install prefix: /opt/apache
    C compiler:     gcc -std=gnu99
    CFLAGS:           -pthread
    CPPFLAGS:        -DLINUX -D_REENTRANT -D_GNU_SOURCE
    LDFLAGS:
    LIBS:
    C preprocessor: gcc -E
[root@linux ~]# make
[root@linux ~]# make install
3.2 基于IP的虚拟主机配置
#使用同一个网络接口上绑定ip
[root@linux ~]# ifconfig ens33:1 192.168.130.131 up
[root@linux ~]# ifconfig ens33:2 192.168.130.132 up
[root@linux ~]# ifconfig
ens33: flags=4163<UP,BROADCAST,RUNNING,MULTICAST>  mtu 1500
        inet 192.168.130.128  netmask 255.255.255.0  broadcast 192.168.130.255
        inet6 fe80::20c:29ff:fe97:8cea  prefixlen 64  scopeid 0x20<link>
        ether 00:0c:29:97:8c:ea  txqueuelen 1000  (Ethernet)
        RX packets 22142  bytes 19875339 (18.9 MiB)
        RX errors 0  dropped 0  overruns 0  frame 0
        TX packets 7938  bytes 1410866 (1.3 MiB)
        TX errors 0  dropped 0 overruns 0  carrier 0  collisions 0

ens33:1: flags=4163<UP,BROADCAST,RUNNING,MULTICAST>  mtu 1500
        inet 192.168.130.131  netmask 255.255.255.0  broadcast 192.168.130.255
        ether 00:0c:29:97:8c:ea  txqueuelen 1000  (Ethernet)

ens33:2: flags=4163<UP,BROADCAST,RUNNING,MULTICAST>  mtu 1500
        inet 192.168.130.132  netmask 255.255.255.0  broadcast 192.168.130.255
        ether 00:0c:29:97:8c:ea  txqueuelen 1000  (Ethernet)

lo: flags=73<UP,LOOPBACK,RUNNING>  mtu 65536
        inet 127.0.0.1  netmask 255.0.0.0
        inet6 ::1  prefixlen 128  scopeid 0x10<host>
        loop  txqueuelen 1  (Local Loopback)
        RX packets 122  bytes 9736 (9.5 KiB)
        RX errors 0  dropped 0  overruns 0  frame 0
        TX packets 122  bytes 9736 (9.5 KiB)
        TX errors 0  dropped 0 overruns 0  carrier 0  collisions 0
#在/etc/hosts文件中设置ip及名称
[root@linux ~]# echo '192.168.130.131 sys1' >> /etc/hosts
[root@linux ~]# echo '192.168.130.132 sys2' >> /etc/hosts
[root@linux ~]# ping sys1
PING sys1 (192.168.130.131) 56(84) bytes of data.
64 bytes from c75 (192.168.130.131): icmp_seq=1 ttl=64 time=0.023 ms
64 bytes from c75 (192.168.130.131): icmp_seq=2 ttl=64 time=0.026 ms
64 bytes from c75 (192.168.130.131): icmp_seq=3 ttl=64 time=0.026 ms
64 bytes from c75 (192.168.130.131): icmp_seq=4 ttl=64 time=0.029 ms
^C
--- sys1 ping statistics ---
4 packets transmitted, 4 received, 0% packet loss, time 3000ms
rtt min/avg/max/mdev = 0.023/0.026/0.029/0.002 ms
[root@linux ~]# ping sys2
PING sys2 (192.168.130.132) 56(84) bytes of data.
64 bytes from sys2 (192.168.130.132): icmp_seq=1 ttl=64 time=0.013 ms
64 bytes from sys2 (192.168.130.132): icmp_seq=2 ttl=64 time=0.025 ms
64 bytes from sys2 (192.168.130.132): icmp_seq=3 ttl=64 time=0.026 ms
64 bytes from sys2 (192.168.130.132): icmp_seq=4 ttl=64 time=0.026 ms
^C
--- sys2 ping statistics ---
4 packets transmitted, 4 received, 0% packet loss, time 3000ms
rtt min/avg/max/mdev = 0.013/0.022/0.026/0.007 ms
#建立虚拟主机存放网页的 跟目录,并创建首页文件index.html
[root@linux ~]# mkdir /opt/apache/www/sys1 -p
[root@linux ~]# mkdir /opt/apache/www/sys2 -p
[root@linux ~]# echo 'sys1,hello_world' > /opt/apache/www/sys1/index.html
[root@linux ~]# echo 'sys2,hello_world' > /opt/apache/www/sys2/index.html
#修改配置文件,在最后添加如下代码
[root@linux ~]# vi /opt/apache/conf/httpd.conf
#为了防止后面端口错误,我们将第52行的 “Listen 80” 注释掉
  506 Listen 192.168.130.131:80
  507 Listen 192.168.130.132:80
  508 Include /opt/apache/vhost/*.conf
[root@linux ~]# mkdir -p /opt/apache/vhost
#添加下面的代码则是虚拟主机的
[root@linux ~]# vi /opt/apache/vhost/sys1.conf
  1 <VirtualHost 192.168.130.131:80>
  2         ServerName sys1
  3         DocumentRoot /opt/apache/www/sys1
  4         <Directory "/opt/apache/www/sys1/">
  5                 Options Indexes FollowSymLinks
  6                 AllowOverride None
  7                 Require all granted
  8         </Directory>
  9 </VirtualHost>

[root@linux ~]# vi /opt/apache/vhost/sys2.conf
  1 <VirtualHost 192.168.130.132:80>
  2         ServerName sys2
  3         DocumentRoot /opt/apache/www/sys2
  4         <Directory "/opt/apache/www/sys2/">
  5                 Options Indexes FollowSymLinks
  6                 AllowOverride None
  7                 Require all granted
  8         </Directory>
  9 </VirtualHost>
#测试apache的配置是否有问题,如有问题请查看日志
[root@linux ~]# /opt/apache/bin/apachectl -t
AH00558: httpd: Could not reliably determine the server's fully qualified domain name, using fe80::20c:29ff:fe97:8cea. Set the 'ServerName' directive globally to suppress this message
Syntax OK
[root@linux ~]# /opt/apache/bin/apachectl start
AH00558: httpd: Could not reliably determine the server's fully qualified domain name, using fe80::20c:29ff:fe97:8cea. Set the 'ServerName' directive globally to suppress this message
#测试
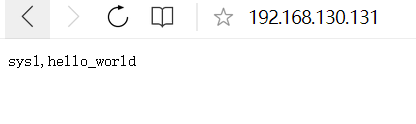
sys1的测试界面
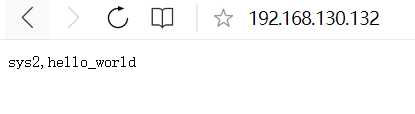
sys2的测试界面
3.3 基于端口的虚拟主机配置
#如果服务器只有一个IP或需要通过不同的端口访问不同的虚拟主机,可以使用基于端口的虚拟主机配置
[root@linux ~]# ifconfig ens33:3 192.168.130.133 up
[root@linux ~]# vi /etc/hosts
192.168.130.133 sys3			#添加此行用于测试
[root@linux ~]# mkdir /opt/apache/www/sys3 -p
[root@linux ~]# mkdir /opt/apache/www/sys3/8080 -p
[root@linux ~]# mkdir /opt/apache/www/sys3/8081 -p
[root@linux ~]# echo '8080,hello' > /opt/apache/www/sys3/8080/index.html
[root@linux ~]# echo '8081,hello' > /opt/apache/www/sys3/8081/index.html
#修改配置文件,在最后添加如下代码
[root@linux ~]# vi /opt/apache/conf/httpd.conf
  509 Listen 192.168.130.133:8080
  510 Listen 192.168.130.133:8081
  511 Include /opt/apache/vhost/*.conf
[root@linux ~]# vi /opt/apache/vhost/sys3_8080.conf
  1 <VirtualHost 192.168.130.133:8080>
  2         ServerName sys3
  3         DocumentRoot /opt/apache/www/sys3/8080
  4         <Directory "/opt/apache/www/sys3/8080/">
  5                 Options Indexes FollowSymLinks
  6                 AllowOverride None
  7                 Require all granted
  8         </Directory>
  9 </VirtualHost>
[root@linux ~]# vi /opt/apache/vhost/sys3_8081.conf
  1 lHost 192.168.130.133:8081>
  2         ServerName sys3
  3         DocumentRoot /opt/apache/www/sys3/8081
  4         <Directory "/opt/apache/www/sys3/8081/">
  5                 Options Indexes FollowSymLinks
  6                 AllowOverride None
  7                 Require all granted
  8         </Directory>
  9 </VirtualHost>
#测试apache的配置是否有问题,如有问题请查看日志
[root@linux ~]# /opt/apache/bin/apachectl -t
AH00558: httpd: Could not reliably determine the server's fully qualified domain name, using fe80::20c:29ff:fe97:8cea. Set the 'ServerName' directive globally to suppress this message
Syntax OK
[root@linux ~]# /opt/apache/bin/apachectl restart
AH00558: httpd: Could not reliably determine the server's fully qualified domain name, using fe80::20c:29ff:fe97:8cea. Set the 'ServerName' directive globally to suppress this message
#测试
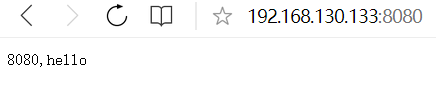
8080端口
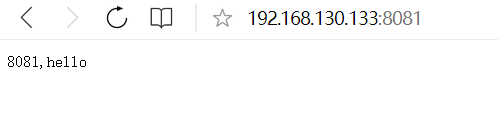
8081端口
3.4 基于域名的虚拟主机配置
[root@linux ~]# ifconfig ens33:4 192.168.130.134 up
[root@linux ~]# vi /etc/hosts
  6 192.168.130.134 www.sys41.com
  7 192.168.130.134 www.sys42.com
[root@linux ~]# ping www.sys41.com
PING www.sys41.com (192.168.130.134) 56(84) bytes of data.
64 bytes from www.sys41.com (192.168.130.134): icmp_seq=1 ttl=64 time=0.018 ms
64 bytes from www.sys41.com (192.168.130.134): icmp_seq=2 ttl=64 time=0.027 ms
64 bytes from www.sys41.com (192.168.130.134): icmp_seq=3 ttl=64 time=0.025 ms
64 bytes from www.sys41.com (192.168.130.134): icmp_seq=4 ttl=64 time=0.028 ms
^C
--- www.sys41.com ping statistics ---
4 packets transmitted, 4 received, 0% packet loss, time 3286ms
rtt min/avg/max/mdev = 0.018/0.024/0.028/0.006 ms
[root@linux ~]# ping www.sys42.com
PING www.sys42.com (192.168.130.134) 56(84) bytes of data.
64 bytes from www.sys41.com (192.168.130.134): icmp_seq=1 ttl=64 time=0.038 ms
64 bytes from www.sys41.com (192.168.130.134): icmp_seq=2 ttl=64 time=0.026 ms
64 bytes from www.sys41.com (192.168.130.134): icmp_seq=3 ttl=64 time=0.052 ms
64 bytes from www.sys41.com (192.168.130.134): icmp_seq=4 ttl=64 time=0.067 ms
^C
--- www.sys42.com ping statistics ---
4 packets transmitted, 4 received, 0% packet loss, time 2999ms
rtt min/avg/max/mdev = 0.026/0.045/0.067/0.017 ms
[root@linux ~]# mkdir /opt/apache/www/sys41.com -p
[root@linux ~]# mkdir /opt/apache/www/sys42.com -p
[root@linux ~]# echo 'sys41,hello' > /opt/apache/www/sys41.com/index.html
[root@linux ~]# echo 'sys42,hello' > /opt/apache/www/sys42.com/index.html
[root@linux ~]# vi /opt/apache/conf/httpd.conf
  512 Listen 192.168.130.134:80
  513 Include /opt/apache/vhost/*.conf
[root@linux ~]# vi /opt/apache/vhost/sys41.com.conf
  1 <VirtualHost 192.168.130.134:80>
  2         ServerName www.sys41.com
  3         DocumentRoot /opt/apache/www/sys41.com
  4         <Directory "/opt/apache/www/sys41.com/">
  5                 Options Indexes FollowSymLinks
  6                 AllowOverride None
  7                 Require all granted
  8         </Directory>
  9 </VirtualHost>
[root@linux ~]# vi /opt/apache/vhost/sys42.com.conf
  1 <VirtualHost 192.168.130.134:80>
  2         ServerName www.sys42.com
  3         DocumentRoot /opt/apache/www/sys42.com
  4         <Directory "/opt/apache/www/sys42.com/">
  5                 Options Indexes FollowSymLinks
  6                 AllowOverride None
  7                 Require all granted
  8         </Directory>
  9 </VirtualHost>
[root@linux vhost]# /opt/apache/bin/apachectl -t
AH00558: httpd: Could not reliably determine the server's fully qualified domain name, using fe80::20c:29ff:fe97:8cea. Set the 'ServerName' directive globally to suppress this message
Syntax OK
[root@linux vhost]# /opt/apache/bin/apachectl restart
AH00558: httpd: Could not reliably determine the server's fully qualified domain name, using fe80::20c:29ff:fe97:8cea. Set the 'ServerName' directive globally to suppress this message
#测试
网址www.1341.com的测试

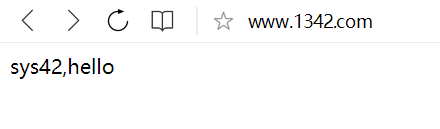
网址www.1342.com的测试
至此我们的http服务全部配置完成,不过再配置过程中遇到一些问题。
配置过程中遇到的问题
在第3步下载安装apache时运行“./configure --prefix=/opt/apache”遇到APR not found,此时需要安装apr包。

apr的依赖包如下,我们直接安装所有。

[root@root httpd-2.4.37]# yum install apr* -y
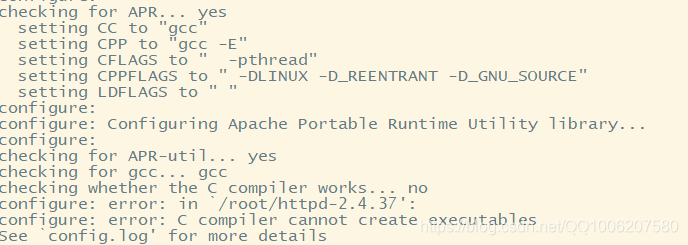
再次运行“./configure --prefix=/opt/apache”发现缺少gcc包。
这里为防止其他错误,或在不清楚需要具体的包时,我们选择全装。

[root@root httpd-2.4.37]# yum install gcc* -y
继续运行“./configure --prefix=/opt/apache”又出错,再次检查并安装pcre包。

[root@root httpd-2.4.37]# yum install pcre* -y
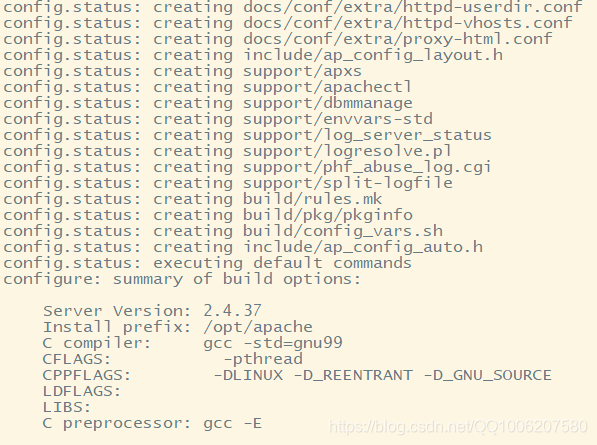
接着,运行命令“./configure --prefix=/opt/apache”,成功。这时继续使用“make”和“make install”编译安装。


 1093
1093


 被折叠的 条评论
为什么被折叠?
被折叠的 条评论
为什么被折叠?
 到【灌水乐园】发言


