


戏如人生,却不是人生;人生如戏,却也不是戏。
文章目录
前言
关于如何搭建SpringBoot工程以及开启Web功能,
可以查看我的这篇博客:用Spring Initializr快速构建SpringBoot及整合MVC
Thymeleaf
都2200年了,还在用JSP吗?但可惜Spring官方支持的服务的渲染模板中,并不包含jsp,而是Thymeleaf和Freemarker等。而Thymeleaf与SpringMVC的视图技术,及SpringBoot的自动化配置集成非常完美,几乎没有任何成本。所以还是跟着官方走吧!

整合部分
1.在依赖管理文件pom.xml中添加Thymeleaf的起步依赖spring-boot-starter-thymeleaf:
<dependency>
	<groupId>org.springframework.boot</groupId>
	<artifactId>spring-boot-starter-thymeleaf</artifactId>
</dependency>
2.在application.yml配置文件中配置关闭thymeleaf页面缓存:
spring:
  thymeleaf:
    # 关闭页面缓存
    cache: false
3.最后一步,在工程src/main/resources/templates目录下,新建一个HTMl文件,你没听错!就是HTML文件,Thymeleaf最大的特点是能够直接在浏览器中打开并正确显示模板页面,而不需要启动整个Web应用,如我们这里新建一个命名为hello.html(SpringBoot默认访问名为index.html的html文件)的html文件,并在标签中添加一个thymeleaf的命名空间:
xmlns:th="http://www.thymeleaf.org"
并编辑点内容,如:
<!DOCTYPE html>
<html lang="en" xmlns:th="http://www.thymeleaf.org">
<head>
    <meta charset="UTF-8">
    <title>Title</title>
</head>
<body>
	<h1>Hello guqueyue!</h1>
</body>
</html>
或者,参照我的这篇博客,直接配置一个Thymeleaf的文件模板:SpringBoot的常用代码模板,直接找到File and Code Templates中的Thymeleaf章节即可。
到这里,已经整合完成了,springboot就是这么简单。下面让我们来测试一下吧!
先在依赖管理文件pom.xml中添加一个Web功能的起步依赖spring-boot-starter-web:
<dependency>
	<groupId>org.springframework.boot</groupId>
	<artifactId>spring-boot-starter-web</artifactId>
</dependency>
再新建一个controller,如:
package com.guqueyue.controller;

import org.springframework.stereotype.Controller;

/**
 * @author guqueyue
 * @Date 2020/4/13
 **/
@Controller
public class HelloController {

    /**
     * 去到hello.html页面
     * @return 直接返回页面的名字就能访问页面
     */
    @RequestMapping("/hello")
    public String toHello() {
        return "hello";
    }
}
启动应用程序,打开浏览器输入"http://localhost:8080/hello",显示:
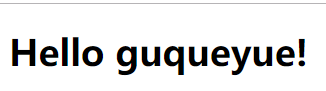
说明访问成功,直接返回页面名字就能访问页面,而不需要像jsp一样配置什么视图解析器,是不是很炫酷?
当然,如果需要的话,我们也可以去application.yml配置文件中配置Thymeleaf的前缀和后缀,如以下配置为默认的前缀和后缀:
spring:
	thymeleaf:
	    # 关闭页面缓存
	    cache: false
	    # 配置前缀
	    prefix: classpath:/templates/
	    # 配置后缀
	    suffix: .html
当然,为了安全着想,SpringBoot并不能直接通过浏览器输入路径来访问视图,而必须通过controller!
Thymeleaf的基本语法
先创建一个实体类,如:
package com.guqueyue.entity;

/**
 * @author guqueyue
 * @Date 2020/4/14
 **/
//lombok插件的注解
@Data // 若未使用lombok插件,请自行生成getter、setter以及toString方法
@AllArgsConstructor // 若未使用lombok插件,请自行生成有参构造方法
@NoArgsConstructor // 若未使用lombok插件,请自行生成无参构造方法
@Accessors(chain = true) // 开启链式编程
public class Person {

    private String name;
    private Integer age;

}
常量和变量的拼接
Thymeleaf中常量和变量如果拼接,那么必须在一头一尾加上|,如:
<td><a th:href="|/stu/delete?id=${stu.id}|">删除</a></td>
存值
Themeleaf在web层通过model或者ModelMap来存值,语法为:
model.addAttribute(key, value);
map.put(key, value);
具体代码如:
package com.guqueyue.controller;

/**
 * @author guqueyue
 * @Date 2020/4/13
 **/
@Controller
public class HelloController {

    /**
     * 去到hello.html页面
     * @return 直接返回页面的名字
     */
    @RequestMapping("/hello")
    public String toHello(Model model) {
        /**
         * 创建两个对象及一个对象数组存放这两个对象
         */
        Person person = new Person().setName("大宝").setAge(17);
        Person person1 = new Person().setName("小宝").setAge(19);
        Person[] persons = {person, person1};

        /**
         * 把这两个对象及这个对象数据添加到模型中
         */
        model.addAttribute("person", person);
        model.addAttribute("person1", person1);
        model.addAttribute("persons", persons);

        return "hello";
    }
}
取值
Thymeleaf通过${}来获取model中的值,虽然很像JSP中的el表达式,但却不是el表达式,而是ognl表达式。
直接取值
直接取值的话没有代码提示,语法:[[${key}]],如:[[${person.name}]]
通过标签取值
通过html标签取值的话,有代码提示,要方便一些,如:
<span th:text="${person1.name}">小花</span>

<input name="name" value="小黑" th:value="${person.name}"/>
具体代码如下:
<!DOCTYPE html>
<html lang="en" xmlns:th="http://www.thymeleaf.org" >
<head>
    <meta charset="UTF-8">
    <title>Title</title>
</head>

    <h1>Hello guqueyue!</h1>

    [[${person.name}]]

    <br/><!-- 换行 -->
    <span th:text="${person1.name}">小花</span>

    <br/><!-- 换行 -->
    <input name="name" value="小黑" th:value="${person.name}"/>

</body>
</html>
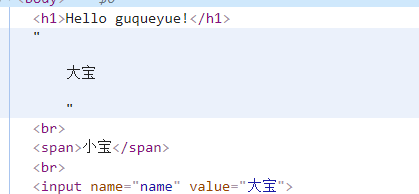
启动程序,打开浏览器输入"http://localhost:8080/hello",显示:

F12检查元素得:
从域对象中取值
Thymeleaf默认从request域中取值,当然我们也可以存值从session中取值,甚至可以通过@SessionAttributes注解从request域中拷贝值到session作用域中,代码示例如:
先新建一个controller:
package com.guqueyue.controller;

/**
 * @author guqueyue
 * @Date 2020/4/15
 * 从域对象中取值
 **/
@Controller
@SessionAttributes(value = {"age"}) // 拷贝request域中的值到session作用域中
public class DomainObjectController {

    @RequestMapping("/session")
    public String getSession(ModelMap map, HttpSession session) {
        map.put("age", 18);
        map.put("name", "古阙月一号");
        session.setAttribute("name", "古阙月二号");

        return "domain";
    }
}
再在工程目录src/main/resources/templates下新建一个名为domian.html的文件,如:
<!DOCTYPE html>
<html lang="en" xmlns:th="http://www.thymeleaf.org">
<head>
    <meta charset="UTF-8">
    <title>从域对象中取值</title>
</head>
<body>
	request: <span th:text="${name}"></span>
	, 通过内置对象获取:<span th:text="${#request.getAttribute('age')}"></span>
	<hr/>
	session: <span th:text="${session.name}"></span>
	, 通过@SessionAttributes注解复制:<span th:text="${session.age}"></span>
	<br/>
</body>
</html>
启动程序,打开浏览器输入"http://localhost:8080/session",显示:

数值回显
其他的输入框需要数值回显直接取值就可,但是单选框和下拉框需要数值回显的话,可能就需要稍微再费点功夫:
单选框用th:checked="exp",只要exp为true即会选中:
<div class="layui-input-block">
	<input type="radio" name="fSex" value="1" title="男" th:checked="${family.FSex}"/>
	<input type="radio" name="fSex" value="0" title="女" th:checked="${!family.FSex}">
</div>
效果:

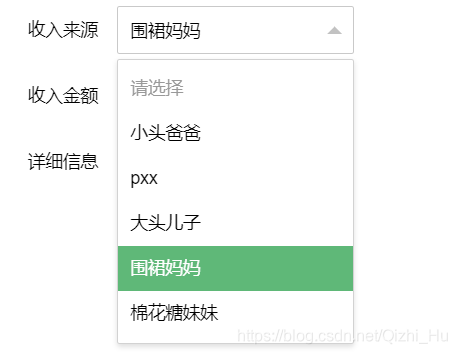
下拉框用th:selected="exp",与之前单选框相同只要exp为true即会选中:
<select name="faId" lay-verify="required">
	<option value="">请选择</option>
	<option th:each="fa : ${familyList}" th:value="${fa.fId}" th:text="${fa.fName}" th:selected="${income.faId == fa.fId}"></option>
</select>
实现效果:
传值
有时候难免要往通过一些事件(该有的事件都有)往方法中传值,如点击事件:
刚开始不熟练的话,可能写成这样,然后往死里传也传不进值:
<a onclick="method([[${name}]])">点我</a>
其实应该这样:
<a th:onclick="method(([[${name}]])">点我</a>
条件判断
if 判断
跟Java的if判断差不多,代码示例:
<a th:if="${person1.age >= 18}">[[${person1.name}]]是个成年人</a>
unless 判断
Thymeleaf中并没有else判断,但有unless判断,英文释义"除非"的意思。它和if判断截然相反,if 判断的意思为:如果(if)为真,则… ;而unless 判断的意思为:除非(unless)为真,不然…;换句话来说,unless 判断的意思为:如果为假,则…,代码示例:
<a th:unless="${person1.age < 18}">[[${person.name}]]是个成年人</a>
三元判断
跟Java的三元操作符差不多,代码示例:
<a th:text="${person.age < 18 ? '未成年' : '成年'}"></a>
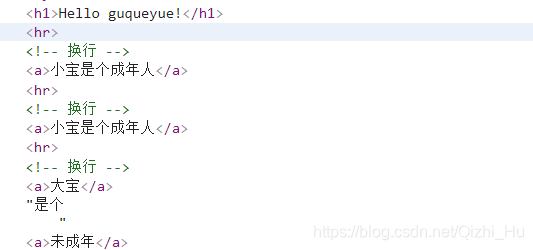
具体代码:
<!DOCTYPE html>
<html lang="en" xmlns:th="http://www.thymeleaf.org" >
<head>
    <meta charset="UTF-8">
    <title>Title</title>
</head>

    <h1>Hello guqueyue!</h1>

    <hr/> <!-- 换行 -->
    <a th:if="${person1.age >= 18}">[[${person1.name}]]是个成年人</a>

    <hr/> <!-- 换行 -->
    <a th:unless="${person1.age < 18}">[[${person1.name}]]是个未成年人</a>

    <hr/> <!-- 换行 -->
    <a th:text="${person.name}"></a>是个
    <a th:text="${person.age < 18 ?  '未成年' : '成年'}"></a>

</body>
</html>
启动程序,打开浏览器输入"http://localhost:8080/hello",显示:
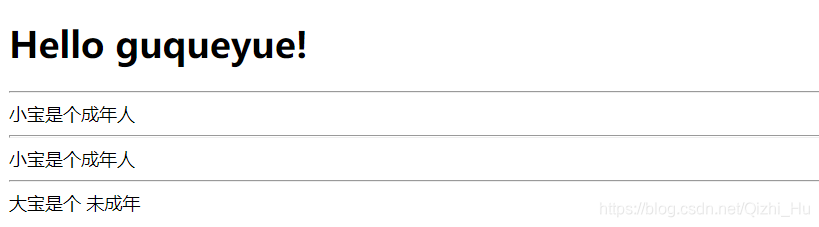
检查元素,得:
循环
语法格式如:
<div th:each="var : ${Items}" th:text="${var}"></div>
具体代码:
<!DOCTYPE html>
<html lang="en" xmlns:th="http://www.thymeleaf.org" >
<head>
    <meta charset="UTF-8">
    <title>Title</title>
</head>

    <h1>Hello guqueyue!</h1>

    <hr/>
    <div th:each="p : ${persons}" th:text="${p}"></div>

	<hr/>
    表格中循环:
    <table border="1">
        <tr>
            <td>姓名</td>
            <td>年龄</td>
        </tr>

        <tr th:each="p: ${persons}">
            <td th:text="${p.name}"></td>
            <td th:text="${p.age}"></td>
        </tr>
    </table>
</body>
</html>
启动程序,打开浏览器输入"http://localhost:8080/hello",显示:
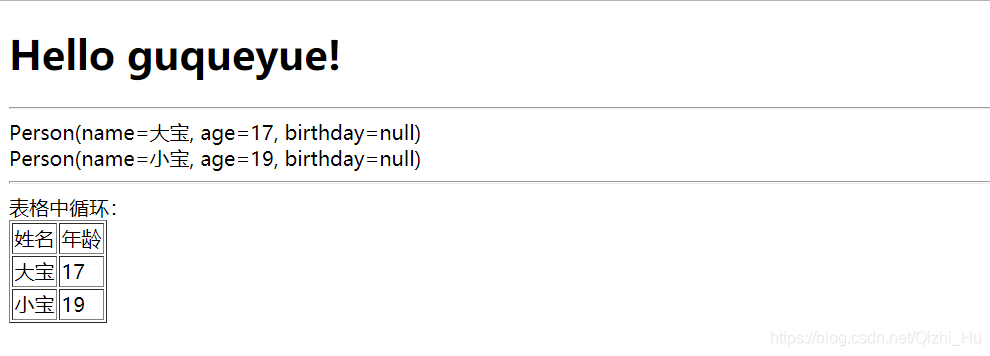
检查元素,为:
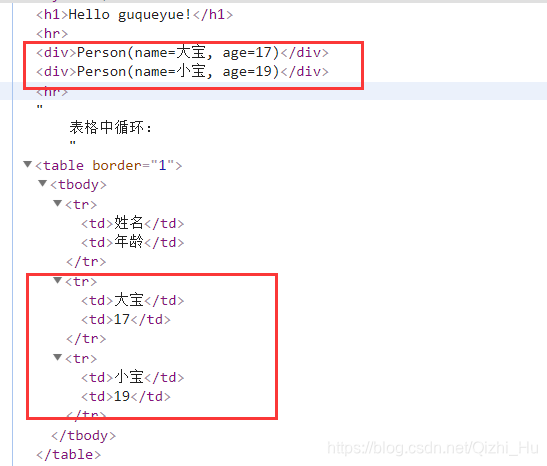 不过循环需要注意一点,循环只从
th:each="var : ${Items}",这行开始循环,而不是th:text="${var}",所以遇到循环下拉框之类的请不要把th:each="var : ${Items}"写到select标签里,而是option标签里,如:
<select name="fiId" lay-verify="required" th:each="fi : ${financeList}">
	<option value="">请选择</option>
	<option th:text="${fi.fName}"></option>
</select>
是错误的,这样才是正确的:
<select name="fiId" lay-verify="required">
	<option value="">请选择</option>
	<option th:each="fi : ${financeList}" th:text="${fi.fName}"></option>
</select>
常用的方法
获取项目根路径:
<base th:href="|${#request.getContextPath()}/|">
或者:
<base th:href="${#request.getContextPath() + '/'}">
另外,在thymeleaf中/表示:ip:port/ (ip地址:端口号/),也就是本文中的http://localhost:8080/。如果没有项目名则项目根路径 + /和/一致;若是有项目名,那么项目根路径为:ip:port/项目名,这个时候就要使用项目根路径 + /,而不能使用/。
当然,一开始就在html文件head标签中加个base就什么事情都没有了(^_−)☆
格式化时间:
<span th:text="${#dates.format(birthday, 'yyyy-MM-dd')}">生日</span>
例如,在web层controller中放入当前日期到模型中:
model.addAttribute("birthday", new Date());
html文件中代码为:
<span th:text="${birthday}">生日</span>
<hr/>
<span th:text="${#dates.format(birthday, 'yyyy-MM-dd')}">生日</span>
运行程序,打开浏览器按设置输入路径,浏览器显示:

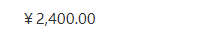
格式化金额
<td th:text="${#numbers.formatCurrency(price)}">66</td>
效果:
动态导入html
Thymeleaf的动态导入也是非常的简单,两步即可:
第一步,用th:fragment将被导入的页面包住,并设置一个标记,如:
<div th:fragment="myImport">
此处是需要导入的内容...
</div>
第二步,在需要导入页面用th:replace直接导入即可,如:
<div th:replace="import :: myImport">
此处即成了上文的内容:此处是需要导入的内容...
</div>
其中标记要统一,如本文中的myImport;然后特别需要注意的是:此处的import是被导入页面的名字,如果被导入页面名为hello.hmtl,则此处的import应该改成hello;如果不是直接放在templates目录下,而是放在templates的下级目录下,那么还应该加上目录名,毕竟Themeleaf默认的前缀为:classpath:/templates/,后缀为:.html。也就是说加上前后缀应该是一个完整的文件名,SpringBoot才能找到这个文件。
如果被导入的html页面是在templates/hi下命名为hello.html的文件,那此处的import 应该改为hi/hello。
之前的解释可能会有些抽象,没关系,我们来举个小demo
首先在目录src/main/resources/templates/commons下创建一个名为import.html的文件,如:
<!DOCTYPE html>
<html lang="en" xmlns:th="http://www.thymeleaf.org">
<head>
    <meta charset="UTF-8">
    <title>Title</title>
</head>
<body>
<h1 th:fragment="myImport">一个被导入页面</h1>
</body>
再在src/main/resources/templates目录下创建一个名为index.html的页面,如:
<!DOCTYPE html>
<html lang="en" xmlns:th="http://www.thymeleaf.org">
<head>
    <meta charset="UTF-8">
    <title>Title</title>
</head>
<body>
<h1>我导入了</h1>
<div th:replace="commons/import :: myImport"></div>
</body>
</html>
启动程序,打开浏览器输入"http://localhost:8080/",默认访问名为index.html的页面,浏览器显示:

看到一个被导入页面则说明导入成功!


 661
661


 被折叠的 条评论
为什么被折叠?
被折叠的 条评论
为什么被折叠?
 到【灌水乐园】发言


