


1 thymeleaf概念
1.1 案例
springboot推荐使用的模板引擎
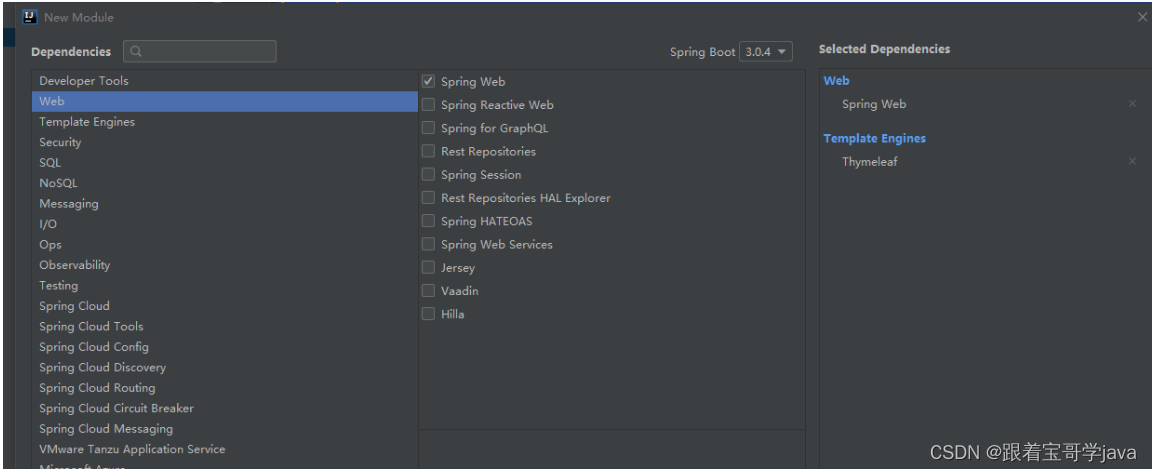
创建web项目
引入依赖
<dependency>
    <groupId>org.springframework.boot</groupId>
    <artifactId>spring-boot-starter-thymeleaf</artifactId>
</dependency>
<dependency>
    <groupId>org.springframework.boot</groupId>
    <artifactId>spring-boot-starter-web</artifactId>
</dependency>

<dependency>
    <groupId>org.projectlombok</groupId>
    <artifactId>lombok</artifactId>
    <optional>true</optional>
</dependency>
<dependency>
    <groupId>org.springframework.boot</groupId>
    <artifactId>spring-boot-starter-test</artifactId>
    <scope>test</scope>
</dependency>
配置信息
spring:
  thymeleaf:
    cache: false
    #以下配置可以不写  都是默认值
    suffix: .html
    prefix: classpath:templates/
    encoding: utf-8
    mode: HTML5
server:
  servlet:
    context-path: /springboot8
action
@RequestMapping("/m1.action")
public String method01(Model model){
    model.addAttribute("message","hello thymeleaf");
    return "demo01";
}
页面
<!DOCTYPE html>
<html lang="en" xmlns:th="http://www.thymeleaf.org">
<head>
    <meta charset="UTF-8">
    <title>第一个htymeleaf页面</title>
</head>
<body>
       <!--
            thymeleaf中:获取域属性方式两种:
            1:在标签中添加th:xxx 的thymeleaf属性
            2:在文本中通过两个中括号 获取变量的值
       -->
       <h1>0 获取变量的方式</h1>
       获取request的域属性:::[[${message}]]<br/>
       获取request的域属性:::<span th:text="${message}"></span><br/>
</body>
</html>
1.2 内置对象
action
@RequestMapping("/m2.action")
public String method02(Model model, HttpServletRequest req){
    model.addAttribute("message","hello thymeleaf");
    //req.setAttribute("aa","aa_request");
    req.getSession().setAttribute("aa","aa_session");
    req.getServletContext().setAttribute("aa","aa_application");
    req.setAttribute("a1","a1_request");
    req.getSession().setAttribute("a2","a2_session");
    req.getServletContext().setAttribute("a3","a3_application");
    req.getContextPath();
    req.getServletContext().getContextPath();
    return "demo01";
}
html
<!--
thymeleaf内置对象:
域对象:  session:::session域对象
         application::::application域对象
对象:    #request:::HttpServletRequest请求对象
         #session:::HttpSession会话对象
         #servletContext::ServletContext上下文对象
-->
<h1>1:获取域属性 通过内置对象</h1>
获取request域属性::方式1通过中括号:[[${a1}]]<br/>
获取request域属性::方式2通过thymeleaf标签:<font th:text="${a1}"></font><br/>
获取request域属性::方式3通过request对象:<font th:text="${#request.getAttribute('a1')}"></font><br/>
获取request域属性::方式3通过request对象:[[${#request.getAttribute('a1')}]]<br/>

<!--获取变量永远都有两种方式::中括号和thymeleaf标签-->
获取session域属性::方式1通过内置对象:session域对象:[[${session.a2}]]<br/>
获取session域属性::方式1通过内置对象:session域对象:[[${session['a2']}]]<br/>
获取session域属性::方式1通过内置对象:session域对象:<font th:text="${session.a2}"></font><br/>
获取session域属性::方式1通过内置对象:session域对象:<font th:text="${session['a2']}"></font><br/>
获取session域属性::方式2通过内置对象:#session对象:[[${#session.getAttribute('a2')}]]<br/>
获取session域属性::方式3通过内置对象:#request对象:[[${#request.session.getAttribute('a2')}]]<br/>
获取session域属性::方式3通过内置对象:#request对象:[[${#request.getSession().getAttribute('a2')}]]<br/>
获取sessionid: [[${#session.id}]]<br/>
获取sessionid: [[${#session.getId()}]]<br/>
获取sessionid: [[${#request.session.id}]]<br/>
获取sessionid: [[${#request.getSession().getId()}]]<br/>
获取sessionid: [[${#request.session.getId()}]]<br/>
获取application域属性:方法1通过内置对象:application域对象:[[${application.a3}]]<br/>
获取application域属性:方法2通过内置对象:#servletContext对象:[[${#servletContext.getAttribute('a3')}]]<br/>

//没有类似于el的全域查找

<h1>3 获取项目路径</h1>
项目路径:[[${#request.getContextPath()}]]<br/>
项目路径:[[${#request.contextPath}]]<br/>
项目路径:[[${#servletContext.getContextPath()}]]<br/>
项目路径:[[${#servletContext.contextPath}]]<br/>

<span th:text="${#request.contextPath +'/imgs/99.jpeg'}"></span><br/>

<h1>4 ${}中可用进行基本运算</h1>
打印字符串:[[${'str'}]]<br/>
打印1+1:[[${'1+1'+'=2'}]]<br/>
运算1+1:[[${1+1}]]<br/>
运算3-1:[[${3-1}]]<br/>
运算3*2:[[${3*2}]]<br/>
运算5/2:[[${5/2}]]<br/>
运算9%2:[[${9%2}]]<br/>
注意
注意1:不要再注释中有 thymeleaf的获取变量的代码::会被解析
注意2:${}中不能有双引号 只能是单引号
注意3:没有全域查找 不指定域对象 就是request域
注意4:上下文对象是#servletContext
注意5:idea会对${session.bb}和${application.cc}报编译错误:可以忽视
1.3 thymeleaf的ognl
概念
ognl:Object Graph Navigation Language对象导航
ognl:对象导航:当对象有getXxx方法时  可以通过对象.xxx调用此方法
在thymeleaf中更强大的使用
定义实体类
@Data
@AllArgsConstructor
@NoArgsConstructor
@Accessors(chain = true)
public class Teacher {
    private int tid;
    private String tname;

    public int add(){
        return 1+1;
    }
    public int add(int a,int b){
        return a+b;
    }
    public String getAddress(){
        return "河南-郑州";
    }

}
@Data
@AllArgsConstructor
@NoArgsConstructor
@Accessors(chain = true)
public class Student {
    private int sid;
    private String sname;
    private float score;
    private Teacher teacher;
    public String haha(){
        return "haha()方法被调用";
    }
    public String getHehe(){
        return "getHehe()方法被调用";
    }
    public String getHehe(int a){
        return "getHehe("+a+")方法被调用";
    }
    public String getHehe(String a,int b){
        return "getHehe("+a+","+b+")方法被调用";
    }
}
action
@Controller
@RequestMapping("/test02")
public class Test02 {

    @RequestMapping("/m1.action")
    public String method01(Model model){
        Teacher teacher=new Teacher().setTname("张三老师").setTid(1001);
        Student student=new Student().setScore(11.1f).setSname("韩梅梅").setSid(11).setTeacher(teacher);
          model.addAttribute("student",student);
          return "demo02";
    }
}
页面
<!DOCTYPE html>
<html lang="en" xmlns:th="http://www.thymeleaf.org">
<head>
<meta charset="UTF-8">
<title>第一个htymeleaf页面</title>
</head>
<body>
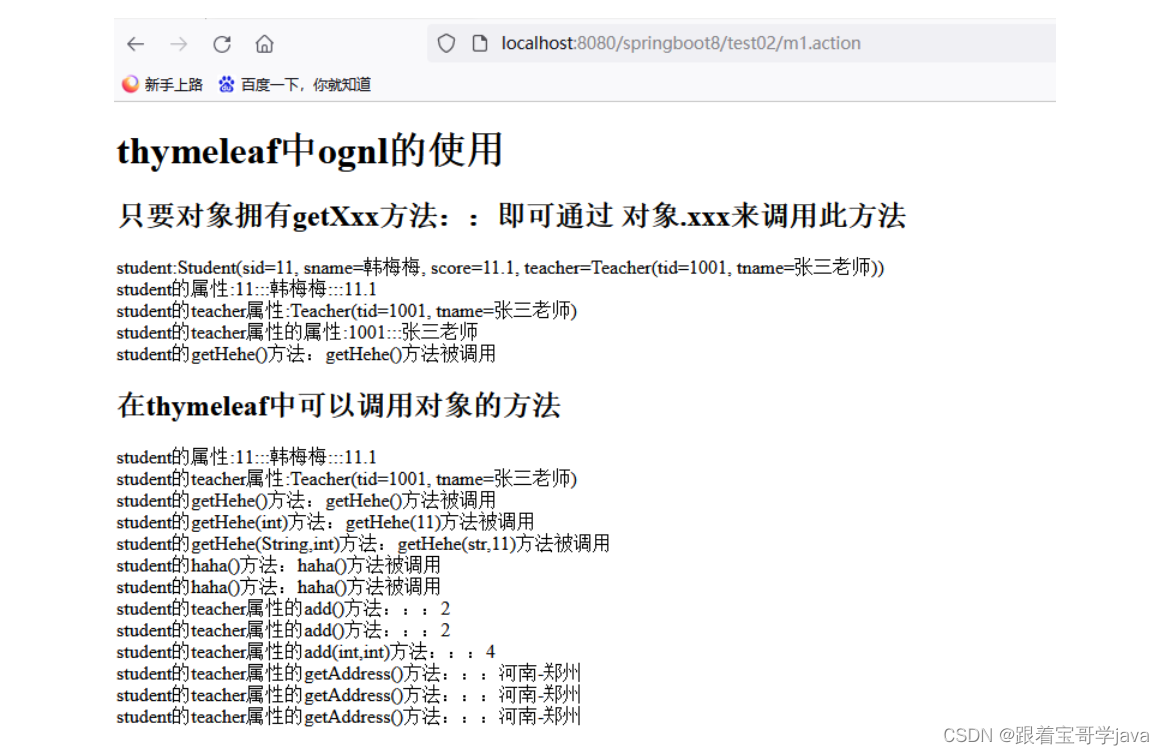
<h1>thymeleaf中ognl的使用</h1>
<h2>只要对象拥有getXxx方法::即可通过 对象.xxx来调用此方法</h2>
student:[[${student}]]<br/>
student的属性:[[${student.sid}]]:::[[${student.sname}]]:::<span th:text="${student.score}"></span><br/>
student的teacher属性:[[${student.teacher}]]<br/>
student的teacher属性的属性:[[${student.teacher.tid}]]:::[[${student.teacher.tname}]]<br/>
student的getHehe()方法:[[${student.hehe}]]
<h2>在thymeleaf中可以调用对象的方法</h2>
student的属性:[[${student.getSid()}]]:::[[${student.getSname()}]]:::<span th:text="${student.getScore()}"></span><br/>
student的teacher属性:[[${student.getTeacher()}]]<br/>
student的getHehe()方法:[[${student.getHehe()}]]<br/>
student的getHehe(int)方法:[[${student.getHehe(11)}]]<br/>
student的getHehe(String,int)方法:[[${student.getHehe('str',11)}]]<br/>
student的haha()方法:[[${student.haha()}]]<br/>
student的haha()方法:[[${student.haha}]]<br/>
student的teacher属性的add()方法:::[[${student.teacher.add}]]<br/>
student的teacher属性的add()方法:::[[${student.teacher.add()}]]<br/>
student的teacher属性的add(int,int)方法:::[[${student.teacher.add(1,3)}]]<br/>
student的teacher属性的getAddress()方法:::[[${student.teacher.address}]]<br/>
student的teacher属性的getAddress()方法:::[[${student.teacher.getAddress}]]<br/>
student的teacher属性的getAddress()方法:::[[${student.teacher.getAddress()}]]<br/>
</body>
</html>
效果
1.4 实现流程控制
实体类
@Data
@AllArgsConstructor
@NoArgsConstructor
@Accessors(chain = true)
public class Student {
    private int sid;
    private String sname;
    private float score;
    private String sex;
    private int sage;
    private boolean sdy;
    private Teacher teacher;
    public String haha(){
        return "haha()方法被调用";
    }
    public String getHehe(){
        return "getHehe()方法被调用";
    }
    public String getHehe(int a){
        return "getHehe("+a+")方法被调用";
    }
    public String getHehe(String a,int b){
        return "getHehe("+a+","+b+")方法被调用";
    }
}
action
@Controller
@RequestMapping("/test03")
public class Test03 {

    @RequestMapping("/m1.action")
    public String method01(Model model){
        List<Student> list=new ArrayList<>();
        for (int i = 0; i <20 ; i++) {
              Student student=new Student();
              student.setSex(i%2==0?"男":"女");
              student.setSname("韩梅"+i);
              student.setScore((int)(Math.random()*1600-300)/10.0f);
              student.setSid(100+i);
              student.setSdy(i%2==0);
              student.setSage((int)(Math.random()*10+15));
              list.add(student);
        }
        model.addAttribute("list",list);
        return "demo03";
    }
}
页面
<!DOCTYPE html>
<html lang="en" xmlns:th="http://www.thymeleaf.org">
<head>
<meta charset="UTF-8">
<title>第三个htymeleaf页面</title>
<style type="text/css">
table{
border:1px solid blue;
width:1600px;
margin:20px auto;
border-collapse: collapse;
}
th,td{
border:1px solid blue;
text-align: center;
padding: 10px;
}
th{
background: #cccccc;
}
</style>
</head>
<body>
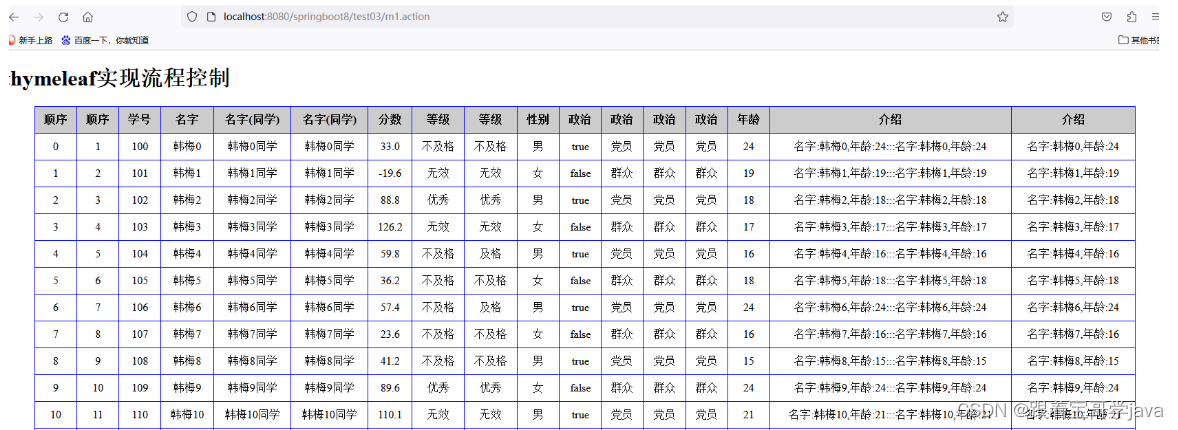
<h1>thymeleaf实现流程控制</h1>
<table>
<tr>
<th>顺序</th><th>顺序</th><th>学号</th>
<th>名字</th><th>名字(同学)</th><th>名字(同学)</th>
<th>分数</th><th>等级</th><th>等级</th>
<th>性别</th>
<th>政治</th><th>政治</th><th>政治</th><th>政治</th>
<th>年龄</th>
<th>介绍</th><th>介绍</th>
</tr>
<!--遍历集合:each="stu,ix:${xxx}"
stu:记录集合中的当前元素
ix:记录当前元素的状态::和jsp中varStatus相同
属性index:从0开始记录下标
属性count:记录已遍历的对象个数
${xxx}::获取reuqest域中的域属性集合对象
-->
<tr th:each="stu,ix:${list}">
<td th:text="${ix.index}"></td>
<td>[[${ix.count}]]</td>
<td th:text="${stu.sid}"></td>
<td><span th:text="${stu.sname} eq null?'无名':${stu.sname}"></span></td>
<td th:text="${stu.sname+'同学'}"></td> <!--字符串拼接-->
<td th:text="${stu.sname}+'同学'"></td> <!--字符串拼接-->
<td>[[${stu.score}]]</td>
<!--使用if实现 选择-->
<td>
<span th:if="${stu.score} lt 0 or ${stu.score} gt 100" th:text="'无效'"></span>
<span th:if="${stu.score} lt 60 and ${stu.score} ge 0" th:text="'不及格'"></span>
<span th:if="${stu.score} lt 70 and ${stu.score} ge 60" th:text="'及格'"></span>
<span th:if="${stu.score} lt 80 and ${stu.score} ge 70" >良好</span>
<span th:if="${stu.score} le 100 and ${stu.score} ge 80" >优秀</span>
</td>
<!--使用switch实现 选择-->
<td th:switch="${#numbers.formatInteger(stu.score/10,0)}">
<span th:case="1">不及格</span>
<span th:case="2">不及格</span>
<span th:case="3">不及格</span>
<span th:case="4">不及格</span>
<span th:case="5">不及格</span>
<span th:case="6">及格</span>
<span th:case="7">良好</span>
<span th:case="8">优秀</span>
<span th:case="9">优秀</span>
<span th:case="*">无效</span>
</td>
<td>[[${stu.sex}]]</td>
<td>[[${stu.sdy}]]</td>
<td>[[${stu.sdy?'党员':'群众'}]]</td> <!--三元表达式-->
<td th:text="${stu.sdy}?'党员':'群众'"></td><!--三元表达式-->
<td th:text="${stu.sdy?'党员':'群众'}"></td><!--三元表达式-->
<td>[[${stu.sage}]]</td>
<!--字符串拼接1:通过+-->
<td>[['名字:'+${stu.sname}+',年龄:'+${stu.sage}]]</td>
<!--字符串拼接2:通过|-->
<td>[[|名字:${stu.sname},年龄:${stu.sage}|]]</td>
</tr>
</table>
</body>
</html>
效果
1.5 表达式格式
a 表达式的格式
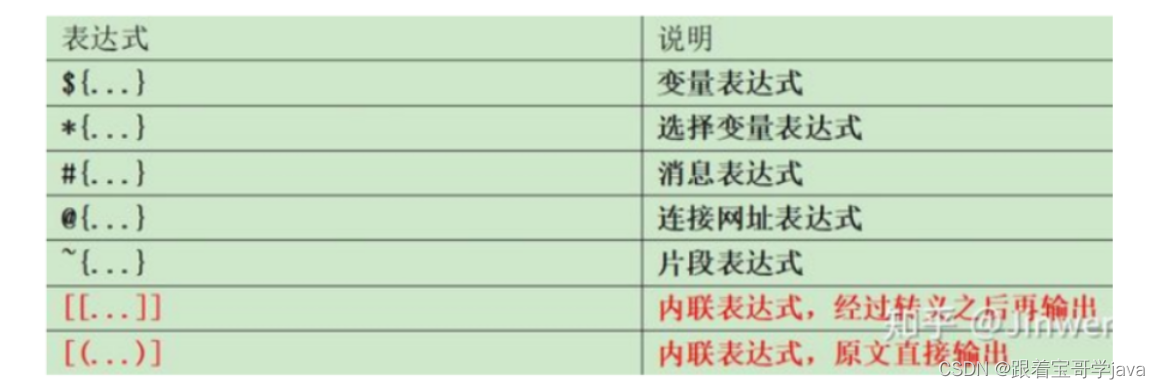
b [[]]和[()]的区别
()不转义所以解析 []转义所以解析
- action
@RequestMapping("/m1.action")
public String method01(Model model){
    String message="message::<font  color='red' size='7' >font标签的文本内容</font>";
    model.addAttribute("message",message);
    return "demo04";
}
- 页面
<h2>两个中括号 和 外中内圆的区别</h2>
message两个中括号:[[${message}]]:::不对内容进行解析<br/>
message外中内圆:[(${message})]:::::对内容解析<br/>
- 效果

c *{xxx}的使用
与:object配合使用 获取指定对象的属性
- action
@RequestMapping("/m1.action")
public String method01(Model model){
    Student student=new Student();
    student.setSex("男");
    student.setSname("韩梅");
    student.setScore((int)(Math.random()*1600-300)/10.0f);
    student.setSid(1001);
    student.setSdy(true);
    student.setSage((int)(Math.random()*10+15));
    student.setTeacher(new Teacher(1,"张三"));
    model.addAttribute("student",student);
    return "demo04";
}
- 页面
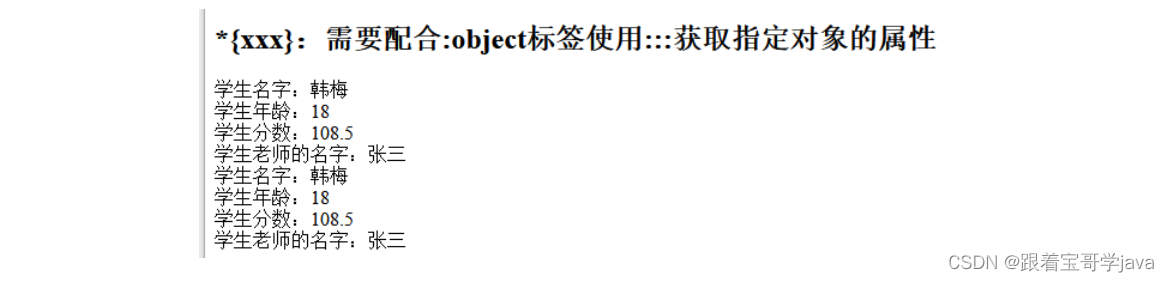
<h2>*{xxx}:需要配合:object标签使用:::获取指定对象的属性</h2>
学生名字:[[${student.sname}]]<br/>
学生年龄:[[${student.sage}]]<br/>
学生分数:[[${student.score}]]<br/>
学生老师的名字:[[${student.teacher.tname}]]<br/>
<div th:object="${student}">
    学生名字:[[*{sname}]]<br/>
    学生年龄:[[*{sage}]]<br/>
    学生分数:[[*{score}]]<br/>
    学生老师的名字:<span th:text="*{teacher.tname}"></span><br/>
</div>
- 效果
d @{xxx}的使用
@{xxx}:用于获取项目路径::茹core标签库中的url标签
项目路径::[[${#request.contextPath}+'/1.html']]<br/>
项目路径::[[@{'/1.html'}]]<br/>
<a  th:href="@{/1.html}">请求1.html</a><br/>
<a  th:href="${#request.contextPath}+'/1.html'">请求1.html</a><br/>
url中有请求参数:
<a  th:href="@{/test04/m2.action(aa=11,bb=abc)}">请求/test04/m2.action</a><br/>
url中有请求参数:
<a  th:href="${#request.contextPath}+'/test04/m2.action?aa=11&bb=abc'">请求/test04/m2.action</a><br/>
url中有url模板:<a  th:href="@{/test04/m3/11.action}">请求/test04/m3/{id}.action</a><br/>
url中有url模板:<a  th:href="@{'/test04/m3/'+${id}+'.action'}">请求/test04/m3/{id}.action</a><br/>
url中有url模板:<a  th:href="@{/test04/m3}+'/'+${id}+'.action'">请求/test04/m3/{id}.action</a><br/>
e ~{}的使用
~{}用于静态包含:实现页面的复用::和th:fragment配合使用
- 被包含的页面:demo0.html
<!DOCTYPE html>
<html lang="en" xmlns:th="http://www.thymeleaf.org">
<head>
    <meta charset="UTF-8">
    <title>第00个htymeleaf页面</title>
</head>
<body>
    <font size="7" color="red" th:fragment="font_logo1">logo1</font>
    <font size="7" color="red" th:fragment="font_logo2">logo2</font>
</body>
</html>
- 主页面:demo04.html
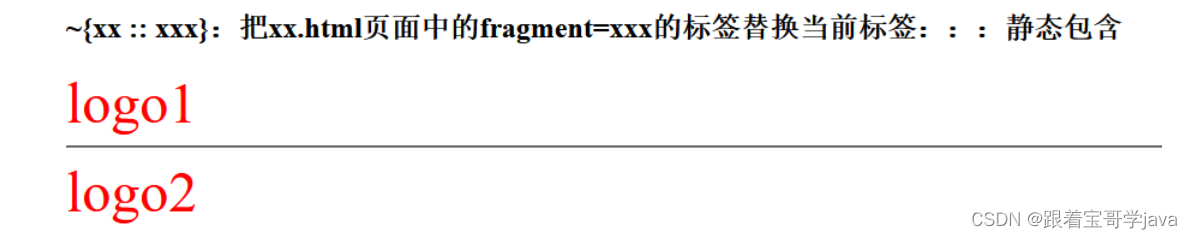
<h2>~{xx :: xxx}:把xx.html页面中的fragment=xxx的标签替换当前标签:::静态包含</h2>
<div th:replace="~{demo0 :: font_logo1}">hehe1</div>
<hr/>
<div th:replace="~{demo0 :: font_logo2}">hehe2</div>
- 效果
1.6 thymeleaf的内置对象
a 概念
thymeleaf的解析引擎在解析thymeleaf页面时 以创建好的对象--内置对象--thymeleaf可用直接使用
内置对象格式:#xxx
环境相关的对象::#request,#session,#servletContext
功能相关的对象::#strings--操作字符串
               #numbers--操作数字
               #dates----操作日期
               #lists----操作集合
               #arrays---操作数组
b action
@Controller
@RequestMapping("/test05")
public class Test05 {

    @RequestMapping("/m1.action")
    public String method01(Model model){
         Object[] arr={1,2,3,4,5,6};
        List<String> list=new ArrayList<>();
        list.add("abc1");list.add("abc2");list.add("abc3");list.add("abc4");
        list.add("abc1");list.add("abc2");list.add("abc3");list.add("abc4");
        model.addAttribute("arr",arr);
        model.addAttribute("list",list);
        return "demo05";
    }
}
c 页面
<h1>thymeleaf内置对象</h1>
<h2>环境相关的内置对象:#request,#session,#servletContext</h2>
<h2>功能相关的内置对象:#strings:::操作字符串</h2>
toLowerCase::转换为小写::<span th:text="${#strings.toLowerCase('abc123ABC')}"></span><br/>
toUpperCase::转换为大写::<span th:text="${#strings.toUpperCase('abc123ABC')}"></span><br/>
trim::去除两边空格::<span th:text="${#strings.trim('  abc   123  ABC  ')}"></span><br/>
replace::替换::<span th:text="${#strings.replace('abcabc123abc','a','-')}"></span><br/>
repeat::字符串重复指定次数::<span th:text="${#strings.repeat('abc',4)}"></span><br/>
substring::获取字串::<span th:text="${#strings.substring('abcdefghijklmn',2)}"></span><br/>
substring::获取字串::<span th:text="${#strings.substring('abcdefghijklmn',2,5)}"></span><br/>
concat::字符串拼接::<span th:text="${#strings.concat('abc','1234')}"></span><br/>
indexOf::获取第一次出现的位置::<span th:text="${#strings.indexOf('abc1234abc','a')}"></span><br/>
contains::判断包含::<span th:text="${#strings.contains('abc123','123')}"></span><br/>
isEmpty::是否为空::<span th:text="${#strings.isEmpty('abc')}"></span><br/>
length::获取字符个数::<span th:text="${#strings.length('abc123')}"></span><br/>
startsWith::判断开头::<span th:text="${#strings.startsWith('abcdef','abc')}"></span><br/>
endsWith::判断结尾::<span th:text="${#strings.endsWith('abcdbcf','bac')}"></span><br/>
arrayJoin::数组元素拼接字符串::<span th:text="${#strings.arrayJoin(arr,'-')}"></span><br/>

<h2>功能相关的内置对象:#dates::操作日期</h2>
createNow::获取当前时间年月日时分秒::<span th:text="${#dates.createNow()}"></span><br/>
createToday::获取当前时间年月日::<span th:text="${#dates.createToday()}"></span><br/>
create::创建时间对象::<span th:text="${#dates.create(2023,3,16,17,34,1)}"></span><br/>
day::获取天::<span th:text="${#dates.day(#dates.createNow())}"></span><br/>
year::获取年::<span th:text="${#dates.year(#dates.createNow())}"></span><br/>
month::获取月::<span th:text="${#dates.month(#dates.createNow())}"></span><br/>
dayOfWeek::获取星期 日为1::<span th:text="${#dates.dayOfWeek(#dates.createNow())}"></span><br/>
hour::获取时::<span th:text="${#dates.hour(#dates.createNow())}"></span><br/>
minute::分::<span th:text="${#dates.minute(#dates.createNow())}"></span><br/>
second::秒::<span th:text="${#dates.second(#dates.createNow())}"></span><br/>
format::获取默认格式的字符串::<span th:text="${#dates.format(#dates.createNow())}"></span><br/>
format::获取指定格式的字符串::<span th:text="${#dates.format(#dates.createNow(),'yyyy年MM月dd日 HH:mm:ss')}"></span><br/>

<h2>功能相关的内置对象:#numbers::操作数字</h2>
formatInteger::转化为整数::<span th:text="${#numbers.formatInteger(1234.567,0)}"></span><br/>
formatInteger::转化为整数::<span th:text="${#numbers.formatInteger(1234.567,5)}"></span><br/><!--不够5位 0补齐-->
<ul th:each="n,ix:${#numbers.sequence(1,10)}">  <!--sequence(start,end) 获取一个数组:指定起始值和结束值 步长默认1-->
    <li th:text="${n}+':::'+${ix.count}"></li>
</ul>
<ul th:each="n,ix:${#numbers.sequence(1,10,2)}"><!--sequence(start,end) 获取一个数组:指定起始值和结束值 步长指定2-->
    <li th:text="${n}+':::'+${ix.count}"></li>
</ul>

<h2>功能相关的内置对象:#lists::操作集合</h2>
contains::判断包含::<span th:text="${#lists.contains(list,'abc')}"></span><br/>
isEmpty::判断是否为空::<span th:text="${#lists.isEmpty(list)}"></span><br/>
size::获取元素个数::<span th:text="${#lists.size(list)}"></span><br/>
<div th:each="s:${#lists.sort(list)}"> <!--排序-->
    <span th:text="${s}+','"></span>
</div>

<h2>功能相关的内置对象:#arrays::操作数组</h2>
contains::判断包含::<span th:text="${#arrays.contains(arr,1)}"></span><br/>
isEmpty::判断是否为空::<span th:text="${#arrays.isEmpty(arr)}"></span><br/>
length::元素个数::<span th:text="${#arrays.length(arr)}"></span><br/>
2 处理异常
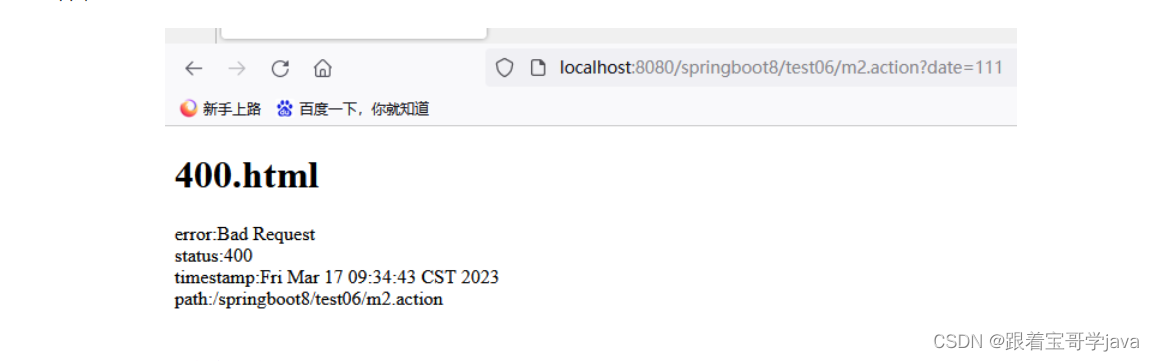
2.1 默认方式:使用指定的页面
当出现错误时:springboot会根据错误状态码 在/templates/error中选中指定的错误页面
- /templates/error/404.html
- /templates/error/4xx.html (Date参数赋值失败405 请求方式不对415)
- /templates/error/500.html
- /templates/error/5xx.html
<!DOCTYPE html>
<html lang="en"  xmlns:th="http://www.thymeleaf.org">
<head>
    <meta charset="UTF-8">
    <title>Title</title>
</head>
<body>
    <h1>500.html</h1>
    error:<span th:text="${error}"></span><br/>
    status:<span th:text="${status}"></span><br/>
    timestamp:<span th:text="${timestamp}"></span><br/>
    path:<span th:text="${path}"></span><br/>
</body>
</html>
- action测试:
package com.zhiyou100.action;
...
@Controller
@RequestMapping("/test06")
public class Test06Exception{

    @RequestMapping("/m1.action")
    public String method01(){
        System.out.println(1/0);
        return "demo06_exception";
    }

    @RequestMapping("/m2.action")
    public String method02(Date date){
        return "demo06_exception";
    }

    @PostMapping("/m3.action")
    public String method03(){
        return "demo06_exception";
    }
}
- 结果
2.2 使用注解处理异常的通知类:ControllerAdvice
- 自定义异常
public class MyException01 extends  RuntimeException {
    public MyException01(String message){super(message);}
}
public class MyException02 extends  RuntimeException {
    public MyException02(String message){super(message);}
}
public class MyException03 extends  RuntimeException {
    public MyException03(String message){super(message);}
}
- 定义处理异常的通知类:@ControllerAdvice+@ExceptionHandler
package com.zhiyou100.action;

@ControllerAdvice
public class MyExceptionAdvice {
    //每种异常对应一个action
    @ExceptionHandler(MyException01.class)
    public String  method01(MyException01 e, Model model){
        model.addAttribute("message",e.getMessage());
        return "error/my_error";
    }
    @ExceptionHandler(MyException02.class)
    public String  method01(MyException02 e, Model model){
        model.addAttribute("message",e.getMessage());
        return "error/my_error";
    }
    @ExceptionHandler(MyException03.class)
    @ResponseBody
    public String  method01(MyException03 e){
        return "出错了::::"+e.getMessage();
    }
    @ExceptionHandler(ArithmeticException.class)
    @ResponseBody
    public String  method01(ArithmeticException e){
        return "出错了::::ArithmeticException:::"+e.getMessage();
    }
}
- 异常页面 :error/my_error.html
<!DOCTYPE html>
<html lang="en"   xmlns:th="http://www.thymeleaf.org">
<head>
    <meta charset="UTF-8">
    <title>Title</title>
</head>
<body>
    <h1>my_error.html</h1>
    message=<span th:if="${not #strings.isEmpty(message)}" th:text="${message}"></span><br/>
</body>
</html>
- action
package com.zhiyou100.action;

import com.zhiyou100.exception.MyException01;
import com.zhiyou100.exception.MyException02;
import com.zhiyou100.exception.MyException03;
import org.springframework.stereotype.Controller;
import org.springframework.ui.Model;
import org.springframework.web.bind.annotation.PostMapping;
import org.springframework.web.bind.annotation.RequestMapping;

import java.util.ArrayList;
import java.util.Date;
import java.util.List;

@Controller
@RequestMapping("/test06")
public class Test06Exception{
    ...
    @RequestMapping("/m4.action")
    public String method04(int n){
        if(n<0){
            throw new MyException01("n 太小了 不能<0");
        }
        if(n>120){
            throw new MyException02("n 太大了 不能>120");
        }
        if(n%10==0){
            throw new MyException03("n 值不正确 不能时10的倍数");
        }
        System.out.println(1/n);
        return "demo06_exception";
    }
}
2.3 使用配置类实现接口:HandlerExceptionResolver
- 创建配置类实现接口HandlerExceptionResolver
@Configuration
public class MyExceptionResolver   implements HandlerExceptionResolver {
    @Override
    public ModelAndView resolveException(HttpServletRequest request, HttpServletResponse resp, Object handler, Exception e) {
        ModelAndView mav=new ModelAndView();
        //判断异常对象的类型 选择不同的视图
        if(e instanceof MyException01 || e instanceof  MyException02|| e instanceof  MyException03){
            mav.addObject("message","自定义异常::"+e.getMessage());
            mav.setViewName("error/my_error");
        }else{
            mav.addObject("message","非自定义异常::"+e.getMessage());
            mav.setViewName("error/my_error2");
        }
        return mav;
    }
}
- action
package com.zhiyou100.action;
...
@Controller
@RequestMapping("/test06")
public class Test06Exception{
...

    @RequestMapping("/m4.action")
    public String method04(int n){
        if(n<0){
            throw new MyException01("n 太小了 不能<0");
        }
        if(n>120){
            throw new MyException02("n 太大了 不能>120");
        }
        if(n>0&&n%10==0){
            throw new MyException03("n 值不正确 不能时10的倍数");
        }
        System.out.println(1/n);
        return "demo06_exception";
    }
}
2.4 使用配置类获取异常解析对象:SimpleMappingExceptionResolver
- 创建配置类
@Configuration
public class MyExceptionMappingResolver02{
    @Bean
    public SimpleMappingExceptionResolver getSimpleMappingExceptionResolver(){
        SimpleMappingExceptionResolver resolver=new SimpleMappingExceptionResolver();
        Properties ps=new Properties();
        //给不同的异常设置不同的 逻辑视图
        ps.setProperty("com.zhiyou100.exception.MyException01","error/my_error");
        ps.setProperty("com.zhiyou100.exception.MyException02","error/my_error");
        ps.setProperty("com.zhiyou100.exception.MyException03","error/my_error2");
        resolver.setExceptionMappings(ps);
        return resolver;
    }
}
3 springboot整合mybatis
3.1 创建springboot项目

3.2 依赖
<?xml version="1.0" encoding="UTF-8"?>
<project xmlns="http://maven.apache.org/POM/4.0.0" xmlns:xsi="http://www.w3.org/2001/XMLSchema-instance"
         xsi:schemaLocation="http://maven.apache.org/POM/4.0.0 https://maven.apache.org/xsd/maven-4.0.0.xsd">
    <modelVersion>4.0.0</modelVersion>
    <parent>
        <groupId>org.springframework.boot</groupId>
        <artifactId>spring-boot-starter-parent</artifactId>
        <version>2.7.3</version>
        <relativePath/> <!-- lookup parent from repository -->
    </parent>
    <groupId>com.zhiyou100</groupId>
    <artifactId>springboot09_mybatis_01</artifactId>
    <version>0.0.1-SNAPSHOT</version>
    <name>springboot09_mybatis_01</name>
    <description>Demo project for Spring Boot</description>
    <properties>
        <java.version>8</java.version>
    </properties>
    <dependencies>
        <dependency>
            <groupId>org.springframework.boot</groupId>
            <artifactId>spring-boot-starter-web</artifactId>
        </dependency>
        <dependency>
            <groupId>org.mybatis.spring.boot</groupId>
            <artifactId>mybatis-spring-boot-starter</artifactId>
            <version>3.0.0</version>
        </dependency>

        <dependency>
            <groupId>mysql</groupId>
            <artifactId>mysql-connector-java</artifactId>
            <version>5.1.49</version>
        </dependency>
        <dependency>
            <groupId>org.projectlombok</groupId>
            <artifactId>lombok</artifactId>
            <optional>true</optional>
        </dependency>
        <dependency>
            <groupId>org.springframework.boot</groupId>
            <artifactId>spring-boot-starter-test</artifactId>
            <scope>test</scope>
        </dependency>
    </dependencies>
    ...

</project>
3.3 配置信息
server:
  servlet:
    context-path: /
  port: 8080
# 连接信息
spring:
  datasource:
    driver-class-name: com.mysql.jdbc.Driver
    url: jdbc:mysql://localhost:3306/db_1?charset=utf8
    username: root
    password: 123456

#mybatis配置信息
mybatis:
  type-aliases-package: com.zhiyou100.entity
  mapper-locations: classpath:mappers/*.xml

# 日志级别
logging:
     level:
         com:
             zhiyou100:
                 dao: debug
3.4 实体类
@Data
@AllArgsConstructor
@NoArgsConstructor
@Accessors(chain = true)
public class Student implements Serializable {
    private Integer id;
    private Float score;
    private Boolean dy;
    private String sex;
    private String name;
}
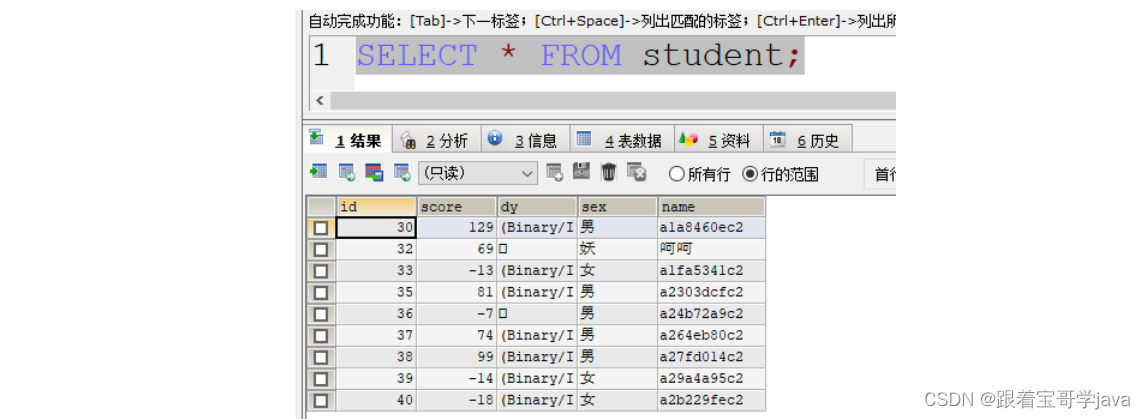
- 表
3.5 dao接口和其映射文
- 接口
package com.zhiyou100.dao;
...
@Mapper    //自动为接口创建实现类
//注意1:dao上的@Mapper和驱动类上的@MapperScan(basePackages = "com.zhiyou100.dao")功能相同
//注意2:注解形式的sql 和映射形式的sql可以共存
@Repository   //指定为持久层bean
public interface StudentDao {
     @Select("select * from student")
     List<Student> getAll();

     Student getOne(int id);
}
- 映射文件 :resources/mappers/StudentDao.xml
<?xml version="1.0" encoding="UTF-8"?>
<!DOCTYPE mapper
        PUBLIC "-//mybatis.org//DTD Mapper 3.0//EN"
        "http://mybatis.org/dtd/mybatis-3-mapper.dtd">
<mapper namespace="com.zhiyou100.dao.StudentDao">
        <select id="getOne" parameterType="int" resultType="Student">
               select * from student where id=#{id}
        </select>
</mapper>
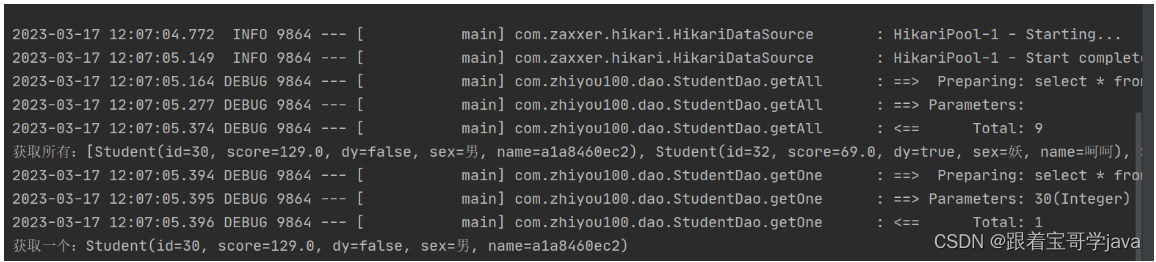
3.6 测试
package com.zhiyou100;
...
@SpringBootTest
class Springboot09Mybatis01ApplicationTests {
    @Autowired
    private StudentDao studentDao;

    @Test
    public void contextLoads() {
        System.out.println("获取所有:"+studentDao.getAll());
        System.out.println("获取一个:"+studentDao.getOne(30));
    }
}
4 i18n国际化
4.1 概念
internationalization  国际化
页面以多种语言格式展示
目前:不同民族 不仅仅是文字不同  还有文化 习惯等不同 所以同一版页面只更改文字 并不能满足不同民族的需求
一个项目只有一套前端页面:不同国家选择不同的语言
4.2 创建springboot项目
4.3 配置信息
server:
  servlet:
    context-path: /
  port: 8080
spring:
  thymeleaf:
    cache: false
    #以下配置可以不写  都是默认值
    suffix: .html
    prefix: classpath:templates/
    encoding: utf-8
    mode: HTML5
  #指定i18n的配置文件夹名字+文件名前缀
  messages:
    basename: i18n.login
4.4 在resources下创建属性集文件
- resources/i18n/login.properties :::不指定环境时的默认环境
login.in=登录
login.reset=重填
login.uname=老师名字
login.upwd=老师密码
login.logo=学生管理系统
test.hehe=呵呵
- resources/i18n/login_zh_CN.properties::指定环境时zh_CN
login.in=登录
login.reset=重填
login.uname=老师名字
login.upwd=老师密码
login.logo=学生管理系统
test.hehe=呵呵
- resources/i18n/login_en_US.properties::指定环境时en_US
login.in=login
login.reset=reset
login.uname=teacher name
login.upwd=teacher pwd
login.logo=Student Manager System
test.hehe=smail
4.5 创建配置类
package com.zhiyou100.config;

import org.springframework.context.annotation.Bean;
import org.springframework.context.annotation.Configuration;
import org.springframework.web.servlet.LocaleResolver;
import org.springframework.web.servlet.config.annotation.WebMvcConfigurer;

import javax.servlet.http.HttpServletRequest;
import javax.servlet.http.HttpServletResponse;
import java.util.Locale;

@Configuration
public class MyMvcConfig   implements WebMvcConfigurer {
    //bean的返回值必须是LocaleResolver类型  bean的方法名必须是localeResolver
    @Bean//bean的方法名必须是类名 首字母小写
    public LocaleResolver  localeResolver(HttpServletRequest request){
        return new LocaleResolver() {
            @Override
            public Locale resolveLocale(HttpServletRequest request) {
                String lang=request.getParameter("lang");
                System.out.println("lang="+lang);
                //为了实现 环境能传递 把环境装入session中
                if(lang==null&&request.getSession().getAttribute("locale")==null){
                    return Locale.getDefault();
                }
                if(lang!=null){
                    Locale locale=new Locale(lang.split("_")[0],lang.split("_")[1]);
                    request.getSession().setAttribute("locale",locale);
                }
                return (Locale)request.getSession().getAttribute("locale");
            }
            @Override
            public void setLocale(HttpServletRequest request, HttpServletResponse response, Locale locale) {

            }
        };
    }
}
4.6 创建action::为访问页面通过连接
@Controller
public class WebAction {
    @RequestMapping({"/","/index","/welcome","/login"})
    public String welcome(){
        return "login";
    }
    @RequestMapping({"/hehe.action"})
    public String hehe(){
        return "hehe";
    }
}
4.7 页面
- login.html
<!DOCTYPE html>
<html lang="en" xmlns:th="http://www.thymeleaf.org">
<head>
<meta charset="UTF-8">
<title>Title</title>
<style type="text/css">
table{
border:1px solid blue;
width:1000px;
margin:20px auto;
border-collapse: collapse;
}
th,td{
border:1px solid blue;
text-align: center;
padding: 10px;
}
th{
background: #cccccc;
}
</style>
</head>
<body>
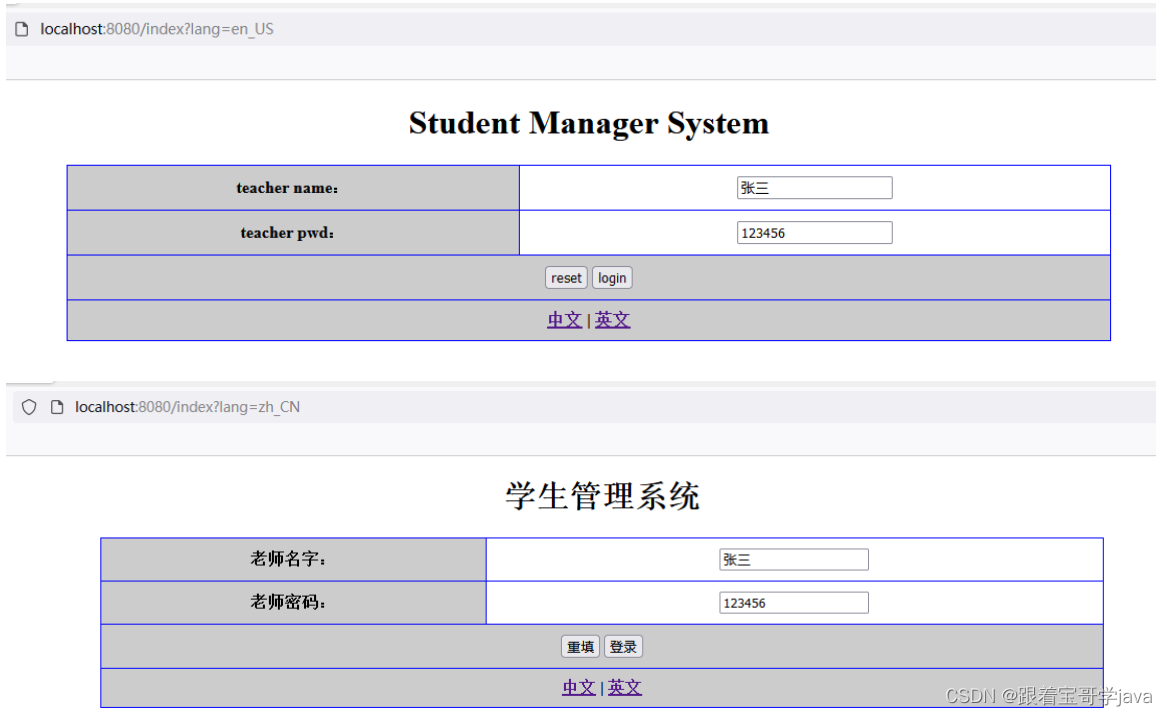
<h1 style="text-align: center">[[#{login.logo}]]</h1>
<form action="" method="post">
<table>
<tr>
<th>[[#{login.uname}]]:</th>
<td><input type="text" name="tname" value="张三"/></td>
</tr>
<tr>
<th>[[#{login.upwd}]]:</th>
<td><input type="text" name="tpwd" value="123456"/></td>
</tr>
<tr>
<th colspan="2">
<input type="button" th:value="#{login.reset}"/>
<input type="submit" th:value="#{login.in}"/>
</th>
</tr>
<tr>
<th colspan="2">
<a th:href="@{/index(lang=zh_CN)}">中文</a> |
<a th:href="@{/index(lang=en_US)}">英文</a>
</th>
</tr>
</table>
</form>
<a th:href="@{/hehe.action}">hehe</a>
</body>
</html>
- hehe.html
<!DOCTYPE html>
<html lang="en"  xmlns:th="http://www.thymeleaf.org">
<head>
    <meta charset="UTF-8">
    <title>Title</title>
</head>
<body>
    <h1>[[#{test.hehe}]]</h1>
    <a th:href="@{/index(lang=zh_CN)}">中文</a>
    <a th:href="@{/index(lang=en_US)}">英文</a>
</body>
</html>
4.8 结果
4.9 注意
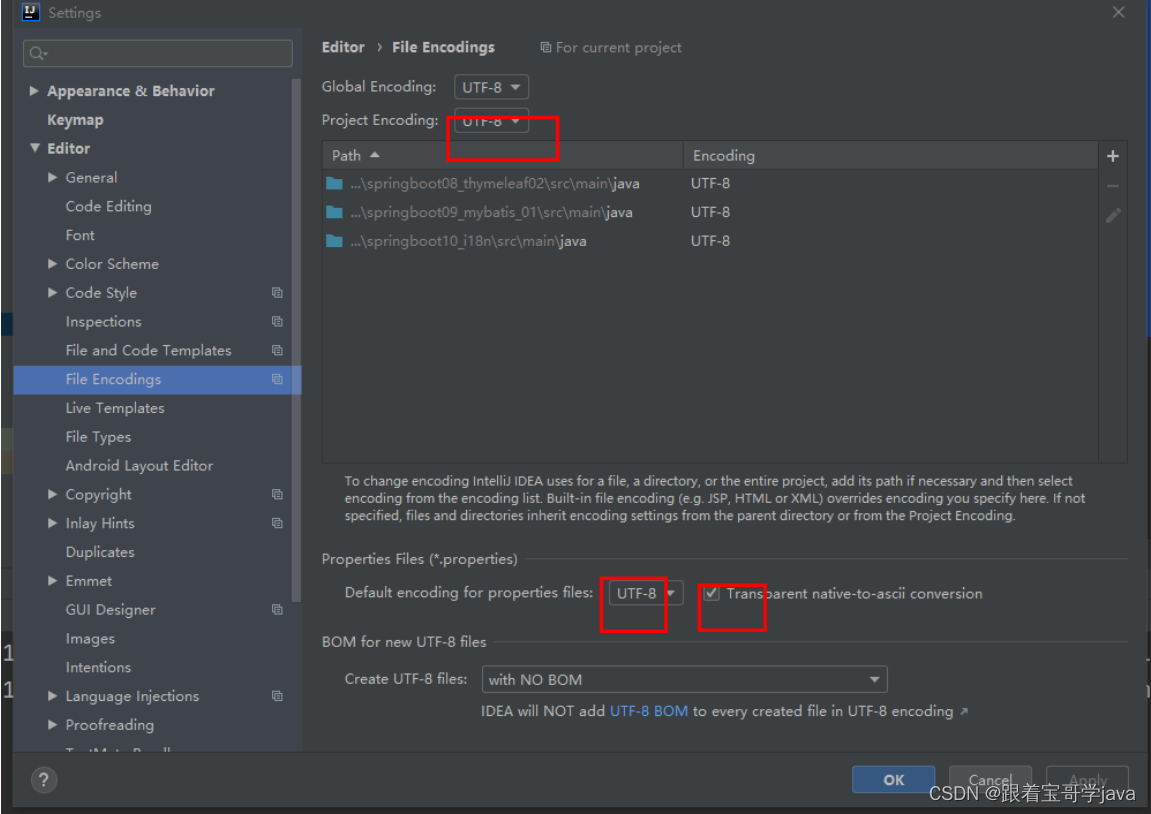
1: 设置properties的编码集为utf-8
2:@Bean//bean的方法名必须是类名 首字母小写
  public LocaleResolver localeResolver(HttpServletRequest request);
5 自定义启动器
5.1 概念
springboot整合了某一指定功能的所有依赖并可以实现自动配置的一组jar包
命名格式:spring-boot-starter-xxxx
- 步骤
添加启动器相关依赖
创建属性配置类
创建自动配置类
编写自动配置文件(spring.factories)
项目打包为jar 被其他项目引用
5.2 创建自定义启动器
创建springboot项目
指定依赖
<dependency>
    <groupId>org.springframework.boot</groupId>
    <artifactId>spring-boot-starter</artifactId>
</dependency>

<dependency>
    <groupId>org.projectlombok</groupId>
    <artifactId>lombok</artifactId>
    <optional>true</optional>
</dependency>
<dependency>
    <groupId>org.springframework.boot</groupId>
    <artifactId>spring-boot-starter-test</artifactId>
    <scope>test</scope>
</dependency>
<!--自动配置连接池-->
<dependency>
    <groupId>com.alibaba</groupId>
    <artifactId>druid</artifactId>
    <version>1.1.12</version>
</dependency>

<dependency>
    <groupId>c3p0</groupId>
    <artifactId>c3p0</artifactId>
    <version>0.9.1.2</version>
</dependency>

<dependency>
    <groupId>org.springframework.boot</groupId>
    <artifactId>spring-boot-configuration-processor</artifactId>
    <optional>true</optional>
</dependency>
创建属性配置类
package com.zhiyou100.config;
...
@Component
@ConfigurationProperties(prefix = "spring.jdbc.datasource.mtb")
@Data
@AllArgsConstructor
@NoArgsConstructor
public class DataSourceProperties {
    private String driverClassNameMtb ;
    private String urlMtb;
    private String usernameMtb;
    private String passwordMtb;
}
创建自动配置类
package com.zhiyou100.config;
...
@SpringBootConfiguration  //当前类是个配置类
@EnableConfigurationProperties(DataSourceProperties.class)
public class DataSourceAutoConfiguration {
    @Autowired
    private DataSourceProperties dataSourceProperties;

   @Bean
   @ConditionalOnProperty(value = "spring.jdbc.datasource.mtb.typeMtb",havingValue = "druid")
    public DataSource createDataSource(){
        DruidDataSource dataSource = new DruidDataSource();
        dataSource.setDriverClassName(dataSourceProperties.getDriverClassNameMtb());
        dataSource.setUrl(dataSourceProperties.getUrlMtb());
        dataSource.setUsername(dataSourceProperties.getUsernameMtb());
        dataSource.setPassword(dataSourceProperties.getPasswordMtb());
        return dataSource;
    }
    @Bean
    @ConditionalOnProperty(value = "spring.jdbc.datasource.mtb.typeMtb",havingValue = "c3p0")
    public DataSource createC3P0DataSource() throws Exception {
        ComboPooledDataSource dataSource = new ComboPooledDataSource();
        dataSource.setDriverClass(dataSourceProperties.getDriverClassNameMtb());
        dataSource.setJdbcUrl(dataSourceProperties.getUrlMtb());
        dataSource.setUser(dataSourceProperties.getUsernameMtb());
        dataSource.setPassword(dataSourceProperties.getPasswordMtb());
        return dataSource;
    }
}
编写自动配置属性文件
在 resource 文件夹下面新建 META-INF/spring.factories
org.springframework.boot.autoconfigure.EnableAutoConfiguration=com.zhiyou100.config.DataSourceAutoConfiguration
执行install , 安装项目
5.3 使用自定义启动器
创建springboot项目
引入自定义启动器
<dependency>
    <groupId>org.springframework.boot</groupId>
    <artifactId>spring-boot-starter-web</artifactId>
</dependency>

<dependency>
    <groupId>org.springframework.boot</groupId>
    <artifactId>spring-boot-starter-test</artifactId>
    <scope>test</scope>
</dependency>

<dependency>
    <groupId>com.zhiyou100</groupId>
    <artifactId>demo02</artifactId>
    <version>0.0.1-SNAPSHOT</version>
</dependency>
<dependency>
    <groupId>mysql</groupId>
    <artifactId>mysql-connector-java</artifactId>
    <version>5.1.49</version>
</dependency>
配置属性
server.port=8081
spring.jdbc.datasource.mtb.driverClassNameMtb=com.mysql.jdbc.Driver
spring.jdbc.datasource.mtb.urlMtb=jdbc:mysql://localhost:3306/db_1?charset=utf8
spring.jdbc.datasource.mtb.usernameMtb=root
spring.jdbc.datasource.mtb.passwordMtb=123456
spring.jdbc.datasource.mtb.typeMtb=c3p0
#spring.jdbc.datasource.mtb.typeMtb=druid
测试类
@RestController
public class HelloAutoController {
    @Autowired
    private DataSource dataSource;

    @RequestMapping("/")
    public String dataSource() throws Exception{
        System.out.println(dataSource.getClass());//打印DruidDataSource数据源
        return "Hello dataSource! ! ! "+dataSource.getConnection() ;
    }
}
6 springboot项目发布
6.1 创建springboot项目
- 依赖
  <dependency>
            <groupId>org.springframework.boot</groupId>
            <artifactId>spring-boot-starter-web</artifactId>
        </dependency>
        <dependency>
            <groupId>org.springframework.boot</groupId>
            <artifactId>spring-boot-starter-thymeleaf</artifactId>
        </dependency>
- 配置信息
spring:
  thymeleaf:
    cache: false
    #以下配置可以不写  都是默认值
    suffix: .html
    prefix: classpath:templates/
    encoding: utf-8
    mode: HTML5
server:
  servlet:
    context-path: /
- action
@Controller
@RequestMapping("/test01")
public class Test01 {
    @RequestMapping("/")
    public String method01(Model model){
        model.addAttribute("message",System.currentTimeMillis());
        return "hello";
    }
}
- 页面
<!DOCTYPE html>
<html lang="en" xmlns:th="http://www.thymeleaf.org">
<head>
    <meta charset="UTF-8">
    <title>hello</title>
</head>
<body>
      message:<span th:text="${message}"></span>
</body>
</html>
- idea发布测试

6.2 打包
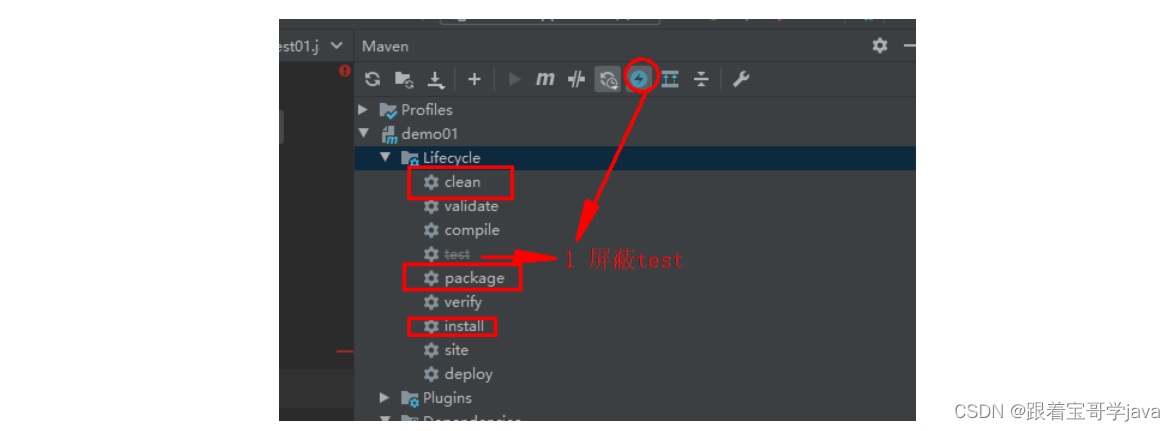
6.3 运行jar
- 找到jar的位置

- 运行cmd
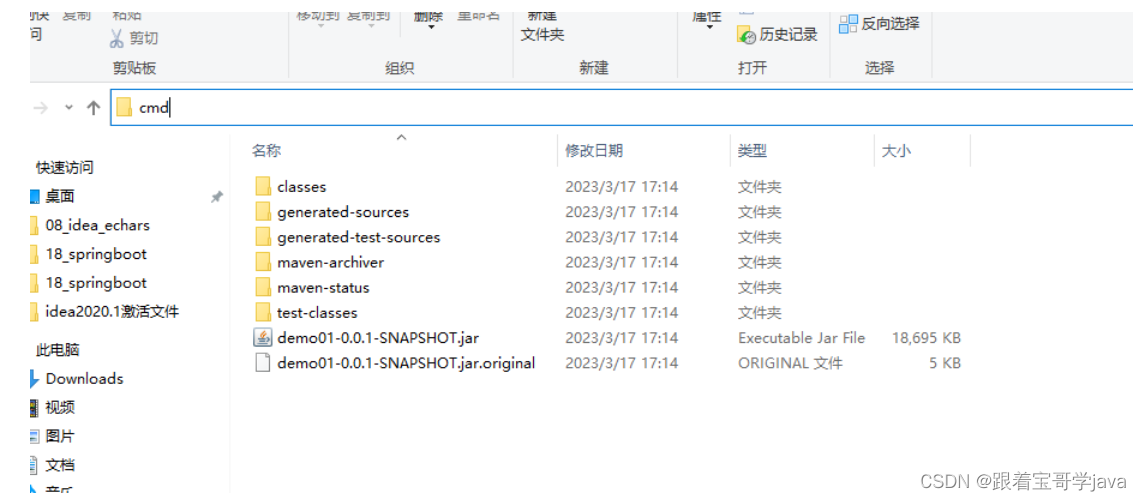
-
运行java -jar
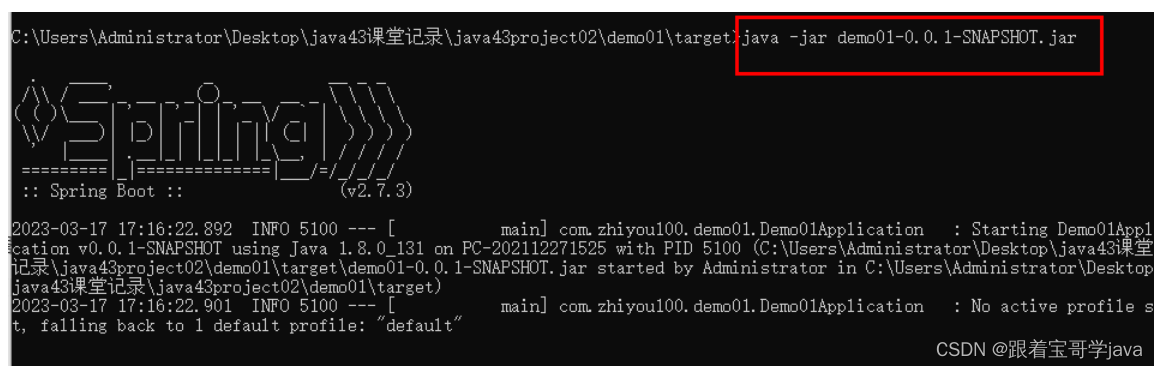
-
访问


 267
267


 被折叠的 条评论
为什么被折叠?
被折叠的 条评论
为什么被折叠?
 到【灌水乐园】发言


