QML -- > ListView(列表视图)

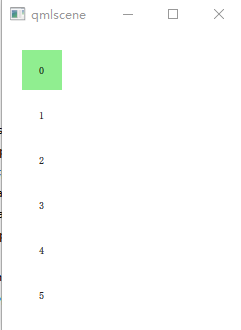
1、对于用户,ListView是一个滚动区域,支持惯性滚动。(代理项delegates)

import QtQuick 2.0

Rectangle{
    width: 80
    height: 300
    color: "white"

    ListView{
        anchors.fill: parent
        anchors.margins: 20

        clip:true

        model:100

        delegate: numberDelegate
        spacing: 5
    }
    Component{
        id:numberDelegate
        Rectangle{
            width: 40
            height: 40
            color: "lightGreen"

            Text{
                anchors.centerIn: parent

                font.pixelSize: 10
                text:index
            }
        }
    }
}

Component只能包含一个顶层Item,而且在这个Item之外不能定义任何数据,除了id。 在顶层Item之内,则可以包含更多的子元素来协同工作,最终形成一个具有特定功能的组件。

Component通常用来给一个View提供图形化组件,比如ListVIew::delegate属性就需要一个Component来指定如何显示列表的每一个项,又比如ButtonStyle::background属性也需要一个Component来指定如何绘制Button的背景。  

  Component不是Item的派生类,而是从QQmlComponent继承而来的,虽然它通过自己的顶层Item为其他的view提供可视化组件,但它本身是不可见元素。你可以这么理解:你定义的组件是一个新的类型,他必须被实例化以后才能显示。而要实例化一个嵌入在QML文件中定义的Component,则可以通过Loader。

2、orientation(方向)
默认的链表视图只提供了一个垂直方向的滚动条,但是有时我们也需要水平方向的

ListView{
   .  
   .
   .
    orientation:ListView.Horizontal 
}

键盘导航和高亮

当使用基于触摸方式的链表视图时,默认提供的视图已经足够使用。在使用键盘甚至仅仅通过方向键选择一个元素的场景下,需要有标识当前选中元素的机制。在QML中,这被叫做高亮。

focus属性设置为true,它设置链表视图能够获得键盘焦点。
然后是highlight属性,指出使用的高亮代理元素。

import QtQuick 2.0

Rectangle{
    width: 240
    height: 300
    color: "white"

    ListView{
        anchors.fill: parent
        anchors.margins: 20

        clip:true

        model:100
//        orientation: ListView.Horizontal

        delegate: numberDelegate
        spacing: 5

        highlight: highlightComponent
        focus: true
    }
    Component{
        id:highlightComponent
        Rectangle{
            width: rect.width
            color: "lightGreen"
        }
    }

    Component{
        id:numberDelegate
        Item{
            id:rect
            width: 40
            height: 40
//            color: "lightGreen"

            Text{
                anchors.centerIn: parent

                font.pixelSize: 10
                text:index
            }
        }
    }
}

添加动画效果

Component{
        id:highlightComponent
        //        Rectangle{
        //            width: rect.width
        //            color: "lightGreen"
        //        }
        Item {
            width: ListView.view.width
            height: ListView.view.currentItem.height
            y: ListView.view.currentItem.y
            Behavior on y {
                SequentialAnimation {
                    PropertyAnimation { target: highlightRectangle; property: "opacity"; to: 0; duration: 200 }
                    NumberAnimation { duration: 1 }
                    PropertyAnimation { target: highlightRectangle; property: "opacity"; to: 1; duration: 200 }
                }
            }
            Rectangle {
                id: highlightRectangle
                anchors.fill: parent
                color: "lightGreen"
            }
        }
    }


ListView与Component一般情况下需要配合使用

  • 0
    点赞
  • 1
    收藏
    觉得还不错? 一键收藏
  • 0
    评论
Qt QML 提供了一个名为 ListView 的组件,可以用于显示列表视图,支持下拉刷新、上拉分页和滚动轴。 以下是一个简单的 ListView 示例: ``` import QtQuick 2.0 import QtQuick.Controls 2.0 ApplicationWindow { visible: true width: 400 height: 600 title: "ListView Example" ListView { id: listView anchors.fill: parent // 设置模型数据 model: ListModel { ListElement { name: "Item 1" } ListElement { name: "Item 2" } ListElement { name: "Item 3" } ListElement { name: "Item 4" } ListElement { name: "Item 5" } ListElement { name: "Item 6" } ListElement { name: "Item 7" } ListElement { name: "Item 8" } ListElement { name: "Item 9" } ListElement { name: "Item 10" } } // 设置每个项的属性 delegate: Rectangle { width: listView.width height: 50 color: index % 2 == 0 ? "#f2f2f2" : "#ffffff" Text { text: name anchors.centerIn: parent } } // 下拉刷新 onRefreshRequested: { console.log("下拉刷新") } // 上拉分页 onEndReached: { console.log("上拉分页") } // 滚动轴 ScrollBar.vertical: ScrollBar {} } } ``` 上面的示例中,ListView 的 model 属性设置了一个 ListModel,用于存储模型数据。delegate 属性则定义了每个项的属性,包括宽度、高度、颜色和文本。 在 ListView 中可以通过 onRefreshRequested 和 onEndReached 信号来实现下拉刷新和上拉分页功能。当用户下拉列表视图时,会触发 onRefreshRequested 信号;当滚动到列表视图底部时,会触发 onEndReached 信号。 最后,为了实现滚动轴,我们可以在 ListView 中添加 ScrollBar 组件,设置其 vertical 属性为 true 即可。

“相关推荐”对你有帮助么?

  • 非常没帮助
  • 没帮助
  • 一般
  • 有帮助
  • 非常有帮助
提交
评论
添加红包

请填写红包祝福语或标题

红包个数最小为10个

红包金额最低5元

当前余额3.43前往充值 >
需支付:10.00
成就一亿技术人!
领取后你会自动成为博主和红包主的粉丝 规则
hope_wisdom
发出的红包
实付
使用余额支付
点击重新获取
扫码支付
钱包余额 0

抵扣说明:

1.余额是钱包充值的虚拟货币,按照1:1的比例进行支付金额的抵扣。
2.余额无法直接购买下载,可以购买VIP、付费专栏及课程。

余额充值