


创建步骤:
1.创建attrs.xml,为自定义的Title定义属性。
2.创建MyTitleBar类,继承自RelativeLayout。在构造函数中对自定义TitleBar的属性进行详细配置。
3.在xml布局中使用该控件。
4.在Activity中使用,并设置监听事件。
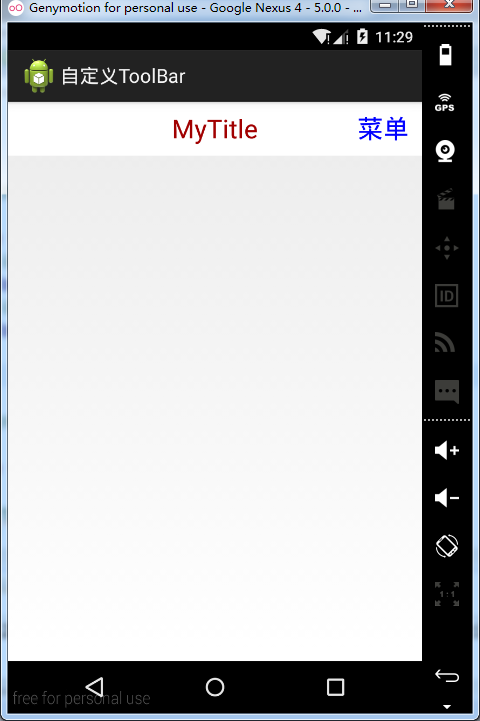
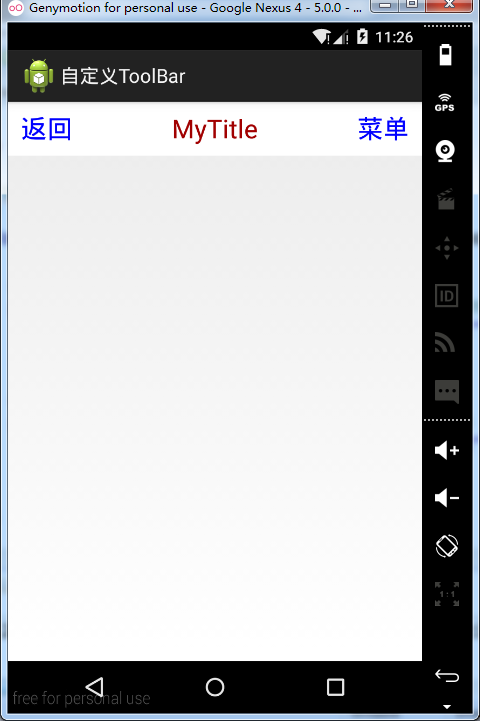
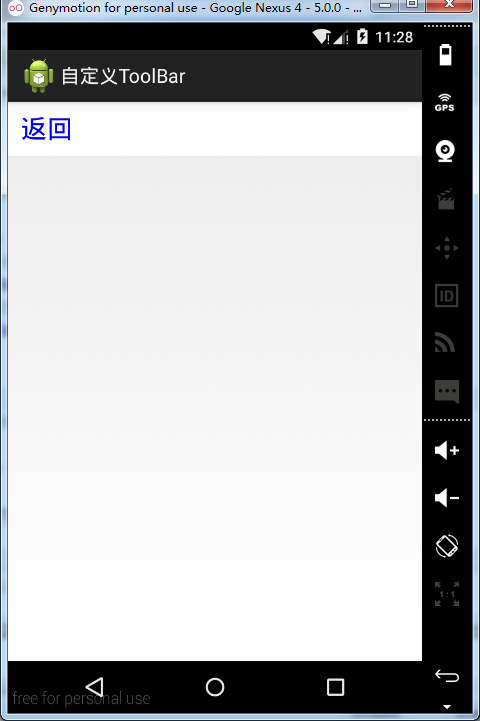
这是效果图:
具体实现:
一、自定义View的属性,首先在res/values/ 下建立一个attrs.xml , 在里面定义我们的属性和声明我们的整个样式。
<?xml version="1.0" encoding="utf-8"?>
<resources>

    <declare-styleable name="MyToolBar">

        <!-- 标题属性 -->
        <attr name="textTitle" format="string" />
        <attr name="titleTextSize" format="dimension" />
        <attr name="titleTextColor" format="color" />
        <!-- 左边按钮属性 -->
        <attr name="leftButtonBackground" format="color" />
        <attr name="leftButtonText" format="string" />
        <attr name="leftButtonTextColor" format="color" />
        <attr name="leftButtonTextSize" format="dimension" />
        <!-- 右边按钮属性 -->
        <attr name="rightButtonBackground" format="color" />
        <attr name="rightButtonText" format="string" />
        <attr name="rightButtonTextColor" format="color" />
        <attr name="rightButtonTextSize" format="dimension" />
    </declare-styleable>

</resources>
我们定义了中间标题的文字,文字大小,文字颜色,和左右两个按钮的文字,文字大小,文字颜色,按钮背景等属性。
二、创建类MyTitleBar,继承自RelativeLayout。
a.在MyTitleBar的构造函数中获得我们自定义的样式。
b.并且实例化组成MyTitleBar的三个控件两个Button和一个TextView,并为这三个控件设置属性。
c.通过LayoutParams参数设置三个控件的位置,并通过addView()方法将控件添加到自定义控件MyTitleBar中.
d.最后为两个按钮设置监听事件。
e.定义setToolBarTitleVisible()方法设置是否显示标题,定义setToolBarBbtn()设置是否显示左右的按钮。代码如下:
package com.raphets.toolbar;

import android.content.Context;
import android.content.res.TypedArray;
import android.graphics.Color;
import android.graphics.drawable.Drawable;
import android.util.AttributeSet;
import android.view.Gravity;
import android.view.View;
import android.widget.Button;
import android.widget.RelativeLayout;
import android.widget.TextView;

/*
 * 自定义ToolBar,继承自RelativeLayout
 **/
public class MyToolBar extends RelativeLayout {

    private Button leftBtn, rightBtn; // 左边和右边的按钮
    private TextView tvTitle; // 中间的标题

    /*
     * 中间标题的属性
     */
    private String title; // 标题
    private boolean showTitle; // 是否显示标题
    private float titleSize; // 标题字体大小
    private int titleColor; // 标题字体颜色

    /*
     * 左边按钮的属性
     */
    private String leftBtnText;// 左边按钮的文字
    private Drawable leftBtnBackground;// 左边按钮的背景
    private boolean showLeftBtn;// 是否显示左边按钮
    private int leftBtnTextColor;// 左边按钮字体颜色
    private float leftBtnTextSize;// 左边按钮字体大小

    /*
     * 右边按钮的属性
     */
    private String rightBtnText;// 右边按钮的文字
    private Drawable rightBtnBackground;// 右边按钮的背景
    private boolean showRightBtn;// 是否显示右边按钮
    private int rightBtnTextColor;// 右边按钮字体颜色
    private float rightBtnTextSize;// 右边按钮字体大小

    /*
     * 三个控件的位置配置参数,右边按钮的位置
     */
    private LayoutParams titleParams;// 标题的位置配置参数
    private LayoutParams leftParams;// 左边按钮的位置配置参数
    private LayoutParams rightParams;// 右边按钮的位置配置参数
    // 事件监听器
    private MyToolBarClickListener listener;

    /*
     * 在构造函数里完成自定义toolbar的属性设置
     */
    public MyToolBar(Context context, AttributeSet attrs) {
        super(context, attrs);
        TypedArray typedArray = context.obtainStyledAttributes(attrs, R.styleable.MyToolBar);
        /*
         * 获取中间标题的自定义属性设置以及默认值
         */
        title = typedArray.getString(R.styleable.MyToolBar_textTitle);
        showTitle = typedArray.getBoolean(R.styleable.MyToolBar_showTitle, true);
        titleSize = typedArray.getDimension(R.styleable.MyToolBar_titleTextSize, 0);
        titleColor = typedArray.getColor(R.styleable.MyToolBar_titleTextColor, 0);
        /*
         * 获取左边按钮的自定义属性设置以及默认值
         */
        leftBtnText = typedArray.getString(R.styleable.MyToolBar_leftButtonText);
        leftBtnTextColor = typedArray.getColor(R.styleable.MyToolBar_leftButtonTextColor, 0);
        leftBtnBackground = typedArray.getDrawable(R.styleable.MyToolBar_leftButtonBackground);
        leftBtnTextSize = typedArray.getDimension(R.styleable.MyToolBar_leftButtonTextSize, 0);
        /*
         * 获取右边按钮的自定义属性设置以及默认值
         */
        rightBtnText = typedArray.getString(R.styleable.MyToolBar_rightButtonText);
        rightBtnTextColor = typedArray.getColor(R.styleable.MyToolBar_rightButtonTextColor, 0);
        rightBtnBackground = typedArray.getDrawable(R.styleable.MyToolBar_rightButtonBackground);
        rightBtnTextSize = typedArray.getDimension(R.styleable.MyToolBar_rightButtonTextSize, 0);
        // 回收资源
        typedArray.recycle();

        /*
         * 创建三个控件的对象
         */
        leftBtn = new Button(context);
        rightBtn = new Button(context);
        tvTitle = new TextView(context);
        /*
         * 设置标题的属性
         */
        tvTitle.setText(title);
        tvTitle.setTextColor(titleColor);
        tvTitle.setTextSize(titleSize);
        tvTitle.setGravity(Gravity.CENTER);
        /*
         * 设置左边按钮的属性
         */
        leftBtn.setText(leftBtnText);
        leftBtn.setTextColor(leftBtnTextColor);
        leftBtn.setBackground(leftBtnBackground);
        leftBtn.setTextSize(leftBtnTextSize);
        /*
         * 设置右边按钮的属性
         */
        rightBtn.setText(rightBtnText);
        rightBtn.setTextColor(rightBtnTextColor);
        rightBtn.setBackground(rightBtnBackground);
        rightBtn.setTextSize(rightBtnTextSize);
        // 设置自定义toolbar的背景色
        setBackgroundColor(Color.WHITE);

        // 中间标题的位置参数 配置
        titleParams = new LayoutParams(LayoutParams.WRAP_CONTENT, LayoutParams.WRAP_CONTENT);
        titleParams.addRule(RelativeLayout.CENTER_IN_PARENT);
        // 向RelativeLayout中添加控件
        addView(tvTitle, titleParams);

        // 左边按钮的位置参数 配置
        leftParams = new LayoutParams(LayoutParams.WRAP_CONTENT, LayoutParams.WRAP_CONTENT);
        leftParams.addRule(RelativeLayout.ALIGN_PARENT_LEFT);
        // 向RelativeLayout中添加控件
        addView(leftBtn, leftParams);

        // 右边按钮的位置参数 配置
        rightParams = new LayoutParams(LayoutParams.WRAP_CONTENT, LayoutParams.WRAP_CONTENT);
        rightParams.addRule(RelativeLayout.ALIGN_PARENT_RIGHT);
        // 向RelativeLayout中添加控件
        addView(rightBtn, rightParams);

        /*
         * 左边按钮点击事件
         */
        leftBtn.setOnClickListener(new OnClickListener() {

            @Override
            public void onClick(View v) {
                listener.leftBtnClick();

            }
        });
        /*
         * 右边按钮点击事件
         */
        rightBtn.setOnClickListener(new OnClickListener() {

            @Override
            public void onClick(View v) {
                listener.rightBtnClick();

            }
        });
    }

    /*
     * 定义接口
     */
    public interface MyToolBarClickListener {
        public void leftBtnClick();// 左边按钮点击事件

        public void rightBtnClick();// 右边按钮点击事件
    }

    /*
     * 自定义的toolbar的事件监听
     */
    public void setOnMyToolBarClickListener(MyToolBarClickListener listener) {
        this.listener = listener;
    }

    /*
     * 设置自定义toolbar的左右两边按钮的是否显示,默认连个按钮都是显示的
     */
    public void setToolBarBtnVisiable(boolean leftFalg, boolean rightFalg) {
        if (leftFalg && rightFalg) {
            leftBtn.setVisibility(View.VISIBLE);
            rightBtn.setVisibility(View.VISIBLE);
        }
        if (!leftFalg && !rightFalg) {
            leftBtn.setVisibility(View.GONE);
            rightBtn.setVisibility(View.GONE);
        }
        if (!leftFalg && rightFalg) {
            leftBtn.setVisibility(View.GONE);
            rightBtn.setVisibility(View.VISIBLE);
        }
        if (leftFalg && !rightFalg) {
            leftBtn.setVisibility(View.VISIBLE);
            rightBtn.setVisibility(View.GONE);
        }

    }

    /*
     * 设置自定义的toolbar是否显示标题,默认是有标题的
     */
    public void setToolBarTitleVisible(boolean flag) {
        if (flag) {
            tvTitle.setVisibility(View.VISIBLE);
        } else {
            tvTitle.setVisibility(View.GONE);
        }
    }
}
三、在xml布局文件中,声明我们的自定义控件,注意添加xmlns:custom=”http://schemas.android.com/apk/res-auto”引入xml命名空间,这样才能使用custom自定义属性。
<RelativeLayout xmlns:android="http://schemas.android.com/apk/res/android"
    xmlns:tools="http://schemas.android.com/tools"
    xmlns:custom="http://schemas.android.com/apk/res-auto"
    android:layout_width="match_parent"
    android:layout_height="match_parent"
    tools:context="com.raphets.toolbar.MainActivity" >

    <com.raphets.toolbar.MyToolBar
        android:id="@+id/myToolBar"
        android:layout_width="fill_parent"
        android:layout_height="50dp"
        custom:leftButtonBackground="@null"
        custom:leftButtonText="返回"
        custom:leftButtonTextColor="#0000ff"
        custom:leftButtonTextSize="12sp"
        custom:rightButtonBackground="@null"
        custom:rightButtonText="菜单"
        custom:rightButtonTextColor="#0000ff"
        custom:rightButtonTextSize="12sp"
        custom:textTitle="MyTitle"
        custom:titleTextColor="#A10000"
        custom:titleTextSize="12sp" >
    </com.raphets.toolbar.MyToolBar>

</RelativeLayout>
四、在Activity中使用我们的自定义TitleBar。通过myTitleBar的setOnMyToolBarClickListener()方法设置左右两边按钮的监听事件。
通过setToolBarBtnVisiable()和setToolBarTitleVisible()方法设置两边按钮和中间标题的显示情况。
package com.raphets.toolbar;

import com.raphets.toolbar.MyToolBar.MyToolBarClickListener;

import android.app.Activity;
import android.os.Bundle;
import android.view.Menu;
import android.view.MenuItem;
import android.widget.Toast;

public class MainActivity extends Activity {
    private MyToolBar myToolBar;// 自定义toolbar

    @Override
    protected void onCreate(Bundle savedInstanceState) {
        super.onCreate(savedInstanceState);
        // 初始化视图
        initView();
        // 初始化数据
        initData();
        // 事件监听
        initListener();

    }

    /*
     * 初始化视图
     */
    private void initView() {
        setContentView(R.layout.activity_main);
        myToolBar = (MyToolBar) findViewById(R.id.myToolBar);
    }

    /*
     * 初始化数据
     */
    private void initData() {
        // 设置左边右边的按钮是否显示
        myToolBar.setToolBarBtnVisiable(false, true);
        // 设置是否显示中间标题,默认的是显示
        myToolBar.setToolBarTitleVisible(true);
    }

    /*
     * 事件监听
     */
    private void initListener() {
        /*
         * toolbar的点击事件处理
         */
        myToolBar.setOnMyToolBarClickListener(new MyToolBarClickListener() {

            @Override
            public void rightBtnClick() {// 右边按钮点击事件
                Toast.makeText(MainActivity.this, "菜单", Toast.LENGTH_SHORT).show();
            }

            @Override
            public void leftBtnClick() {// 左边按钮点击事件
                Toast.makeText(MainActivity.this, "返回", Toast.LENGTH_SHORT).show();

            }
        });
    }

}
**


 515
515

 被折叠的 条评论
为什么被折叠?
被折叠的 条评论
为什么被折叠?
 到【灌水乐园】发言


