


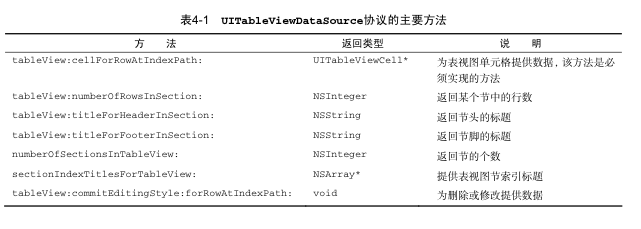
UITableView的API总结:
* UITableView 的父类是UIScorllView,所以他是可以滚动的,但是只能在竖直方向上
* 它是iOS中提供的用来以列表的形式展示数据,但是只有一列
* 它可以由多个分组构成(section-分组),每个分组下可以有很多行,分组和行的下标都是从零开始 (sention 班级分组, row  同学所在的排数)
* UITableView可以有两种样式(plain)(grouped),一旦给tableView指定样式之后,就不能修改了
* UITableView 的很多方法都和NSIndexpath有关,NSIndexpath 中存储的是当前你要使用的单元格(cell)所在分区的下标和所在分区中行的下标
创建对象:
UITableView *tableView = [[UITableView alloc]initWithFrame:[UIScreen mainScreen].bounds style:(UITableViewStylePlain)];配置属性
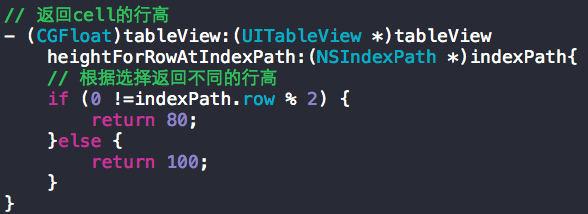
2.1 配置单元格的行高
tableView.rowHeight = 100;
2.2 配置单元格分割线的颜色
tableView.separatorColor = [UIColor redColor];
2.3 配置单元格分割线的样式
tableView.separatorStyle = UITableViewCellSeparatorStyleSingleLine;
2.4 配置tableView的表头
2.4.1 准备表头视图
UIView *headerView = [[UIView alloc]initWithFrame:CGRectMake(0, 0, kScreenWidth, 50)];
headerView.backgroundColor = [UIColor greenColor];
2.4.2 将准备的视图赋值给tableView的表头视图属性
tableView.tableHeaderView = headerView; //add好像也可以
[headerView release];
2.5 配置tableView表尾
UIView *footView = [[UIView alloc]initWithFrame:CGRectMake(0, 0, kScreenWidth, 50)];
footView.backgroundColor = [UIColor redColor];
tableView.tableFooterView = footView;
[footView release];
快速去除多余的单元格
tableView.tableFooterView = [[[UIView alloc]init] autorelease];
// 2.6 配置数据源代理
tableView.dataSource = self;
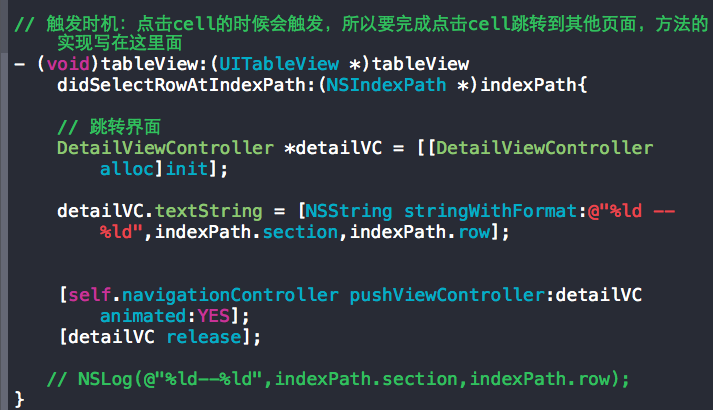
// 2.7 配置业务代理
tableView.delegate = self;
方法的实现
返回的分区的个数
- (NSInteger)numberOfSectionsInTableView:(UITableView *)tableView{
// 根据数组元素的个数,确定分区的个数(分了多少个区,如果方法不实现,默认是1)
return self.bigArray.count;
}
返回每个分区对应的行数 —required
- (NSInteger)tableView:(UITableView *)tableView numberOfRowsInSection:(NSInteger)section{
// 根据分区的下标找出大数组中的小数组的元素
return [self.bigArray[section] count];
}
在这个方法中创建单元格,并为单元格配置数据—required
- (UITableViewCell )tableView:(UITableView )tableView cellForRowAtIndexPath:(NSIndexPath *)indexPath{
// UItableViewCell 单元格视图
// UITableViewCellStyle 格式有四种
UITableViewCell *cell = [[[UITableViewCell alloc]initWithStyle:(UITableViewCellStyleValue1) reuseIdentifier:nil]autorelease]; // 注意,需要释放
pargma mark cell的重用
// cell的重用是为了避免反复的消耗系统资源,还能达到节省内存的作用
// cell重用的步骤:
1. 创建一个重用标识(重用ID),这个标识在cell创建的时候使用,也在重用池中去cell时判断使用
//*// 如果把这个变量使用static修饰,使其只能被初始化一次,可以稍微提高重用效率
static NSString *identfier = @“cell”;
2. 当需要一个单元格是,先去“重用池”中根据“重用ID”去查有没有可以使用的单元格,如果有,就直接拿来使用(修改单元格上的数据),如果没有,此时只能直接创建一个新的cell;
UITableViewCell *cell = [tableView dequeueReusableCellWithIdentifier:identfier];
3. 判断是否成功取到可重用的cell
if (cell == nil){ // !cell
cell = [[[UITableViewCell alloc]initWithStyle:(UITableViewCellStyleValue1) reuseIdentifier:identfier]autorelease];
}
pargma mark 从数组中区数组数据展示
// 1. 先取出大数组中的元素
NSArray *nameArray = self.bigArray[indexPath.section];
// 2. 从nameArray中取出名字
NSString *name = nameArray[indexPath.row];
// 将取出来的名字赋值给 cell.textLabel.text
cell.textLabel.text = name;
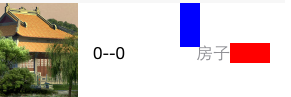
cell.imageView.image = [UIImage imageNamed:@"1"];
pargma mark 给cell上设置的其他属性
- 给cell的imageView属性赋值
cell.imageView.image = [UIImage imageNamed:@”1”]; - 给cell的textlabel赋上文本内容
cell.textLabel.text =[NSString stringWithFormat:@”%ld–%ld”,indexPath.section,indexPath.row]; 给cell的 detailTextLabel 附上文本内容
cell.detailTextLabel.text = @“房子”给cell的右边界设置辅助视图,有五种
cell.accessoryType = UITableViewCellAccessoryDisclosureIndicator;
// 将辅助视图设置为Switch开关控件
cell.accessoryView = [[[UISwitch alloc]init]autorelease];
// 又或者可以自定义辅助视图:
UIView *accessoryView = [[UIView alloc]initWithFrame:CGRectMake(0, 0, 40, 20)];
accessoryView.backgroundColor = [UIColor redColor];
cell.accessoryView = accessoryView;
[accessoryView release];
// cell上有两个视图,一个是 contentView 一个是 accessoryView(用来放辅助视图的地方),而我们用到的 cell 属性 textLabel,detailLabel,imageView 这些视图都是放在 contentView 上面,所以当我们自定义cell的时候,一定要把自定义的空间放在contentView上. 在没有添加辅助视图的情况下,accessoryView默认是没有的,此时contentView占了整个视图,一旦accessoryView出现,就会自动整理出空间。


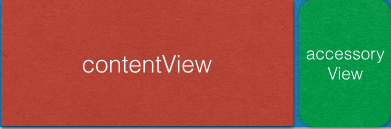

如果添加到cell.accessoryView上,是看不见的,它只能存放辅助视图
配置每个分区的页眉(区头)的 title
- (NSString )tableView:(UITableView )tableViewtitleForHeaderInSection:(NSInteger)section{
// 根据排好序的数组返回区头(数组方法)
return self.orderkey[section];
}


 688
688

 被折叠的 条评论
为什么被折叠?
被折叠的 条评论
为什么被折叠?
 到【灌水乐园】发言


