


SpringBoot
创建项目
- 使用idea创建(idea需要联网)
- 使用
https://start.spring.io/在官网上生成项目结构
特点
可以通过mvn package打包
之后使用jar -jar xx.jar运行
更换为jetty服务器
通过排除依赖,排除掉内置的tomcat服务器, 然后添加jetty依赖
    <dependencies>
        <dependency>
            <groupId>org.springframework.boot</groupId>
            <artifactId>spring-boot-starter-web</artifactId>
            <exclusions>
                <exclusion>
                    <groupId>org.springframework.boot</groupId>
                    <artifactId>spring-boot-starter-tomcat</artifactId>
                </exclusion>
            </exclusions>
        </dependency>

        <!--更换为jetty服务器-->
        <dependency>
            <groupId>org.springframework.boot</groupId>
            <artifactId>spring-boot-starter-jetty</artifactId>
        </dependency>
配置文件
格式
三种格式 properties / yml / yaml
application.properties
server.port=80
application.yml
server:
  port: 81
application.yaml
优先级
properties > yml > yaml
获取方法
Value注解赋值
    @Value("${test.name}")
    private String name;
使用Environment自动装配
    @Autowired
    private Environment environment;
//之后直接通过api操纵属性
    System.out.println(environment.getProperty("test.age"));
使用实体类对象读取
@Component
@ConfigurationProperties(prefix = "test")
public class Test {
    private String name;
    private Integer age;
    private String tel;

    public String getName() {
        return name;
    }

    public void setName(String name) {
        this.name = name;
    }
之后使用自动装配获取对象
    @Autowired
    private Test test;
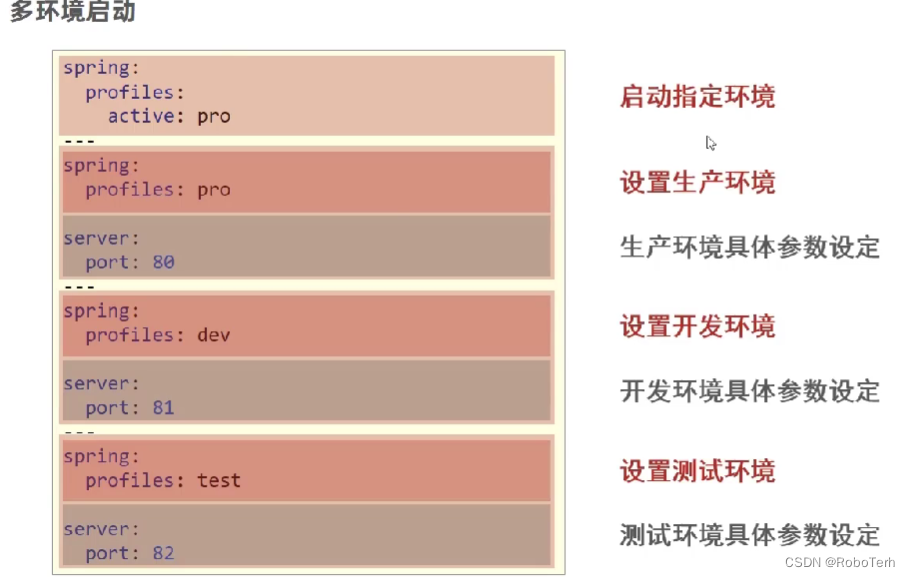
多环境启动
spring:
  profiles:
    active: pro

---

server:
  port: 80
spring:
  config:
    activate:
      on-profile: pro

---

server:
  port: 81
spring:
  config:
    activate:
      on-profile: dev

---

server:
  port: 82
spring:
  config:
    activate:
      on-profile: test
或者旧版格式:
命令行启动
我们可以通过java -jar xxx.jar启动Springboot应用,那我们需要更换生产环境或者端口就可以采用命令行的方式进行
首先看一下配置文件内容
spring:
  profiles:
    active: pro

---

server:
  port: 80
test:
  name: huyf
  age: 89
  tel: 123
spring:
  config:
    activate:
      on-profile: pro

---

server:
  port: 81
spring:
  config:
    activate:
      on-profile: dev

---

server:
  port: 82
spring:
  config:
    activate:
      on-profile: test
之后通过命令行参数进行更改Springboot应用的各种参数
java -jar xxx.jar --spring.profiles.active=dev --server.port=8888
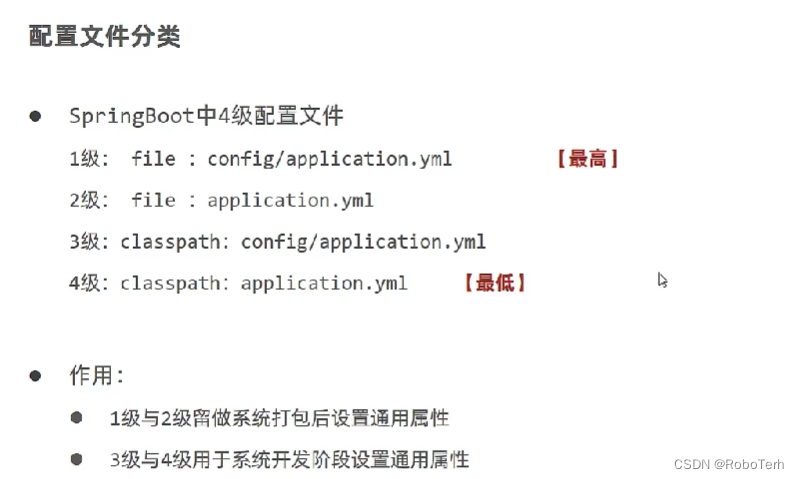
配置文件分类
整合Mybatis
特例
如果spring-boot是小于2.4.3, Mysql驱动时大于8.0的时候需要加上
jdbc:mysql://localhost:3306/javaweb?serverTimezone=UTC
创建实体类User
package com.RoboTerh.pojo;

public class User {
    private Integer id;

    private String username;
    private String password;
    private String nickname;
    private String age;

    @Override
    public String toString() {
        return "User{" +
                "id=" + id +
                ", username='" + username + '\'' +
                ", password='" + password + '\'' +
                ", nickname='" + nickname + '\'' +
                ", age='" + age + '\'' +
                '}';
    }

    public Integer getId() {
        return id;
    }

    public void setId(Integer id) {
        this.id = id;
    }

    public String getUsername() {
        return username;
    }

    public void setUsername(String username) {
        this.username = username;
    }

    public String getPassword() {
        return password;
    }

    public void setPassword(String password) {
        this.password = password;
    }

    public String getNickname() {
        return nickname;
    }

    public void setNickname(String nickname) {
        this.nickname = nickname;
    }

    public String getAge() {
        return age;
    }

    public void setAge(String age) {
        this.age = age;
    }
}
之后配置创建UserDao, 这里记得加上@Mapper使得其能够被扫描
package com.roboterh.dao;

import com.roboterh.pojo.User;
import org.apache.ibatis.annotations.Mapper;
import org.apache.ibatis.annotations.Select;

@Mapper
public interface UserDao {

    @Select("select * from user where id = #{id}")
    public User getById(Integer id);
}
最后需要在application.yml中写入数据库相关信息
spring:
  config:
    activate:
      on-profile: pro
  datasource:
    driver-class-name: com.mysql.cj.jdbc.Driver
    url: jdbc:mysql://localhost:3306/javaweb
    username: root
    password: root
    type: com.alibaba.druid.pool.DruidDataSource
mybatis-plus
小示例
其他操作不变,只需要在dao.UserDao1方法继承BaseMapper<User>
就可以在使用的时候调用方法
但是,值得注意的是,对于使用mybatis-plus开发,对应的实体类的id属性需要时Long类型
package com.roboterh.dao;

import com.baomidou.mybatisplus.core.mapper.BaseMapper;
import com.roboterh.pojo.User;
import org.apache.ibatis.annotations.Mapper;

/**
 * mybatis-plus 示例
 */
@Mapper
public interface UserDao1 extends BaseMapper<User> {
}
lombok的使用
导包
        <dependency>
            <groupId>org.projectlombok</groupId>
            <artifactId>lombok</artifactId>
            <scope>provided</scope>
        </dependency>
在实体类上面使用@Data代替setter/getter/toString方法
分页查询
在使用selectPage方法的时候需要传入一个IPage的对象
想要使用Page就需要添加对象的拦截器
    @Test
    public void getByPageTest() {
        IPage page = new Page(1, 2);
        userDao1.selectPage(page, null);
        System.out.println("当前条数" + page.getCurrent());
        System.out.println("每页显示数" + page.getSize());
        System.out.println("页数" + page.getPages());
        System.out.println("总共" + page.getTotal());
        System.out.println("数据" + page.getRecords());
    }
拦截器配置 @Configuration是为了让Application.java能够扫描到这个Bean, 或者可以在Application.java中使用@Import注解进行导入操作
package com.roboterh.config;

import com.baomidou.mybatisplus.extension.plugins.MybatisPlusInterceptor;
import com.baomidou.mybatisplus.extension.plugins.inner.PaginationInnerInterceptor;
import org.springframework.context.annotation.Bean;
import org.springframework.context.annotation.Configuration;

@Configuration
public class MpConfig {

    @Bean
    public MybatisPlusInterceptor mybatisPlusInterceptor() {
        // 为page添加拦截器
        MybatisPlusInterceptor mybatisPlusInterceptor = new MybatisPlusInterceptor();
        mybatisPlusInterceptor.addInnerInterceptor(new PaginationInnerInterceptor());
        return mybatisPlusInterceptor;
    }
}
按条件查询
三种方法
    @Test
    public void getAllTest() {
        //按条件查询
//        // 方法一:
//        QueryWrapper qw = new QueryWrapper();
//        qw.lt("age", 20);
//        List<User> list = userDao1.selectList(qw);
//        System.out.println(list);

//        // 方法二:lambda方式查询
//        QueryWrapper<User> lqw = new QueryWrapper<User>();
//        lqw.lambda().lt(User::getAge, 20);
//        List<User> list = userDao1.selectList(lqw);
//        System.out.println(list);

        // 方法三:同样是lambda方法查询
        LambdaQueryWrapper<User> lqw = new LambdaQueryWrapper<User>();
        lqw.lt(User::getAge, 20);
        List<User> list = userDao1.selectList(lqw);
        System.out.println(list);
    }
如果需要做范围查询
lqw.lt(User::getAge, 20).or().gt(User::getAge, 30);
字段映射和表名映射
使用@TableField进行属性注解
- 如果表字段和实体类字段属性不一致:
@TableField(Value="pwd") - 如果表中没有的属性名
@TableField(exist=false) - 使用了默认查询将会查询所有字段的信息,我们不想查询密码字段
@TableField(value="pwd", select=false)
使用@TableName(tb_user)进行表名的映射
ID生成策略
使用@TableId(type=IdType.AUTO)


 1990
1990


 被折叠的 条评论
为什么被折叠?
被折叠的 条评论
为什么被折叠?
 到【灌水乐园】发言


